
Custom recognizers
Custom recognizers let you configure detection rules that automatically identify and tag sensitive data during profiling and ingestion. Unlike the default auto-classification, recognizers give you full control over what patterns to detect and how to tag them.What are recognizers?
Recognizers are configurable detection rules attached to classification tags. When the Auto Classification Agent runs, recognizers analyze your data and automatically apply tags when they detect matching patterns. Each auto-applied tag includes metadata showing which recognizer detected it and the confidence score. Key benefits:- Customizable detection: Define your own patterns for organization-specific data (employee IDs, internal codes, custom formats)
- Multiple detection methods: Use regex patterns, exact terms, or 45+ pre-built detectors
- Learning from feedback: Users can report false positives, which automatically refine recognizer behavior
- Confidence-based tagging: Set minimum confidence thresholds to control precision
Recognizer types
Pattern recognizers
Use regular expressions to match structured data formats. Best for:- Emails, phone numbers, IP addresses
- Custom organizational patterns (employee IDs:
EMP-\d{5}) - Any data following predictable patterns
Exact Terms recognizers
Match specific values from a predefined list. Best for:- Known sensitive values (internal project codes, department names)
- Fixed vocabularies (country codes, status values)
- Cases requiring exact matches (no pattern variation)
Predefined recognizers
Built-in detectors from Microsoft Presidio (45+ recognizers). Best for:- Standard PII (credit cards, SSNs, passports)
- International identifiers (IBANs, UK NHS numbers, ES NIF)
- When you don’t want to write custom regex
- Financial: CreditCardRecognizer, IbanRecognizer, UsBankRecognizer
- Personal ID: UsSsnRecognizer, UsPassportRecognizer, InPanRecognizer, InAadhaarRecognizer
- Healthcare: NhsRecognizer, MedicalLicenseRecognizer
- Contact: EmailRecognizer, PhoneRecognizer, UrlRecognizer
Creating a Recognizer
- Navigate to Governance > Classification and
- In the Classifications pane, select a classification. For example, “PII”.
- In the Tag column, click the tag for which you want create a reconizer.
-
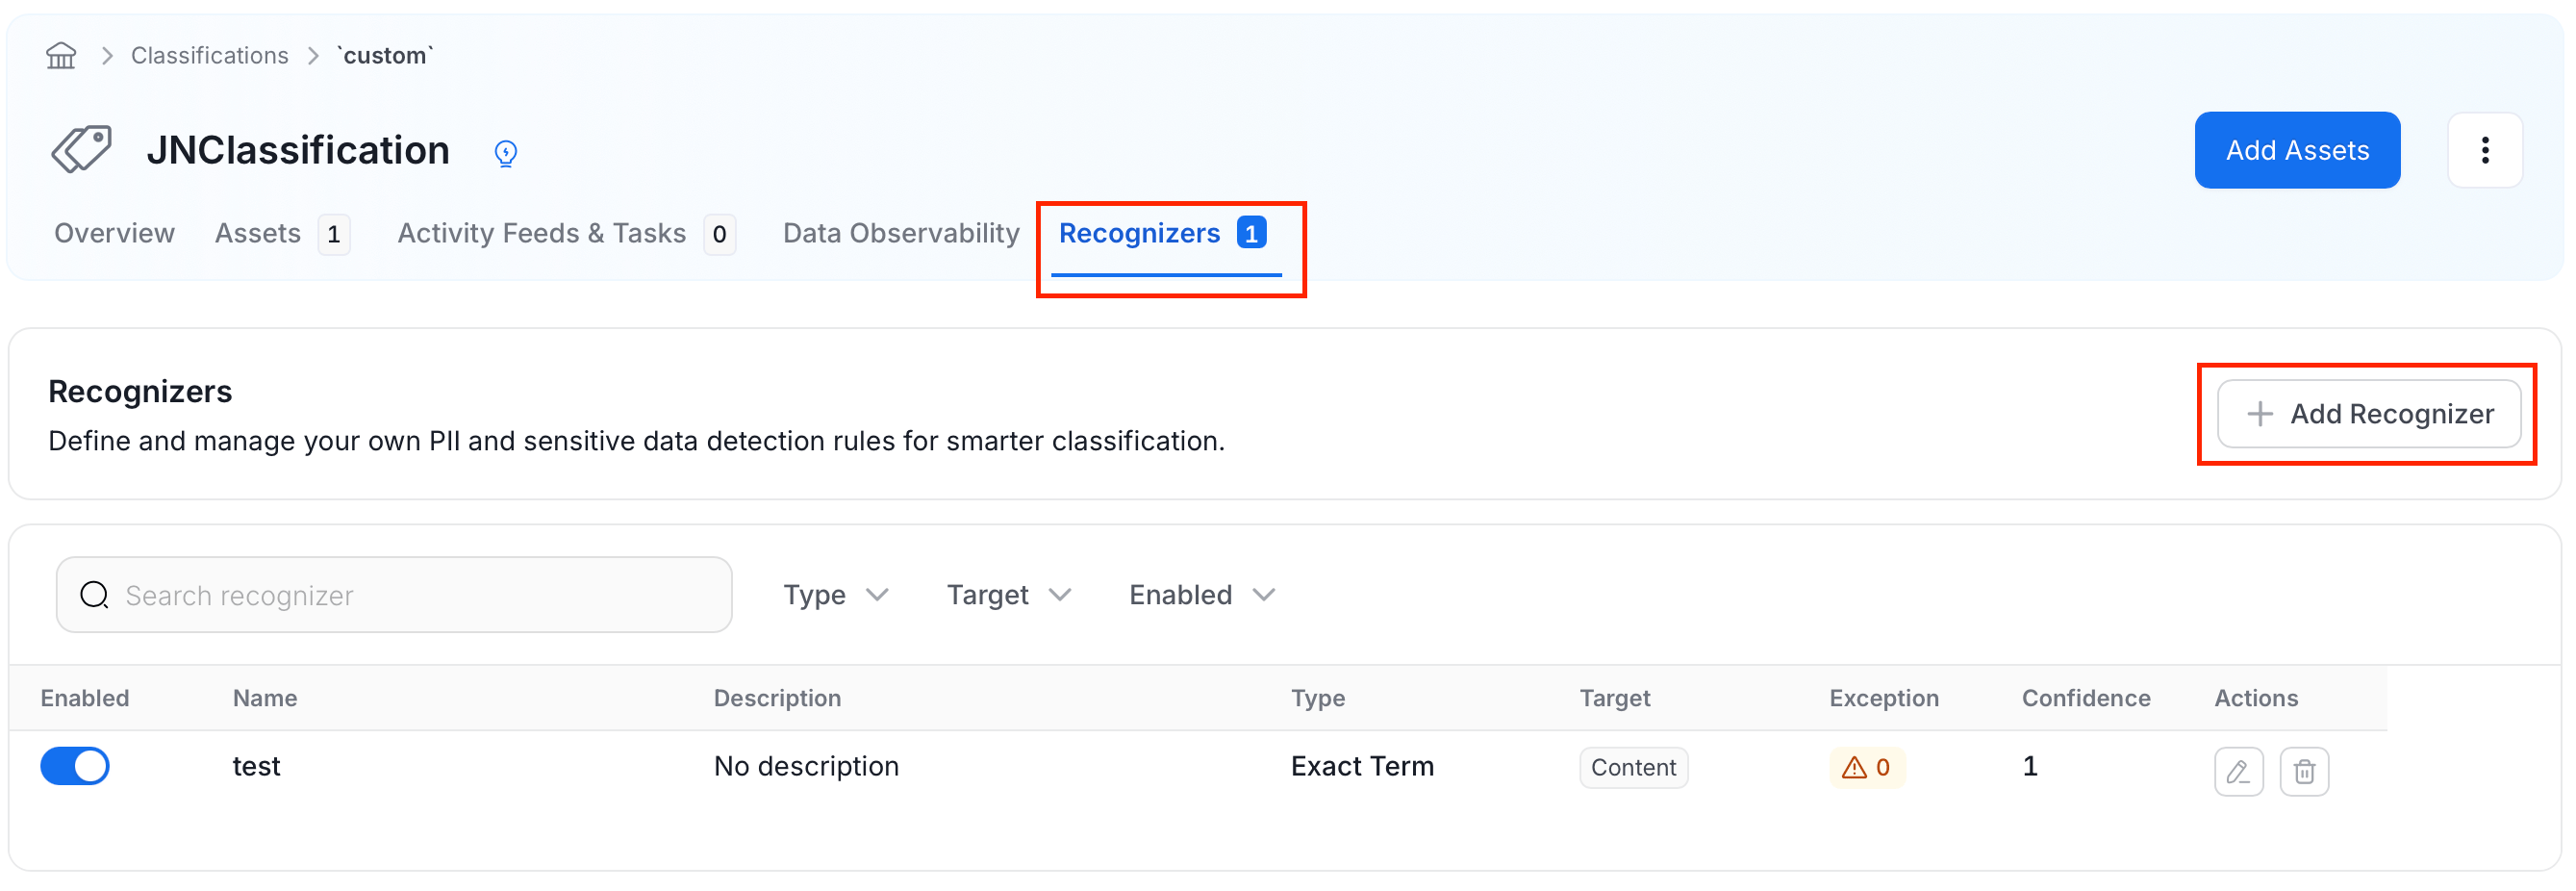
Open the Recognizers tab and click Add Recognizer.
-
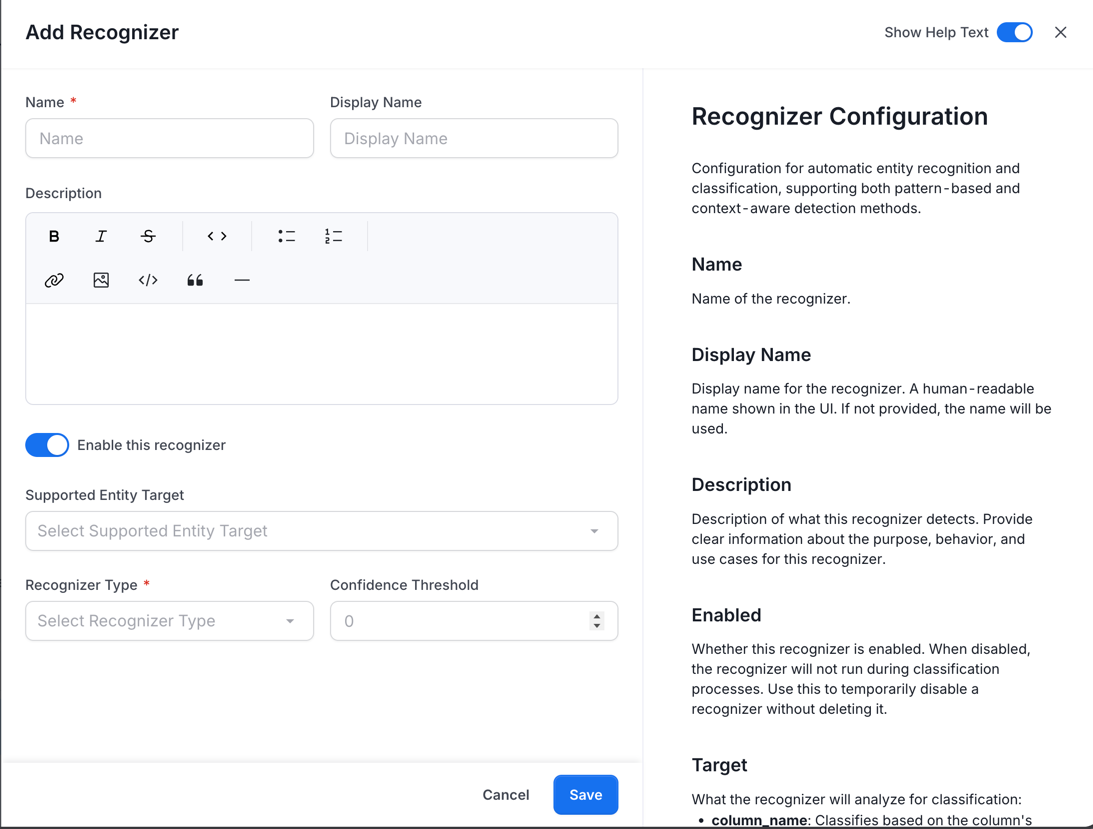
Configure the recognizer:
- Name: Unique identifier (e.g.,
email_pattern) - Display Name: A unique descriptive name (e.g., “Email Pattern Detector”)
- Description: What this recognizer detects
- Supported Entity Target: Choose where to analyze:
- Content: Analyze actual data values in sampled rows. Tags are applied when the confidence score meets the threshold.
- Column Name: Apply the tag based on the column name alone — no sample data is needed. Use this when sampled values are masked, anonymized, or unavailable.
- Recognizer Type: Select the detection method:
- Pattern: Match using regular expressions. To set up Pattern recognizer, see Pattern Recognizer Settings.
- Exact Term: Match specific values from a list. To set up Exact Term recognizer, see Exact Terms Settings.
- Pre-Defined: Use a built-in Presidio recognizer. To set up Pre-Defined recognizer, see Pre-defined Recognizer Settings.
- Confidence Threshold: Minimum score (0.0-1.0) to apply tag (default: 0.6)
- Name: Unique identifier (e.g.,
- Click Save
Pattern Recognizer Settings
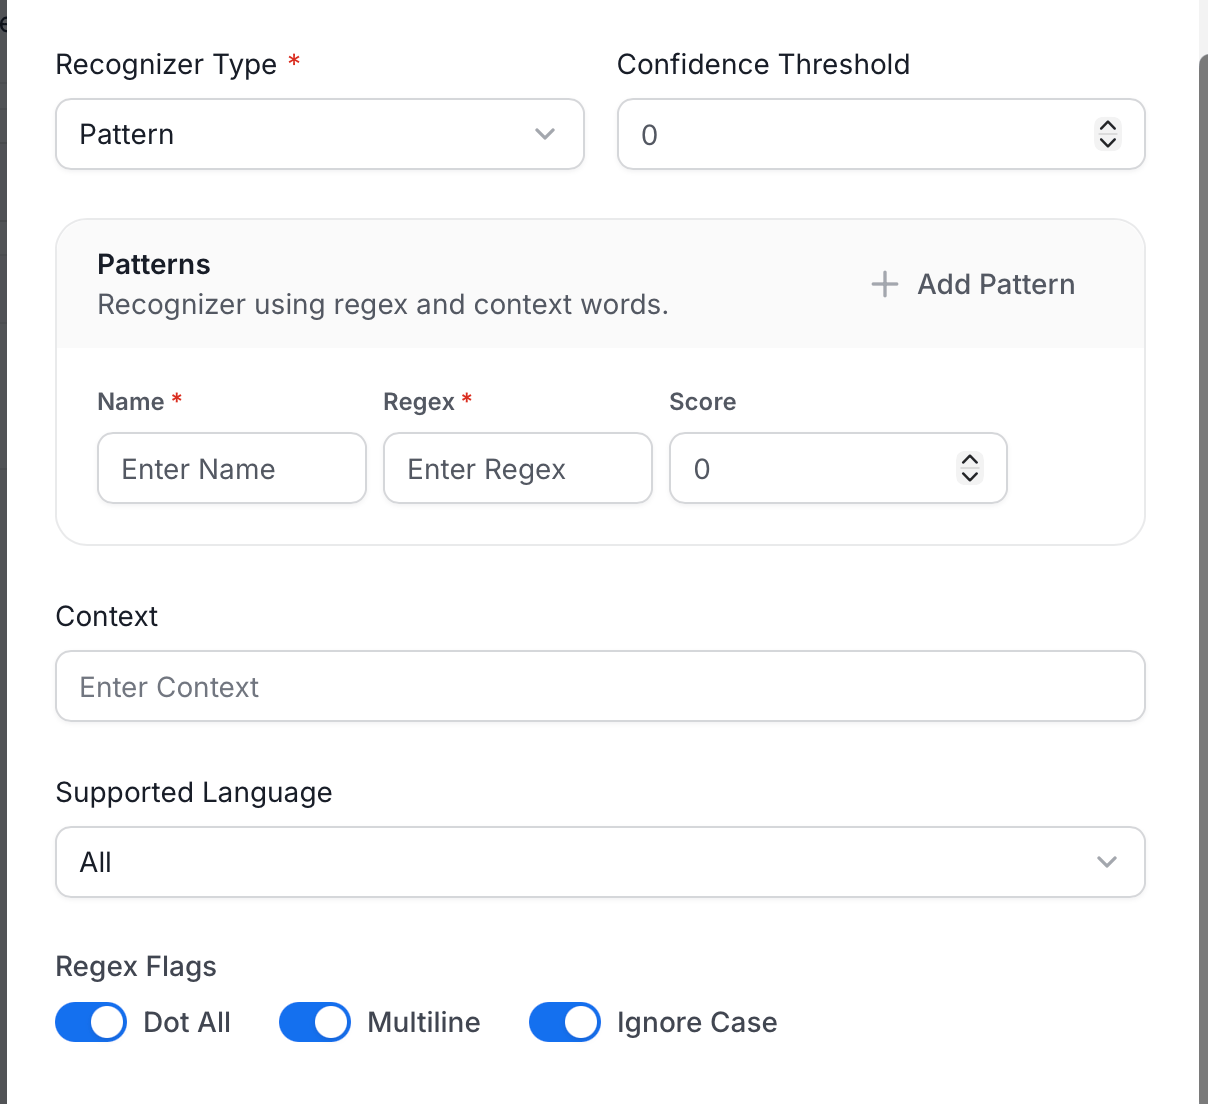
The following fields appear when Recognizer Type is set to Pattern:- Add Pattern: Add one or more regex patterns, each with:
- Name: A unique descriptive name, helps identify the purpose of each pattern when you have multiple patterns in one recognizer. For example, Visa Format, MasterCard Format, AmEx Format.
- Regex: Regular expression pattern to match against the content or column name. Use standard regex syntax.
- Score: Confidence score assigned when this pattern matches. Values range from 0.0 to 1.0. Use higher scores for more specific/reliable patterns and lower scores for broader patterns.
- Supported Language: Language scope for this recognizer. Defaults to All.
- Context (optional): List of context words that can help boost confidence score. These words provide additional context for pattern matching and can increase confidence when found near the matched pattern. For example, for a credit card recognizer, context might include: “card”, “credit”, “payment”, “cvv”.
- Regex Flags: Toggle Dot All, Multiline, and Ignore Case as needed.
- Dot All: Enable dot-all regex flag. When enabled, the dot (.) metacharacter matches newline characters as well as any other character. Useful for multi-line pattern matching.
- Multiline: Enable multiline regex flag. When enabled, the ^ and $ anchors match at line breaks in addition to the start and end of the entire string. Useful for patterns that should match line by line.
- Ignore Case: Enable case-insensitive matching. When enabled, the pattern matches regardless of letter case (e.g., “EMAIL” matches “email”, “Email”, “EMAIL”).
Exact Terms Settings
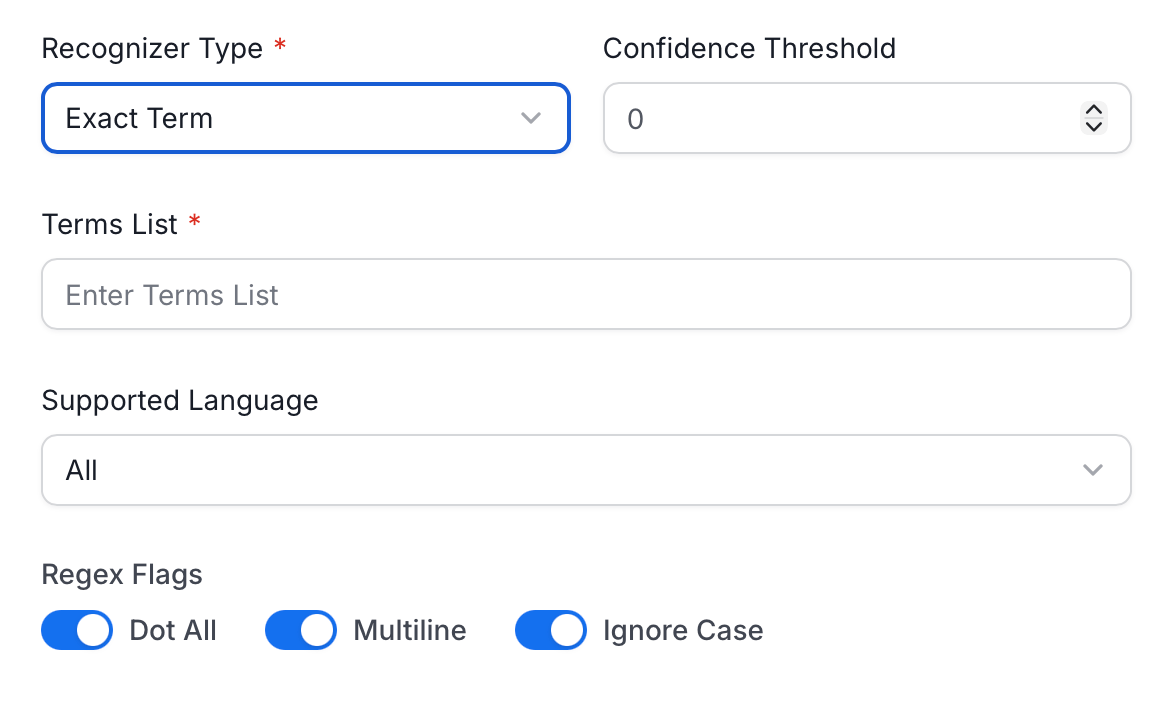
The following fields appear when Recognizer Type is set to Exact Term:- Term List: List of specific values to match against. The recognizer will identify data that exactly matches any value in this list. Useful for identifying specific sensitive terms, names, or identifiers that should be flagged. For example, [“confidential”, “secret”, “internal-only”, “do-not-share”]
- Supported Language: Language scope for this recognizer. Defaults to All.
- Regex Flags: Toggle Dot All, Multiline, and Ignore Case as needed.
- Dot All: Enable dot-all regex flag. When enabled, the dot (.) metacharacter matches newline characters as well as any other character. Useful for multi-line pattern matching.
- Multiline: Enable multiline regex flag. When enabled, the ^ and $ anchors match at line breaks in addition to the start and end of the entire string. Useful for patterns that should match line by line.
- Ignore Case: Enable case-insensitive matching. When enabled, the pattern matches regardless of letter case (e.g., “EMAIL” matches “email”, “Email”, “EMAIL”).
Pre-defined Recognizer Settings
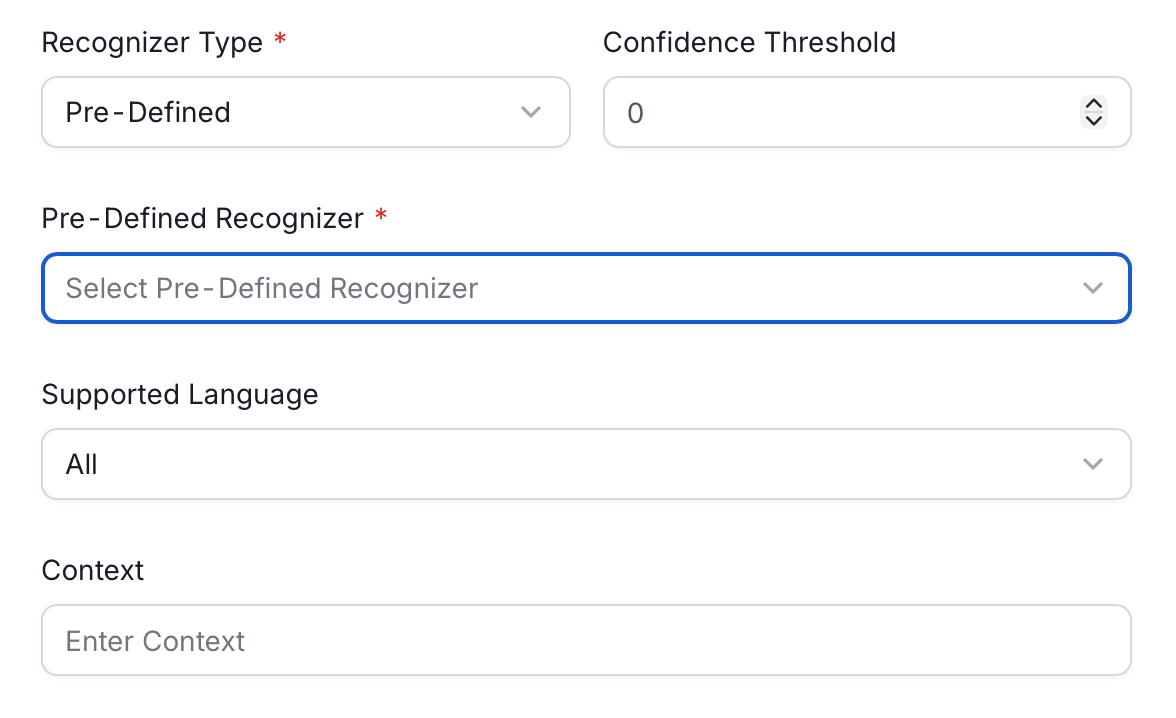
The following fields appear when Recognizer Type is set to Pre-Defined:-
Pre-Defined Recognizer: Select a pre-configured recognizer from the system.
- Financial: AbaRoutingRecognizer, CreditCardRecognizer, IbanRecognizer, UsBankRecognizer
- Personal ID: UsSsnRecognizer, UsItinRecognizer, UsPassportRecognizer, UsLicenseRecognizer, InPanRecognizer, InAadhaarRecognizer
- Healthcare: NhsRecognizer, MedicalLicenseRecognizer, AuMedicareRecognizer
- Contact: EmailRecognizer, PhoneRecognizer, UrlRecognizer, IpRecognizer
- Geographic: EsNifRecognizer, EsNieRecognizer, UkNinoRecognizer, AuAbnRecognizer, PlPeselRecognizer
- Advanced: SpacyRecognizer, StanzaRecognizer, TransformersRecognizer, GLiNERRecognizer
- Context (optional): Context that helps boost the confidence score when found near detected entities. For example, for EmailRecognizer, context might include: “email”, “contact”, “address”, “send”.
- Supported Language: Language scope for this recognizer. Defaults to All.
Column Name Recognizer Settings
When Target is set to Column Name, the recognizer matches against the column name itself rather than sampled row values. This is useful when sampled data is masked, anonymized, or unavailable. Use Exact Terms type for known column names: Example: Tag columns namedemail, person_id, or customer_email
_email or _id
Managing Recognizers
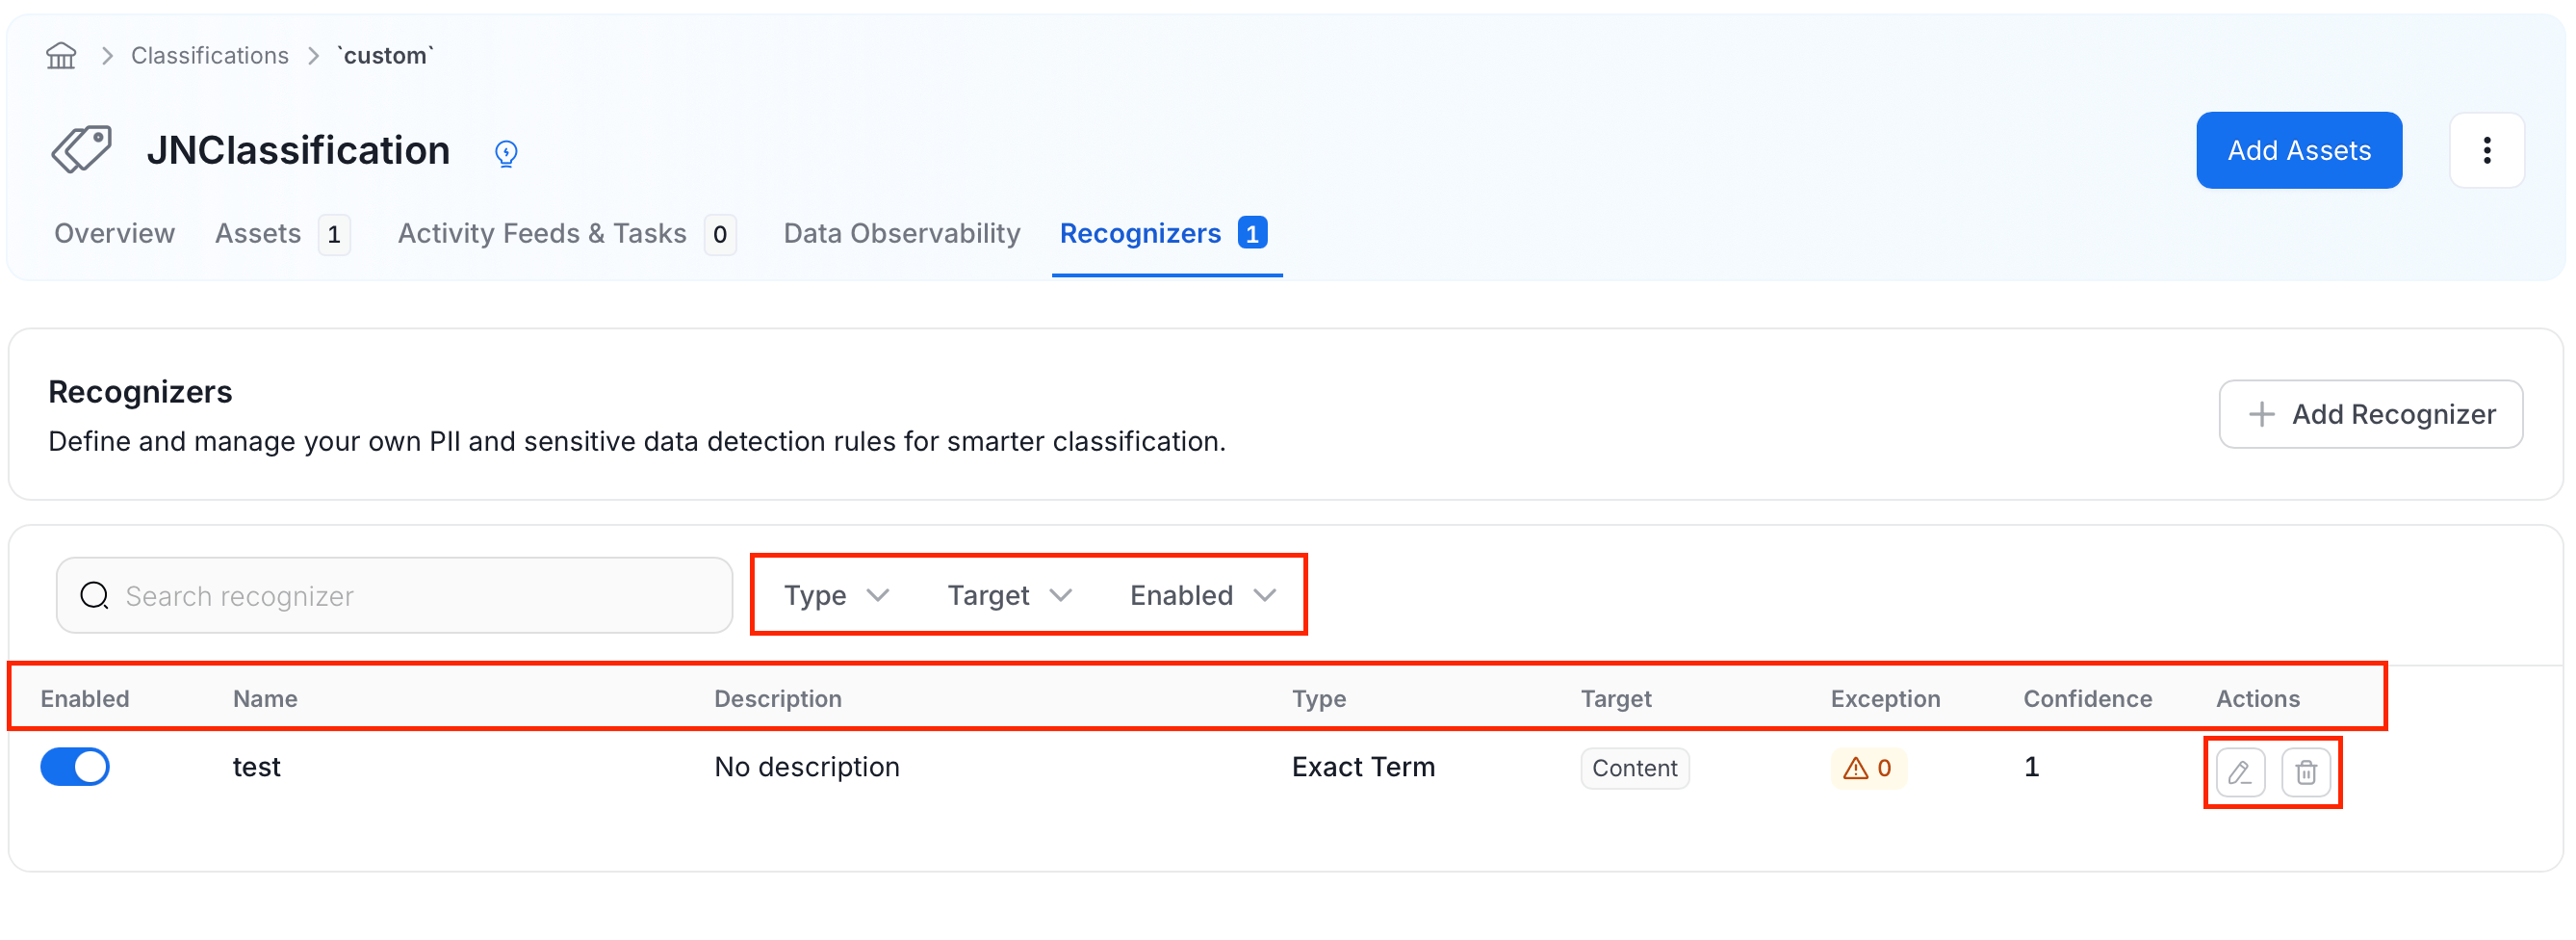
Once recognizers are created, you can view, filter, edit, disable, and delete them from the recognizers list.View All Recognizers
The recognizers list displays all recognizers configured for a tag. Each row shows the following columns:- Enabled — Toggle to activate or deactivate the recognizer.
- Name — The recognizer’s name.
- Description — A brief description of what the recognizer detects.
- Type — The recognizer type: Pattern, Exact Term, Predefined, or Context.
- Target — Whether the recognizer applies to Content or Column Name.
- Exception — The number of entities excluded from this recognizer.
- Confidence — The confidence threshold for a match.
- Actions — Edit (pencil icon) or Delete (trash icon).
Filter and Search
Use the Type, Target, and Enabled dropdowns to filter the list. Use the Search recognizer box to find recognizers by name or description.Edit a Recognizer
- In the Action column, click the Edit icon .
- Modify the fields in the form.
- Click Save.
Delete a Recognizer
- In the Action column, click the Delete icon.
- Confirm the deletion.
Enable or Disable recognizers
To disable the recognizer, toggle the switch in the Enabled column to pause a recognizer without deleting it. The change takes effect on the next classification run.Managing Exceptions
Click the Exceptions count to view entities where this recognizer should not run. Exceptions are automatically added when feedback is approved. To manually delete an exception:- Click the Exception count for the recognizer.
- In the exceptions panel, find the exception you want to remove.
- Click Delete next to the exception.
- Confirm the removal.
Best Practices
Follow these guidelines to get the most accurate and reliable results from your recognizers.Creating effective recognizers
- Start with high confidence: Begin with threshold 0.7-0.8, adjust if needed
- Test patterns first: Validate regex patterns with sample data before creating the recognizer
- Use context words: Add relevant context to reduce false positives
- Multiple patterns: Create separate patterns for different formats (e.g., phone:
(123)456-7890vs123-456-7890) - Descriptive names: Use clear, searchable names and descriptions
Managing False Positives
- Review feedback regularly: Check pending feedback from users
- Adjust thresholds: If too many false positives, increase confidence threshold
- Refine patterns: Edit patterns to be more specific
- Add context words: Boost confidence for true positives with relevant context
Performance Tips
- Target appropriately: Use “Column Name” target when possible (faster than content analysis)
- Disable unused recognizers: Deactivate recognizers you no longer need
- Combine patterns: Use one recognizer with multiple patterns instead of many single-pattern recognizers
- Limit context words: Keep context word lists concise (under 20 words)
Troubleshooting
Recognizer Not Detecting Data
Check:- Recognizer is Enabled
- Confidence threshold not too high
- Pattern syntax is correct (test with a regex tool)
- Target matches your use case (Content vs Column Name)
- Entity is not in the exception list
- Profiler and auto-classification are enabled in ingestion config
Too Many False Positives
Solutions:- Increase confidence threshold
- Add context words for true positives
- Make patterns more specific
- Consider using exact terms recognizer instead
- Let users submit feedback to build exception lists
Pattern Not Matching
Common issues:- Missing escape characters in regex (use
\\dnot\d) - Incorrect regex flags (check case sensitivity, multi-line)
- Pattern too specific or too broad
- Test your pattern at regex101.com first
Next Steps
Tag Feedback & Approval
Learn how to report false positives and improve recognizer accuracy through user feedback
Auto PII Tagging
Understand the default PII tagging logic