Building Blocks of Authorization: Rules, Policies, and Roles
Collate controls access through three building blocks: rules define what is allowed or denied, policies group rules together and apply them to teams, and roles bundle policies into job-function templates you can assign to users. Every access decision Collate makes comes down to three questions: who is the user, what are they trying to access, and what do they want to do with it?
Rules
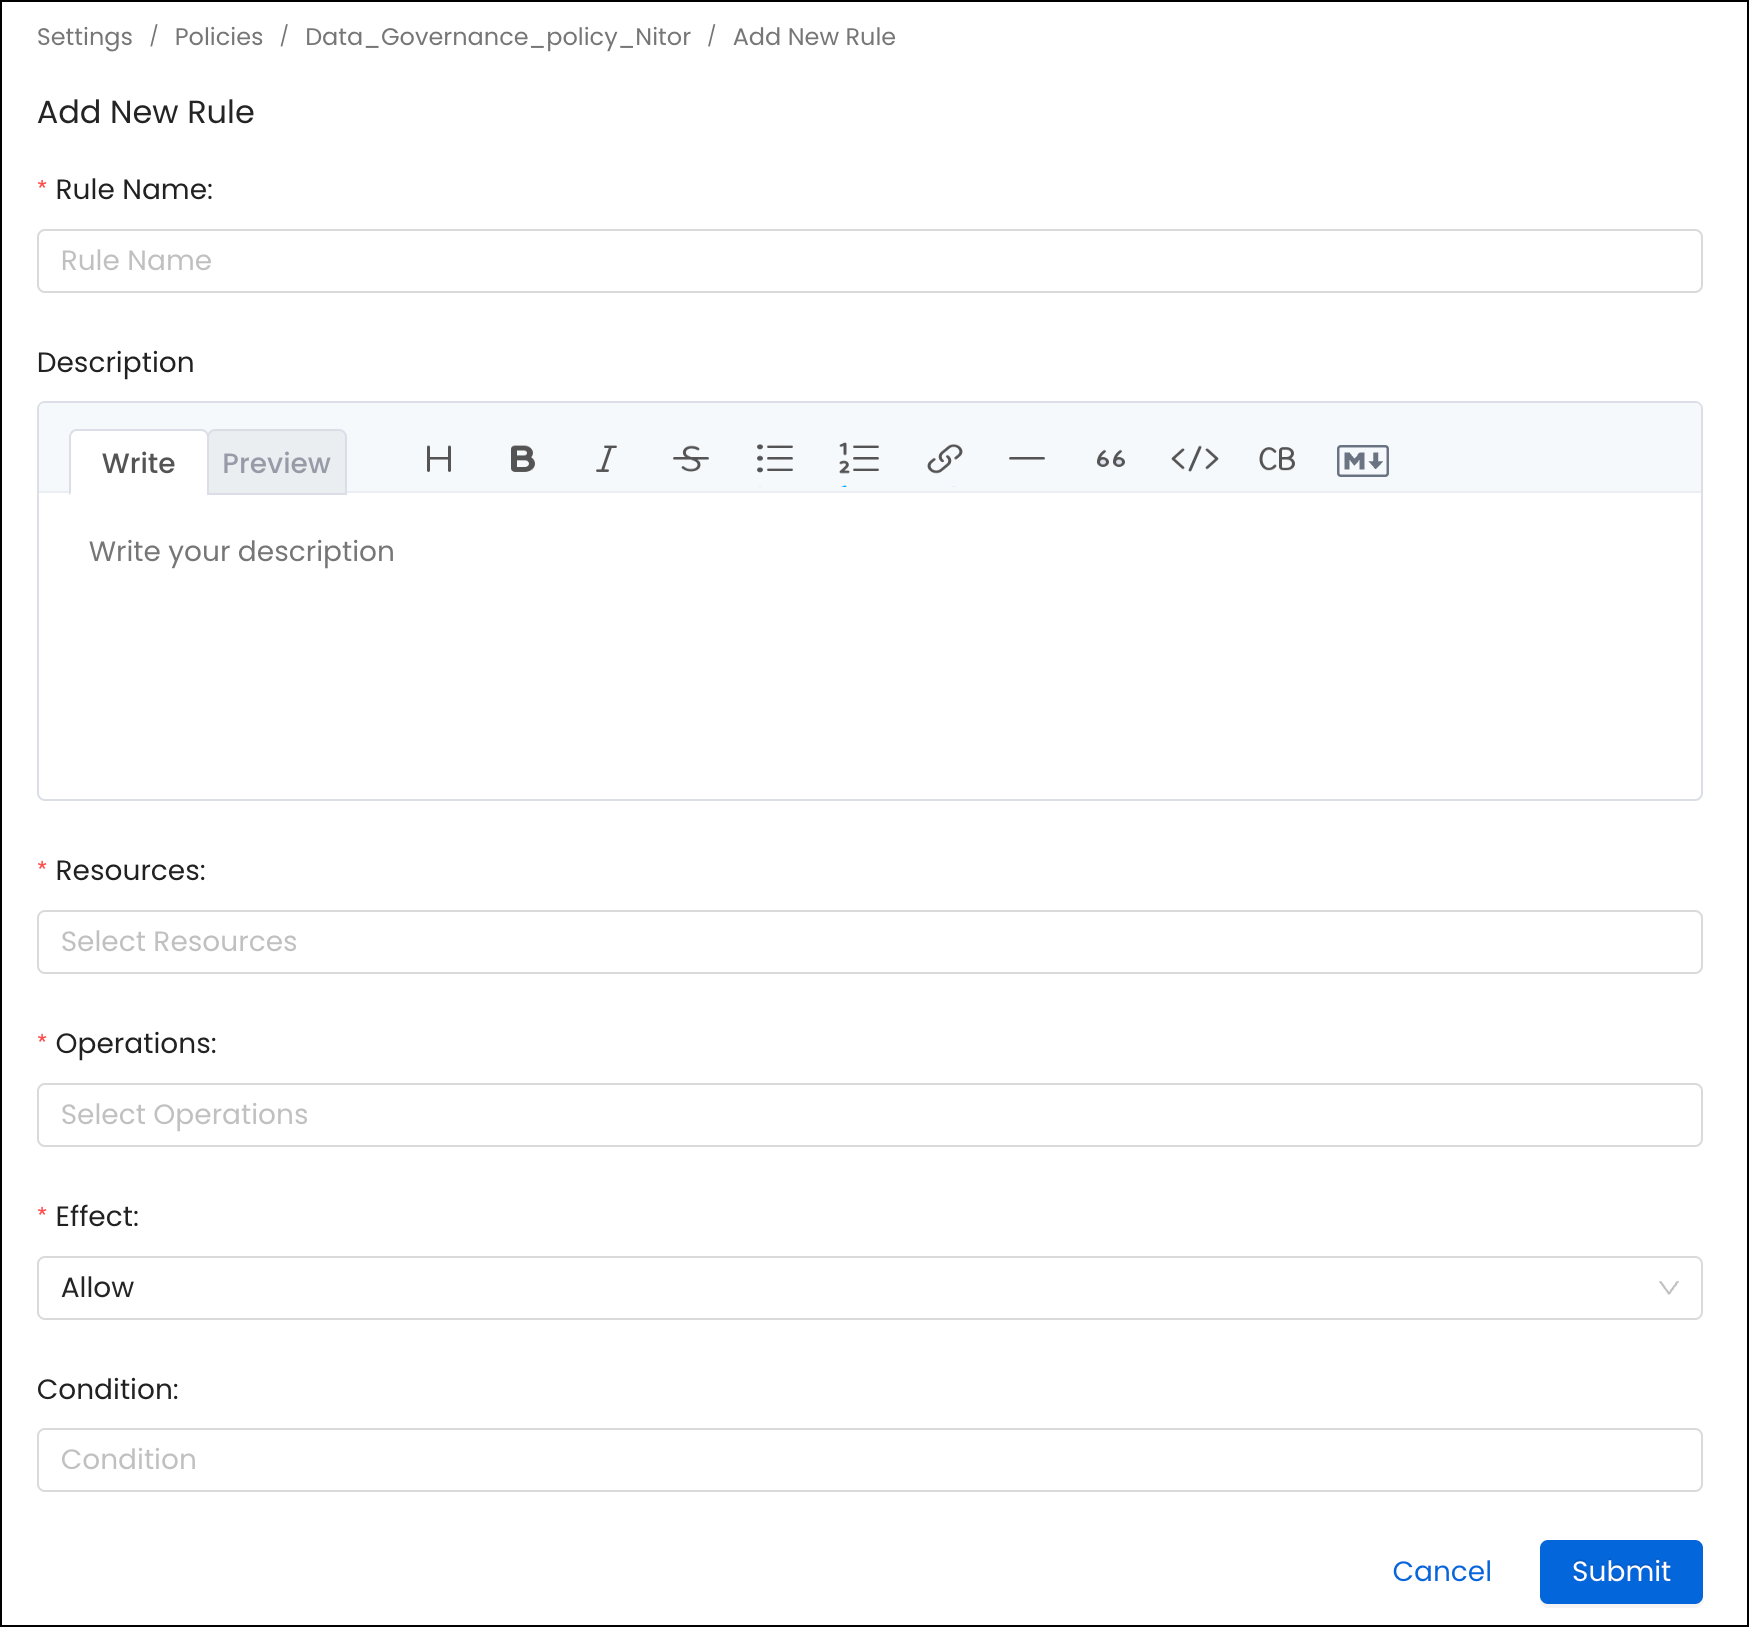
A rule in a policy is the building block of authorization. It contains the following:
- Name: A unique name to define the rule
- Description: Description of the rule
- Resources: List of resources this rule applies to. An admin can select a specific resource, such as Table or All, to apply against all resources.
- Operations: List of operations this rule applies to. An admin can select a specific operation such as EditOwners or All to apply against all the operations.
- Condition: Expressions written using policy functions that evaluate true or false.
- Effect: Deny or Allow the operation.
Operations
When you build a rule, you pick one or more operations to cover. Each operation
controls a specific action – for example, ViewAll, EditTags, or Delete.
Operations vary in risk level, from low-risk viewing permissions to critical
admin-only actions like Impersonate, EditPolicy, EditRole, and GenerateToken.
For a reference for common operations, risk levels, and recommended role assignments, see
Resource scope and operations reference.
Important: EditAll overrides every other edit permission. Only use it when full editing access is intentional – otherwise assign the specific edit operations you need.
Condition
Conditions let you make a rule apply only when certain things are true about the asset being accessed. For example, you can write a rule that only applies to assets tagged as PII.Sensitive, or only to assets that don’t have an owner yet.
Collate uses SpEL-based expressions for conditions. For more information about SpEL expressions, see Spring Expression Language (SpEL).
Following are some examples of conditions:
| Condition | Applies when… |
|---|
noOwner() | The asset has no assigned owner |
isOwner() | The person accessing it is the owner |
matchAllTags(tagFqn, ...) | The asset carries all of the tags listed |
matchAnyTag(tagFqn, ...) | The asset carries at least one of the tags listed |
matchTeam() | The user belongs to the team that owns the asset |
hasDomain() | The user’s domain access matches the asset’s domain |
&& (both must be true) or || (either can be true). For example:
noOwner() && matchAllTags('PersonalData.Personal', 'Tier.Tier1')
Default Rules
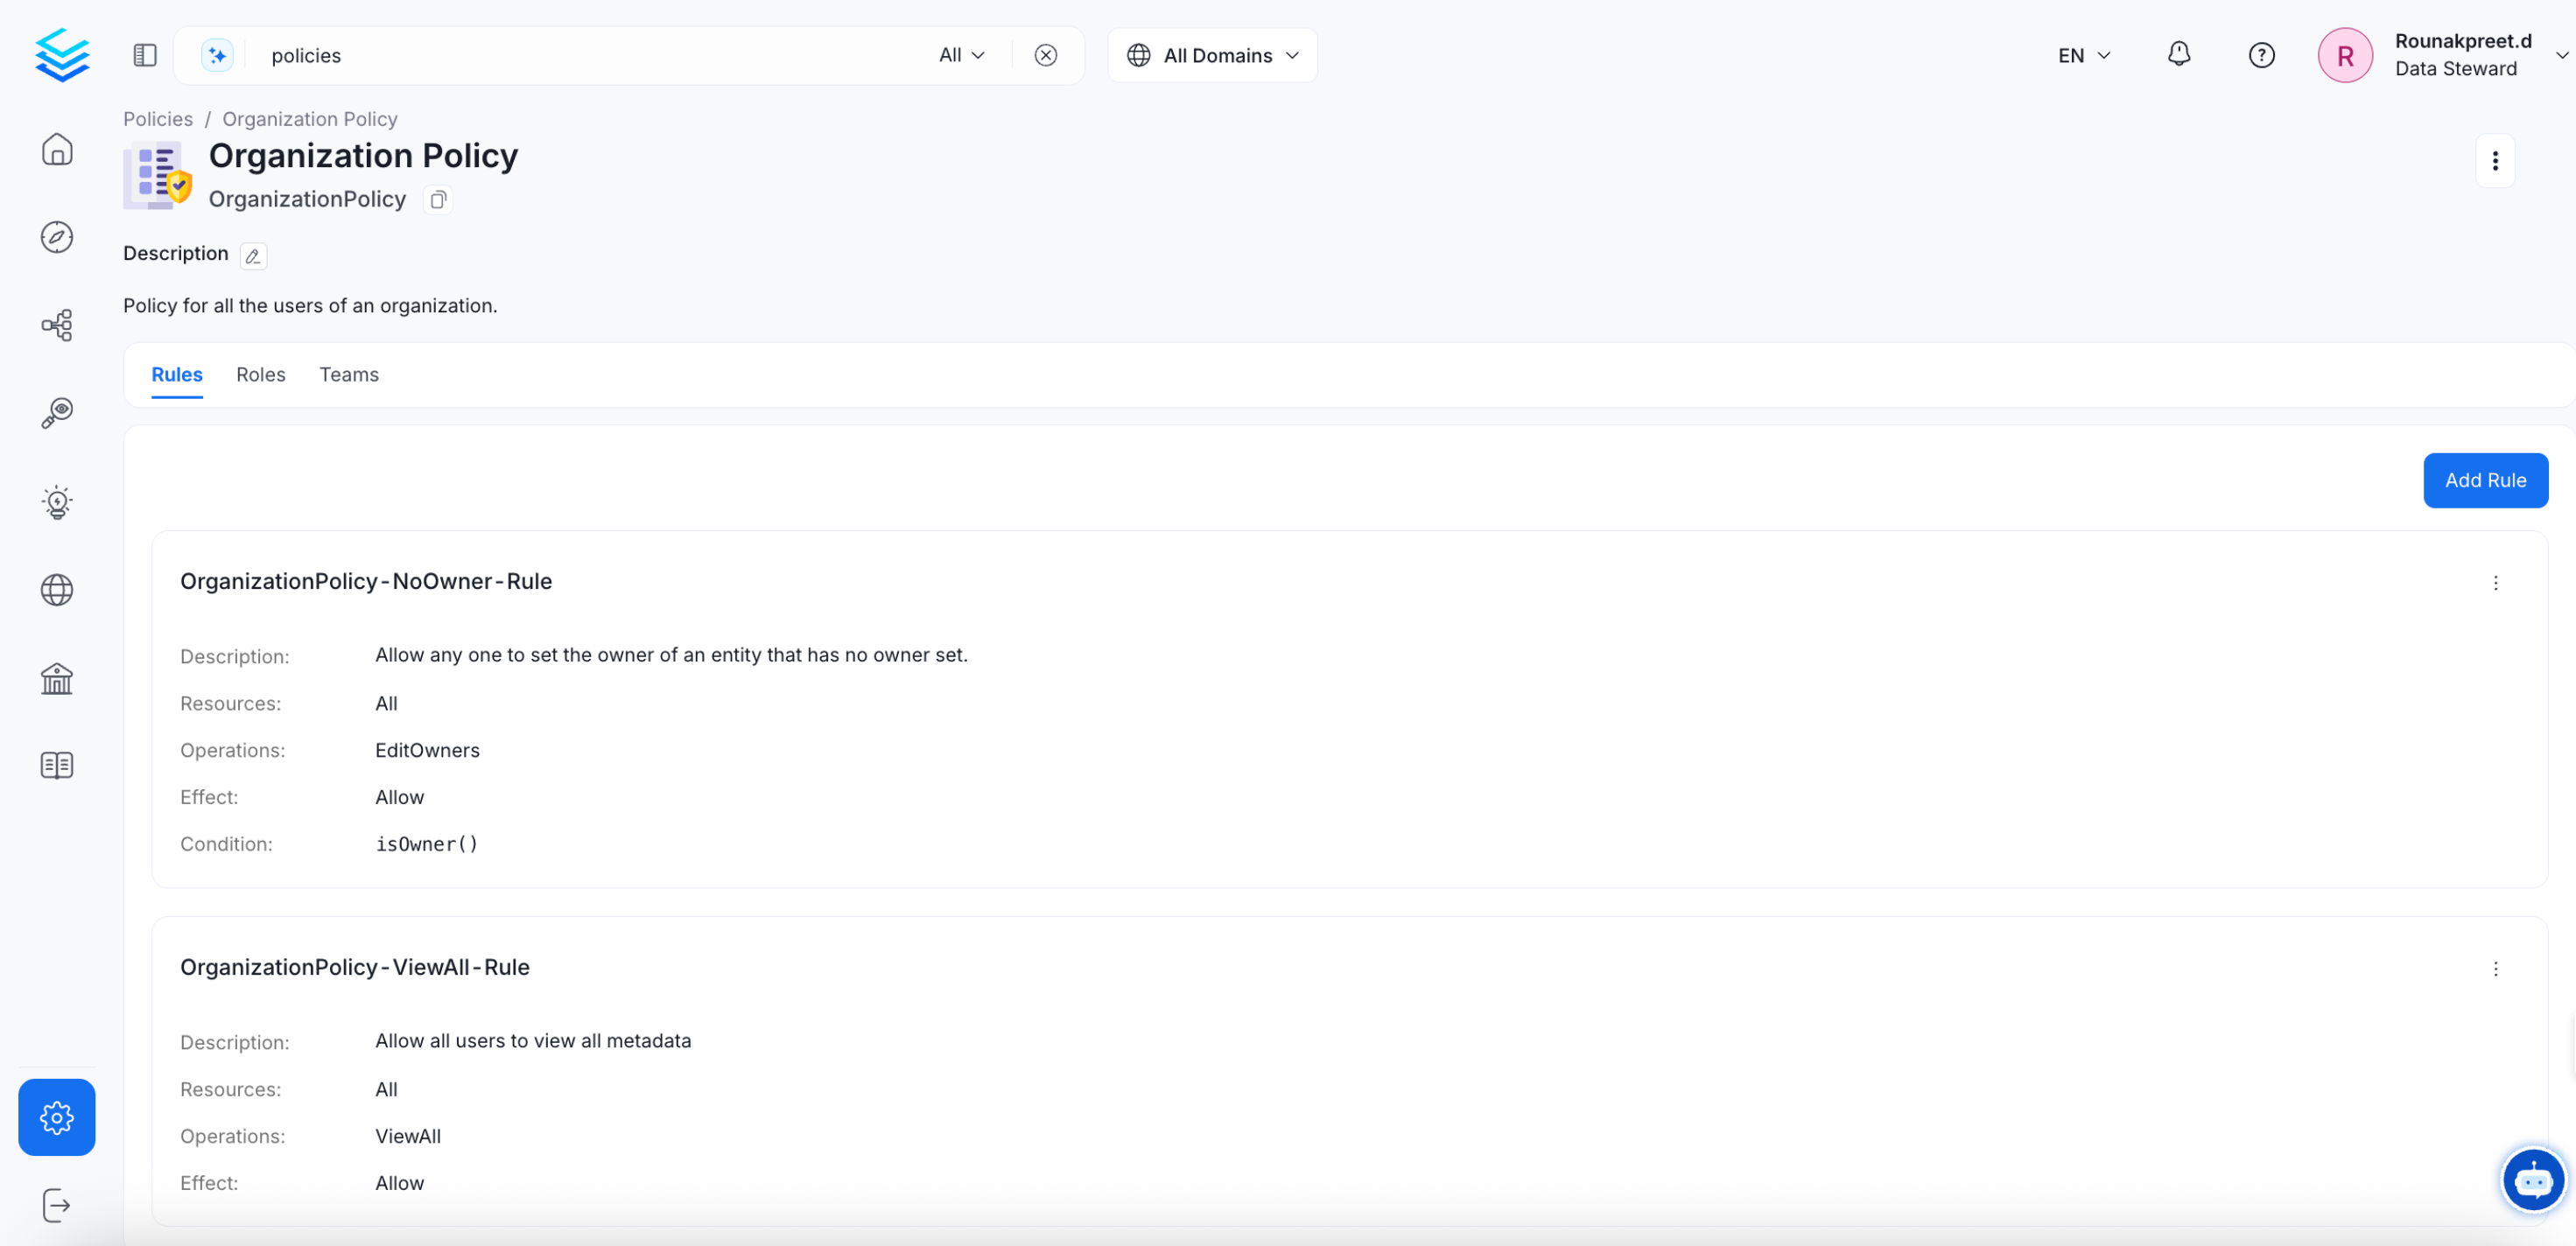
Go to Settings > Policies > Organization Policy to see the two rules that come built in and apply to everyone in your organization.
-
OrganizationPolicy-NoOwner-Rule
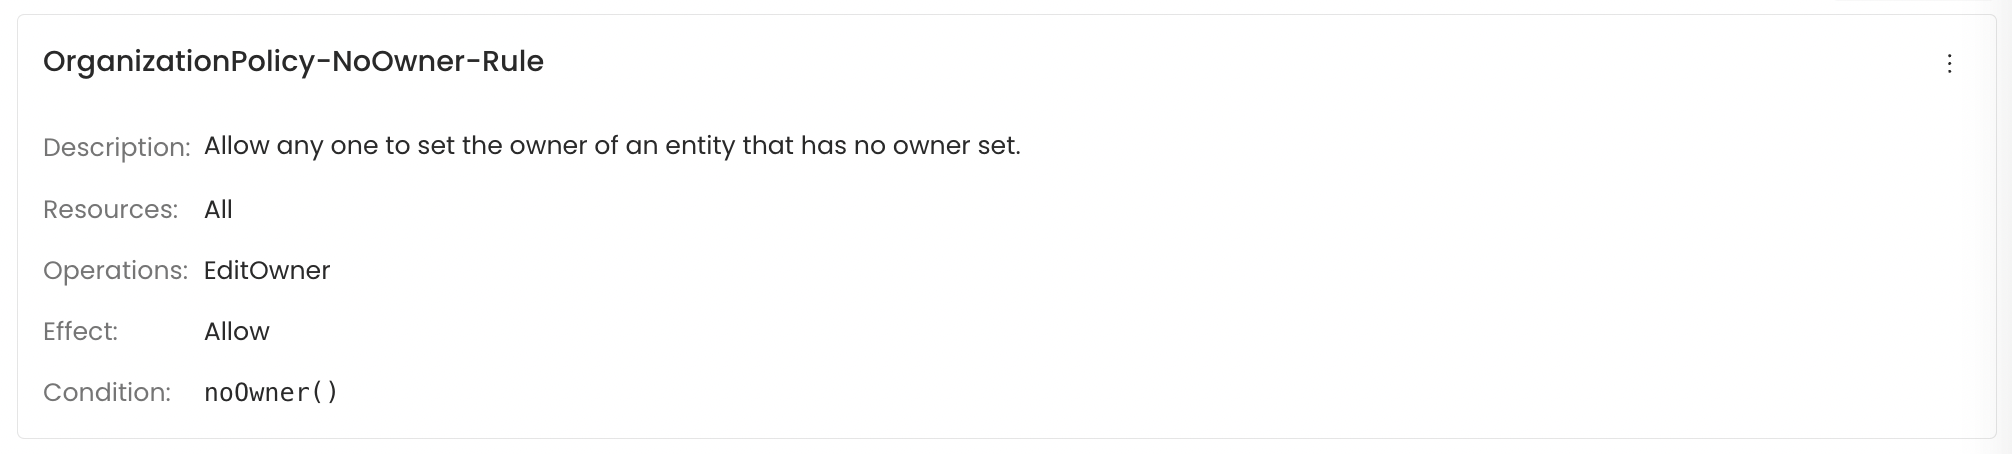 This rule lets any user assign ownership to an asset that doesn’t have an owner yet. Once an owner is assigned, the rule no longer applies to that asset.
For example, if a user accesses fact_table and finds that it is unowned, then they can modify the ownership field to establish a new owner. However, for a table like dim_address that already has an assigned owner, any attempt to change the ownership will be restricted.
This rule lets any user assign ownership to an asset that doesn’t have an owner yet. Once an owner is assigned, the rule no longer applies to that asset.
For example, if a user accesses fact_table and finds that it is unowned, then they can modify the ownership field to establish a new owner. However, for a table like dim_address that already has an assigned owner, any attempt to change the ownership will be restricted.
-
OrganizationPolicy-Owner-Rule
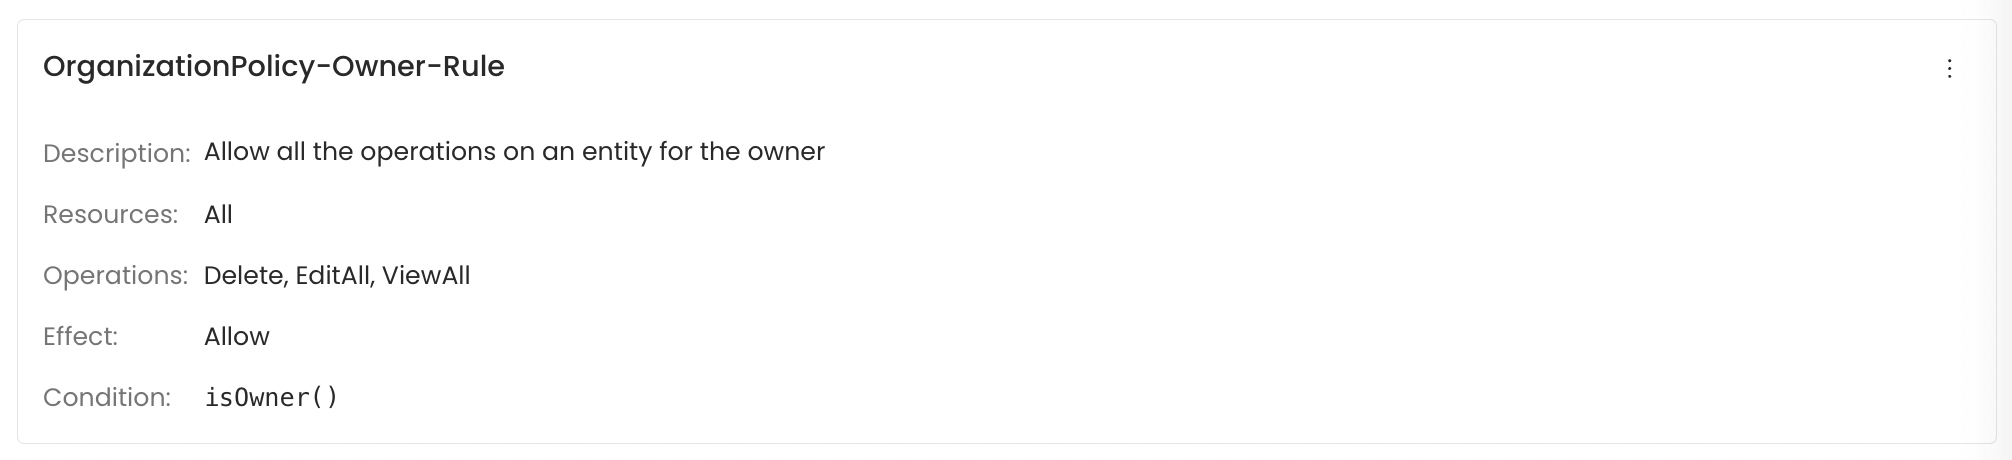 This rule gives the owner of an asset – or any member of the owning team – full access to edit and view all its details.
When a user, who either personally owns a table or is part of the team owning that table logs in, they’re granted extensive rights. They can modify all properties of that data asset and access complete information about it.
This rule gives the owner of an asset – or any member of the owning team – full access to edit and view all its details.
When a user, who either personally owns a table or is part of the team owning that table logs in, they’re granted extensive rights. They can modify all properties of that data asset and access complete information about it.
By setting up such default rules, the organization ensures clarity in access control based on ownership status and user roles.
Policies
A policy is a named group of rules. When you access a resource in Collate, it checks all the rules in all the policies that apply to your account and decides whether to allow or deny the action.
How Policies Work
When rules conflict
If two rules in the same policy disagree – for example, one allows EditDescription and another denies it – the Deny always wins.
How policies are assigned
Policies are assigned to teams, not to individual users. When you’re added to a team, you automatically inherit all the policies assigned to that team.
Inheritance and Application
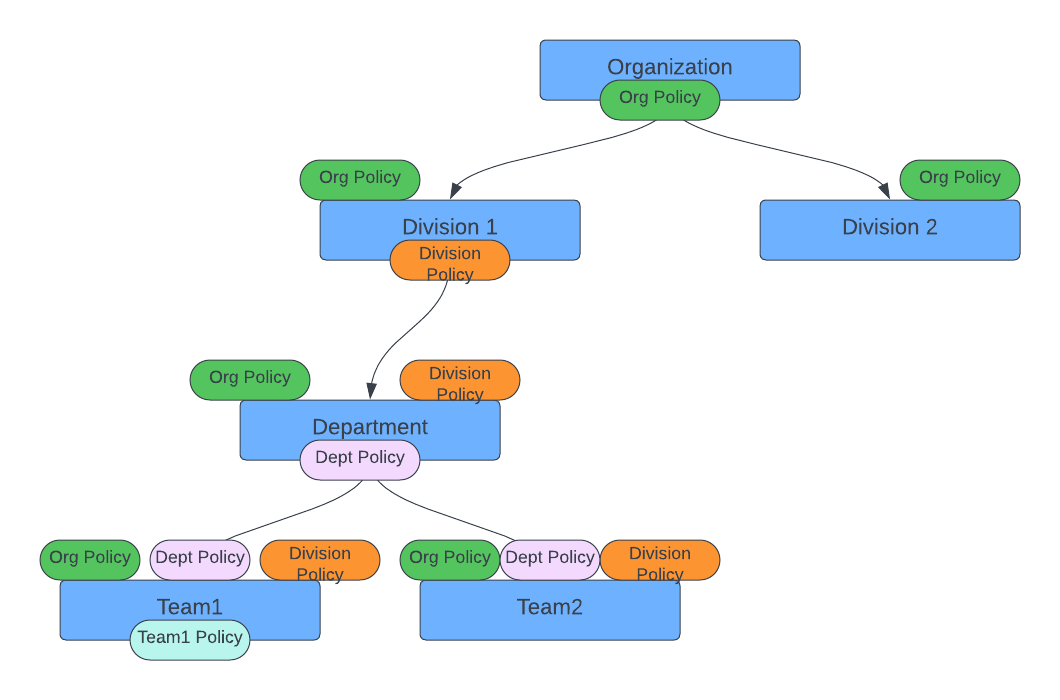 Any user positioned within a team structure inherently adopts its policies. For instance, if the “Organization-NoOwner-Policy” is instituted at the organization’s apex, all its internal members will be governed by this policy and the rules therein.
Similarly, if a policy is assigned to “Division1” such as “Division Policy”, every member – whether “Department”, “Team1”, “Team2”, or individual users in these groups – falls under its scope.
However, if you create a policy specifically for “Team1”, only its members are affected.
Policy Design Principles
This architecture sets broad rules at the organizational level, with more lenient defaults at the top. Teams can then define stricter, more tailored policies as you move down the hierarchy. For example, a policy can say: ‘Deny access to everyone outside of Team 1.’ This gives you flexibility at the top and precision where it matters most.
When designing policies for sensitive processes, it’s also worth thinking
about who should hold which permissions – not just what the permissions are.
Any user positioned within a team structure inherently adopts its policies. For instance, if the “Organization-NoOwner-Policy” is instituted at the organization’s apex, all its internal members will be governed by this policy and the rules therein.
Similarly, if a policy is assigned to “Division1” such as “Division Policy”, every member – whether “Department”, “Team1”, “Team2”, or individual users in these groups – falls under its scope.
However, if you create a policy specifically for “Team1”, only its members are affected.
Policy Design Principles
This architecture sets broad rules at the organizational level, with more lenient defaults at the top. Teams can then define stricter, more tailored policies as you move down the hierarchy. For example, a policy can say: ‘Deny access to everyone outside of Team 1.’ This gives you flexibility at the top and precision where it matters most.
When designing policies for sensitive processes, it’s also worth thinking
about who should hold which permissions – not just what the permissions are.
Separation of Duties
For teams with compliance or regulatory requirements, it’s good practice to make sure no single person can complete a sensitive process from start to finish on their own. Split the steps across two roles so each one requires a different person.
| Process | First role | Second role | Why it’s split |
|---|
| Pipeline deployment | Data engineer (Create, EditAll) | Pipeline approver (Deploy) | Stops unreviewed pipelines reaching production |
| PII labelling | Data steward (EditTags) | Compliance officer (review via AuditLogs) | Makes sure PII labels are independently checked |
| User provisioning | HR system via SCIM (CreateScim) | Admin (EditRole assignment) | Prevents someone granting themselves elevated access |
| Glossary publishing | Business analyst (create term) | Data steward (EditCertification) | Requires a steward to sign off before a term goes live |
Roles
A role is a ready-made bundle of policies that matches a job function. Instead of assigning individual policies to every user, you assign them a role and they get all the right policies in one step.
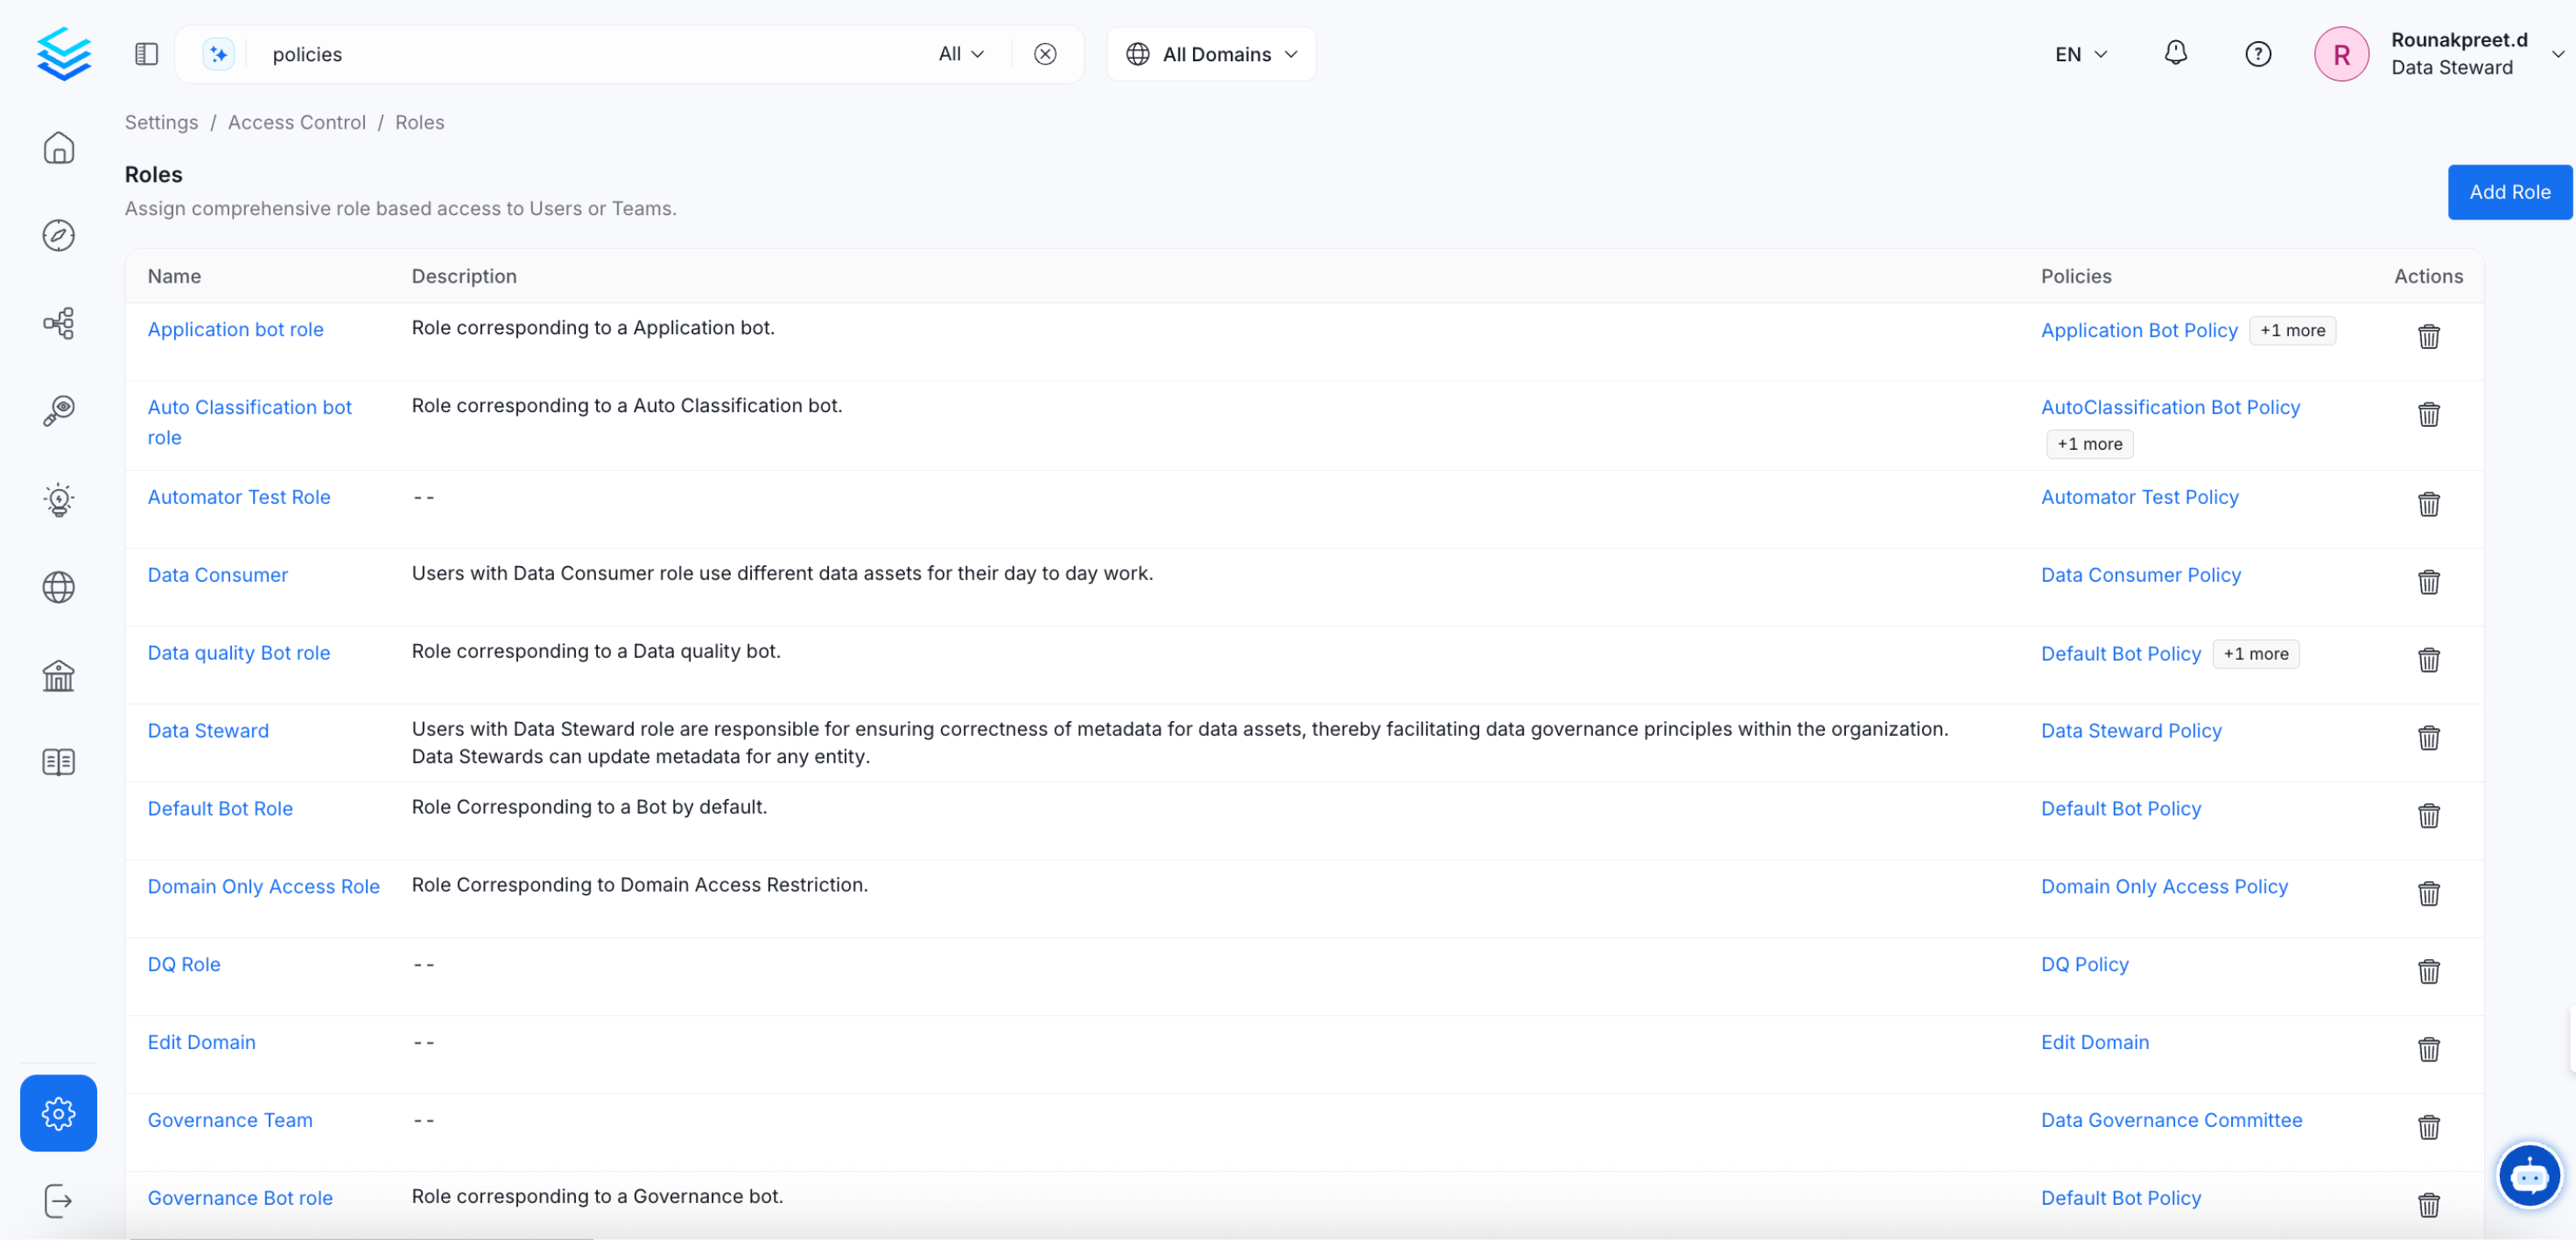 Roles can be assigned to individual users or to entire teams. When a role is assigned to a team, every member of that team gets it automatically – which makes onboarding and offboarding much simpler.
Some common examples of how roles map to job functions:
Roles can be assigned to individual users or to entire teams. When a role is assigned to a team, every member of that team gets it automatically – which makes onboarding and offboarding much simpler.
Some common examples of how roles map to job functions:
- Data engineers build and maintain data assets – they need
Create, Deploy, and Trigger
- Analysts explore and use data – they need
ViewAll, ViewUsage, and ViewQueries
- Data stewards manage governance – they need
EditTags, EditGlossaryTerms, and EditCertification
A role bundles multiple policies that match a specific job function. For example, a “Data Consumer” role includes a “Data Consumer Policy.” Anyone assigned that role – whether an individual or a team – automatically gets all the permissions defined in those policies.
Common Mistakes to Avoid
| Mistake | Why it’s a problem | What to do instead |
|---|
Assigning EditAll when only EditDescription is needed | The user ends up with access to change lineage, ownership, and tags – not just descriptions | Assign only EditDescription and EditDisplayName for documentation roles |
Giving ViewSampleData to all analysts | Exposes production row-level data broadly across the team | Create a separate role for sample data access and require approval to join it |
Using Delete outside admin roles | Risks accidental or unauthorised deletion of assets | Keep Delete for admins only |
Granting EditPolicy without regular audit reviews | A user could change their own permissions without anyone noticing | Only admins get EditPolicy – review the audit log weekly for policy changes |
| Using one global role for everyone | Gives people access to assets in domains that have nothing to do with their work | Scope roles to specific domains or resource types where possible |
| Overlooking Bot and MCP resources | Automated integrations can access or move data if over-permissioned | Treat bot and MCP permissions with the same care as human user permissions |
Leaving out Ingestion Runner in pipeline roles | Engineers can create pipelines but can’t run them | Always pair Ingestion Pipeline (Create) with Ingestion Runner (Trigger) |
Important: This has been enforced since Collate 1.12.9. Triggering an ingestion pipeline through the API (POST /v1/services/ingestionPipelines/trigger/{id}) now requires the Trigger operation to be explicitly granted — EditAll no longer covers it. The upgrade automatically added Trigger to the default bot policies (Ingestion, Lineage, Profiler, Quality, Usage) and the default Data Steward role.If you have a custom role or policy that grants EditAll on Ingestion Pipeline without an explicit Trigger grant, add Trigger to it after upgrading — otherwise pipeline triggers will start failing silently for anyone assigned that role. Scheduled runs are unaffected. This only applies to manually or programmatically triggered runs.
Roles Based Access Controls (RBAC) Search
By default, every user can search for and find any data asset in Collate, regardless of whether they have permission to access it. If you want search results to reflect each user’s permissions, turn on RBAC search – this ensures users only see assets their role allows them to access.
To enable or disable this, go to Settings > Preferences > Search.

What Changes When You Turn It On
Search results are filtered by permission – users only see assets their
role gives them access to, which helps with data security and compliance.
Permissions apply at the point of discovery – users can’t find or browse
assets they’re not allowed to access, even through search.
Before You Turn It On
Check your roles and policies are fully configured – make sure every user and team has the right permissions for the assets they need. Incomplete configuration can cause users to lose visibility of assets they should see.
Test with real users after enabling – ask someone from each role to run searches and confirm they’re seeing the right results.
For a full guide on setting up roles and policies, see Roles and Policies. Enabling RBAC search makes sure Collate’s search aligns with your organization’s data governance and access requirements.
Use Cases: Creating Roles & Policies in Collate
Tailor your policies to meet your organizational and team needs.