
AI Automations
Note: AI Automations is significantly expanded in Collate 2.0: a guided creation wizard, six ready-made templates, scheduled or on-demand runs, and configurable destinations for every run. See the sections below for details. Collate 2.0 also introduces the Weekly Insight Digest app.
CollateAIApplicationBot, previously used by the documentation agent, has been removed. If you were relying on the API or SDK with CollateAIApplicationBot, update your tokens: the more generic CollateAIAutomationBot now handles this.
Create an Automation
-
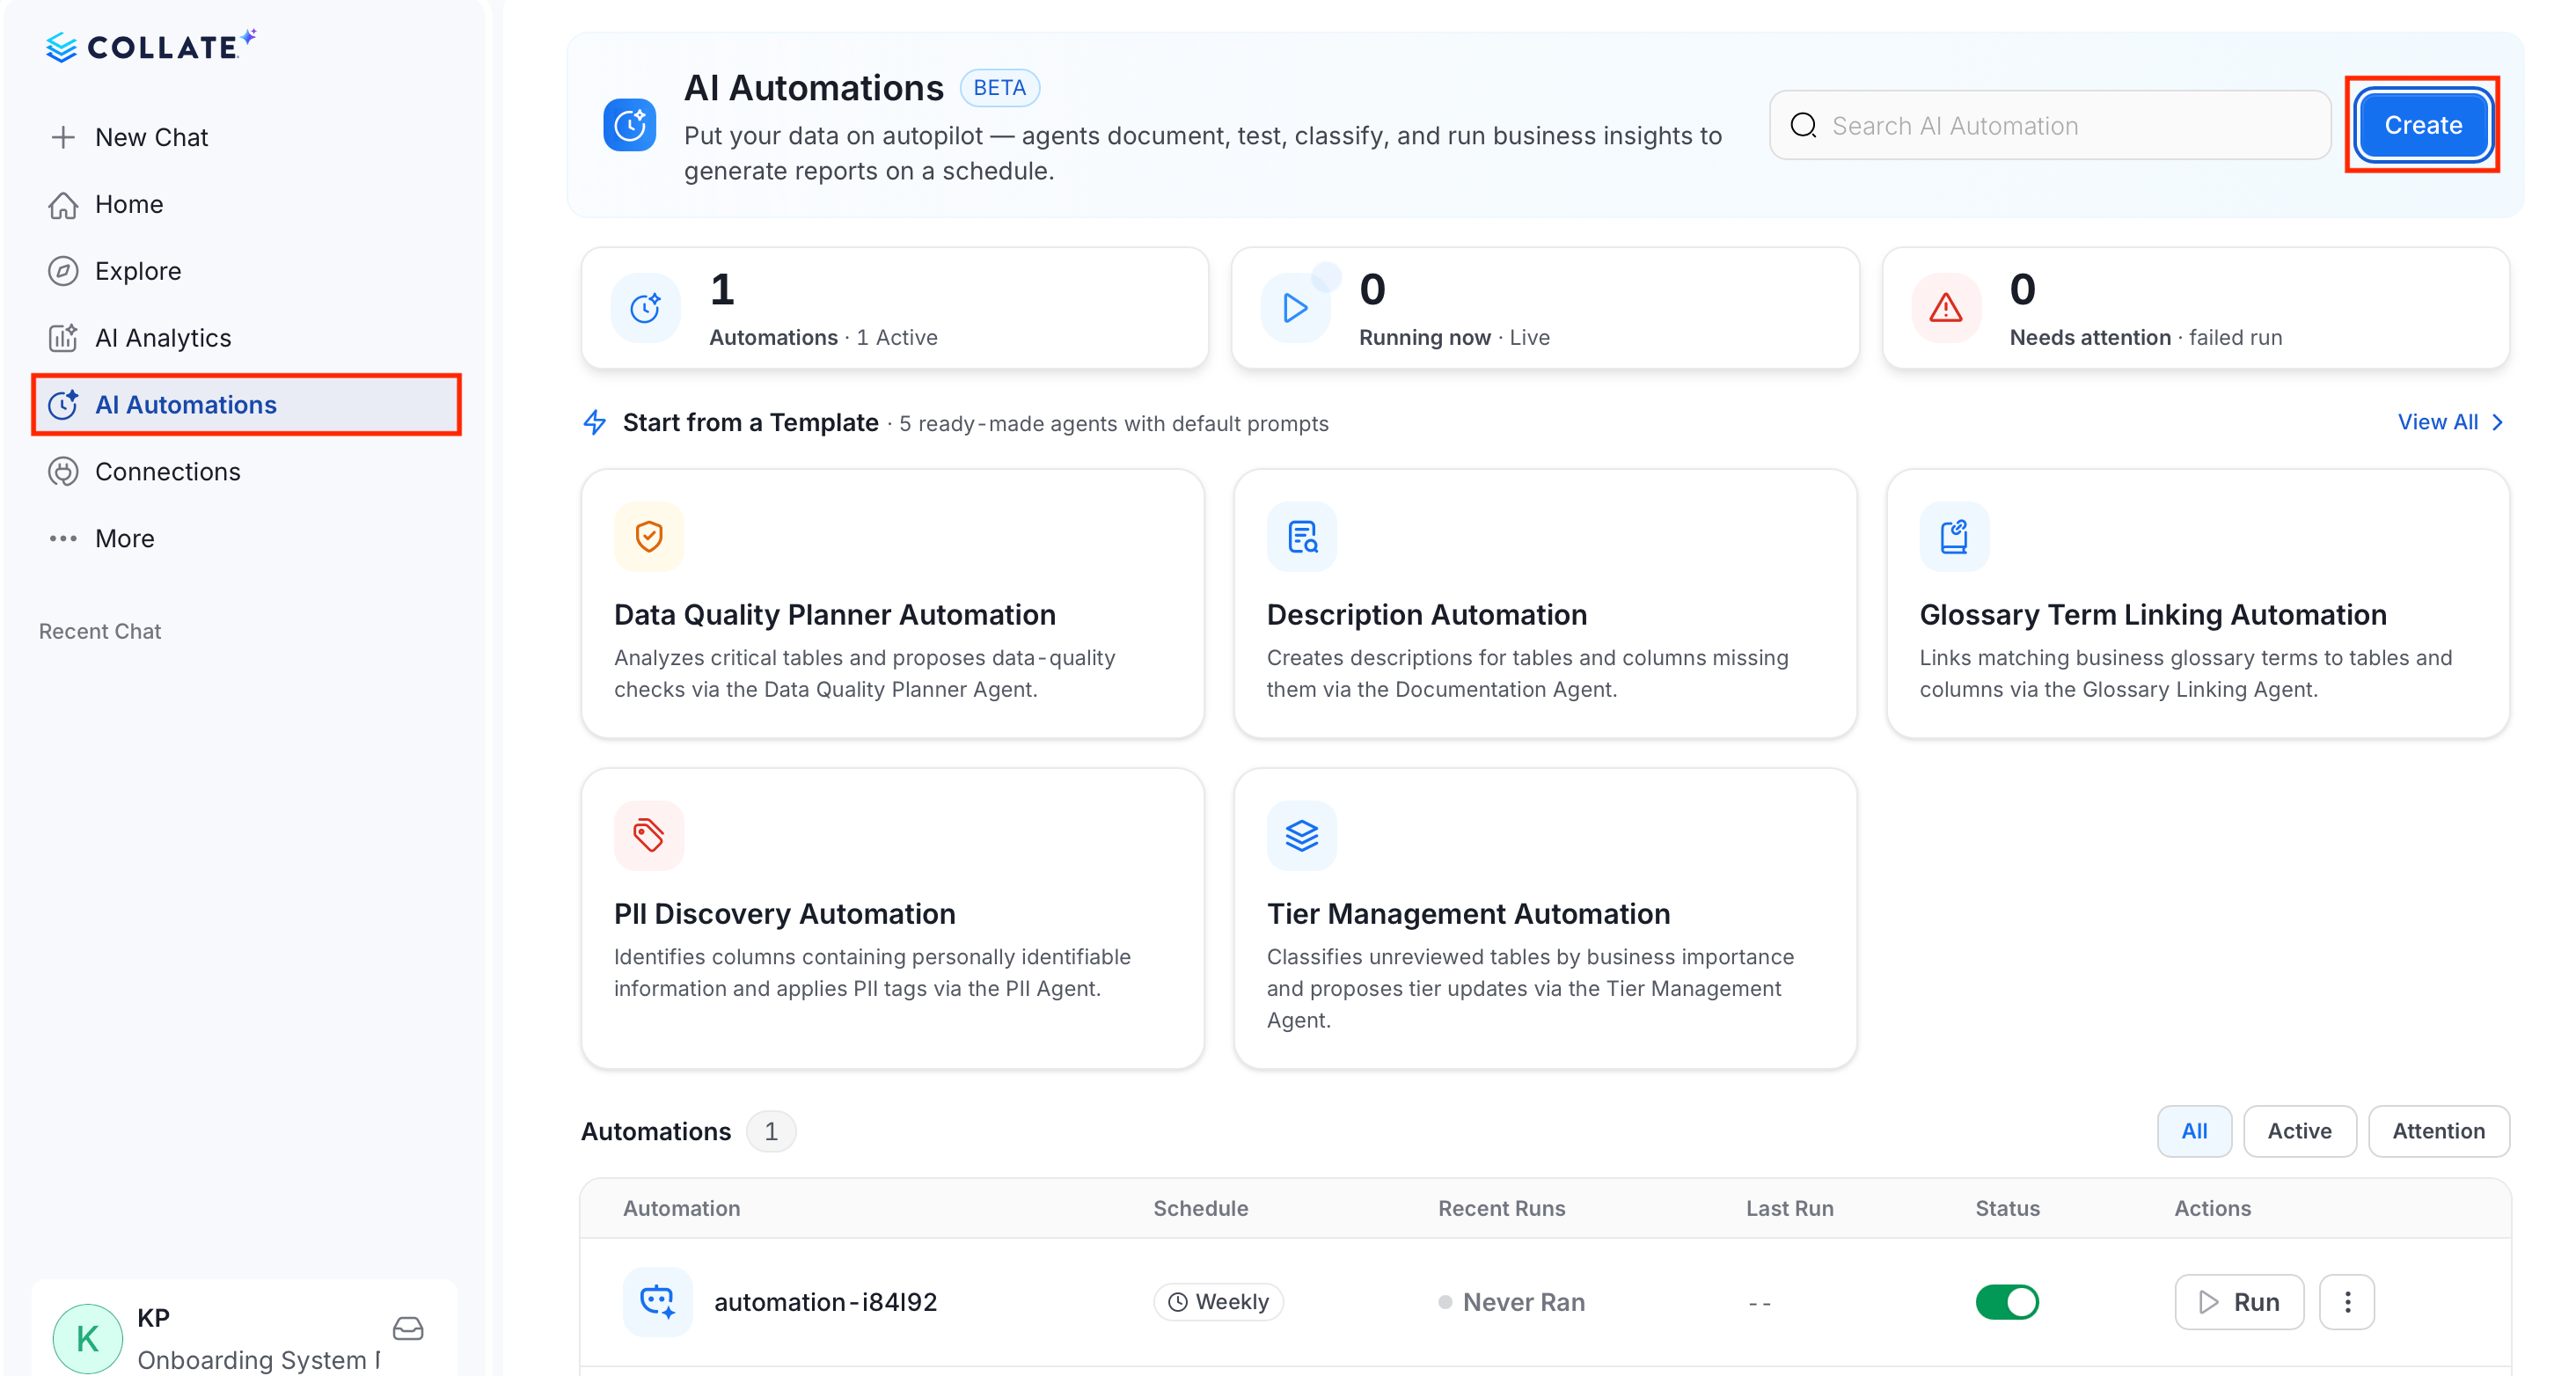
In the left side bar, select AI Automations and click Create.
-
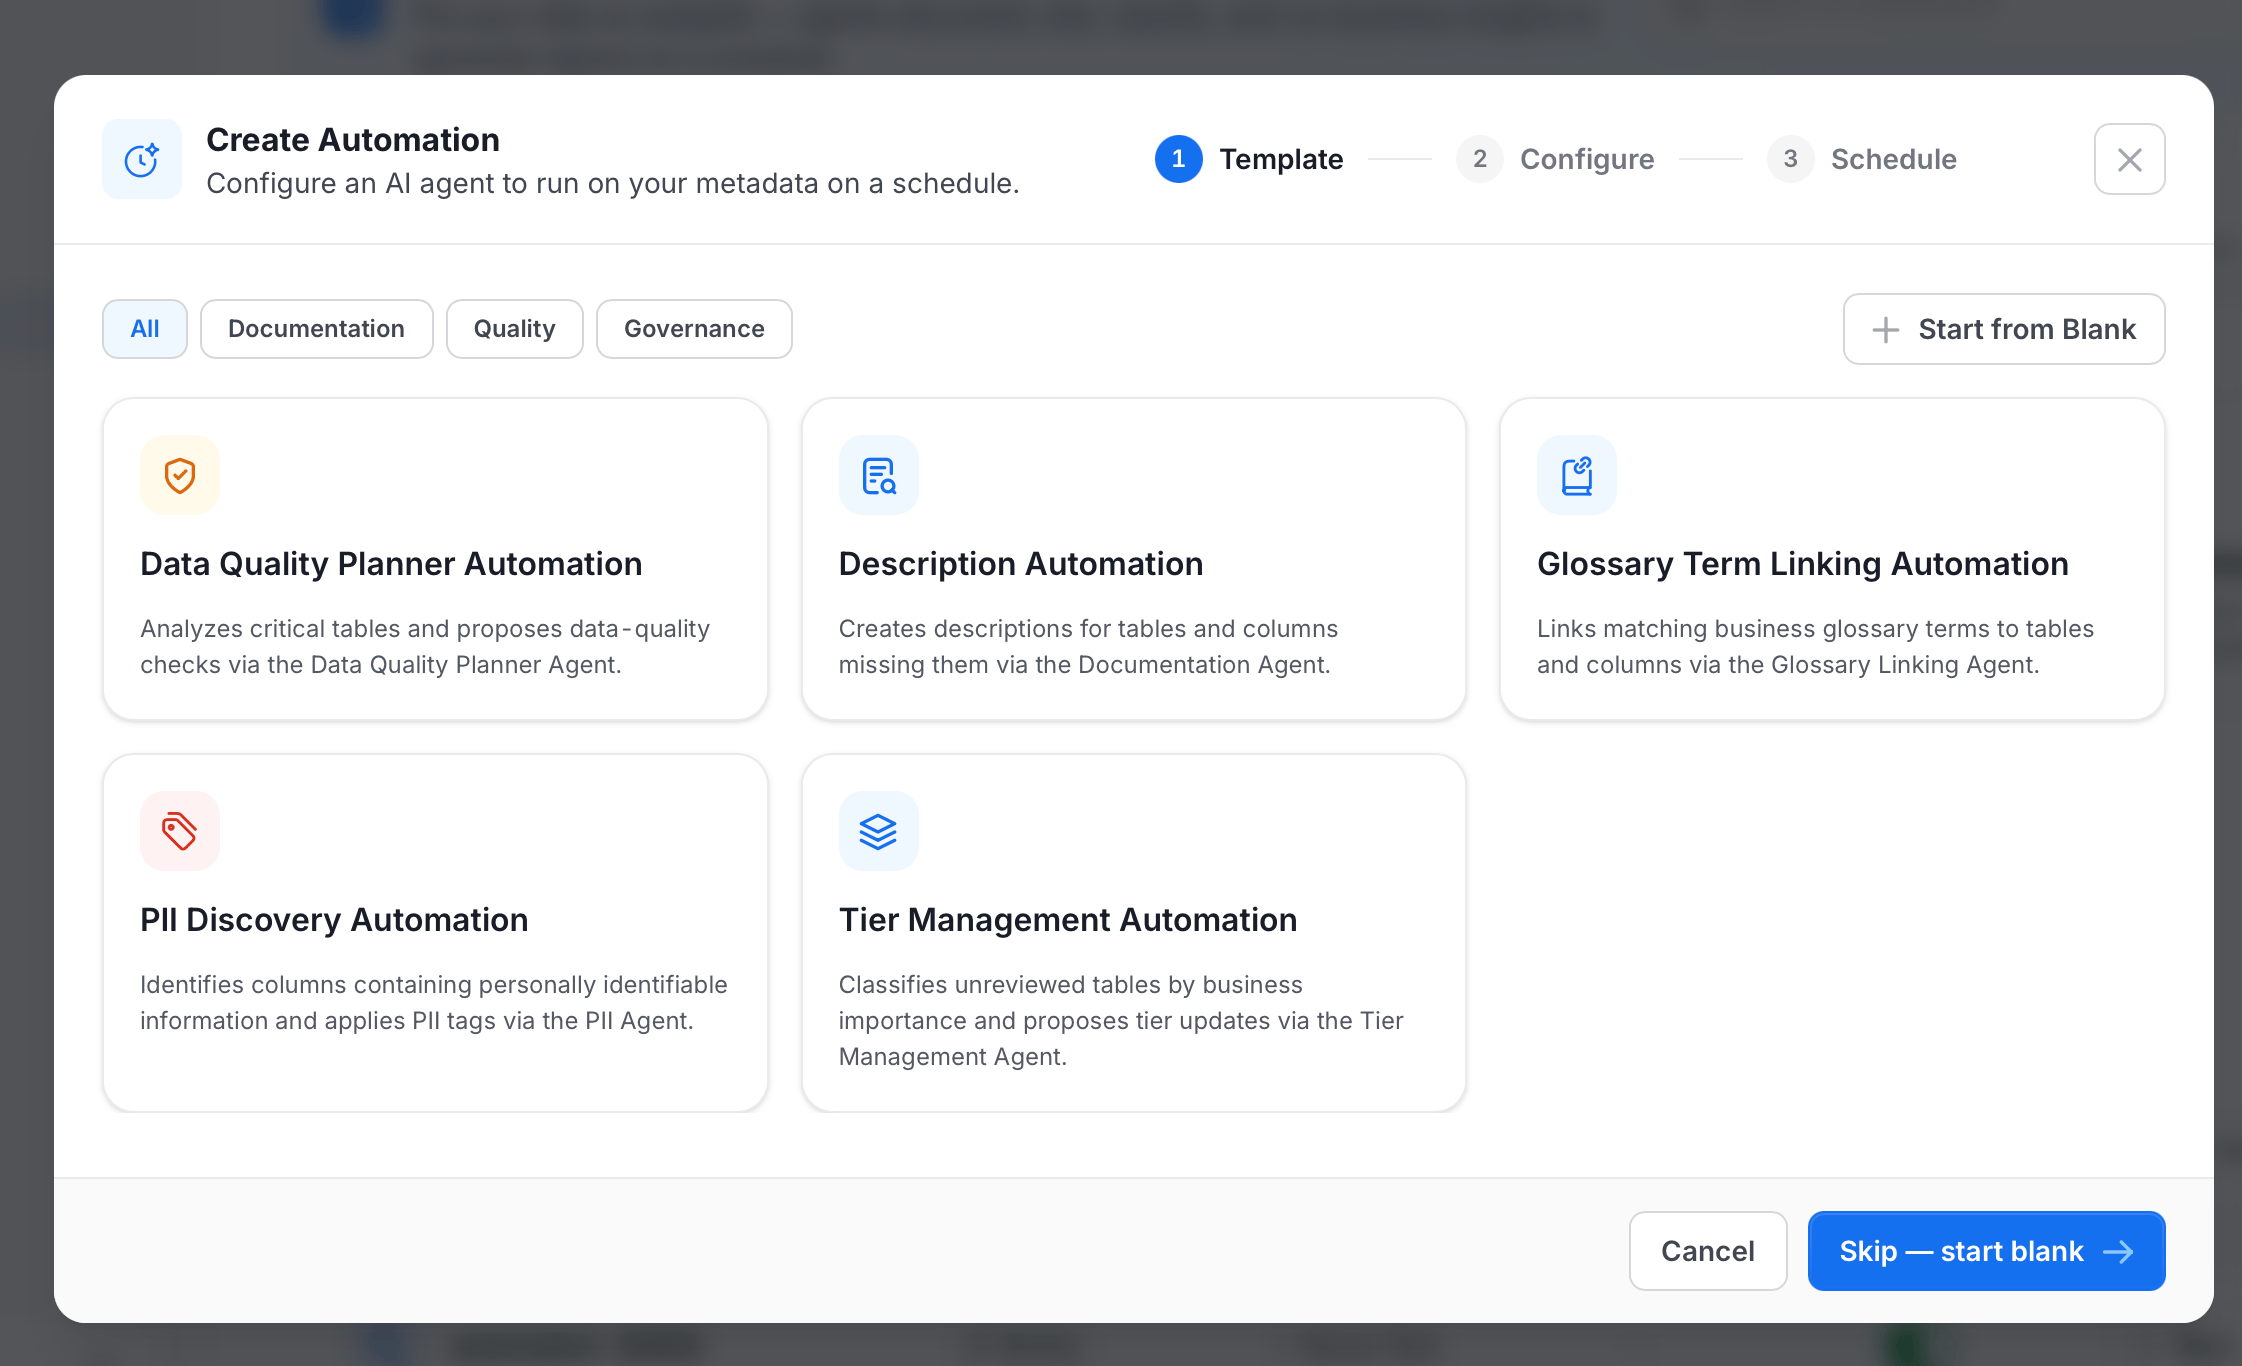
Choose a template, or click Start from Blank. Filter templates by category: All, Documentation, Quality, or Governance.
-
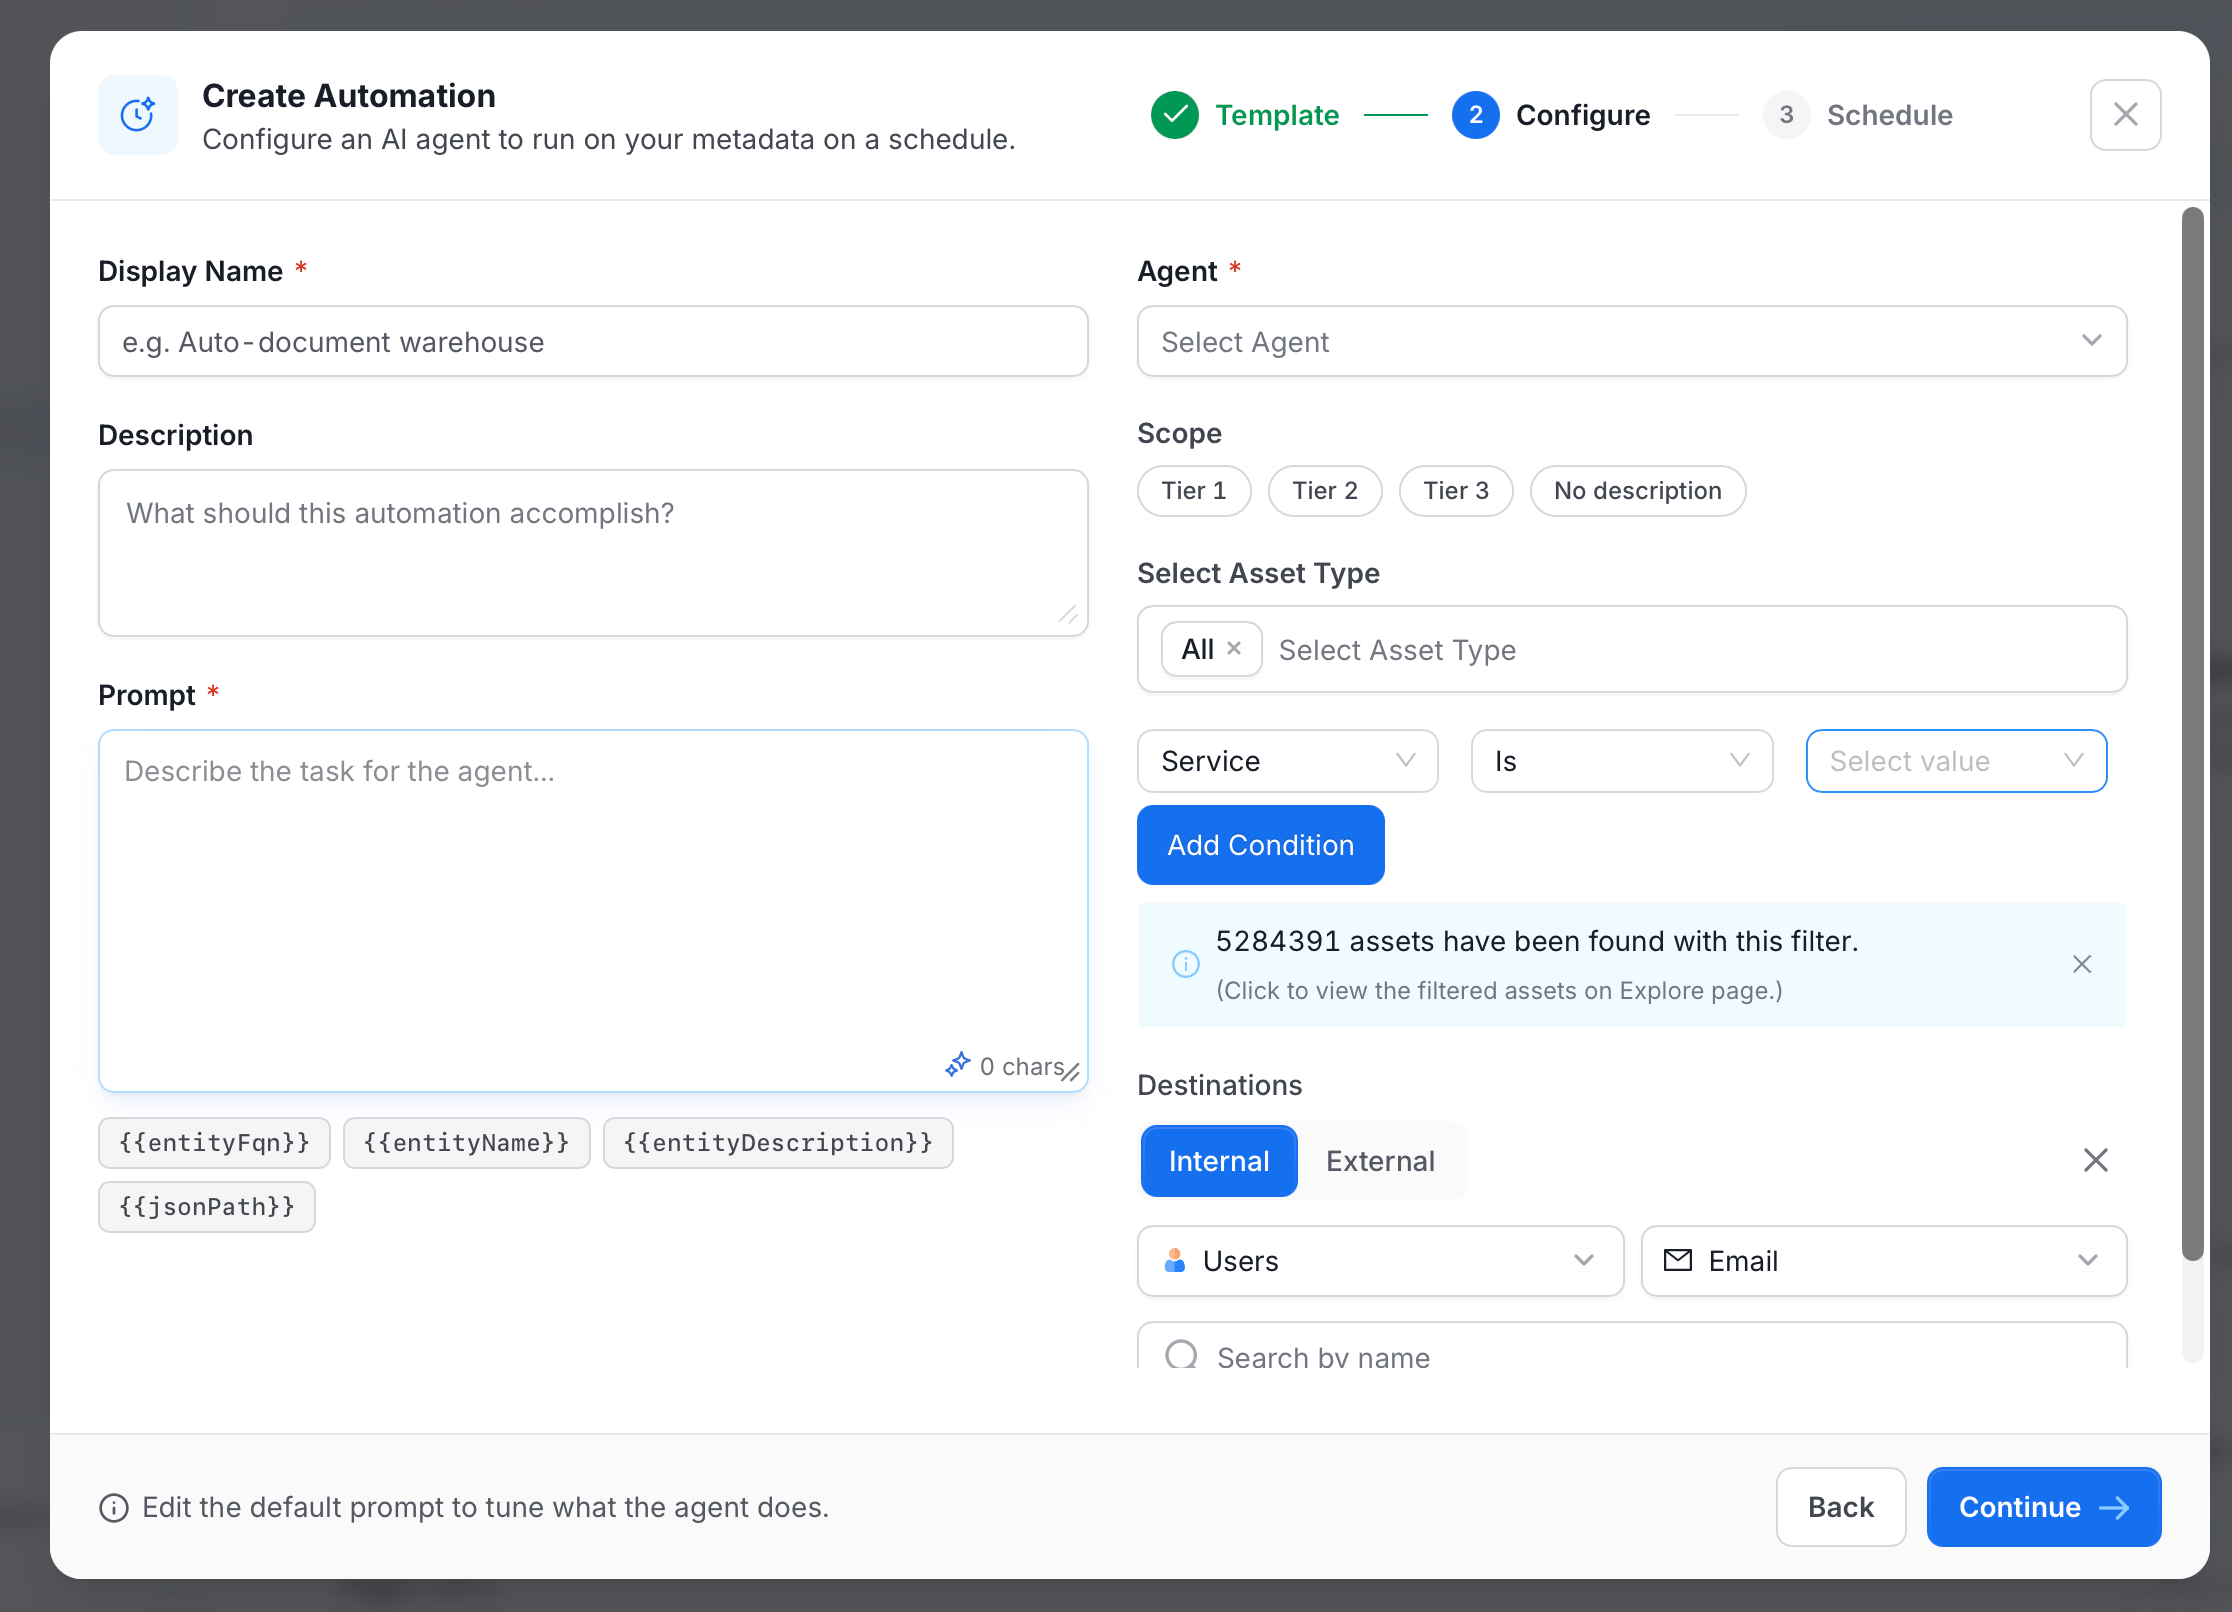
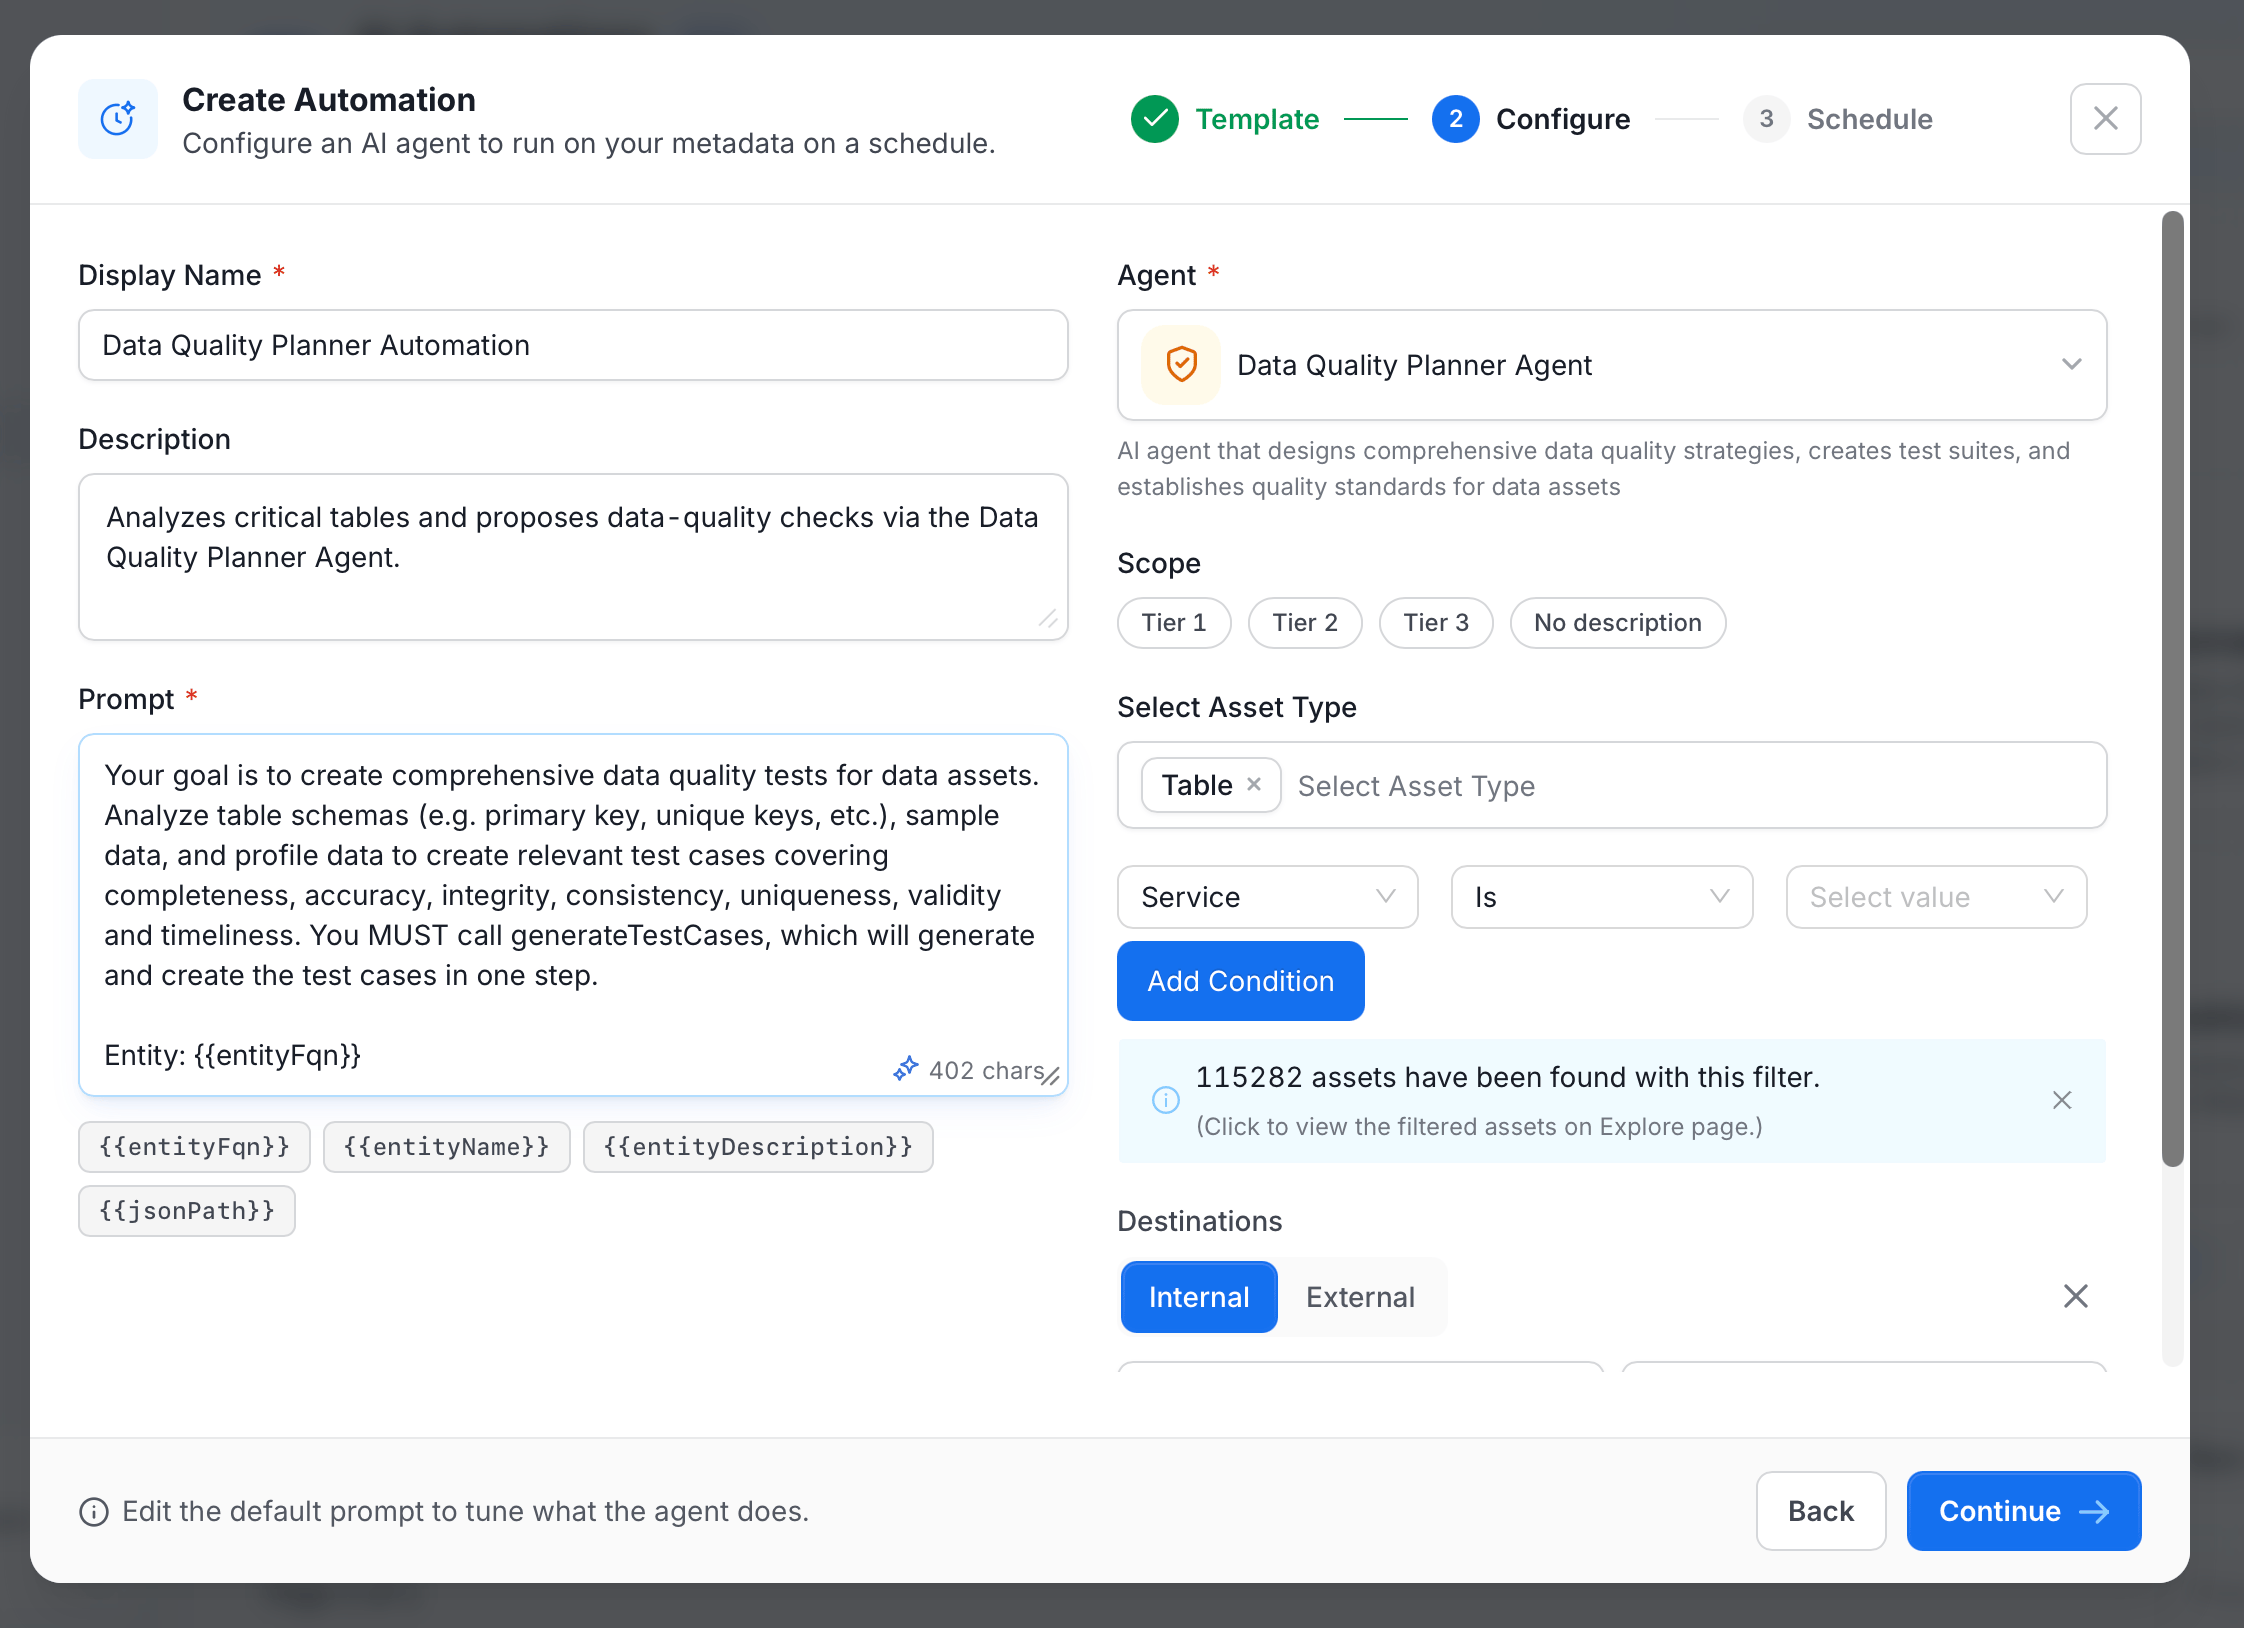
Configure the automation:
- Display Name: Enter a name for the automation, for example Auto-document warehouse.
- (Optional) Description: Enter what the automation should accomplish.
-
Prompt: Enter the task instructions for the agent. Insert
{{entityFqn}},{{entityName}},{{entityDescription}}, or{{jsonPath}}to reference details about each asset the automation processes. - Agent: Select the agent that runs the automation. See Automation Templates for ready-made template agents, or Agents for the full list of available agents.
- (Optional) Scope: The assets the automation runs on. See Setting the Scope.
-
(Optional) Destinations: Who is notified when a run completes. See Choosing Destinations.
-
Click Continue and set the schedule:
- Schedule: The automation runs repeatedly based on the frequency you set—Hourly, Daily, Weekly, Monthly, or Custom—plus the day and time.
-
On Demand: The automation runs once, only when you trigger it manually.
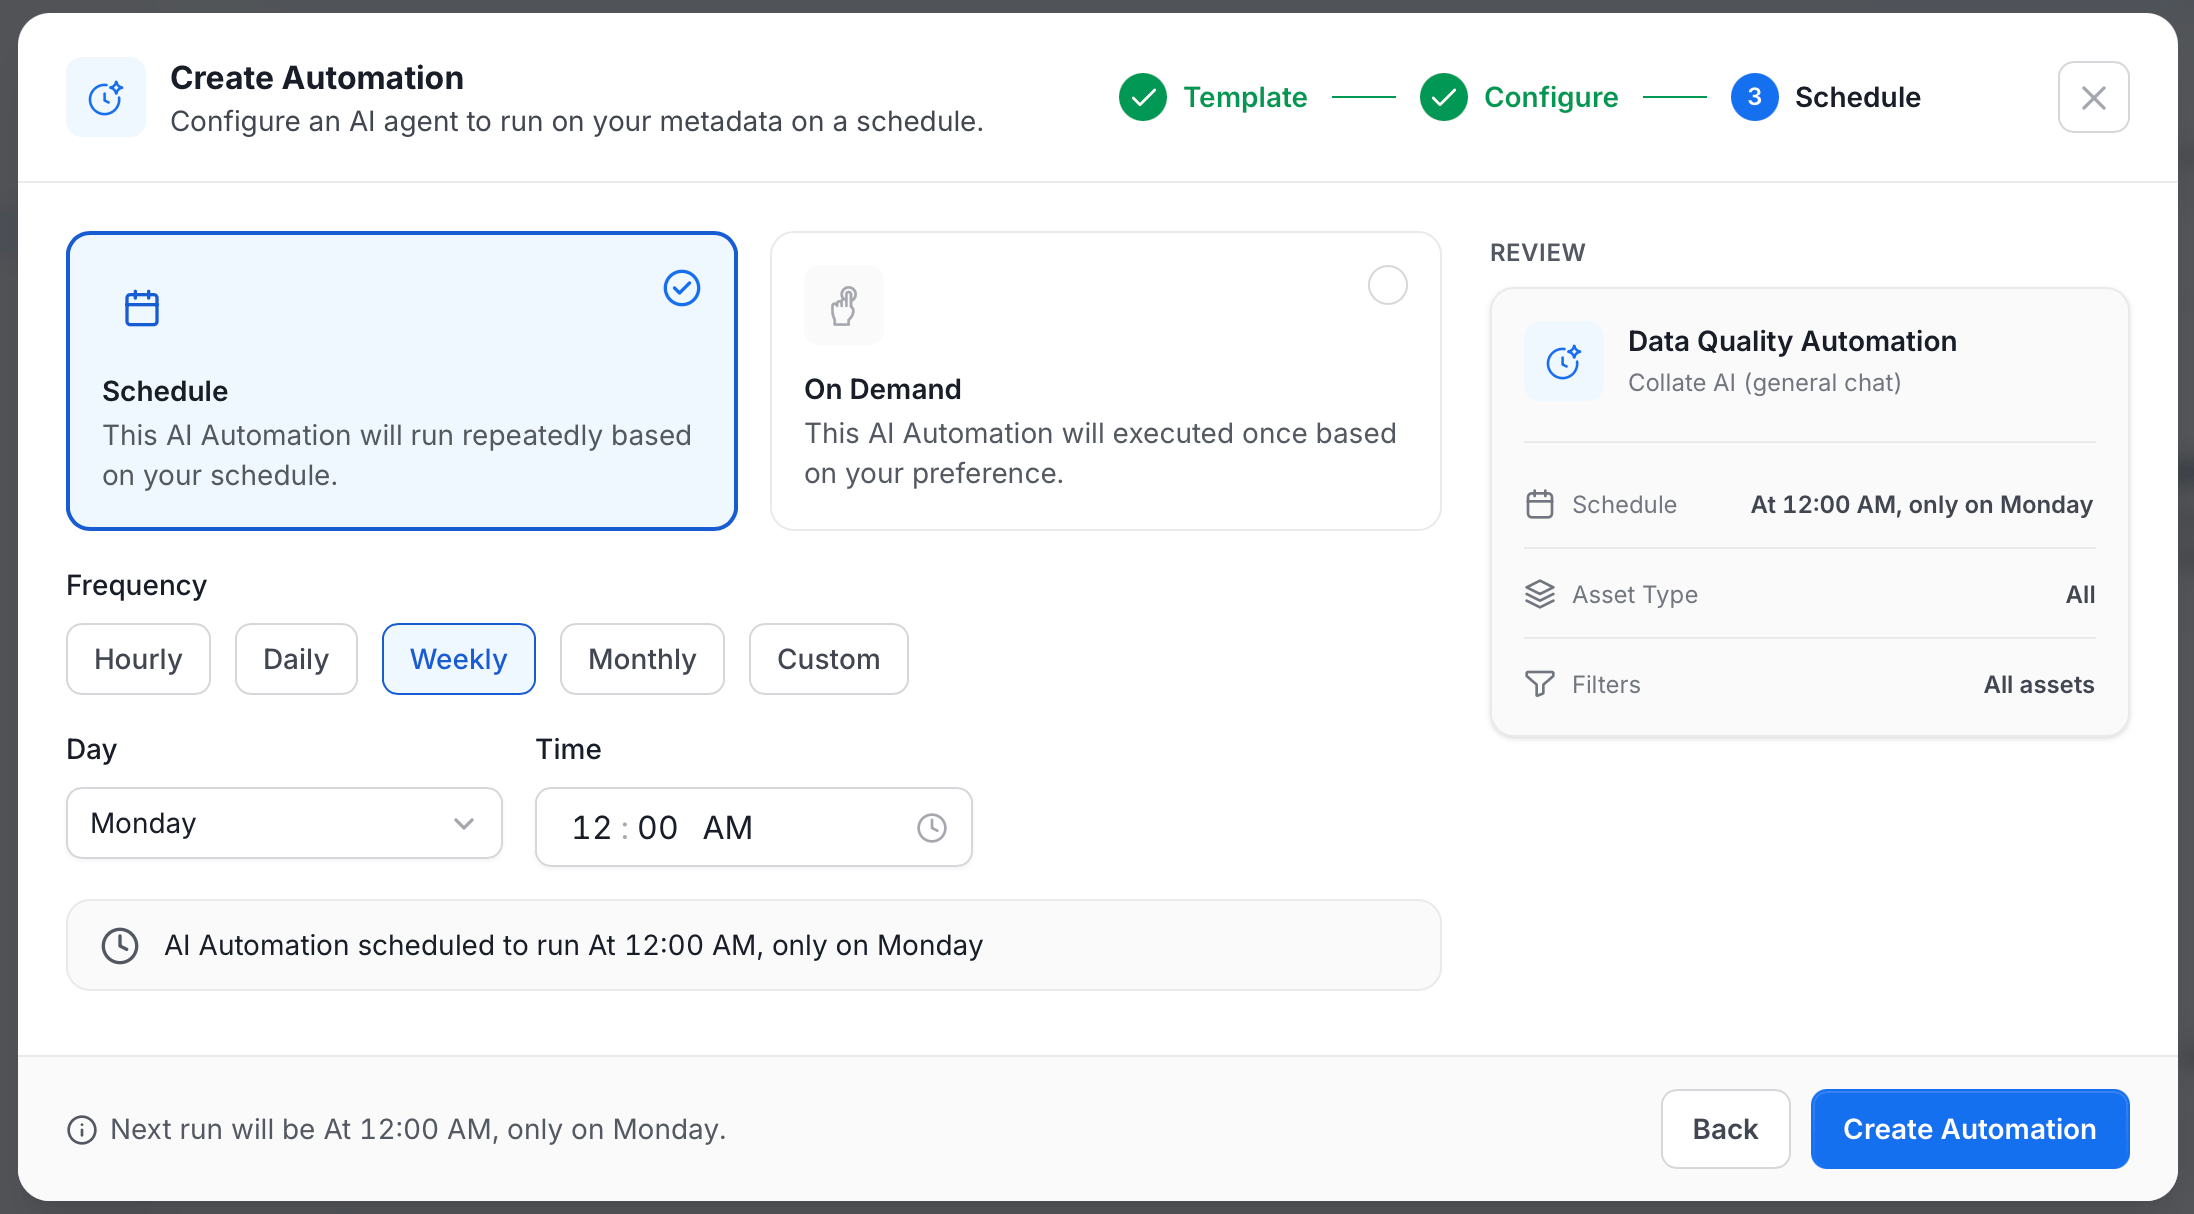
- Review the summary—schedule, asset type, and filters—and click Create Automation.
Creating an Automation via Collate AI Chat
Ask Collate AI in chat to create an automation instead of going through the wizard. If your request matches exactly one of the automation templates, Collate AI clones that template as a starting point, inheriting its agent, prompt, and asset type. It can’t clone an automation you’ve already created yourself. When no single template fully covers your request, Collate AI writes a new prompt and builds the automation from scratch instead.Prompt Templates
The Prompt field is how you tell the agent what to do with each asset it processes. Use template variables to reference the specific asset being processed — Collate substitutes the real value for each asset at runtime.Example Prompts
Description Automation — write a description from scratch:Note: Prompts run once per matched asset. The agent sees the asset’s schema, column names, sample values, and existing metadata alongside your prompt — you don’t need to describe the table structure yourself.
Automation Templates
Collate ships with six ready-made automation templates to help you get started quickly. Each template is pre-configured with a default prompt and the appropriate agent. Select a template when creating an automation, then customize the prompt and scope as needed. For the full list of available agents, see Agents.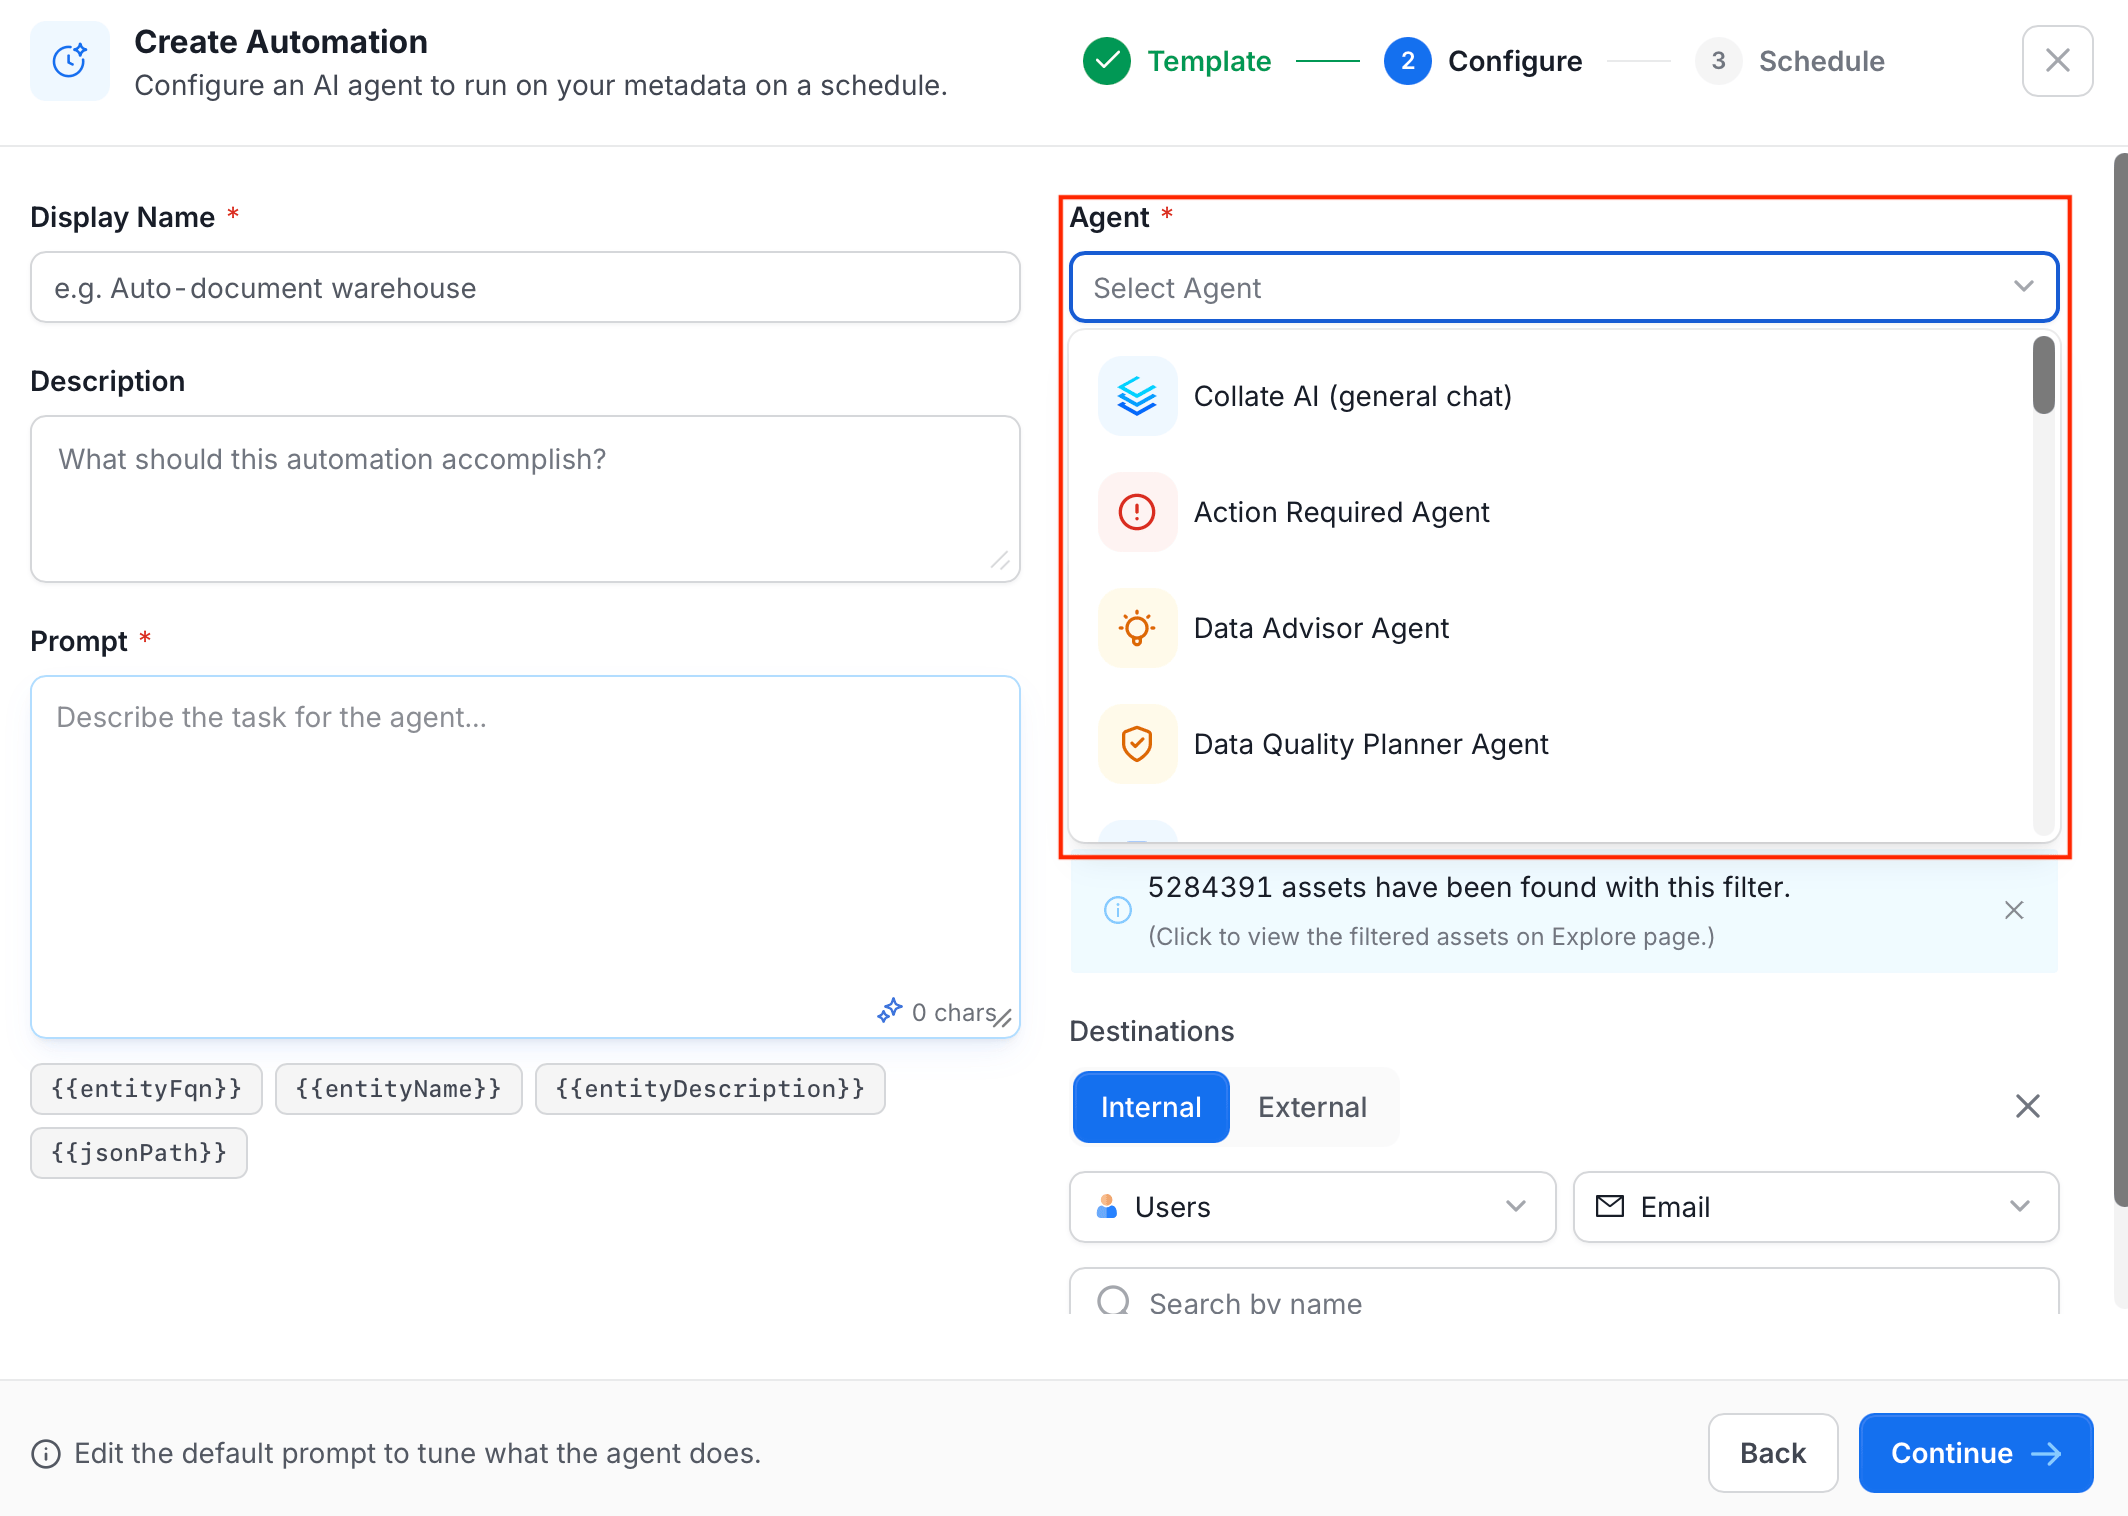
Description Automation
Generates and updates human-readable descriptions for tables and columns across your data catalog. It reads each asset’s schema, column names, sample values, and existing metadata to produce context-aware descriptions — not generic boilerplate. Key capabilities:- Writes descriptions for tables and columns that currently have none.
- Refreshes outdated or low-quality descriptions based on current schema and sample data.
- Keeps a human in the loop: when a description already exists, the automation opens a suggestion for review instead of overwriting it directly.
- Empty description: The automation writes one directly, with no review step.
- Existing description: The automation opens a suggestion instead of overwriting it, so a person reviews and approves the change before it’s applied.
- Existing description that a previous automation run wrote: The automation skips the field. Because the automation already generated that description once, generating and suggesting it again wouldn’t add value. It would only spend tokens redoing work that’s already there.
- Table with an open suggestion: The automation skips the entire table until that suggestion is resolved or dismissed. Otherwise, every run would pile another suggestion on top of the one still waiting for review, so skipping avoids duplicate suggestions and the tokens spent generating them.
Data Quality Planner Automation
Designs and deploys data quality test suites for your assets using AI. It analyzes each table’s structure, constraints, and similarities with other tables to recommend the most relevant checks — then creates them in Collate automatically. Key capabilities:- Proposes completeness, accuracy, integrity, consistency, uniqueness, validity, and timeliness tests based on column types and constraints.
- Creates test suites and applies them to selected assets on a schedule.
- Scales quality coverage without requiring manual test configuration per table.
Tier Management Automation
Analyzes usage patterns, lineage depth, and business value signals to assign the appropriate governance tier (Tier 1, 2, or 3) to your assets. It considers query frequency, the number of downstream dependents, and how the asset is referenced across the organization. Key capabilities:- Assigns tiers to untiered assets based on actual usage and lineage, not manual judgement.
- Re-evaluates tier assignments as usage changes over time.
- Keeps a human in the loop: tier suggestions can be reviewed before being applied.
Note: The agent analyzes every matched asset, including those that would fall into Tier 4 or Tier 5, but never patches those. Tier 4 and 5 assignments are skipped entirely. Only Tier 1, 2, and 3 are written back to the catalog.
Domain Assignment Automation
Assigns a business domain to tables that have none, by matching each asset’s metadata — name, column names, and description — against the domain definitions in your Collate catalog. No SQL is executed; the agent works entirely from metadata. Key capabilities:- Reads table and column names, descriptions, and existing tags to infer the right domain.
- Matches against the domain descriptions you have set up in Collate.
- Processes large numbers of undomained tables in a single scheduled run.
Note: The agent only fills gaps — it never overwrites a domain that is already set. If a table already carries a domain, whether assigned directly or inherited from its schema, the agent leaves it unchanged.
PII Discovery Automation
Classifies columns for personally identifiable information and applies PII tags automatically. It combines column names, sample data values, and profiling results to detect sensitive data — covering names, email addresses, phone numbers, national IDs, financial data, and more. The agent applies two tag levels:
Surrogate keys, foreign keys, and opaque internal identifiers that merely reference a person are not tagged — they are join references, not personal data.
Key capabilities:
- Scans columns and applies PII classification tags based on content and naming patterns.
- Uses profiler output (sample values and distributions) to catch PII that column names alone don’t reveal.
- Supports compliance requirements including GDPR, CCPA, and India’s DPDP Act.
Glossary Term Linking Automation
Links your organization’s business glossary terms to the tables and columns they describe. It uses column names, sample data, and profiling to find the best matches — keeping your semantic layer connected to your physical data as schemas evolve. Key capabilities:- Maps glossary terms to relevant tables and columns automatically.
- Detects new matching opportunities as new assets are ingested.
- Keeps term associations current without manual re-linking after schema changes.
- Additive only — always appends the matched term to the column’s existing term list, never replaces it. No previously linked term is dropped.
Note:
Glossary Term Linking Automation consumes significantly more credits than other automations. Linking requires the agent to explore and compare each column against your full glossary, which involves substantially more reasoning per asset than writing a description or assigning a tier. Confirm your scope’s live count before running this automation at scale.
Agents
The Agent dropdown lists every agent available in your organization. Select the agent that best fits your automation goal. You can also select any custom agent you have created in AI Studio.General
Collate AI (general chat) The general-purpose agent. Instead of a task-specific worker, it routes your automation through Collate AI’s chat intelligence — the same model that powers Collate AI Chat. Use it when no dedicated agent fits your prompt, or when you want to combine multiple types of work in a single automation. Key capabilities:- Handles any metadata task you can describe in natural language.
- Combines documentation, classification, and quality work in one prompt.
- Falls back gracefully when a specialized agent is unavailable.
Automation Agents
These agents are designed for use in AI Automations and are available as ready-made templates. See Automation Templates for full configuration details.Additional Agents
SQL Query Agent Generates optimized SQL queries based on user requirements. Use in automations that need to produce SQL — for example, generating diagnostic queries for assets in a specific service. Data Advisor Agent Advises on the operational state of data assets — ingestion pipelines, dbt jobs, profiler results, and lineage. Diagnoses issues and produces prioritized remediation actions.System Agents
These agents primarily power Collate UI widgets but are selectable in the dropdown.Setting the Scope
Scope controls which assets the automation processes and how it executes.Automation Cost Reference
Different automations consume very different amounts of AI credits per asset.To Run on Specific Entities or a Specific Service
Configure any scope — an asset type, a condition, or a scope chip. The automation runs once per matched asset, sequentially. Each asset gets its own isolated agent invocation with its own rendered prompt.- Select Asset Type — choose the kind of asset to process: Table, Topic, Dashboard, Pipeline, ML Model, Container, Search Index, Stored Procedure, or Data Product.
- Conditions — filter which assets within that type are included. For example, add Service is
mysql_prodto limit the automation to assets in that specific service. Add multiple conditions to narrow further — all conditions must match. - Scope Chips — one-click shortcuts to further narrow the matched set:
- Tier 1 / 2 / 3 — limits to assets at that governance tier. Select multiple tiers to match any of them. See Tiering.
- No description — limits to assets with no description set. Combine with a tier chip to target, for example, Tier 1 assets that still lack descriptions.
To Apply Globally Across a Selected Asset Type
Leave the condition builder empty — select an asset type but add no conditions. The automation runs against every asset of that type across all services. For example, selecting Table with no conditions runs the automation on every table in every database service in your catalog. Leave the scope completely empty — no asset type, no conditions, no chips — to run the automation once with no entity context, useful for catalog-wide reports or actions not tied to a specific asset.Note: A single run processes up to 500 matched assets. If your scope matches more, the run stops at 500 and logs a warning. Split large scopes across multiple automations — for example, one per service — to stay within the limit.
Live Count
As you adjust the scope, Collate shows a live count of matching assets with a link to view them on the Explore page. Confirm the count before creating the automation.Choosing Destinations
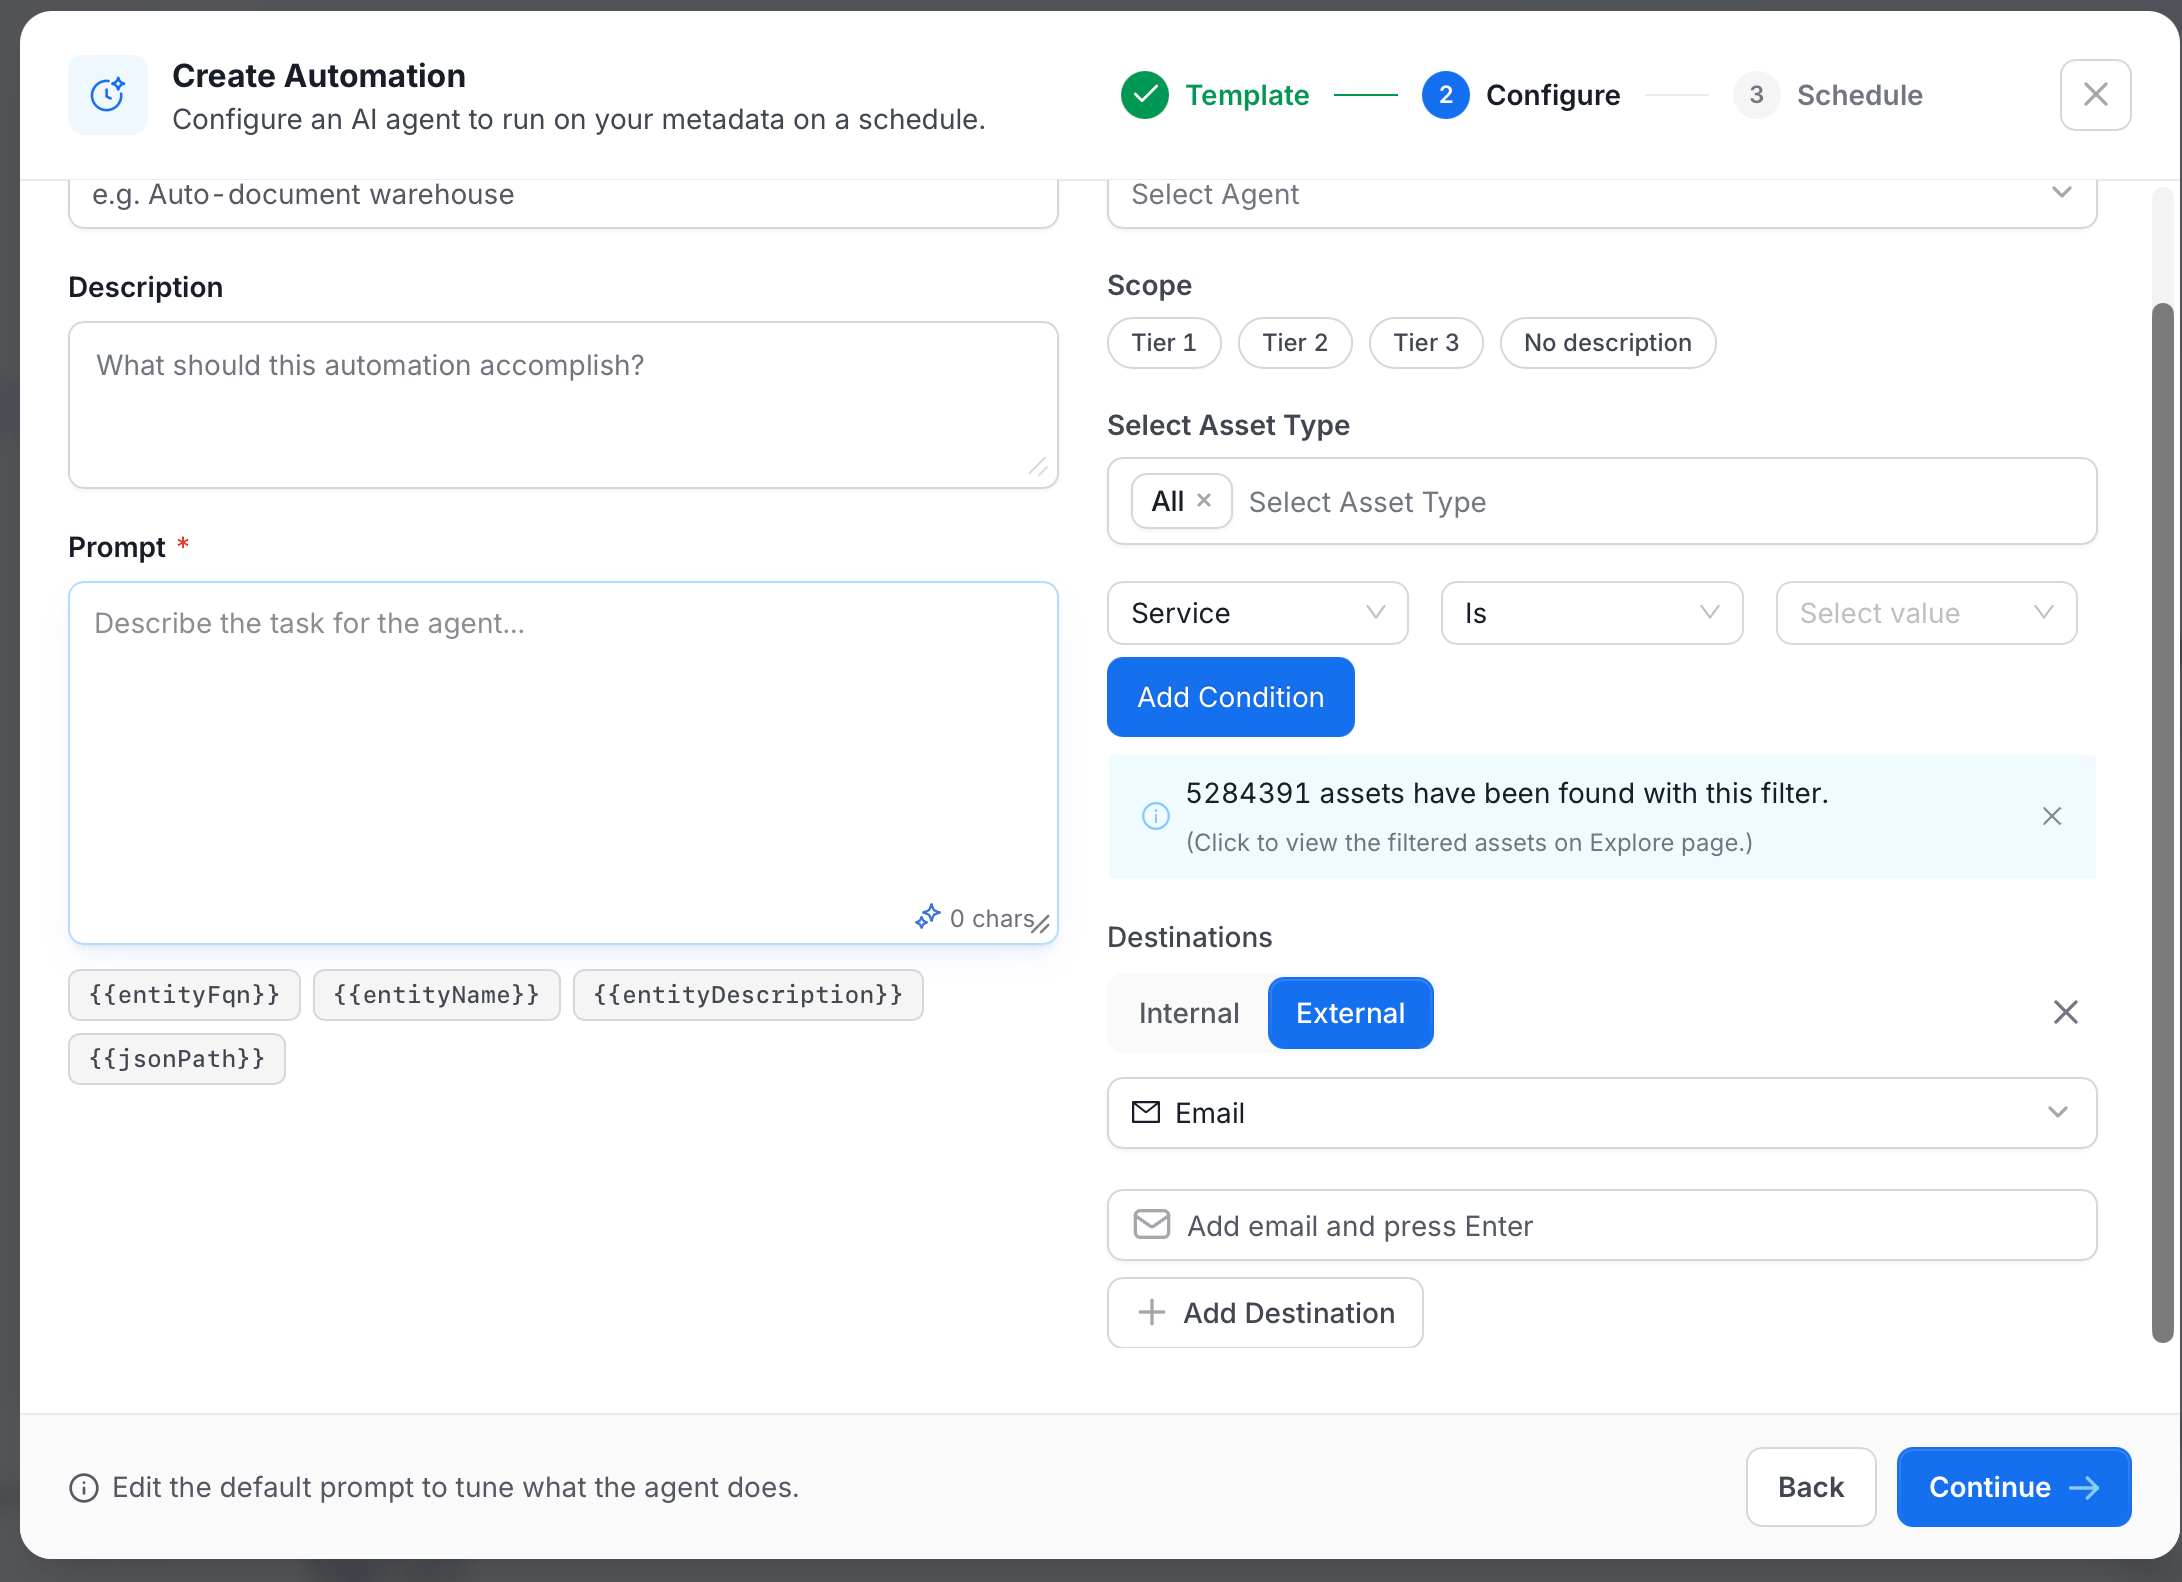
Destinations decide who is notified when an automation runs. Choose Internal to notify people in Collate, or External to notify people outside Collate.-
Internal:
- Recipient type: Choose Users, Teams, Admins, Owners, Followers, Mentions, or Assignees.
- Users, Teams, Mentions, or Assignees: Search for and select specific people or teams.
- Admins, Owners, or Followers: No picker needed—Collate automatically notifies everyone in that group for the relevant assets.
- Channel: Choose Email or Slack. Slack isn’t available when the recipient type is Users, Admins, or Followers.
-
External:
- Channel: Choose Email or Slack.
- Email: Enter one or more email addresses, pressing Enter after each.
- Slack: Enter a Slack channel name, for example
#channel-name.
Viewing and Managing Automations
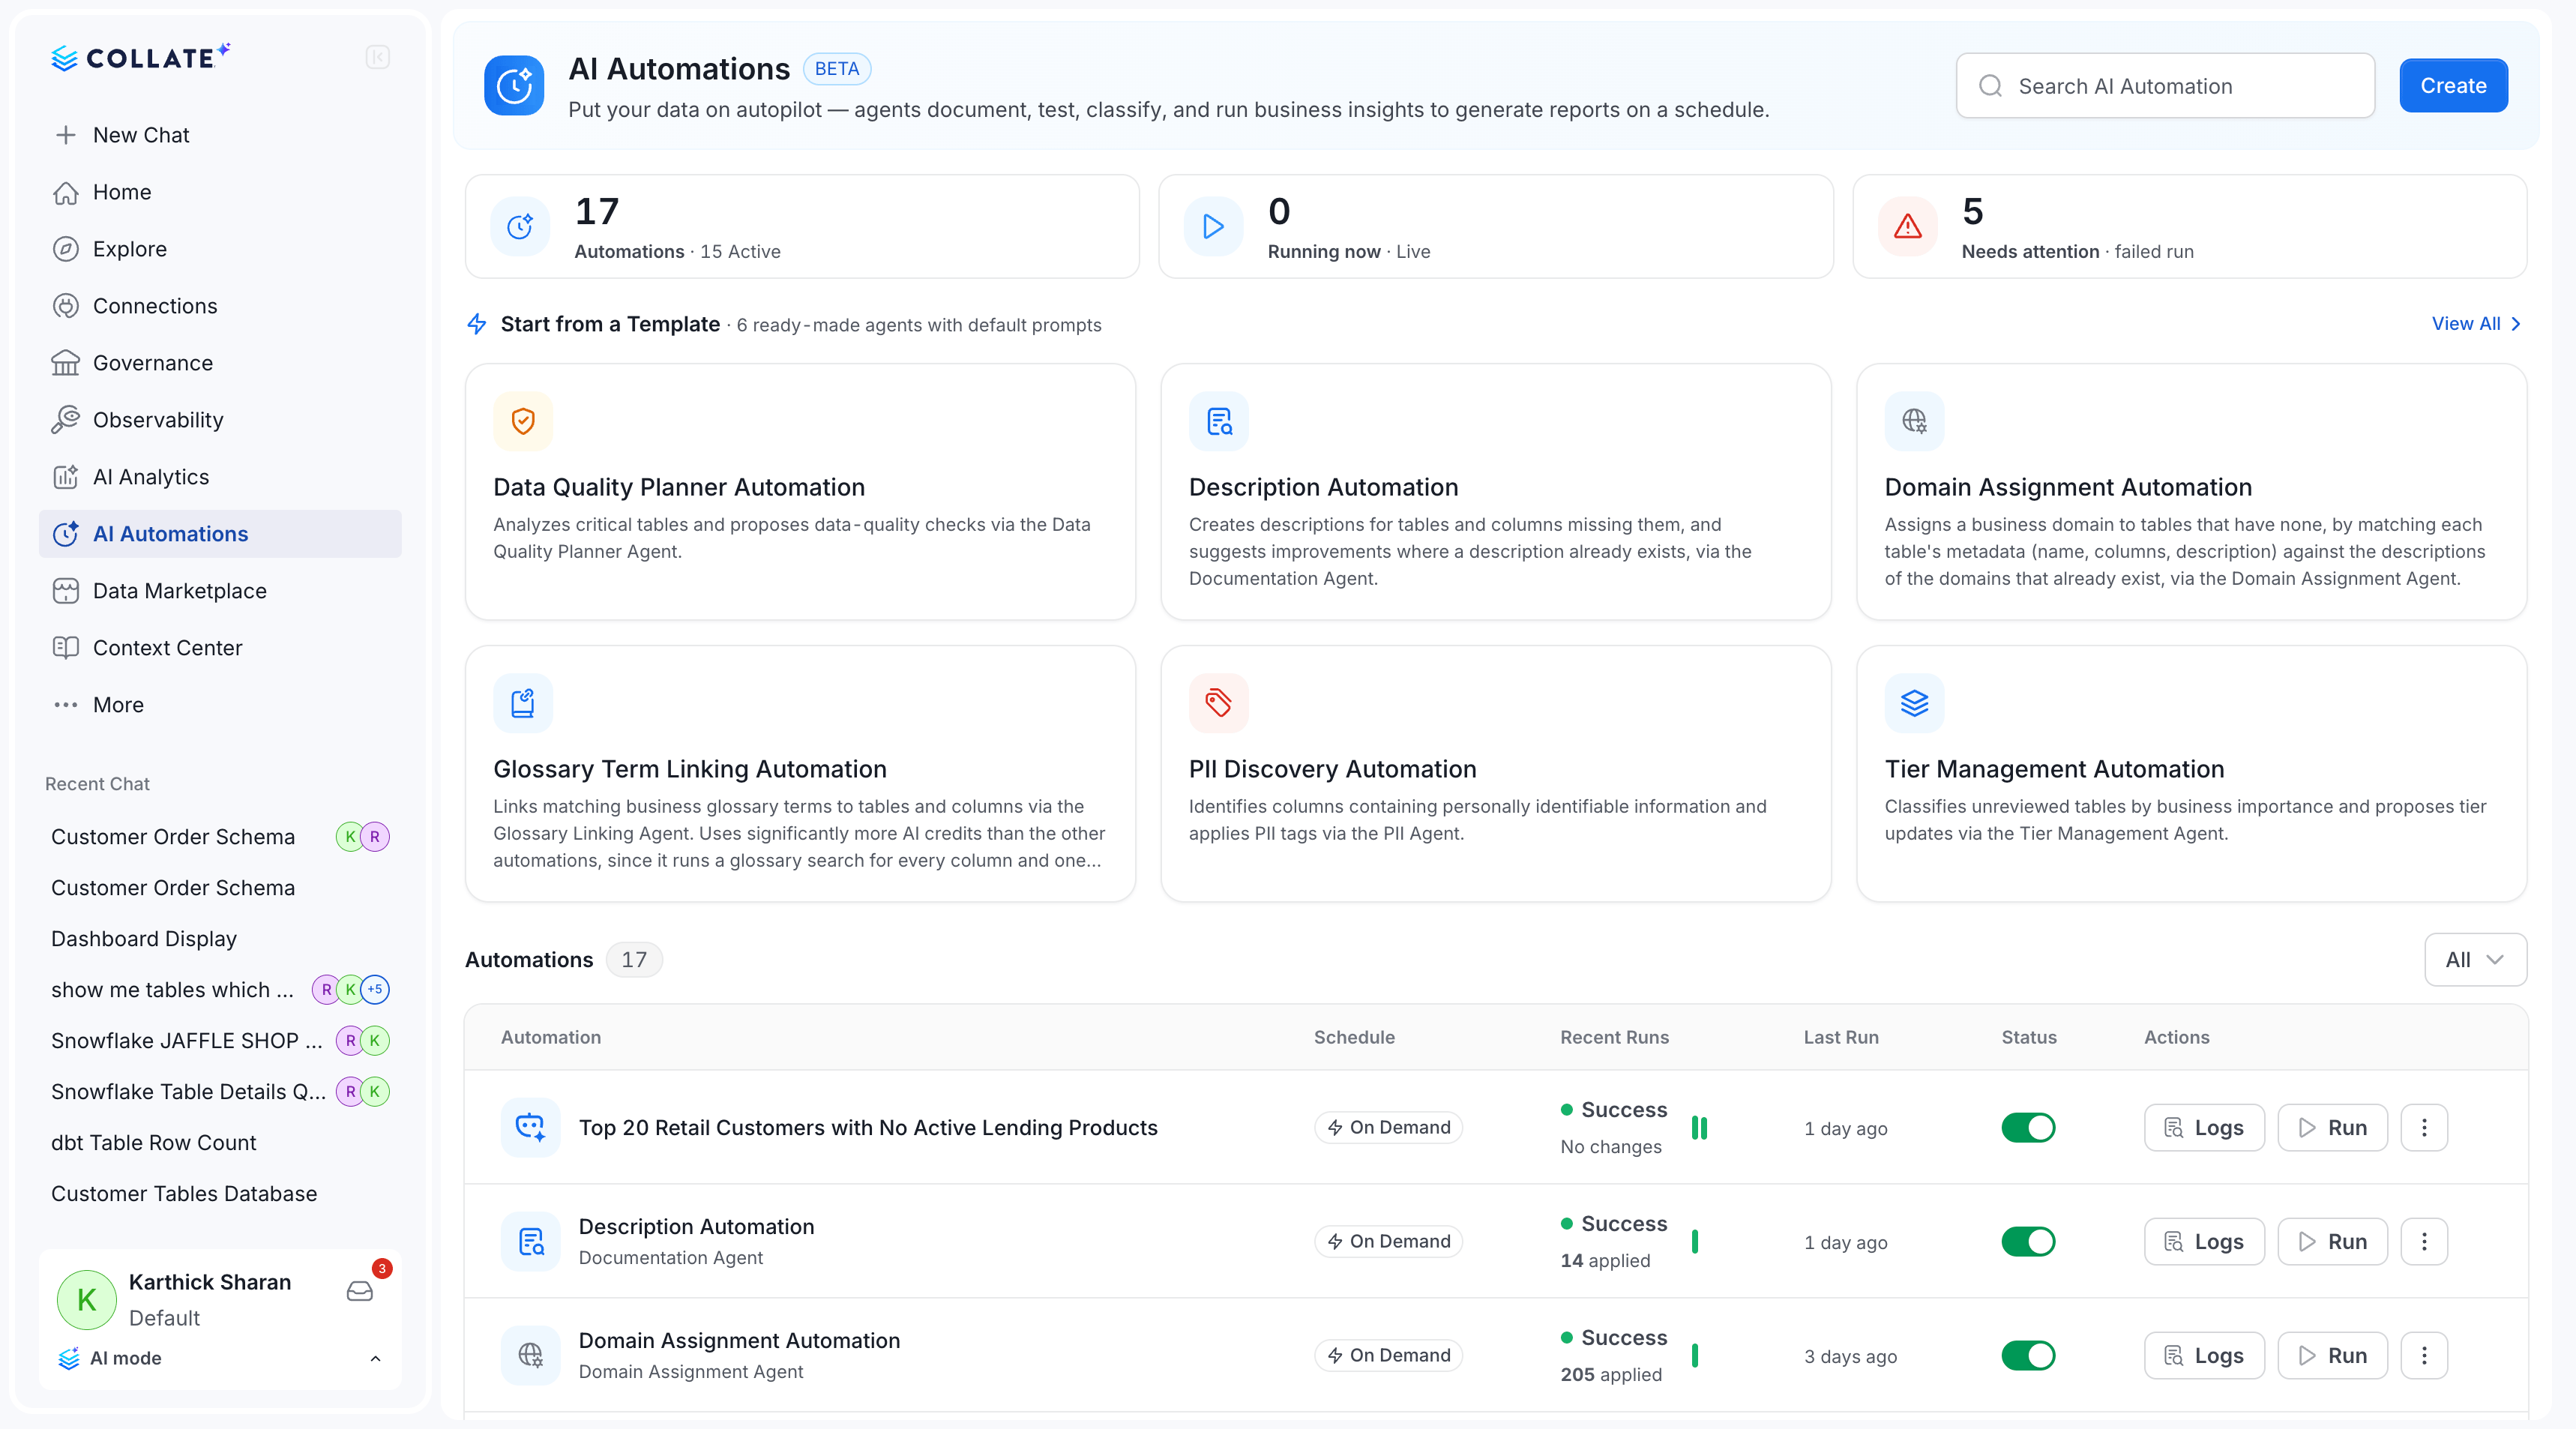
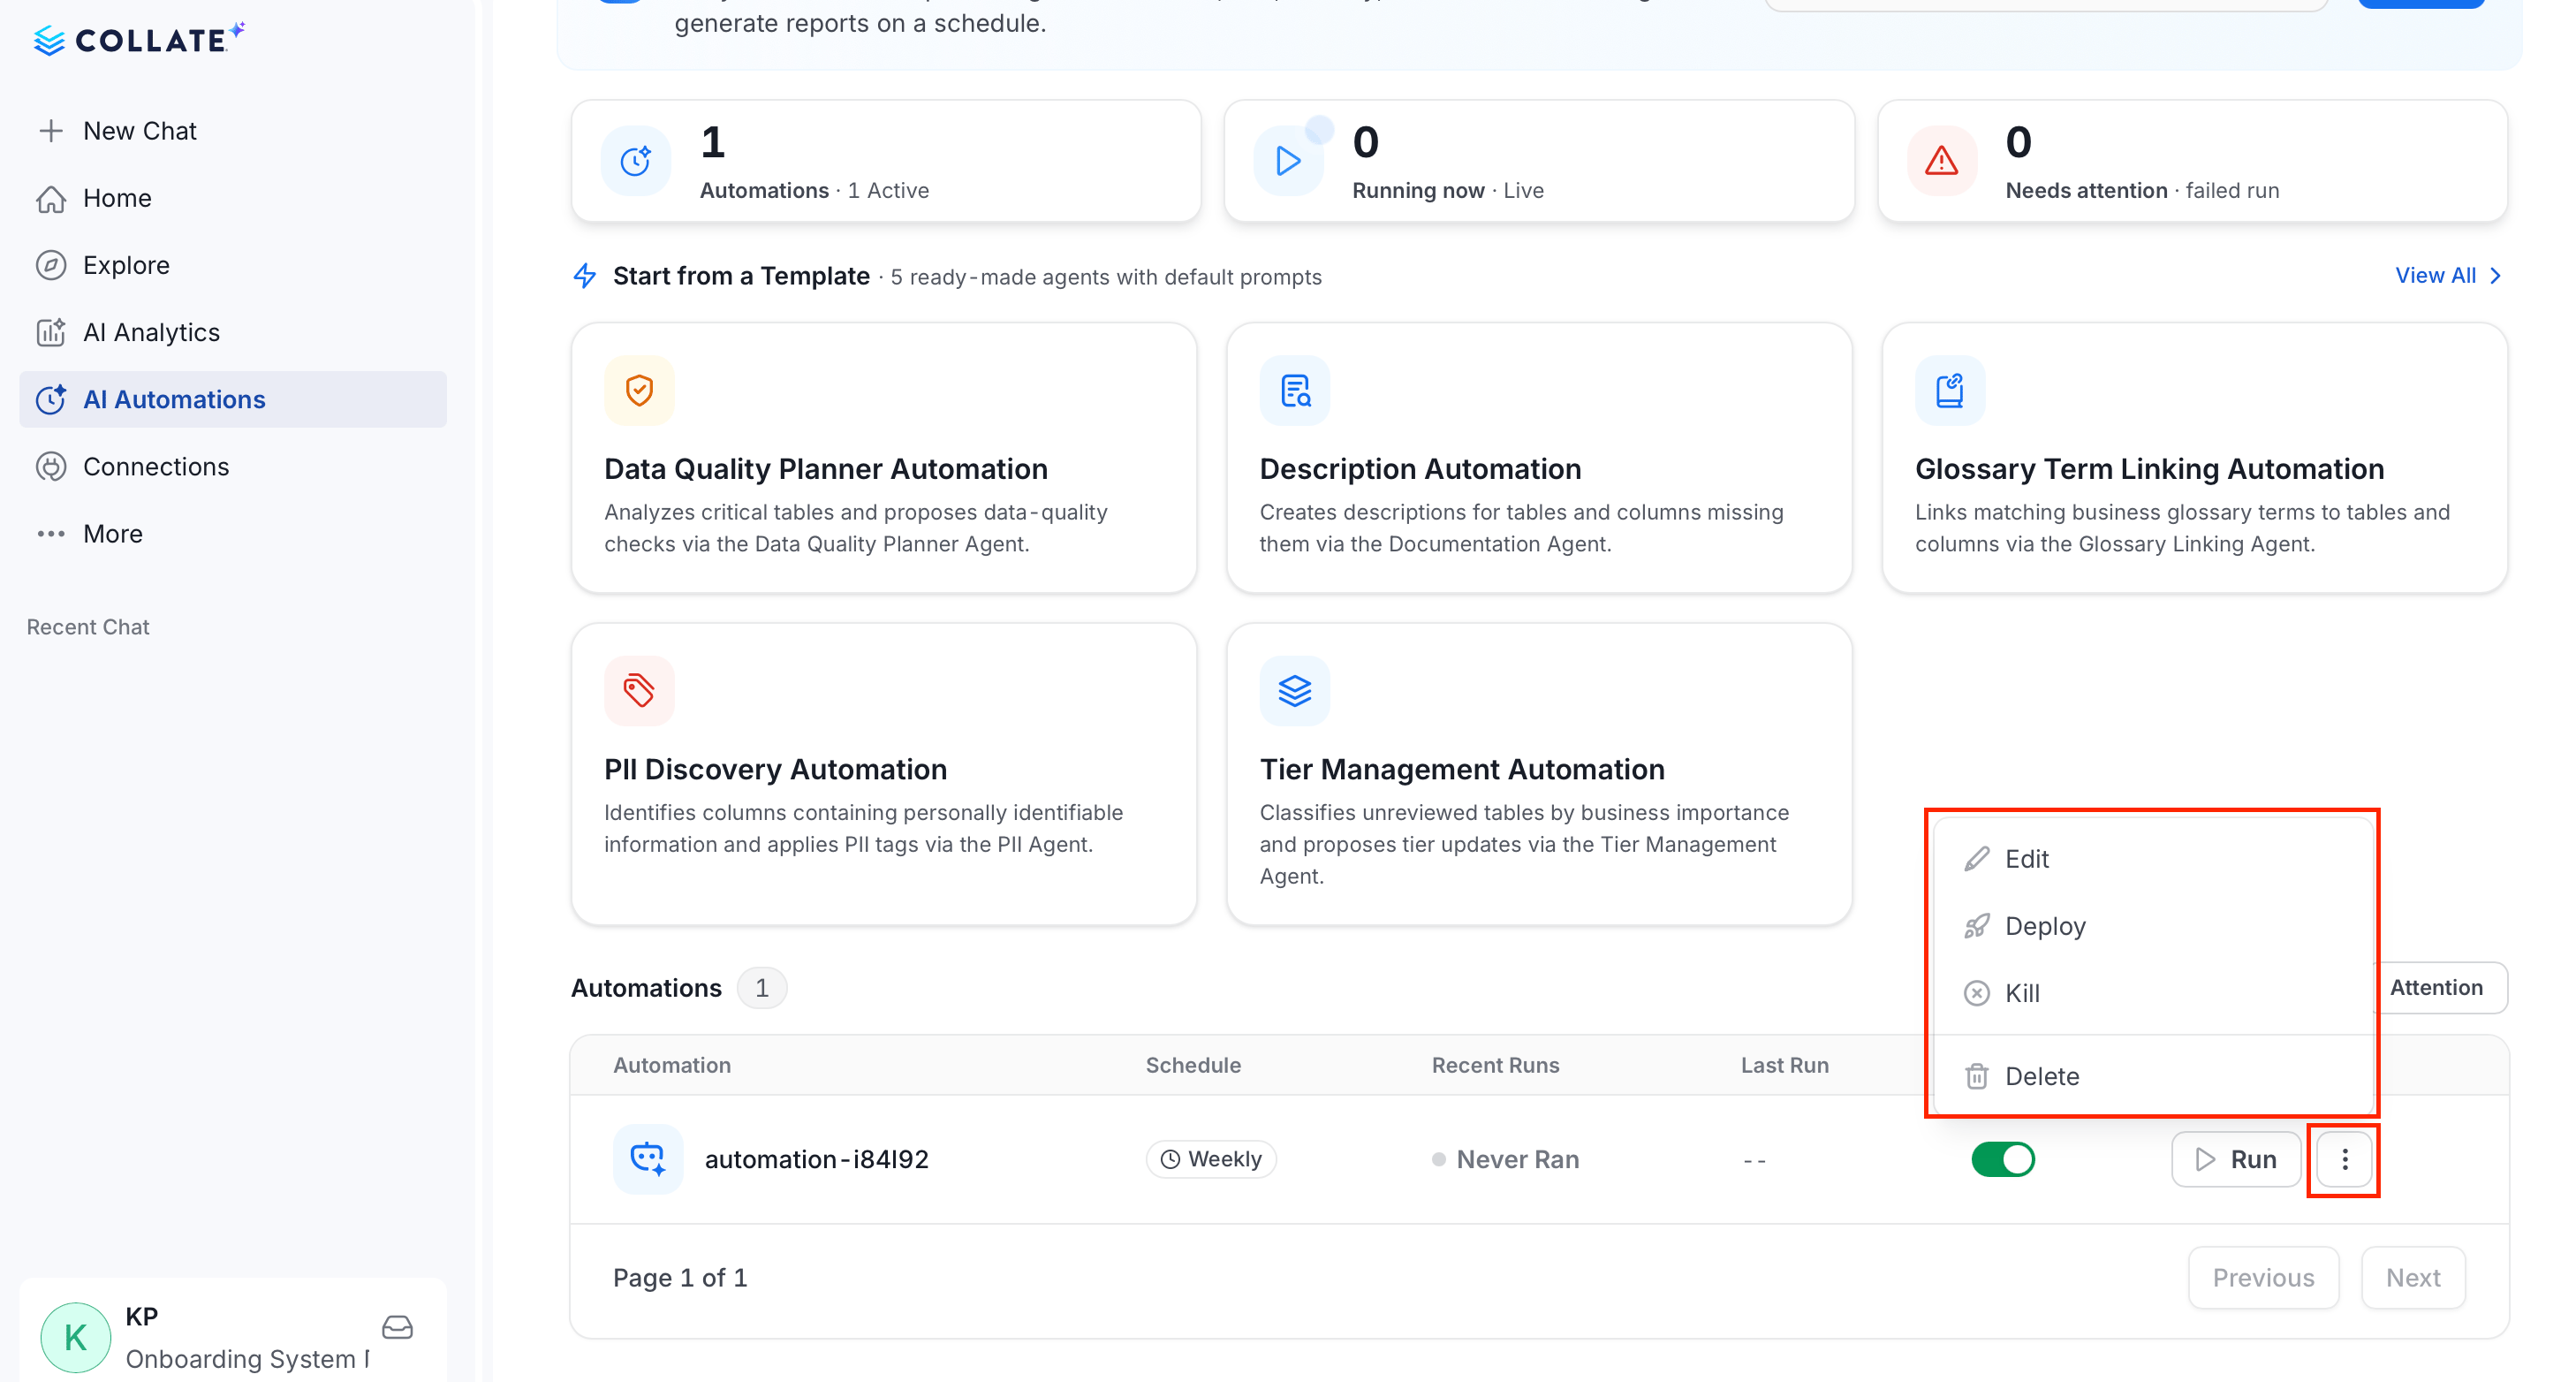
After a AI Automation is created, it appears in the AI Automations landing page. The Automation tables shows the following details:- Summary cards: total automations and how many are active, how many are running now, and how many need attention after a failed run.
- Automations table, filterable by All, Active, or Attention, with columns for the automation name, schedule, recent runs, last run time, an on/off status toggle, and actions.
- Run: trigger the automation once immediately, without waiting for its schedule.
-
Manage automations: Click the ⋮ menu on a row for further actions:
- Edit: Reopen the wizard to change the automation’s configuration or schedule.
- Deploy: Push the automation’s schedule to the pipeline runner. Automations deploy automatically after you create or save them, so this step usually isn’t necessary. Use it to manually redeploy if an automatic deployment fails.
- Kill: Stop a run that’s currently in progress.
- Delete: Permanently remove the automation.
Reading What a Run Found
Ask Collate AI in chat what an automation’s run produced. For example, ask “What did the Description Automation find in its last run?” Collate AI resolves the automation, reads the messages from that run’s conversation, and reports them back. This comes from the run’s conversation rather than its logs, so it can also explain the reasoning behind decisions such as tier assignments. Name a specific run, or leave it out to get the most recent one. Anyone who can view the automation can read what its runs produced, the same permission as viewing it. There’s no separate permission for this.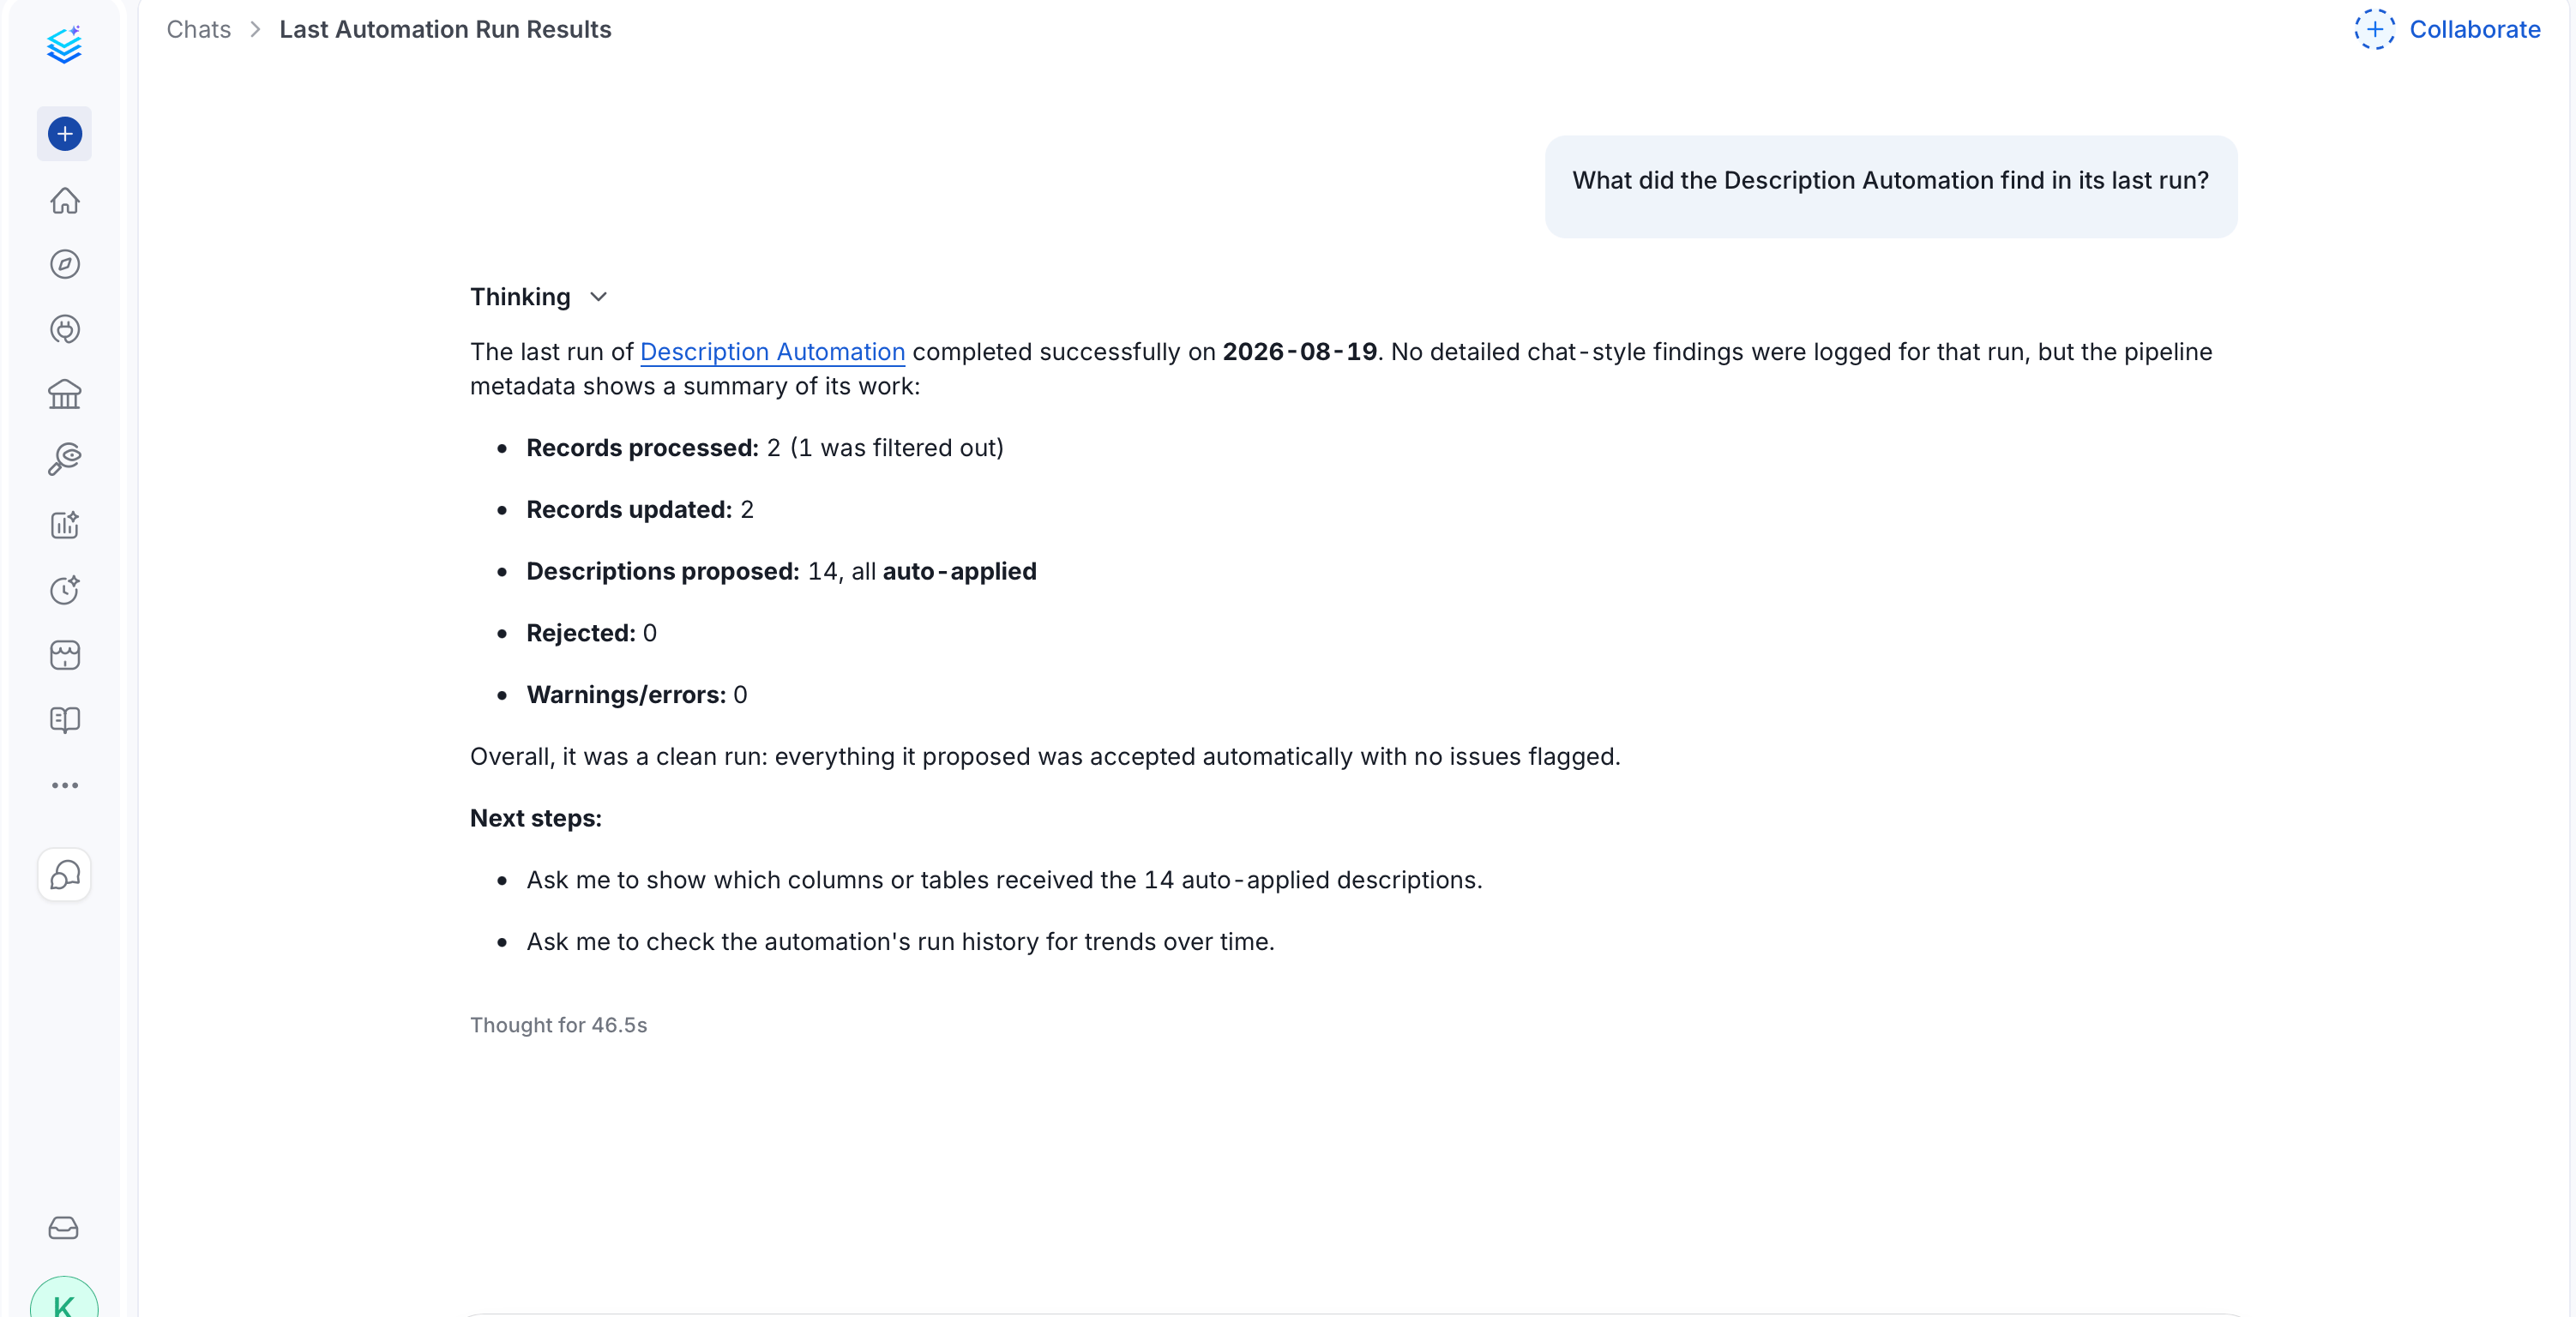
Note: Findings are only available for runs that happened after this capability shipped. A run from before then returns nothing, not an error, because it never recorded a conversation to read from.
Permissions
Only users with the right permissions on the AI Automation resource can manage automations:
Administrators have full access by default. Built-in templates are read-only for everyone, including administrators—start from a template to create your own editable copy instead of modifying the template directly.