Documentation Index
Fetch the complete documentation index at: https://docs.getcollate.io/llms.txt
Use this file to discover all available pages before exploring further.
Hybrid Ingestion Runner
The Hybrid Ingestion Runner is a component designed to enable Collate customers operating in hybrid environments to securely execute ingestion workflows within their own cloud infrastructure. In this setup, your SaaS instance is hosted on Collate’s cloud, while the workflows are going to deployed and executed within your private cloud. The Hybrid Runner acts as a bridge between these two environments, allowing ingestion workflows to be triggered and managed remotely-without requiring the customer to share secrets or sensitive credentials with Collate. It securely receives workflow execution requests and orchestrates them locally, maintaining full control and data privacy within the customer’s environment.Prerequisites
Before setting up the Hybrid Ingestion Runner, ensure the following:- Hybrid Runner has been setup. Contact the Collate team for assistance with setting up the Hybrid Runner in your infrastructure.
- Secrets manager configured on your cloud.
Configuration Steps for Admins
Once your DevOps team has installed and configured the Hybrid Runner, follow these steps as a Collate Admin to configure services and manage ingestion workflows.1. Validate Hybrid Runner Setup
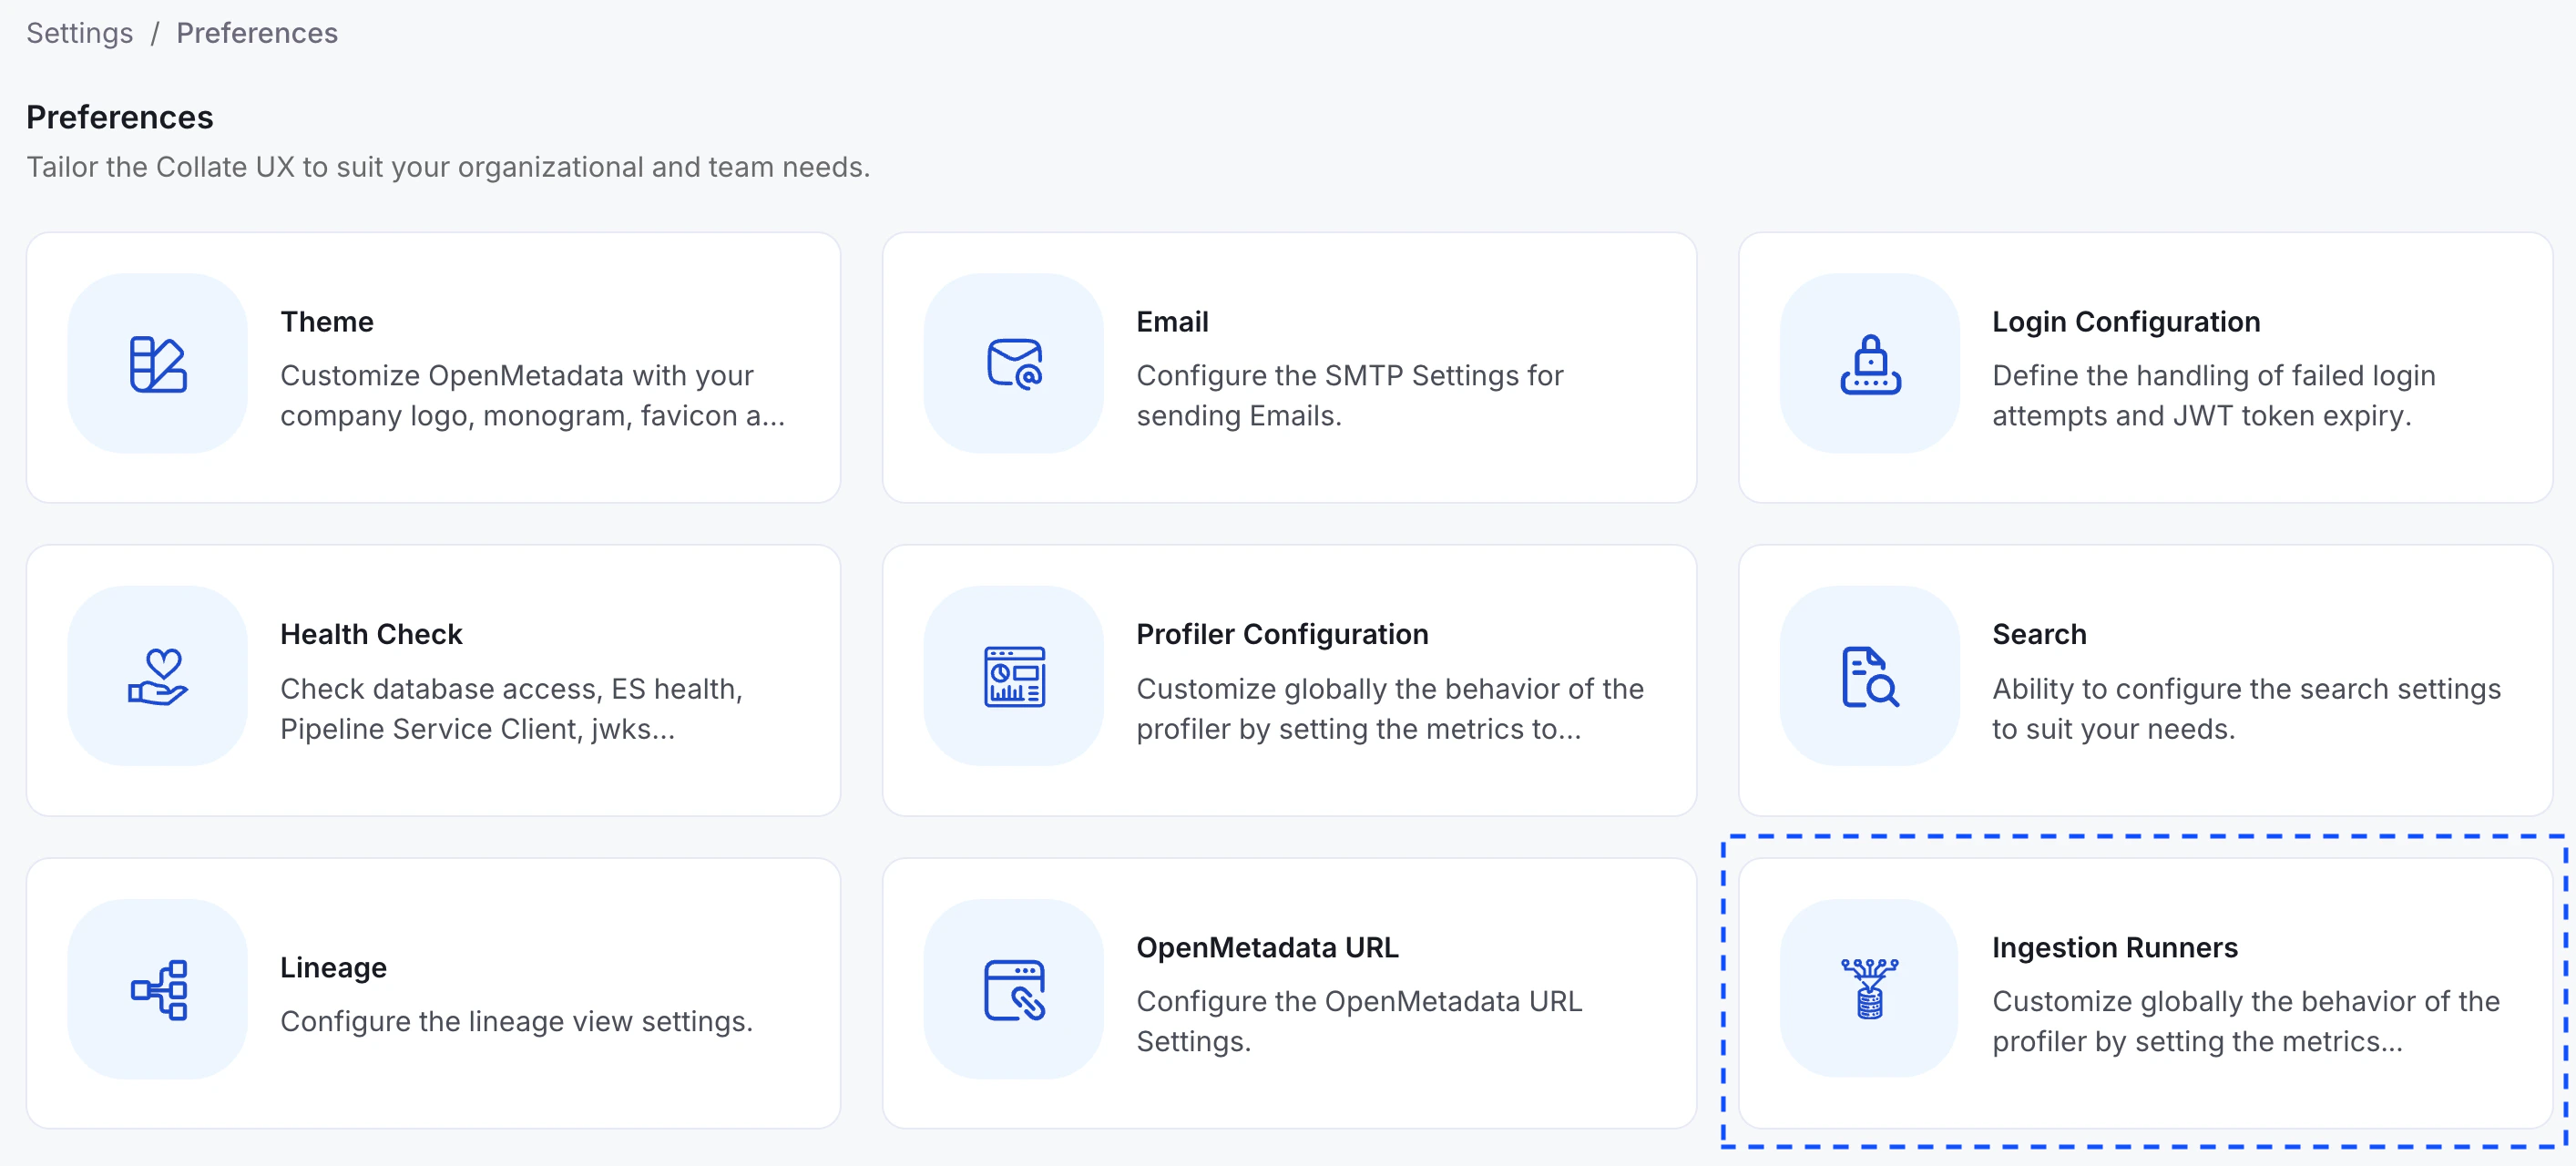
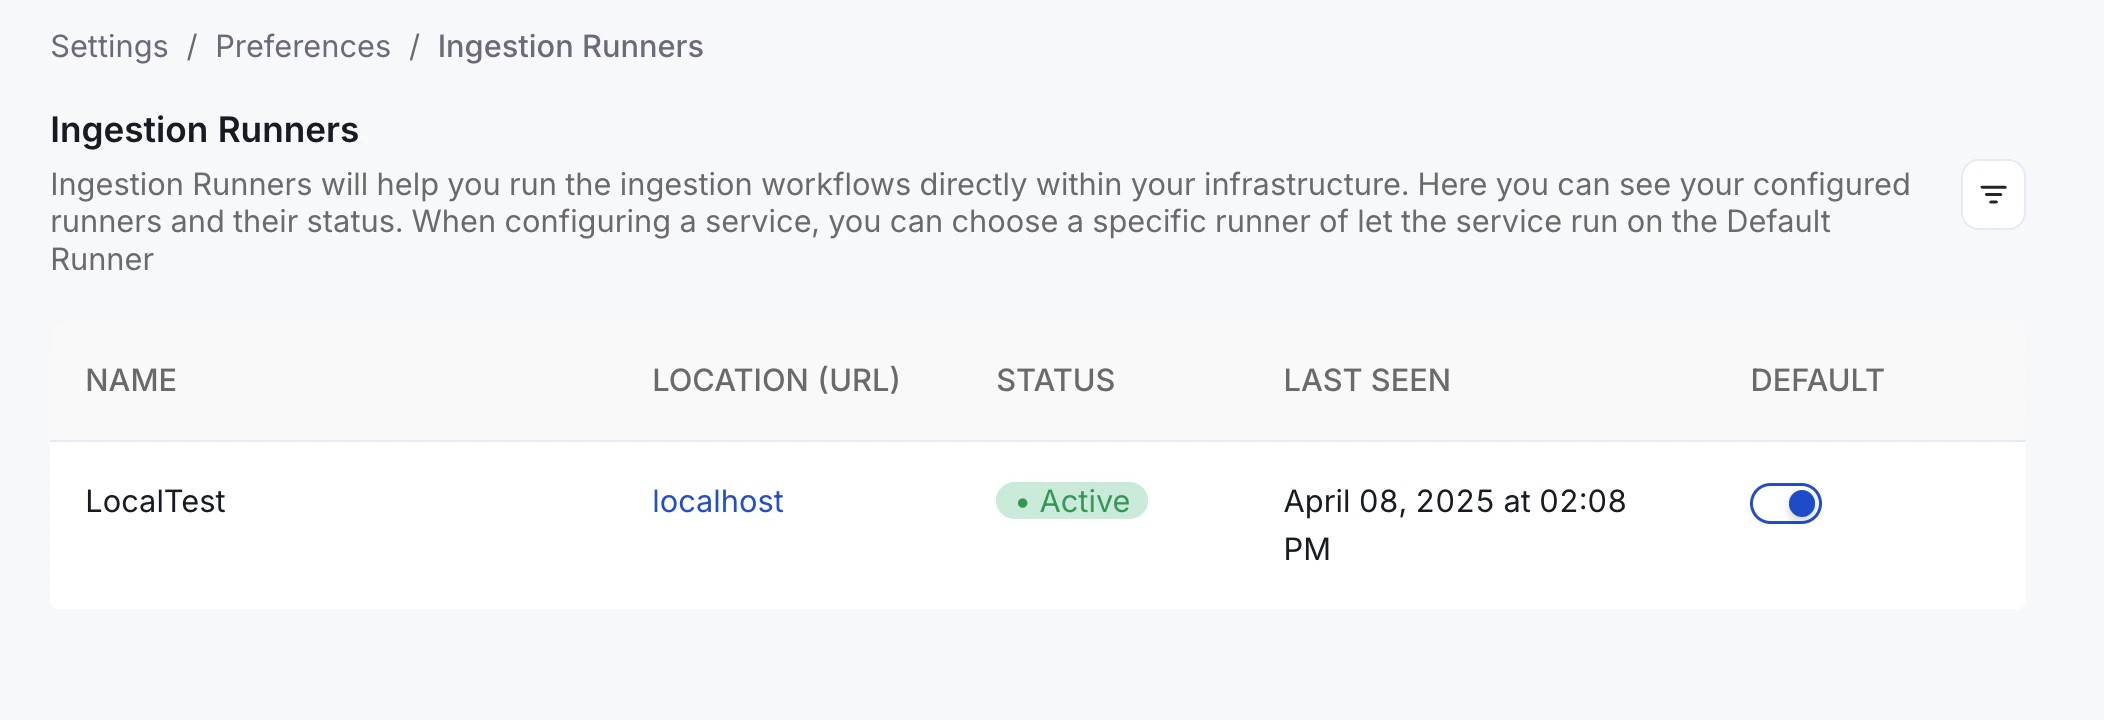
- Go to Settings > Preferences > Ingestion Runners in the Collate UI.
- Look for your runner in the list.
- The status should display as Connected.
If the runner is not connected, reach out to Collate support.
2. Create a New Service
- Navigate to Settings > Services.
- Click + Add New Service.
- Fill in the service details.
- In the “Ingestion Runner” dropdown, choose the hybrid runner.
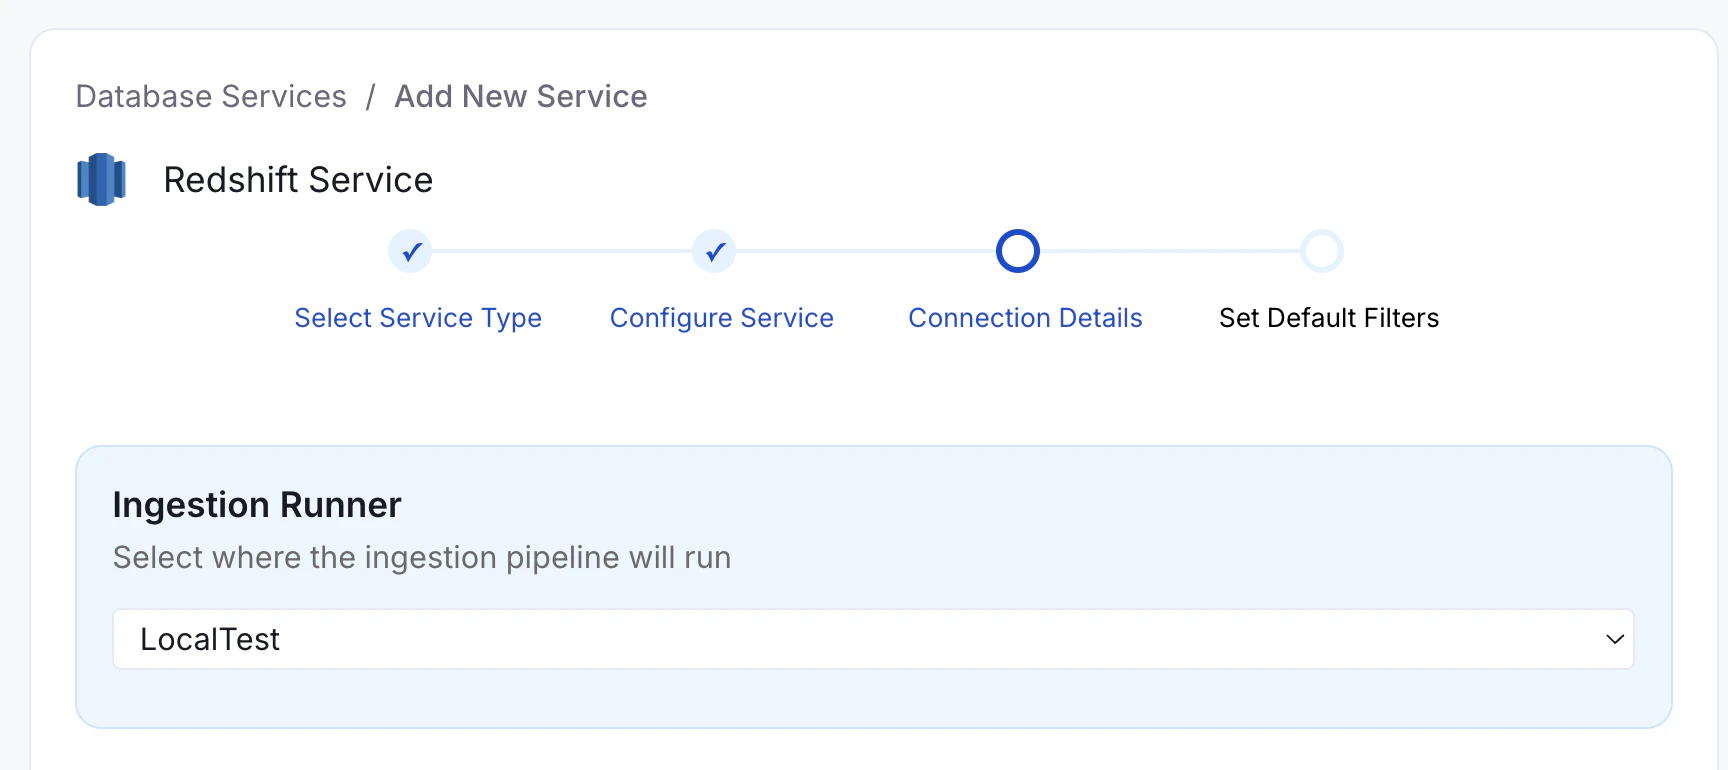
Even if you’re operating in hybrid mode, you can still choose “Collate SaaS Runner” to run the ingestion workflow within Collate’s SaaS environment.
3. Manage Secrets Securely
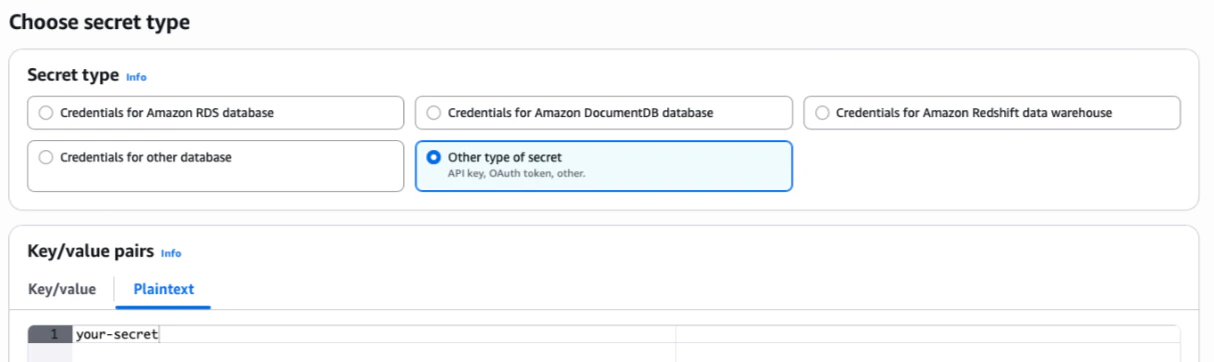
When executing workflows on your Hybrid environment, you have to use your existing cloud provider’s Secrets Manager to store sensitive credentials (like passwords or token), and reference them securely in Collate via the Hybrid Runner. Collate never stores or accesses these secrets directly-only the Hybrid Runner retrieves them at runtime from your own infrastructure. Steps:- Create your secret in your Secrets Manager of choice:
- AWS Secrets Manager
- Azure Key Vault
- GCP Secret Manager
password123) without any additional formatting or encoding. The Hybrid Runner will handle the retrieval and decryption of the secret value at runtime.
For example, in AWS Secrets Manager, you can click on Store a new secret > Other type of secret > Plaintext. You need to paste the secret as-is, without any other formatting (such as quotes, JSON, etc.).
secret: prefix followed by the full path to your secret.
📌 For example, in AWS Secrets Manager, if your secret is stored at: /my/database/password, you would reference it in the service connection form as:
Helm Deployment
The Hybrid Runner is deployed using a Helm chart that handles the installation of the Hybrid Runner Server, Argo Workflows, and all supporting components.Prerequisites
- Kubernetes cluster running version 1.28 or later
- Helm and kubectl installed
- AWS credentials provided by Collate (for pulling Docker images from ECR)
Minimal Configuration
Create avalues.yaml with the following minimal configuration:
If you’re unsure about any values, reach out to your Collate support contact for credentials and configuration details.
Getting the Authentication Token
Log in to your Collate instance using an administrator account, navigate toSettings > Bots and search for ingestion. Click on IngestionBot and copy the OpenMetadata JWT Token.
Deploy
Configuring Node Scheduling for Ingestion Pods
Ingestion pods run as independent Kubernetes pods. If your cluster uses node taints to isolate workloads, you must configure tolerations and node affinity so that ingestion pods can be scheduled on the correct nodes. The configuration differs depending on your executor type. Use the section that matches your setup:- Argo Workflows executor (Hybrid Runner with Argo): use
ARGO_PIPELINE_TYPE_CONFIGS - Simple Kubernetes executor (default, Hybrid Runner without Argo): use
SIMPLEK8S_PIPELINE_TYPE_CONFIGS
automation, metadata, profiler, lineage.
Argo Workflows Executor
Add the following to yourvalues.yaml:
Replace
nodetype and openmetadata-hybrid-runner with the taint key and value used in your cluster. You can check your node taints by running:Simple Kubernetes Executor
If you are using the default Simple K8s executor (no Argo Workflows), configure the equivalent usingSIMPLEK8S_PIPELINE_TYPE_CONFIGS:
Supported Configuration Fields per Pipeline Type
Each pipeline type entry (automation, metadata, profiler, lineage) supports the following fields:
| Field | Description |
|---|---|
tolerations | List of Kubernetes toleration objects to allow scheduling on tainted nodes |
affinity | Node/pod affinity rules (supports nodeAffinity, podAffinity, podAntiAffinity) |
nodeSelector | Key-value labels to target specific nodes |
priorityClassName | Kubernetes priority class for the pod |
resources | CPU and memory requests and limits |
Additional Settings
Hosting Your Own Docker Images
If you need to use your own Docker registry instead of Collate’s ECR, update the following Helm values. For the Hybrid Runner pod:If you host your own images, make sure to do so for both the Hybrid Runner and Ingestion pods.
1.11.1 → image tag om-1.11.1-cl-1.11.1). If you manage your own tags, disable this behavior:
Configuring Cloud Secret Stores
AWS (EKS Pod Identity or IRSA)
Configure Pod Identity via EKS Pod Identity or IRSA to assume an IAM role. TheserviceAccount name is ingestion by default.
Required IAM permissions:
secretsmanager:GetSecretValuesecretsmanager:DescribeSecretsecretsmanager:ListSecrets
values.yaml:
Azure (Workload Identity)
Configure Workload Identity with a User Assigned Managed Identity. Required role: Key Vault Secrets Officer.Metrics Exposure for Prometheus
The Collate hybrid agent exposes operational metrics in a Prometheus-compatible format via an HTTP endpoint. These metrics are designed to support observability, enabling integration with Prometheus and similar monitoring systems. The exposed metrics provide insight into agent state, activity, and performance. These may evolve over time, and users are encouraged to inspect the /metrics endpoint directly for the latest set of available metrics.Example
An example metric exposed by the agent:Configuration
Metrics exposure can be configured via the following settings:- port: Port on which the metrics endpoint will be served (default: 8989)
- path: HTTP path for accessing metrics (default: /metrics)