In this section, we provide guides and references to use the MySQL connector.
Configure and schedule MySQL metadata and profiler workflows from the Collate UI:
- Requirements
- Metadata Ingestion
- Data Profiler
- Data Quality
- dbt Integration
- Enable Security
- Data Lineage
- Troubleshooting
- Reverse Metadata
Requirements
Metadata
Note that We support MySQL (version 8.0.42 or greater) and the user should have access to theINFORMATION_SCHEMA table. By default a user can see only the rows in the INFORMATION_SCHEMA that correspond to objects for which the user has the proper access privileges.
Aurora MySQL IAM Authentication
- Connect as an admin user with password authentication and create (or validate) the IAM DB user:
- Grant minimum metadata permissions and verify:
- Attach the IAM policy to the AWS principal used by ingestion:
- Policy action must include
rds-db:connect. - Resource must be exactly:
arn:aws:rds-db:<aws_region>:<aws_account_number>:dbuser:<rds_db_resource_id>/openmetadata_iam - If ingestion runs on EC2/ECS/EKS, attach the policy to that runtime role.
- If ingestion runs locally, attach the policy to the IAM user/profile generating auth tokens.
- Validate IAM login from the same host that runs ingestion:
Lineage & Usage
To extract lineage & usage you need to enable the query logging in mysql and the user used in the connection needs to have select access to themysql.general_log.
Log Table Management
Themysql.general_log table grows continuously as it stores query logs. This can consume significant storage space over time and affect the execution time of lineage and usage procedures.
- Note: We recommend cleaning up log tables only after successful execution of Usage & Lineage workflows to ensure no loss of query data during extraction. Once cleanup occurs, the query history is lost. Here are some important considerations and best practices:
Create Manual Schedule to rotate logs
When you rotate log tables manually, the current log table is copied to a backup log table and the entries in the current log table are removed. If the backup log table already exists, then it is deleted before the current log table is copied to the backup. You can query the backup log table if needed. The backup log table for themysql.general_log table is named mysql.general_log_backup.
The backup log table for the mysql.slow_log table is named mysql.slow_log_backup
Create Automatic Event to clear older logs
You can also create automatic event like showed below which runs every week to clear older logs.mysql.general_log table manually by calling the mysql.rds_rotate_general_log procedure. You can rotate the mysql.slow_log table by calling the mysql.rds_rotate_slow_log procedure.
You can also check below docs about more info on logs & its rotation methods.
- Rotating mysql query logs
- RDS for MySQL database logs
- Aurora for MySQL database logs Best Practices:
- Monitor log table size regularly
- Implement a log rotation schedule
- Consider automating log cleanup after DAG execution
- Keep logging enabled only when needed for lineage extraction
Profiler & Data Quality
Executing the profiler workflow or data quality tests, will require the user to haveSELECT permission on the tables/schemas where the profiler/tests will be executed. More information on the profiler workflow setup can be found here and data quality tests here.
Metadata Ingestion
Connection Details
Connection Details
- Username: Specify the User to connect to MySQL. It should have enough privileges to read all the metadata.
-
Auth Type: Basic Auth or IAM based auth to connect to instances / cloud rds.
-
Basic Auth:
- Password: Password to connect to MySQL.
-
IAM Based Auth:
- AWS Access Key ID & AWS Secret Access Key: When you interact with AWS, you specify your AWS security credentials to verify who you are and whether you have
permission to access the resources that you are requesting. AWS uses the security credentials to authenticate and
authorize your requests (docs).
Access keys consist of two parts: An access key ID (for example,
AKIAIOSFODNN7EXAMPLE), and a secret access key (for example,wJalrXUtnFEMI/K7MDENG/bPxRfiCYEXAMPLEKEY). You must use both the access key ID and secret access key together to authenticate your requests. You can find further information on how to manage your access keys here. - AWS Region: Each AWS Region is a separate geographic area in which AWS clusters data centers (docs). As AWS can have instances in multiple regions, we need to know the region the service you want reach belongs to. Note that the AWS Region is the only required parameter when configuring a connection. When connecting to the services programmatically, there are different ways in which we can extract and use the rest of AWS configurations. You can find further information about configuring your credentials here.
- AWS Session Token (optional): If you are using temporary credentials to access your services, you will need to inform the AWS Access Key ID and AWS Secrets Access Key. Also, these will include an AWS Session Token. You can find more information on Using temporary credentials with AWS resources.
- Endpoint URL (optional): To connect programmatically to an AWS service, you use an endpoint. An endpoint is the URL of the entry point for an AWS web service. The AWS SDKs and the AWS Command Line Interface (AWS CLI) automatically use the default endpoint for each service in an AWS Region. But you can specify an alternate endpoint for your API requests. Find more information on AWS service endpoints.
- Profile Name: A named profile is a collection of settings and credentials that you can apply to a AWS CLI command.
When you specify a profile to run a command, the settings and credentials are used to run that command.
Multiple named profiles can be stored in the config and credentials files.
You can inform this field if you’d like to use a profile other than
default. Find here more information about Named profiles for the AWS CLI. - Assume Role Arn: Typically, you use
AssumeRolewithin your account or for cross-account access. In this field you’ll set theARN(Amazon Resource Name) of the policy of the other account. A user who wants to access a role in a different account must also have permissions that are delegated from the account administrator. The administrator must attach a policy that allows the user to callAssumeRolefor theARNof the role in the other account. This is a required field if you’d like toAssumeRole. Find more information on AssumeRole.
- Assume Role Session Name: An identifier for the assumed role session. Use the role session name to uniquely identify a session when the same role
is assumed by different principals or for different reasons.
By default, we’ll use the name
OpenMetadataSession. Find more information about the Role Session Name. - Assume Role Source Identity: The source identity specified by the principal that is calling the
AssumeRoleoperation. You can use source identity information in AWS CloudTrail logs to determine who took actions with a role. Find more information about Source Identity.
- AWS Access Key ID & AWS Secret Access Key: When you interact with AWS, you specify your AWS security credentials to verify who you are and whether you have
permission to access the resources that you are requesting. AWS uses the security credentials to authenticate and
authorize your requests (docs).
Access keys consist of two parts: An access key ID (for example,
-
Basic Auth:
-
IAM Policy Requirement: The principal used by ingestion must have
rds-db:connectpermission with the exact DB user resource ARN:arn:aws:rds-db:<aws_region>:<aws_account_number>:dbuser:<rds_db_resource_id>/openmetadata_iam. -
Credentials Source:
- If ingestion runs on EC2/ECS/EKS, prefer runtime role credentials.
- If ingestion runs locally, configure IAM user/profile credentials.
- You can also provide AWS Access Key ID + AWS Secret Access Key + optional AWS Session Token.
- If needed, use Assume Role (Assume Role Arn, Assume Role Session Name, optional Source Identity).
-
Host and Port: Use the Aurora cluster endpoint and port
3306that ingestion will use. - databaseName: Optional name to give to the database in OpenMetadata. If left blank, we will use default as the database name.
- databaseSchema: databaseSchema of the data source. This is optional parameter, if you would like to restrict the metadata reading to a single databaseSchema. When left blank, OpenMetadata Ingestion attempts to scan all the databaseSchema.
-
caCertificate: Provide the CA bundle path used by ingestion runtime (for example,
global-bundle.pem). - sslCertificate: Provide the path to ssl client certificate file (ssl_cert).
- sslKey: Provide the path to ssl client certificate file (ssl_key).
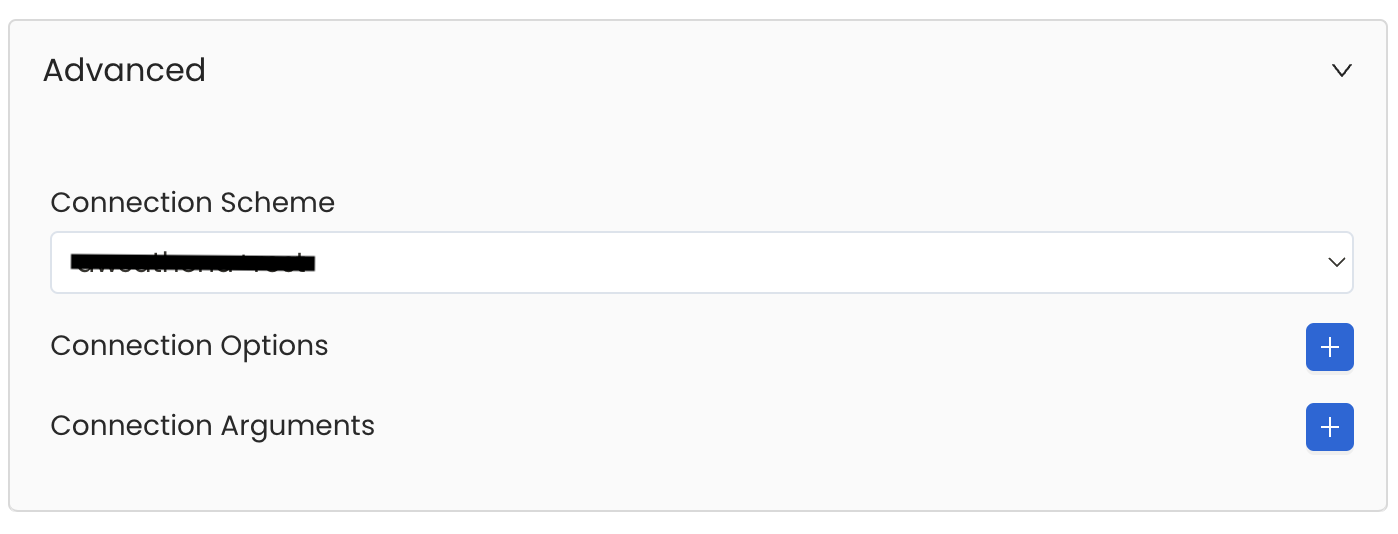
Advanced Configuration
Database Services have an Advanced Configuration section, where you can pass extra arguments to the connector
and, if needed, change the connection Scheme.This would only be required to handle advanced connectivity scenarios or customizations.
- Connection Options (Optional): Enter the details for any additional connection options that can be sent to database during the connection. These details must be added as Key-Value pairs.
-
Connection Arguments (Optional): Enter the details for any additional connection arguments such as security or protocol configs that can be sent during the connection. These details must be added as Key-Value pairs.
Test the Connection
Once the credentials have been added, click on Test Connection and Save the changes.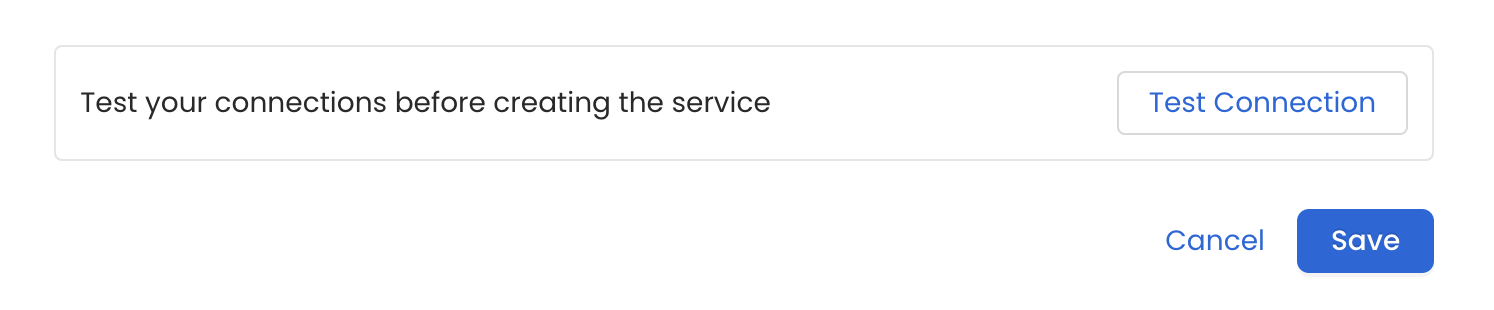
Configure Metadata Ingestion
In this step we will configure the metadata ingestion pipeline,
Please follow the instructions below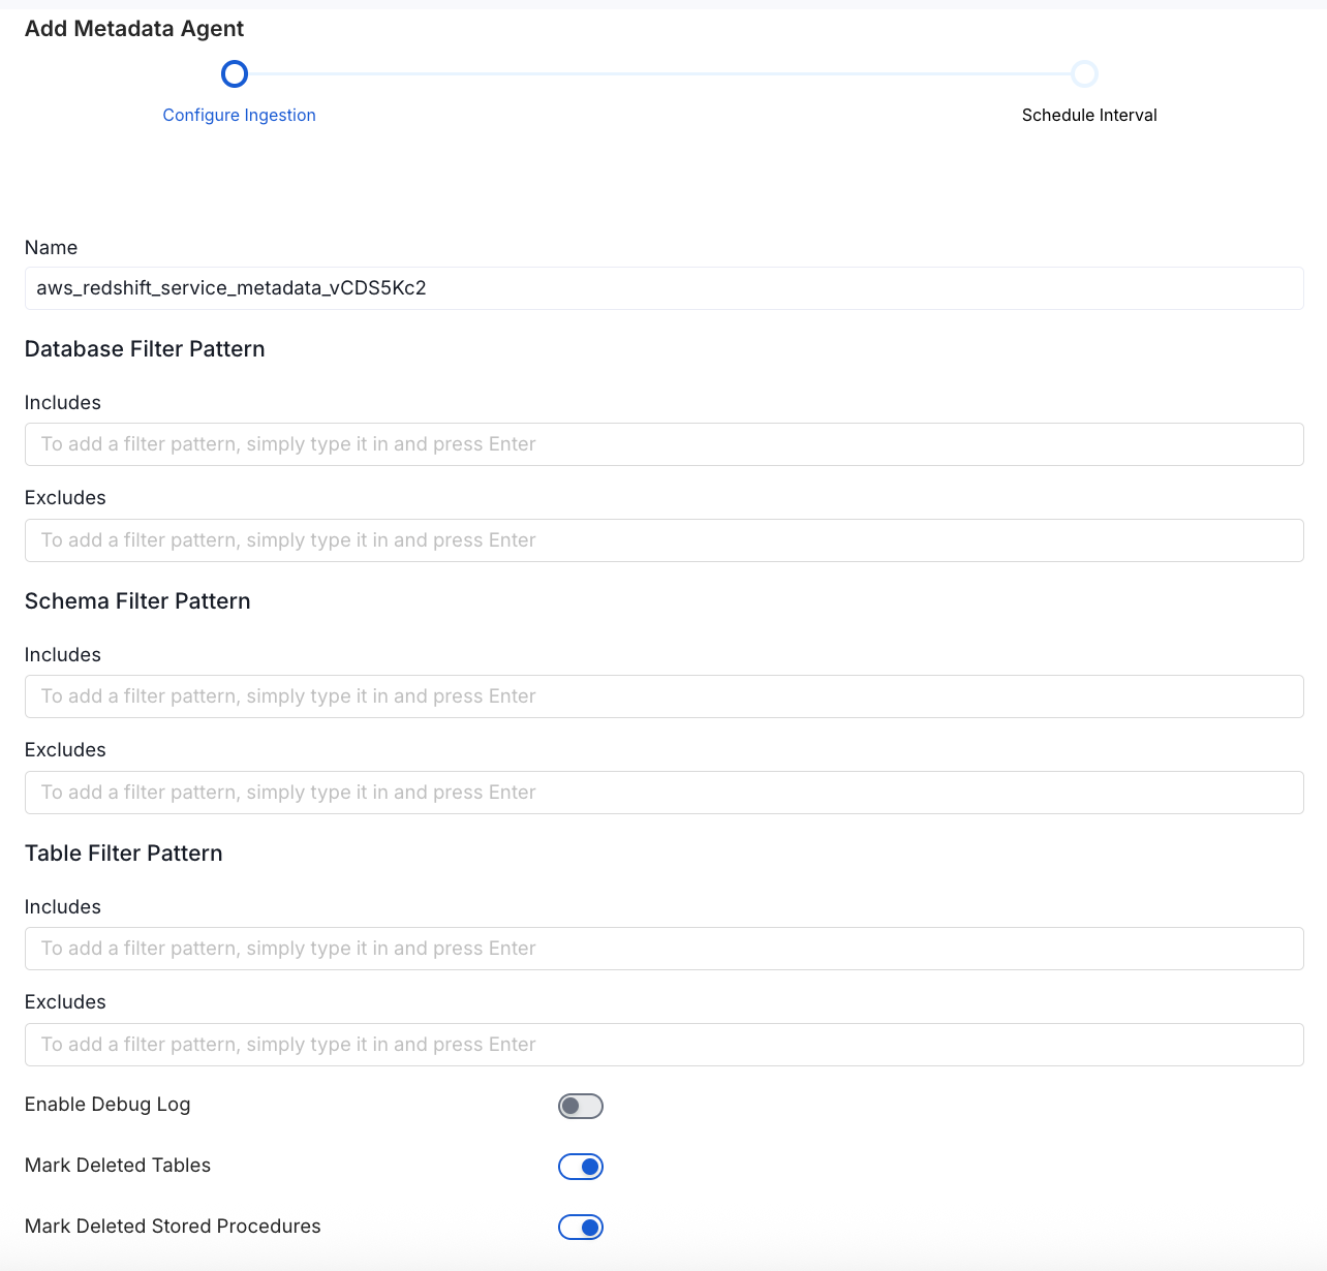
Metadata Ingestion Options
- Name: This field refers to the name of ingestion pipeline, you can customize the name or use the generated name.
-
Database Filter Pattern (Optional): Use to database filter patterns to control whether or not to include database as part of metadata ingestion.
- Include: Explicitly include databases by adding a list of comma-separated regular expressions to the Include field. OpenMetadata will include all databases with names matching one or more of the supplied regular expressions. All other databases will be excluded.
- Exclude: Explicitly exclude databases by adding a list of comma-separated regular expressions to the Exclude field. OpenMetadata will exclude all databases with names matching one or more of the supplied regular expressions. All other databases will be included.
-
Schema Filter Pattern (Optional): Use to schema filter patterns to control whether to include schemas as part of metadata ingestion.
- Include: Explicitly include schemas by adding a list of comma-separated regular expressions to the Include field. OpenMetadata will include all schemas with names matching one or more of the supplied regular expressions. All other schemas will be excluded.
- Exclude: Explicitly exclude schemas by adding a list of comma-separated regular expressions to the Exclude field. OpenMetadata will exclude all schemas with names matching one or more of the supplied regular expressions. All other schemas will be included.
-
Table Filter Pattern (Optional): Use to table filter patterns to control whether to include tables as part of metadata ingestion.
- Include: Explicitly include tables by adding a list of comma-separated regular expressions to the Include field. OpenMetadata will include all tables with names matching one or more of the supplied regular expressions. All other tables will be excluded.
- Exclude: Explicitly exclude tables by adding a list of comma-separated regular expressions to the Exclude field. OpenMetadata will exclude all tables with names matching one or more of the supplied regular expressions. All other tables will be included.
- Enable Debug Log (toggle): Set the Enable Debug Log toggle to set the default log level to debug.
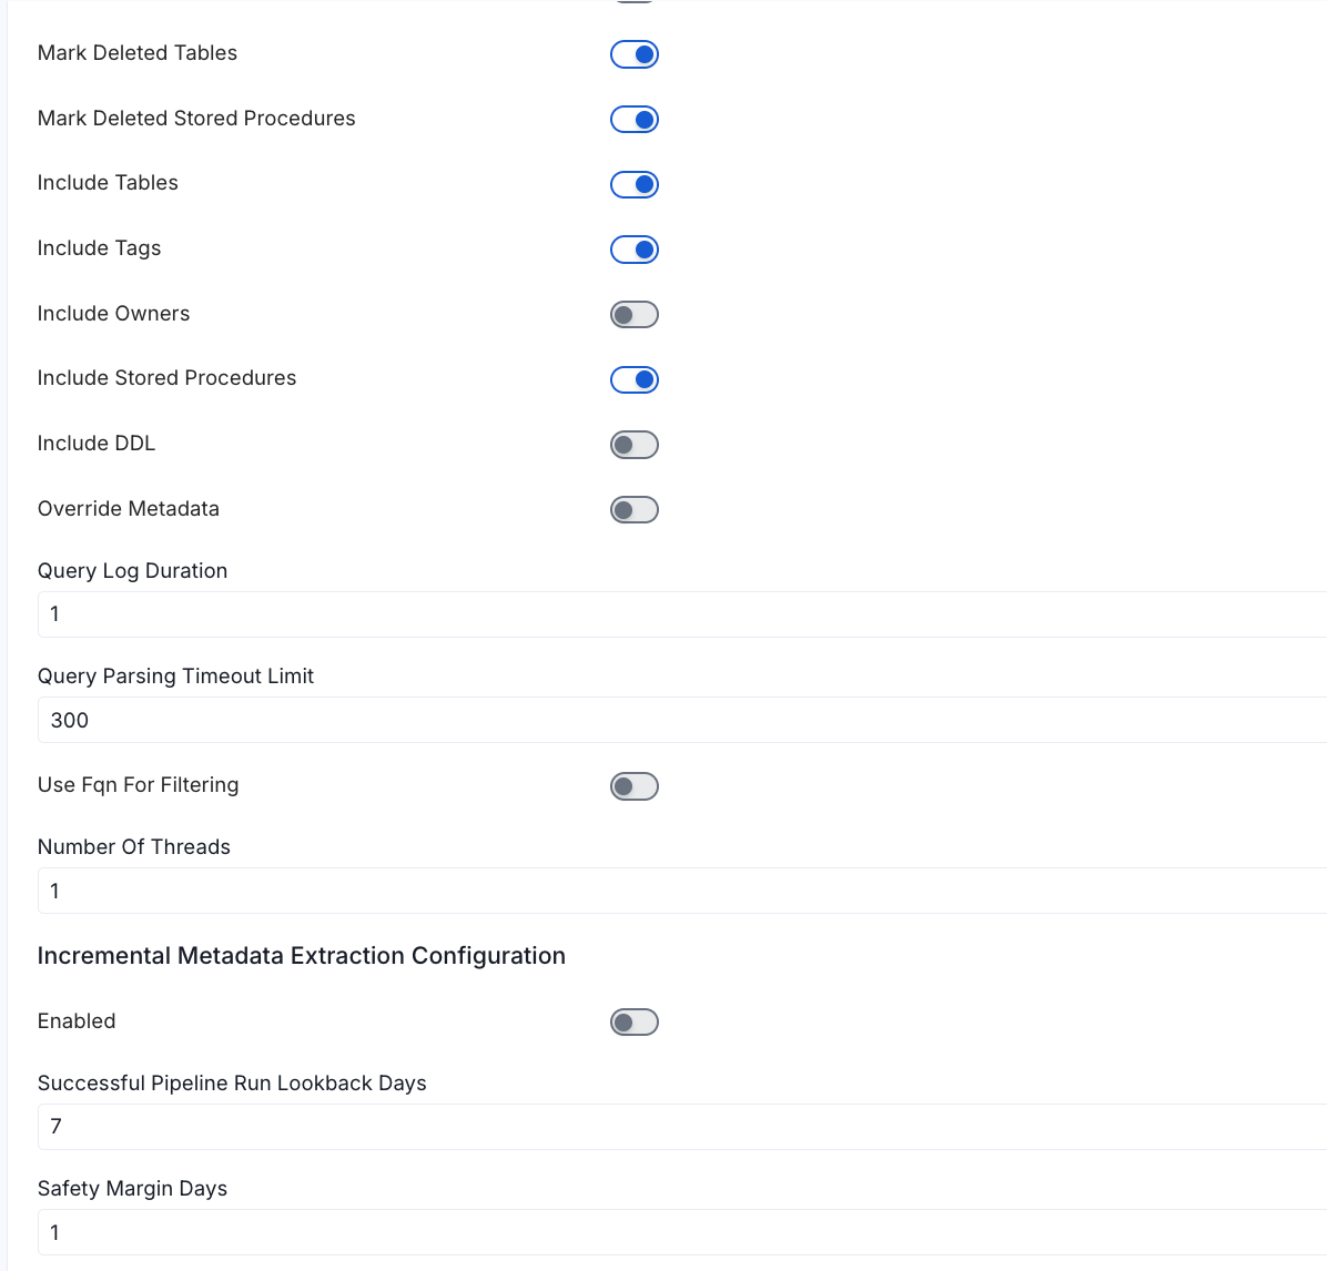
- Mark Deleted Tables (toggle): Set the Mark Deleted Tables toggle to flag tables as soft-deleted if they are not present anymore in the source system.
- Mark Deleted Tables from Filter Only (toggle): Set the Mark Deleted Tables from Filter Only toggle to flag tables as soft-deleted if they are not present anymore within the filtered schema or database only. This flag is useful when you have more than one ingestion pipelines. For example if you have a schema
- includeTables (toggle): Optional configuration to turn off fetching metadata for tables.
- includeViews (toggle): Set the Include views toggle to control whether to include views as part of metadata ingestion.
- includeTags (toggle): Set the ‘Include Tags’ toggle to control whether to include tags as part of metadata ingestion.
- includeOwners (toggle): Set the ‘Include Owners’ toggle to control whether to include owners to the ingested entity if the owner email matches with a user stored in the OM server as part of metadata ingestion. If the ingested entity already exists and has an owner, the owner will not be overwritten.
- includeStoredProcedures (toggle): Optional configuration to toggle the Stored Procedures ingestion.
- includeDDL (toggle): Optional configuration to toggle the DDL Statements ingestion.
- queryLogDuration (Optional): Configuration to tune how far we want to look back in query logs to process Stored Procedures results.
- queryParsingTimeoutLimit (Optional): Configuration to set the timeout for parsing the query in seconds.
- useFqnForFiltering (toggle): Regex will be applied on fully qualified name (e.g service_name.db_name.schema_name.table_name) instead of raw name (e.g. table_name).
-
Incremental (Beta): Use Incremental Metadata Extraction after the first execution. This is done by getting the changed tables instead of all of them. Only Available for BigQuery, Redshift and Snowflake
- Enabled: If
True, enables Metadata Extraction to be Incremental. - lookback Days: Number of days to search back for a successful pipeline run. The timestamp of the last found successful pipeline run will be used as a base to search for updated entities.
- Safety Margin Days: Number of days to add to the last successful pipeline run timestamp to search for updated entities.
- Enabled: If
- Threads (Beta): Use a Multithread approach for Metadata Extraction. You can define here the number of threads you would like to run concurrently.
Schedule the Ingestion and Deploy
Scheduling can be set up at an hourly, daily, weekly, or manual cadence. The
timezone is in UTC. Select a Start Date to schedule for ingestion. It is
optional to add an End Date.Review your configuration settings. If they match what you intended,
click Deploy to create the service and schedule metadata ingestion.If something doesn’t look right, click the Back button to return to the
appropriate step and change the settings as needed.After configuring the workflow, you can click on Deploy to create the
pipeline.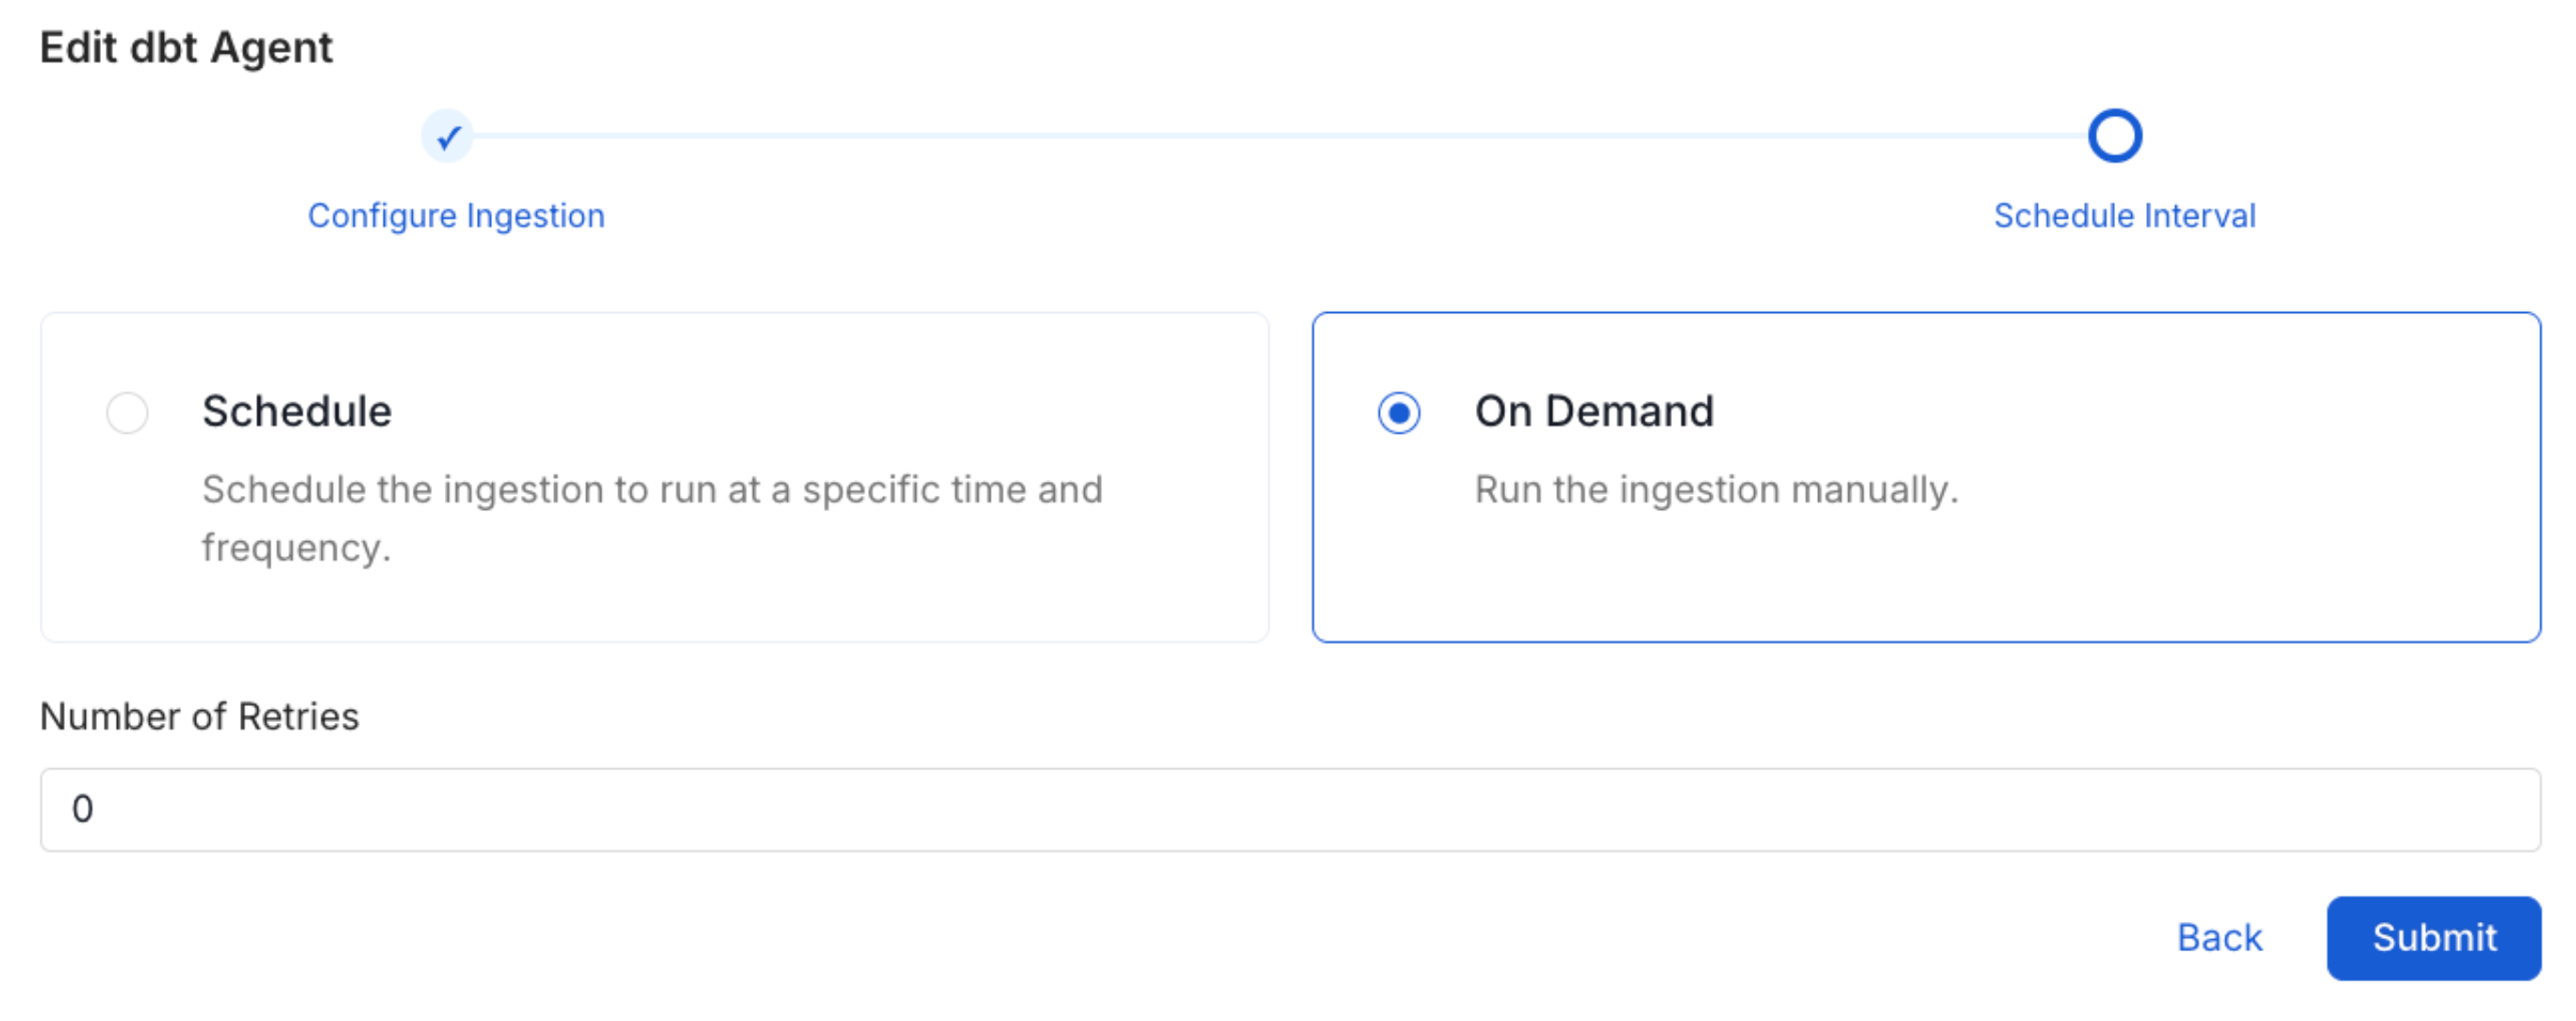
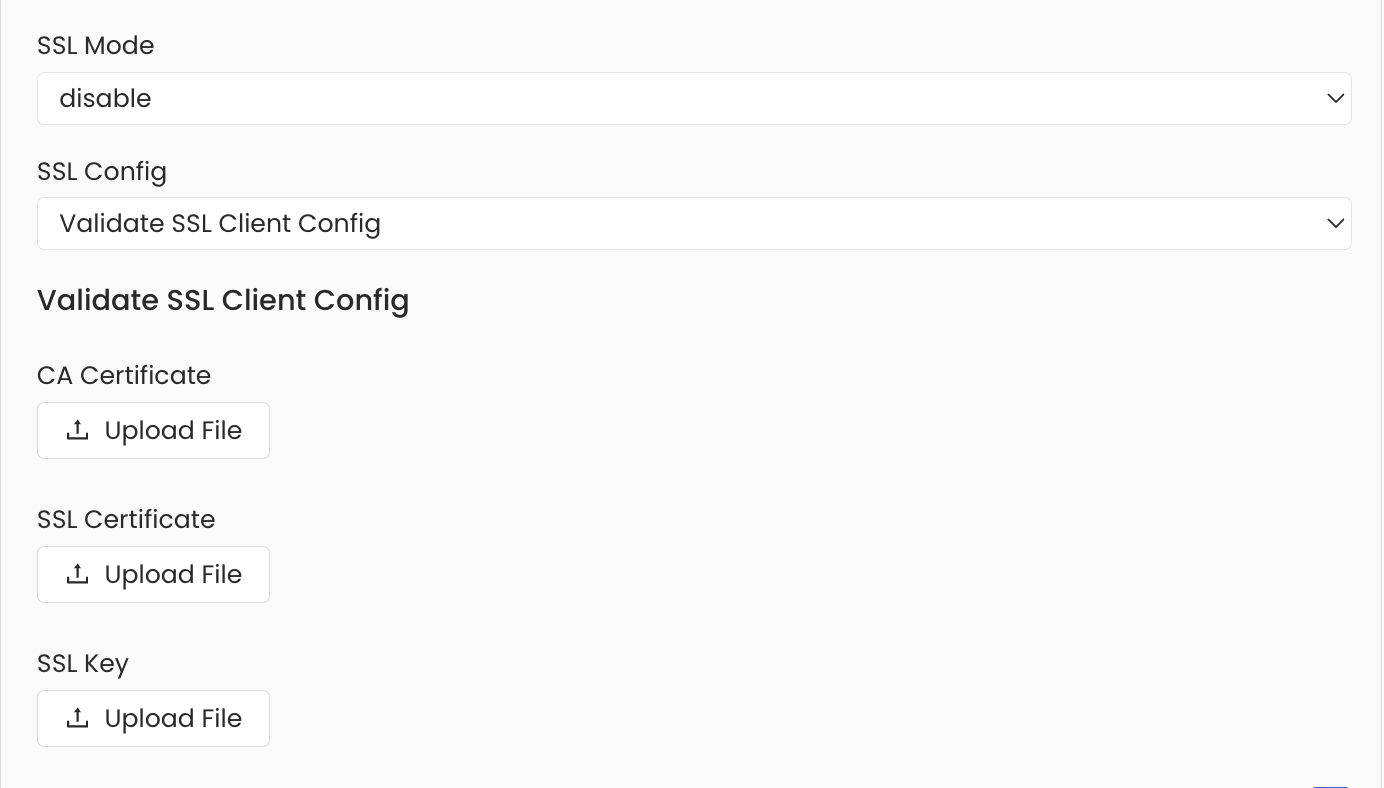
Securing MySQL Connection with SSL in OpenMetadata
To establish secure connections between OpenMetadata and MySQL, navigate to theAdvanced Config section. Here, you can provide the CA certificate used for SSL validation by specifying the caCertificate. Alternatively, if both client and server require mutual authentication, you’ll need to use all three parameters: ssl_key, ssl_cert, and ssl_ca. In this case, ssl_cert is used for the client’s SSL certificate, ssl_key for the private key associated with the SSL certificate, and ssl_ca for the CA certificate to validate the server’s certificate.
When using IAM auth with Aurora MySQL, ensure TLS is enabled and the CA file path is valid in the same runtime where ingestion executes. If you run ingestion in Docker or Kubernetes, mount the CA bundle into the container and configure the container path (not a laptop path).
Reverse Metadata
Reverse Metadata
Description Management
MySQL supports description updates at the following level:- Table level
Owner Management
Owner management is not supported for MySQL.Tag Management
❌ Tag management is not supported for MySQL.Custom SQL Template
MySQL supports custom SQL templates for metadata changes. The template is interpreted using python f-strings.Here are examples of custom SQL queries for metadata changes:Requirements for Reverse Metadata
In addition to the basic ingestion requirements, for reverse metadata ingestion the user needs:- `
Troubleshooting
MySQL Troubleshooting
Learn more about how to troubleshoot common MySQL connector issues and resolve configuration or ingestion errors.
Related
Usage Workflow
Learn more about how to configure the Usage Workflow to ingest Query information from the UI.
Lineage Workflow
Learn more about how to configure the Lineage from the UI.
Profiler Workflow
Learn more about how to configure the Data Profiler from the UI.
Data Quality Workflow
Learn more about how to configure the Data Quality tests from the UI.
dbt Integration
Learn more about how to ingest dbt models’ definitions and their lineage.