Collate Automations
Overview
Collate’s Automation feature is a powerful tool designed to simplify and streamline metadata management tasks. By automating repetitive actions such as assigning owners, domains, or tagging data, Collate helps maintain consistency in metadata across an organization’s datasets. These automations reduce manual effort and ensure that metadata is always up-to-date, accurate, and governed according to predefined policies.Why Automations are Useful
Managing metadata manually can be challenging, particularly in dynamic environments where data constantly evolves. Collate’s Automation feature addresses several key pain points:- Maintaining Consistency: Automation helps ensure that metadata such as ownership, tags, and descriptions are applied consistently across all data assets.
- Saving Time: Automations allow data teams to focus on higher-value tasks by eliminating the need for manual updates and maintenance.
- Enforcing Governance Policies: Automations help ensure that data follows organizational policies at all times by automatically applying governance rules (e.g., assigning data owners or domains).
- Data Quality and Accountability: Data quality suffers without clear ownership. Automating ownership assignments helps ensure that data quality issues are addressed efficiently.
Key Use Cases for Collate Automations
1. Bulk Description
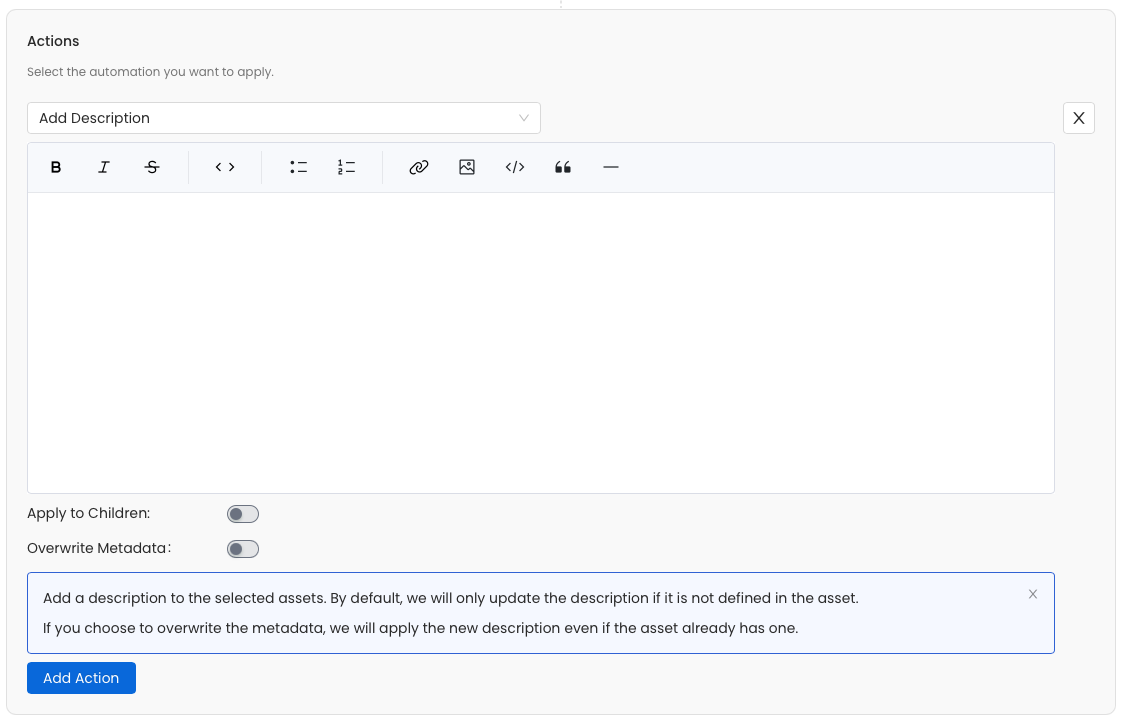
- Problem: Many datasets lack descriptions, making it difficult for users to understand the data’s purpose and contents. Sometimes, the same column description needs to be added to multiple datasets.
- Solution: Automations can bulk-apply descriptions to tables and columns, ensuring that all data assets are consistently documented.
- Benefit: This use case improves data discoverability and understanding, making it easier for users to find and use the data effectively.
- Apply to Children: Lets you apply the description to the selected child assets (e.g., columns) within an asset.
- Overwrite Metadata: Allows you to overwrite existing descriptions with the new description. Otherwise, we will only apply the description to empty tables or columns.
2. Bulk Ownership and Domain Assignment
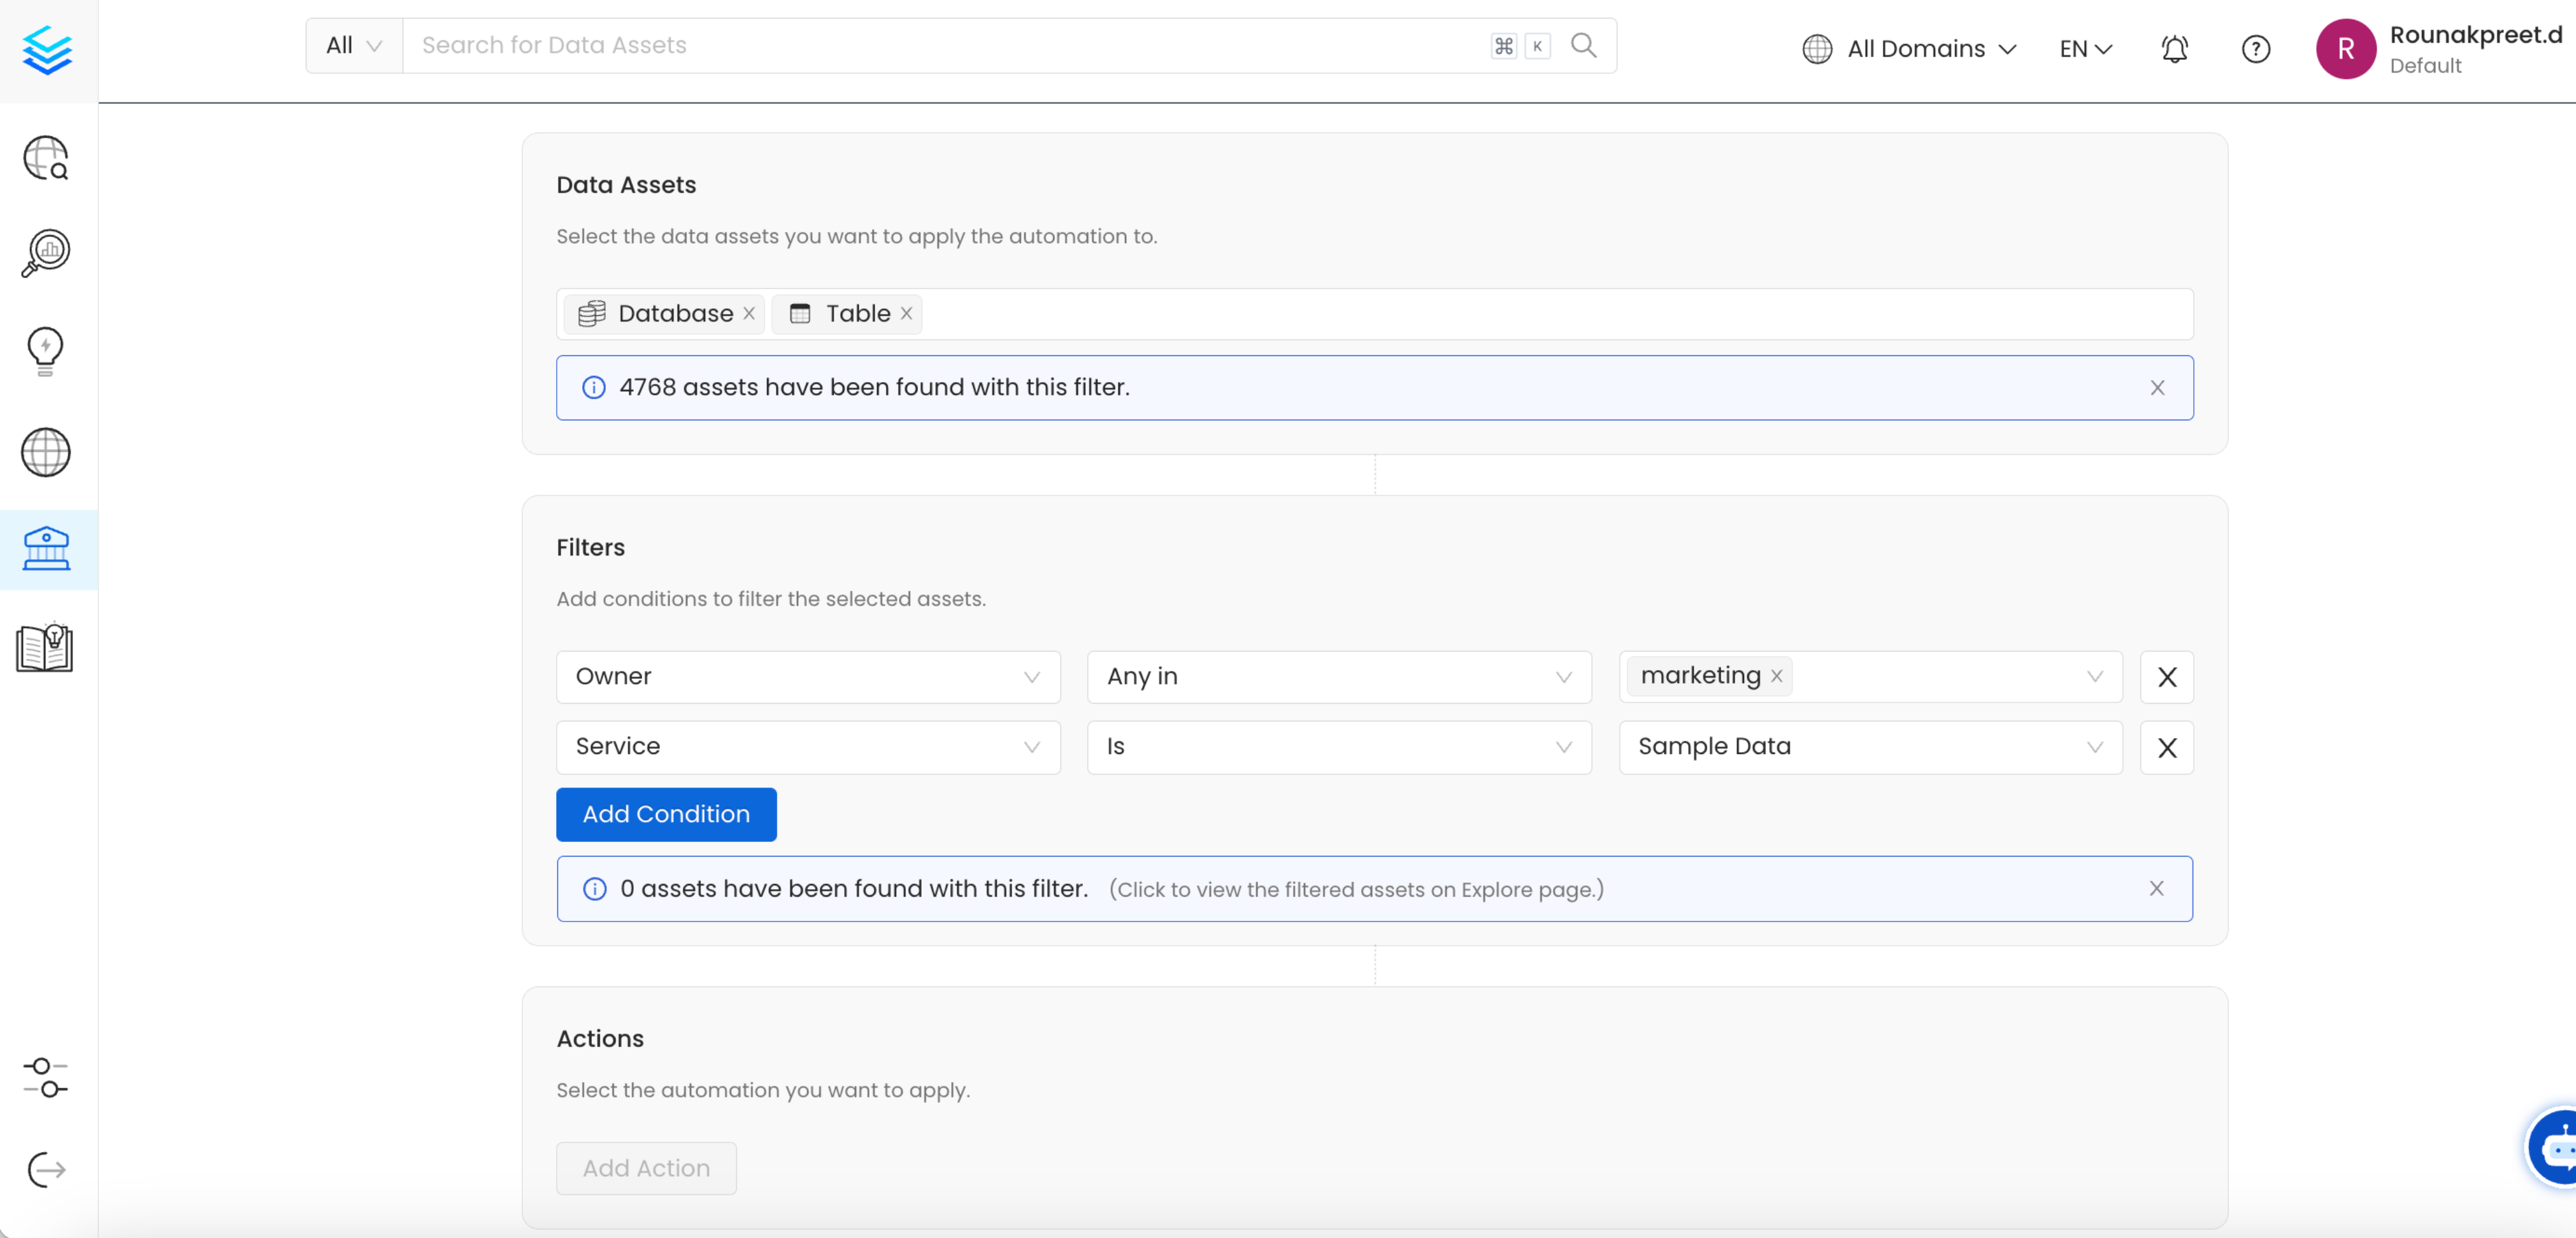
- Problem: Many data assets lack proper ownership and domain assignment, leading to governance and accountability issues. Manually assigning owners can be error-prone and time-consuming.
- Solution: Automations can bulk-assign ownership and domains to datasets, ensuring all data assets are correctly categorized and owned. This process can be applied to tables, schemas, or other assets within Collate.
- Benefit: This use case ensures data assets have a designated owner and are organized under the appropriate domain, making data more discoverable and accountable.
- Overwrite Metadata: Allows you to overwrite existing owner or domain with the configured one. Otherwise, we will only apply the owner or domain to assets that do not have an existing owner or domain.
3. Bulk Tagging and Glossary Term Assignment
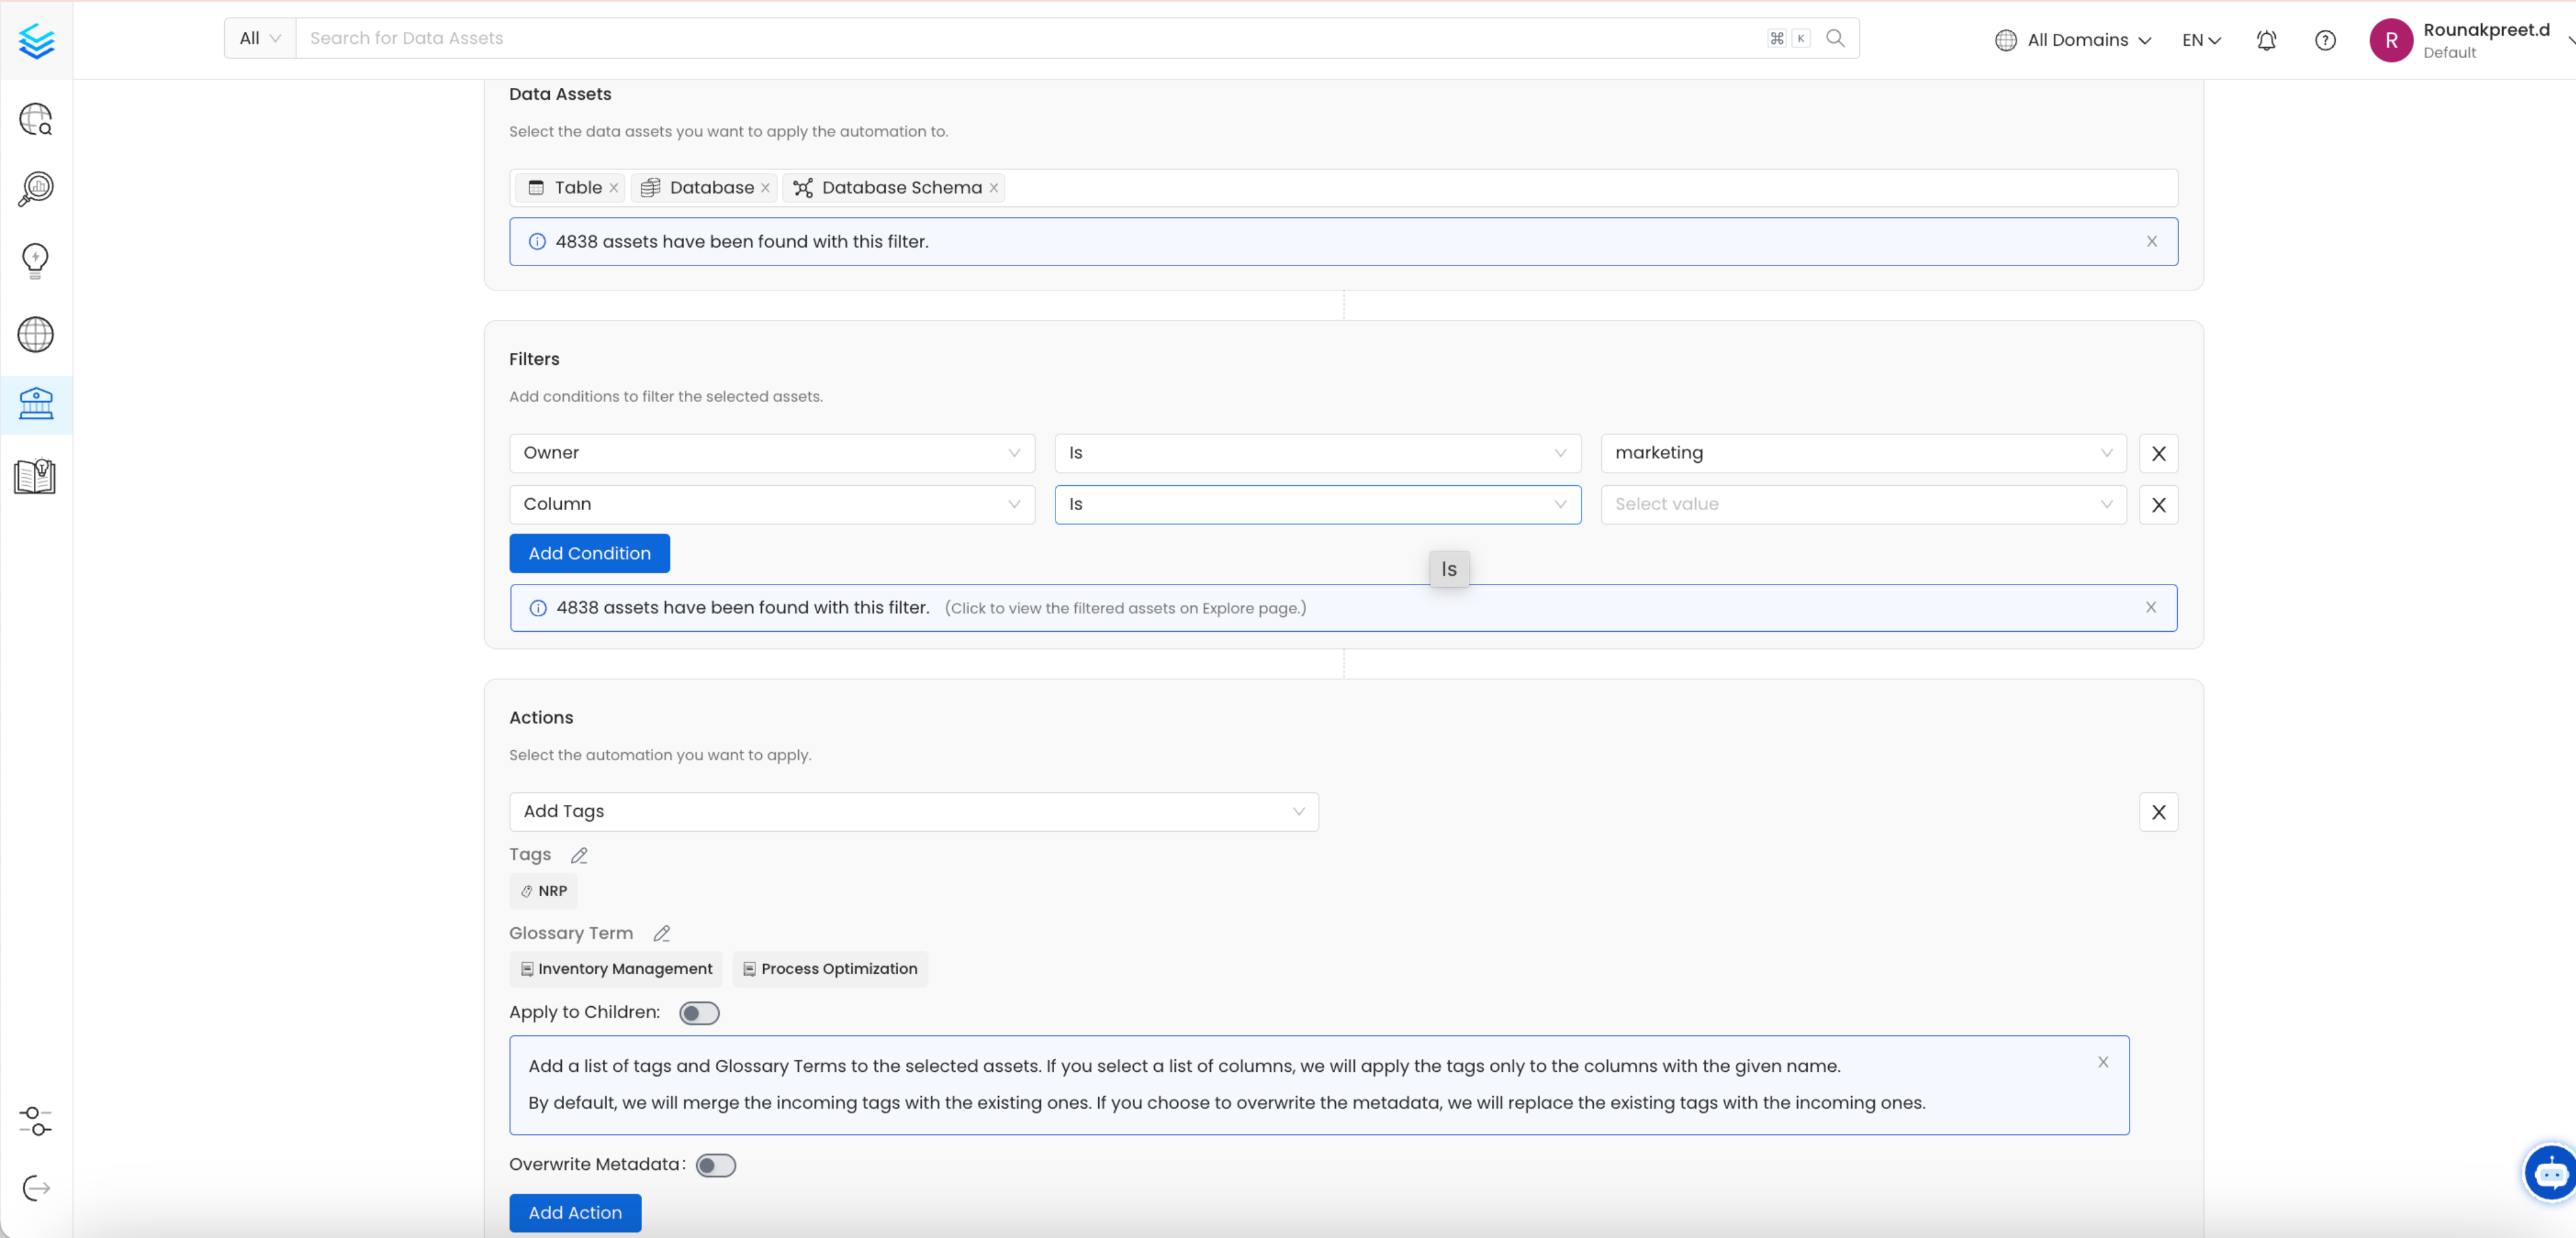
- Problem: Manually applying the same tags or glossary terms to multiple datasets can be inefficient and inconsistent.
- Solution: Automations allow users to bulk-apply tags (e.g., PII) or glossary terms (e.g., Customer ID) to specific datasets, ensuring uniformity across the platform.
- Benefit: This automation reduces the risk of missing important tags like PII-sensitive and ensures that key metadata elements are applied consistently across datasets.
- Apply to Children: Lets you apply the Tags or Glossary Terms to the selected child assets (e.g., columns) within an asset.
- Overwrite Metadata: Allows you to overwrite existing Tags or Terms with the configured one. Otherwise, we will add the new Tags or Terms to the existing ones.
4. Bulk Test cases Assignment
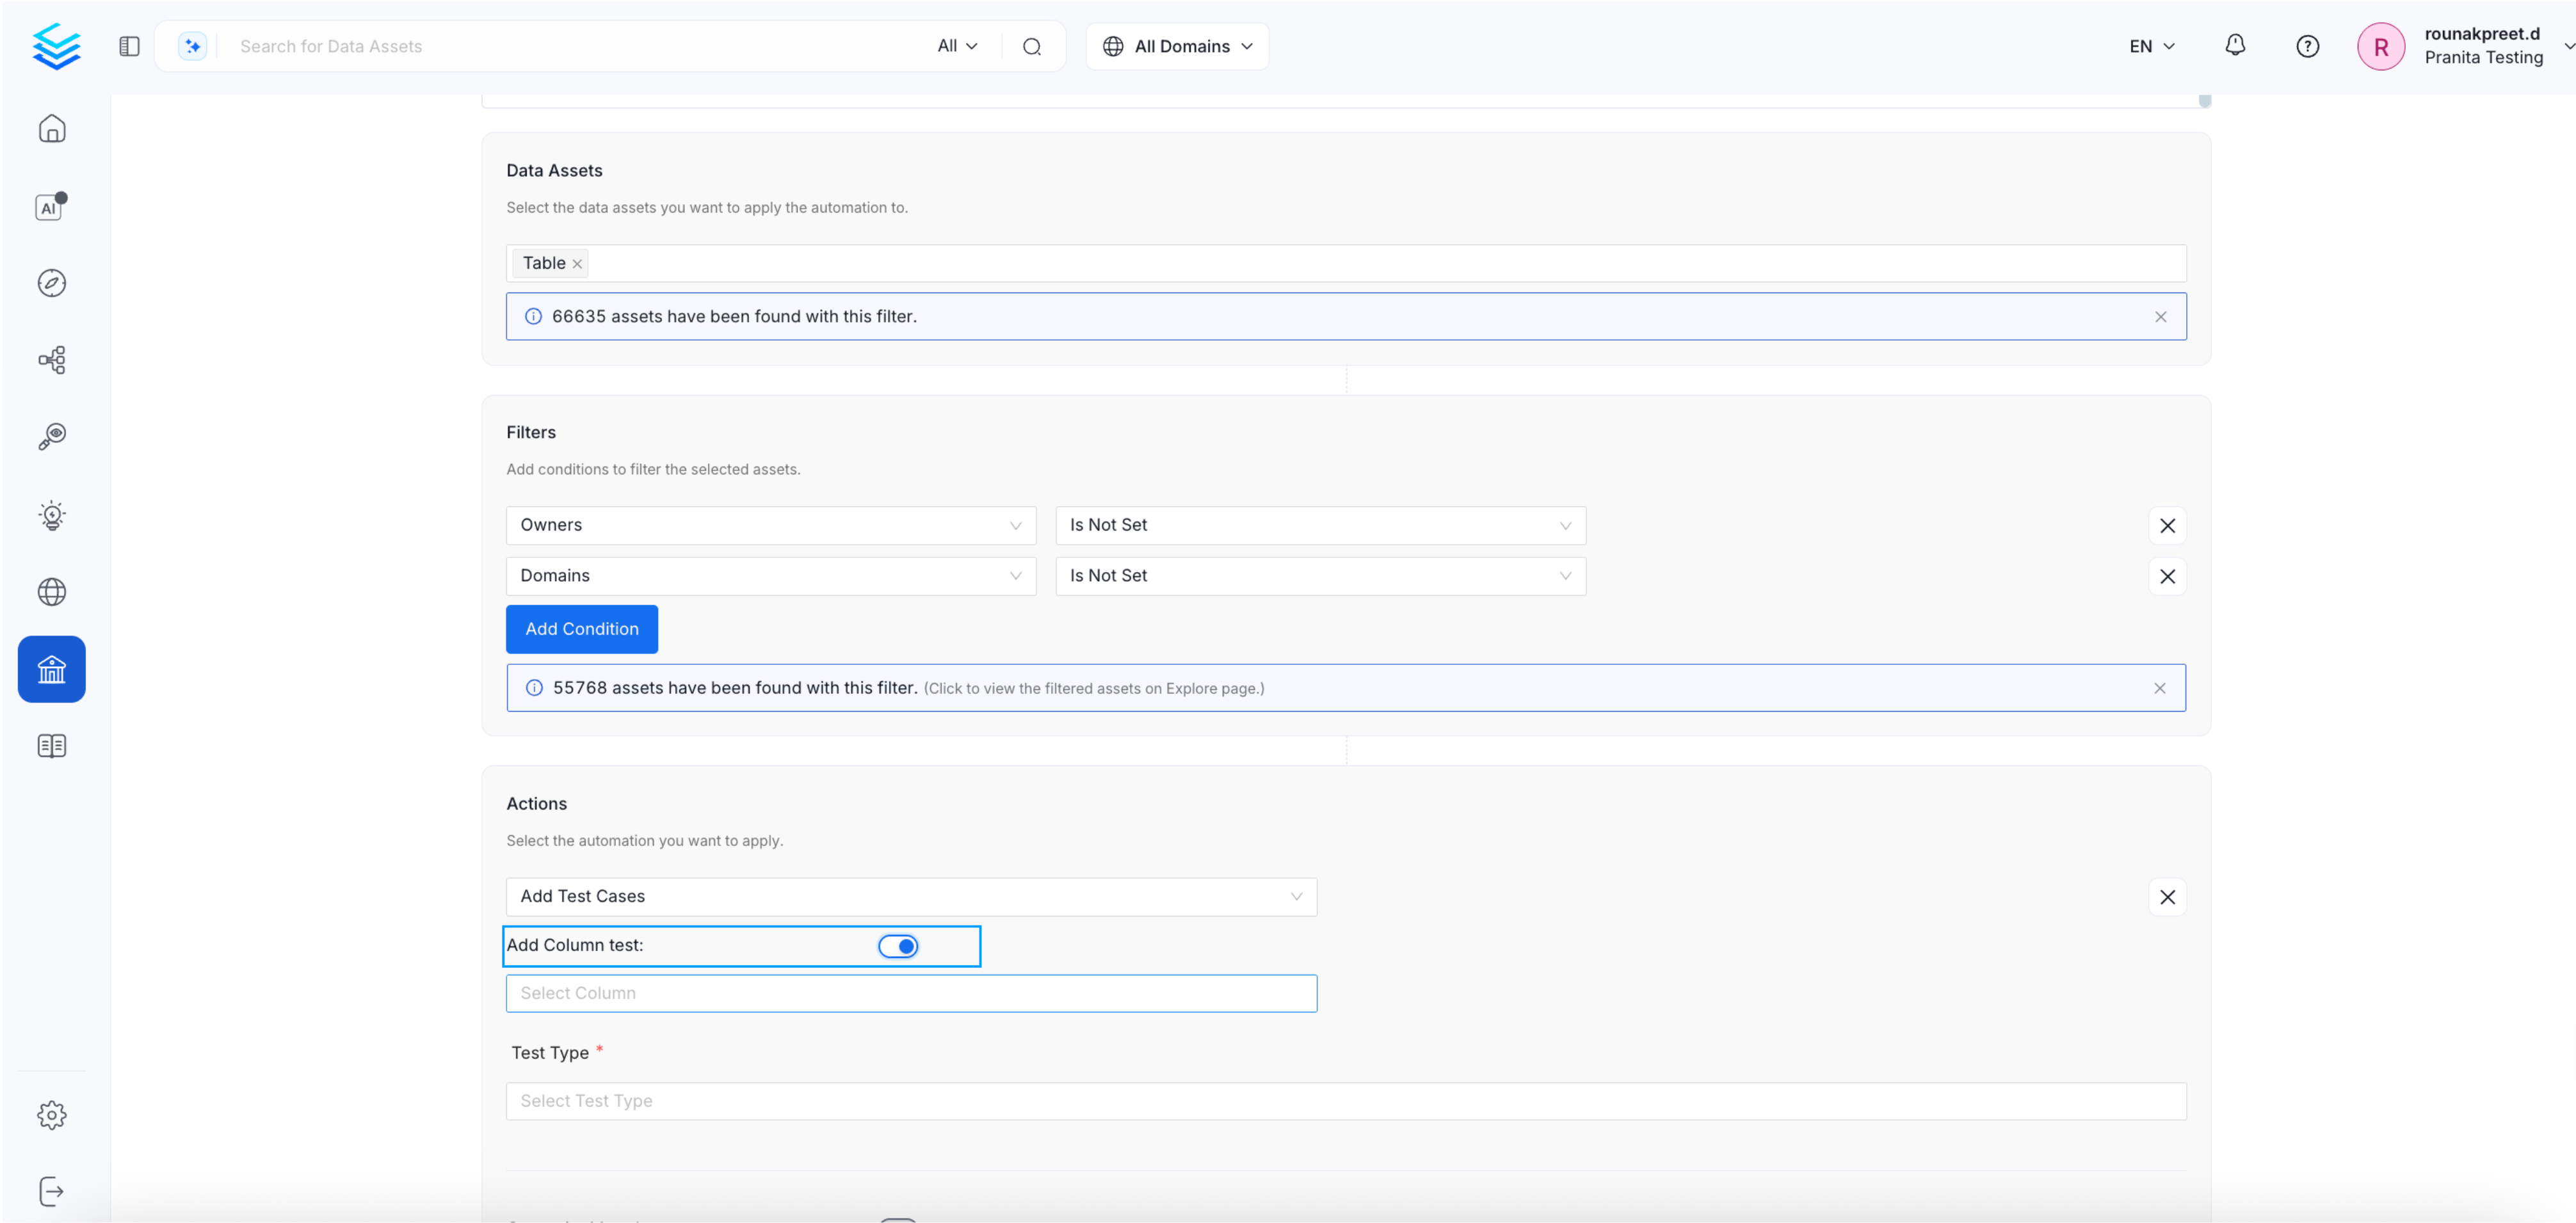
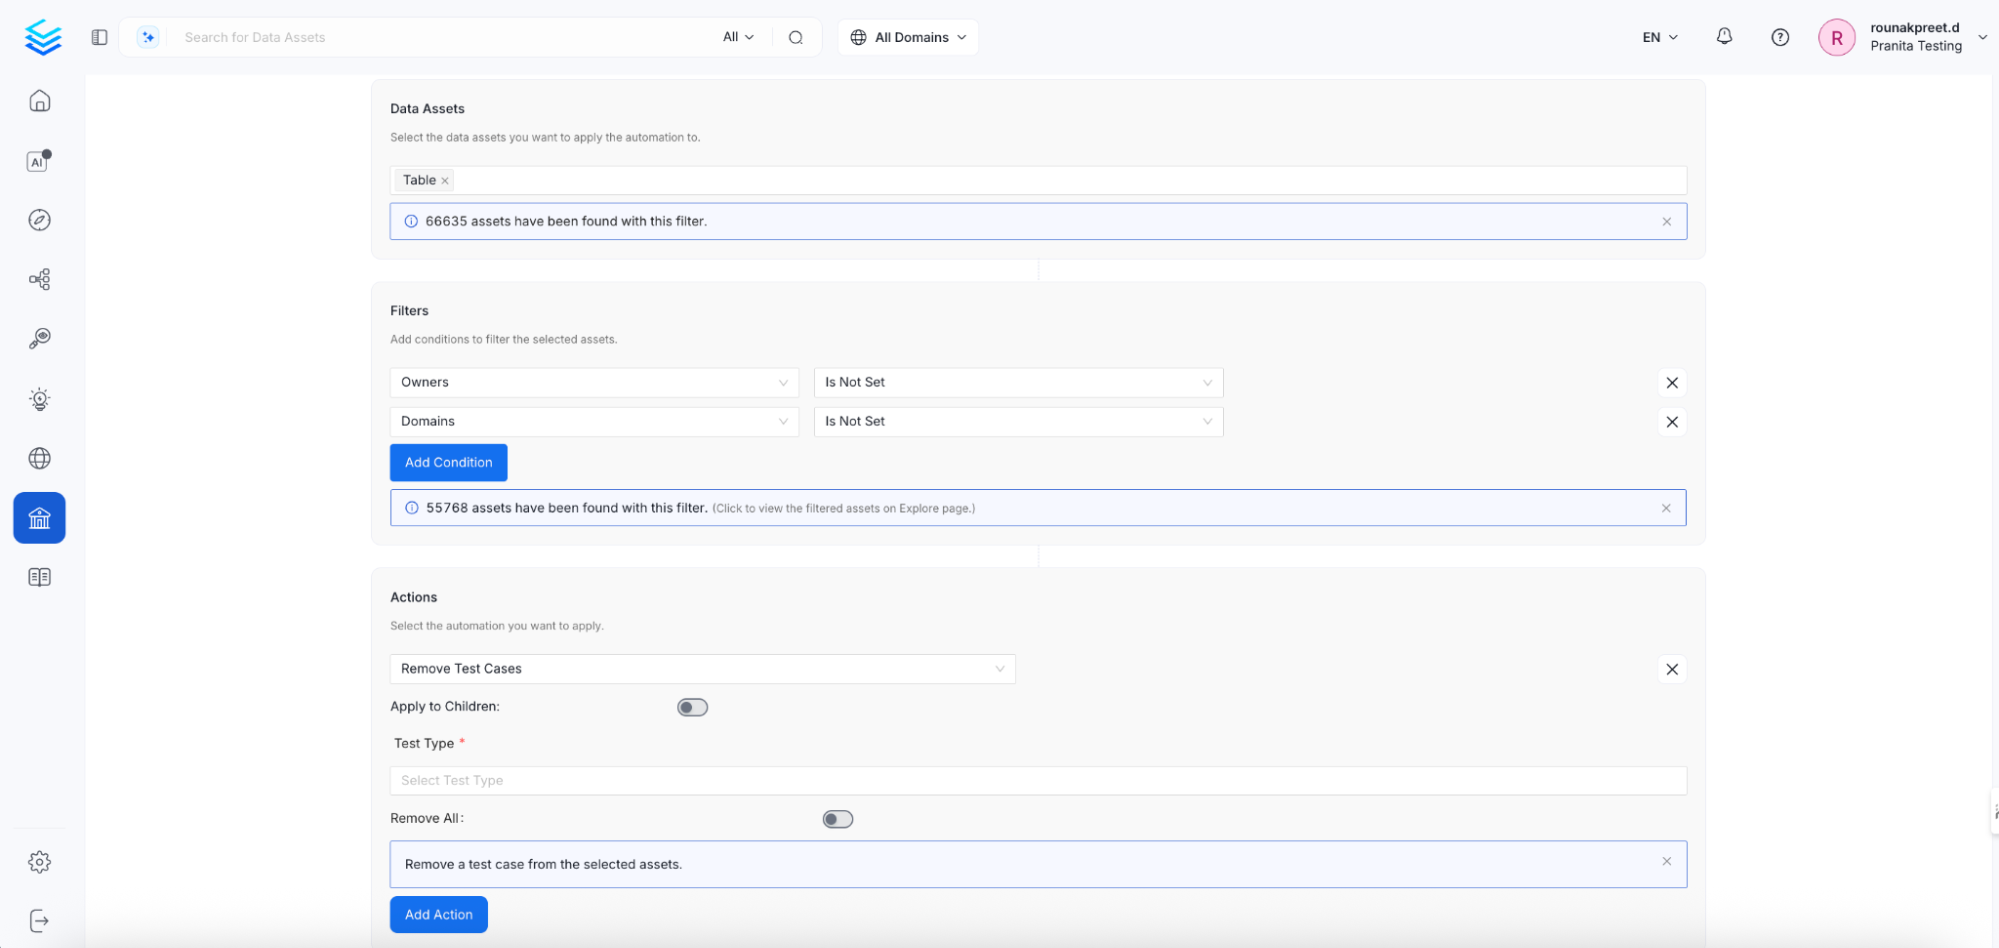
- Problem: Manually assigning or removing test cases for individual data assets is time-consuming and error-prone, especially at scale. For teams managing hundreds or thousands of assets, this repetitive process creates friction, reduces consistency, and delays the rollout of standardized data quality checks.
- Solution: The Add Test Cases and Remove Test Cases actions in Automator allow users to manage test case assignments in bulk. Instead of individually configuring test cases on each asset, users can apply or remove a common test case (of the same type and configuration) across all filtered data assets in a single step.
-
Benefit:
- Saves manual effort by enabling one-click bulk operations (add or remove) on test cases.
- Enforces standardization of similar data quality checks across filtered assets.
- Reduces human error and speeds up test deployment.
- Helps maintain consistency in validation strategies across domains, asset types, or tags.
Action Configuration:
Add Test Cases Apply the same test case configuration to all filtered data assets in one go. This is useful for bulk-enforcing validation rules like “not null”, “regex match”, etc. Example Use Case:- Apply a “not null” test to every Column tagged as Sensitive.
- Remove all “row count threshold” test cases from tables within a deprecated domain.
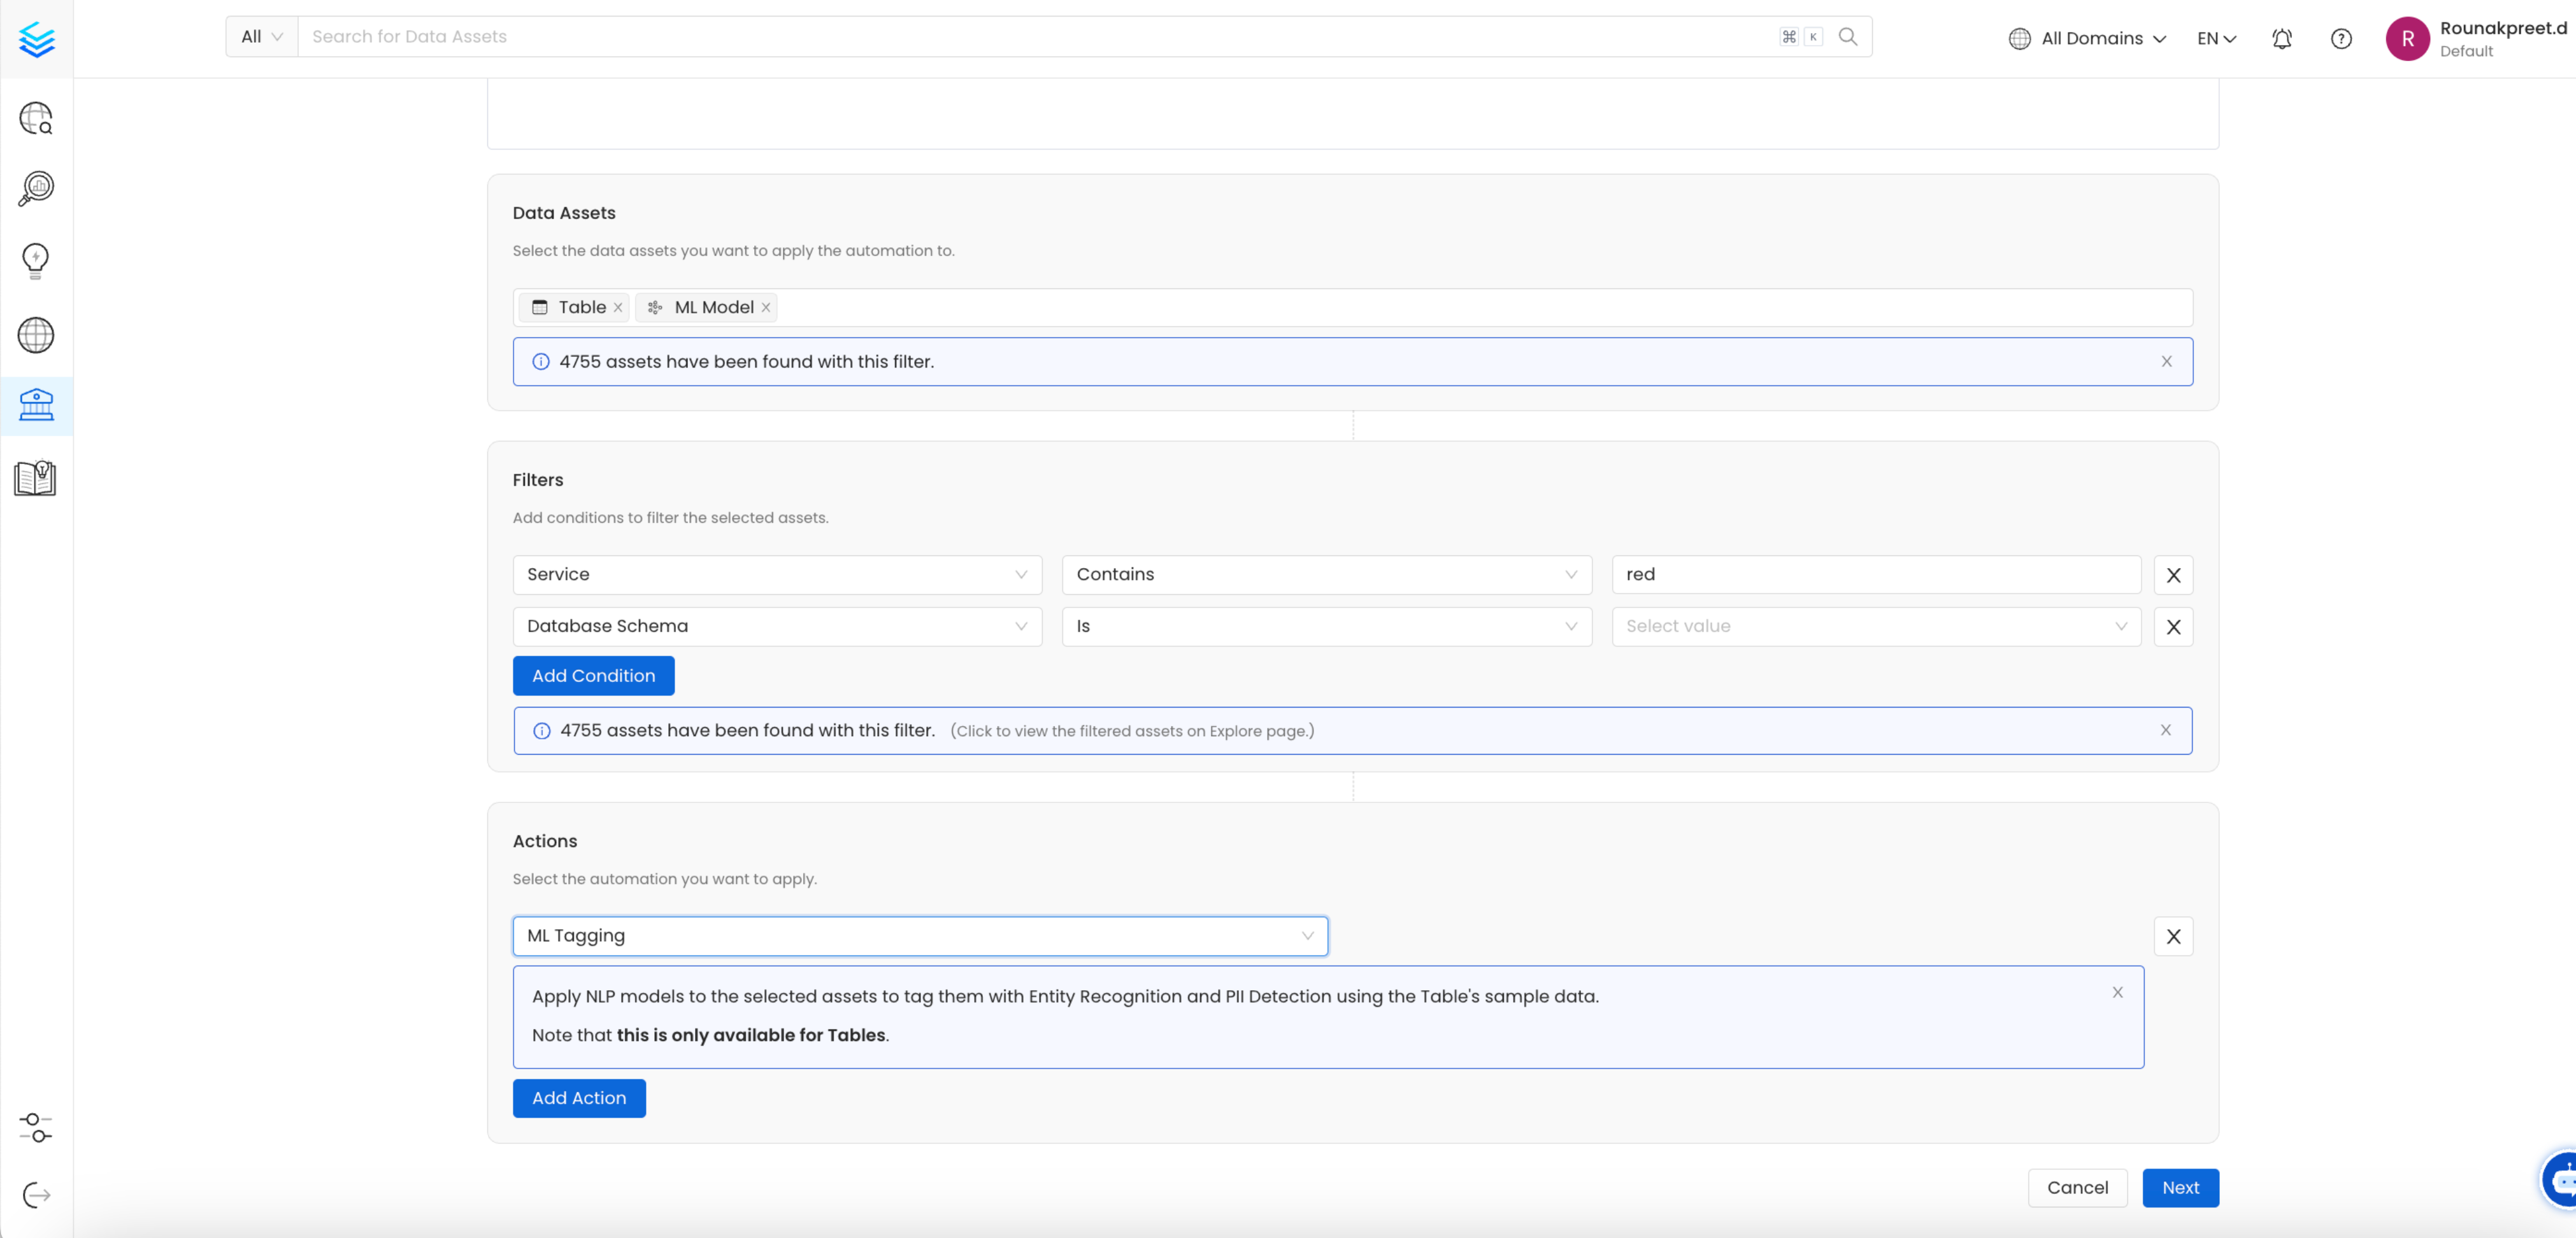
5. Lineage Propagation of Metadata
- Problem: Updating metadata such as tags, descriptions, or glossary terms on a single asset does not automatically apply those changes to downstream assets connected through lineage. For example, a description updated on a source table may be missing from the dependent tables, views, dashboards, or reports built from it.
- Solution: Configure a Lineage Propagation automation to apply metadata from a selected set of assets to every related dataset reachable through lineage. Supported attributes include description, tags, glossary terms, owners, tier, and domain.
- Benefit: A single update at the source applies to all downstream assets automatically. Metadata stays consistent across the lineage graph, reducing manual maintenance and preserving one source of truth.
How Propagation Works
Metadata propagation flows along the natural direction of the lineage graph: upstream to downstream. The Propagation Filter Mode setting in the Advance Config panel controls which side of the lineage the filter applies to. It supports two modes:- Source (default): The assets matched by the filter act as the origin of metadata, and the configured attributes propagate downstream to every reachable asset.
- Target: The direction of propagation does not change, but the filtered assets act as the destination rather than the origin.
Note: Automations created before this feature update are saved in Target mode and their behavior remains unchanged after upgrade. Newly created automations default to Source mode and can be changed from Propagation Filter Mode in the Advance Config settings.
Configuring the Lineage Propagation
The Actions section has two parts: a main section (always visible) and an Advance Config panel (collapsed by default). To configure the lineage propagation, perform the following steps:Step 1: Choose What to Propagate
-
Select where the metadata should apply. You can choose one or both of the following options:
- Propagate Parent: Apply metadata to the parent entity itself. For example, a table.
- Propagate Column Level: Apply metadata to columns and fields via column-level lineage.
-
Then select which attributes to propagate. The table below shows which options are available at each level.
Step 2: (Optional) Set the Propagation Depth
Use Propagation Depth to limit how many steps the propagation moves through the lineage. Enter a positive integer (1, 2, 3) or leave it blank to propagate through the full lineage. When you set Propagation Filter Mode to Target, an additional Propagation Depth Mode selector appears. Use it to choose whether depth is counted from the lineage roots or from each target asset. See Propagation Depth Modes.Note: In Source mode, the Propagation Depth field alone controls how far downstream propagation flows. There is no Propagation Depth Mode selector. Leaving the depth blank in either mode lets propagation run along the full lineage.
Step 3: Choose Whether to Overwrite Existing Metadata
The Overwrite Metadata toggle controls how propagation handles values already present on downstream assets.- Off (default): Propagation only fills in metadata on assets that do not already have it. Manually set values are preserved, and upstream tags are merged with existing ones.
- On: Propagation overwrites existing values with the propagated ones, including manually set metadata.
Step 4: (Optional) Configure the Advance Config Settings
The Advance Config panel is collapsed by default. Click Advance Config to expand and configure the following settings: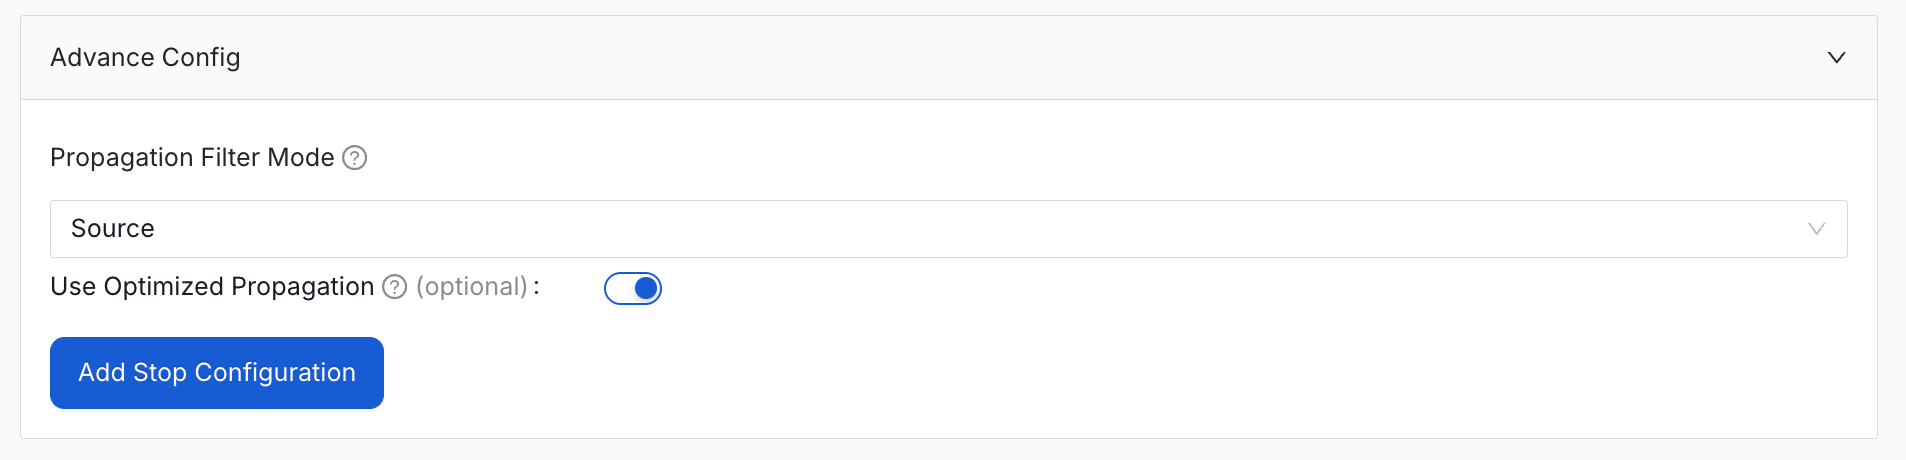
Propagation Filter Modes
The Propagation Filter Mode is set to Source by default. You can choose from any of the following options: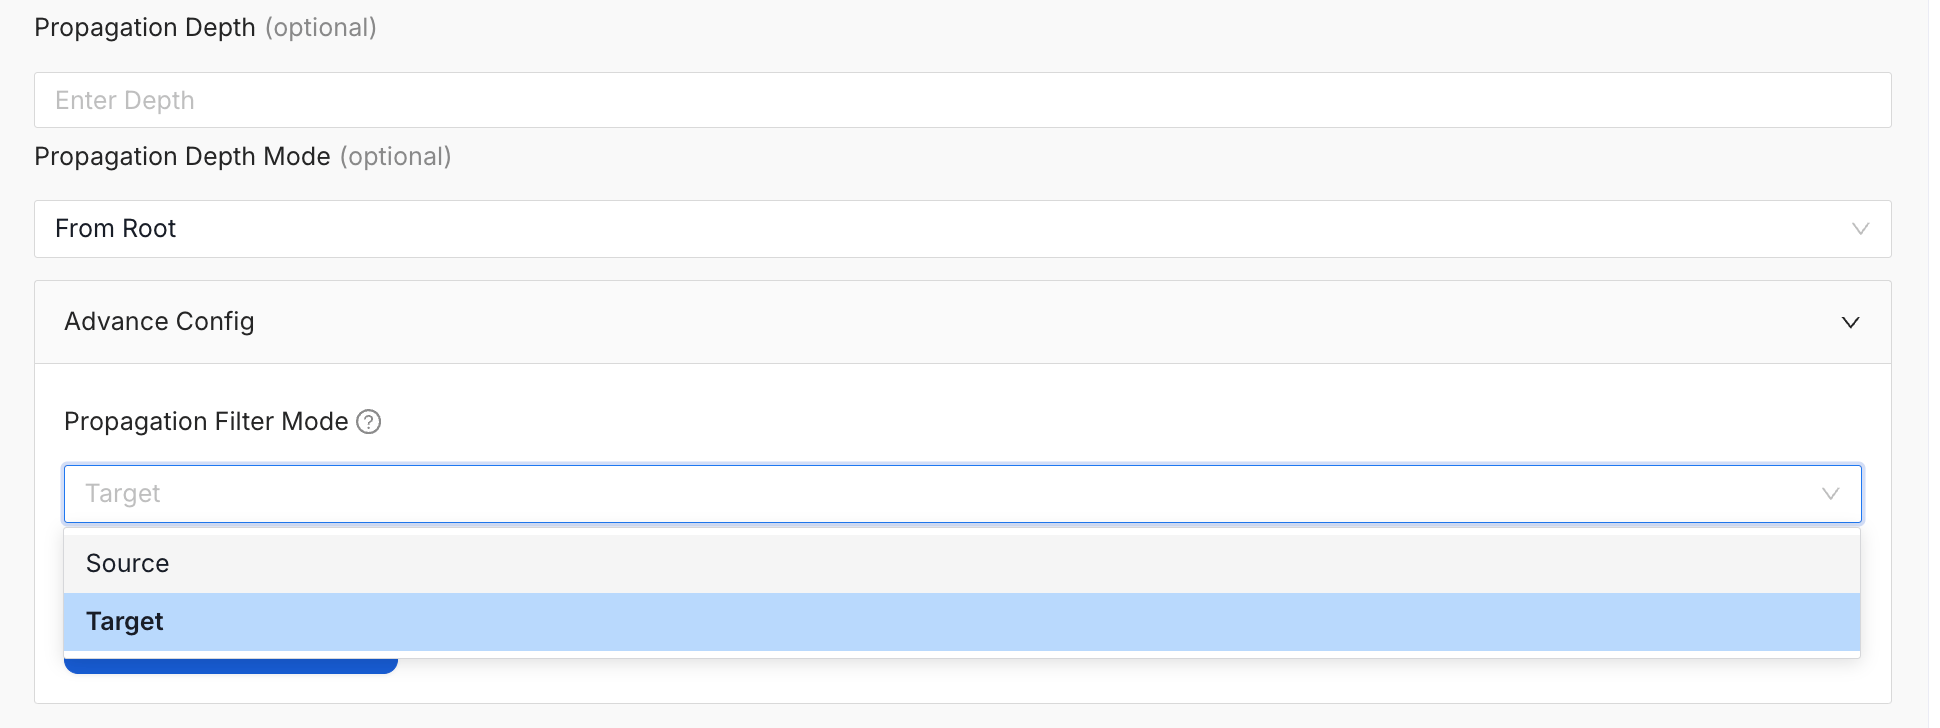
Use Optimized Propagation
This setting is enabled by default. The optimized engine is faster and uses less memory on large lineage graphs. It fetches lineage in a single direction, loads metadata only when needed, and requests only the fields required.Note: Disable this setting only when reproducing a previous run with the original engine for debugging purposes.
Stop Propagation Conditions
Halts propagation when an asset matches a defined condition. Click Add Stop Configuration to add stop conditions. For more information about stop propagation conditions, see Stop Propagation Conditions.Propagation Depth Modes
When Propagation Filter Mode is set to Target, the Propagation Depth Mode selector appears. It decides how depth is counted when a Propagation Depth value is configured.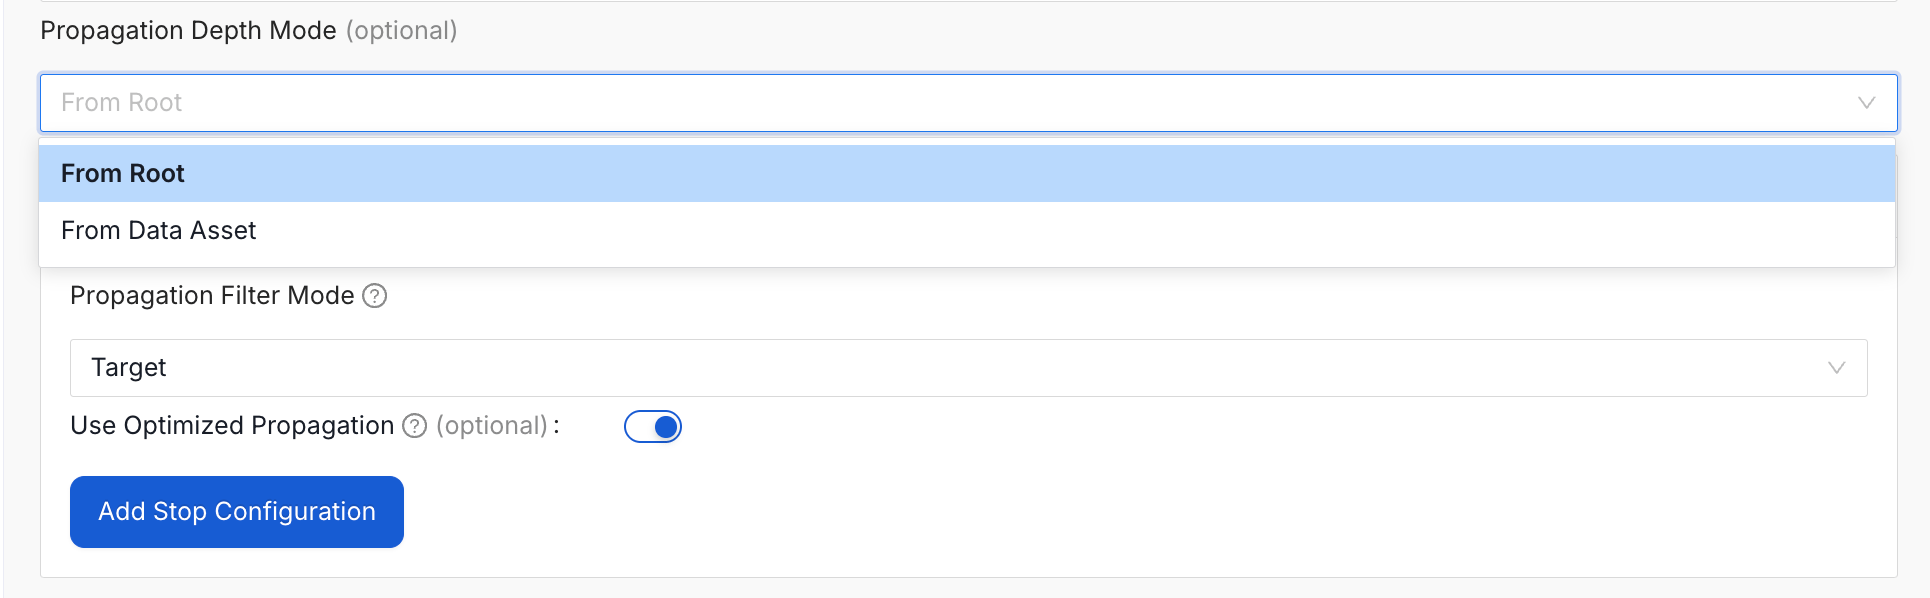
Note: Propagation Depth Mode is available in Target mode. In Source mode, the selector is hidden. The selected depth mode only applies when a Propagation Depth value is configured; leaving depth blank lets propagation run along the full lineage.
Root Mode (default)
The system measures depth starting from the lineage root (an asset with no upstream parents) and counts downward. Each downstream step increments depth by one, evaluated per path. Examples Linear Lineage:A → B → C → D
- A — depth 0 (root)
- B — depth 1
- C — depth 2
- D — depth 3
Propagation Depth = 2, metadata reaches B and C. D is excluded.
Multiple Parents Lineage:
A → B → CD → C
Propagation Depth = 1, C receives metadata from D (depth 1) but not from A (depth 2 via B).
When to use Root Mode
- You want a strict top-down flow from root entities.
- Your lineage tree is deep and you want to limit the propagation scope.
- You want to optimize performance on large graphs.
Data Asset Mode
The system measures depth starting from each target asset and counts upward toward its sources. Only upstream nodes within the configured depth contribute metadata to that target. Example Lineage:A → B → C → D, Target: D, Propagation Depth: 2.
- D — depth 0 (target)
- C — depth 1
- B — depth 2
- A — depth 3
- You want each target asset to inherit metadata from a fixed number of immediate (proximate) upstream sources.
- You’re propagating to specific data assets in a complex graph and want isolated, per-target control.
Root mode vs. Data Asset mode
Both modes propagate metadata from upstream to downstream. The difference is in how depth is counted.Stop Propagation Conditions
Adding stop propagation conditions halts metadata flow when an asset matches a configured condition. This prevents metadata from crossing sensitive boundaries, for example, stopping when a sensitive-data marker is encountered. Supported attributes You can stop propagation on any of these:
Common patterns
- Sensitive data boundaries — stop at nodes tagged
ConfidentialorPII.Sensitive. - Organizational boundaries — halt at assets owned by specific teams.
- Domain transitions — stop when crossing into a different business domain.
- Quality thresholds — stop at certain tier levels.
6. Automatic PII Detection and Tagging
- Problem: Manually identifying and tagging Personally Identifiable Information (PII) across large datasets is labor-intensive and prone to errors.
- Solution: Automations can automatically detect PII data (e.g., emails, usernames) and apply relevant tags to ensure that sensitive data is flagged appropriately for compliance.
- Benefit: Ensures compliance with data protection regulations by consistently tagging sensitive data, reducing the risk of non-compliance.
Best Practices
- Validate Assets Before Applying Actions: Always use the Explore page to verify the assets that will be affected by the automation. This ensures that only the intended datasets are updated.
- Use Automation Logs: Regularly check the Recent Runs logs to monitor automation activity and ensure that they are running as expected.
- Propagate Metadata Thoughtfully: When propagating metadata via lineage, make sure that the source metadata is correct before applying it across multiple datasets.
- Start with Controlled Propagation: For complex and large lineage trees, begin the propagation with a limited propagation depth (e.g., 2-3 levels/depth) and gradually increase as needed to avoid unintended widespread changes.
- Understand Path-Aware Depth Behavior: In complex lineage with multiple parent paths, remember that propagation depth is calculated separately for each path from each root entity. This ensures precise control over which upstream sources contribute metadata to downstream assets.
- Set Up Stop Conditions for Critical Data: Configure strategic stop conditions around critical ownership boundaries or sensitive data boundaries (Tags- PII, Confidential) to prevent accidental metadata overwrites.
- Pick the Right Filter Mode: Use Source when a curated set of assets should broadcast its metadata downstream (e.g., propagating tags from a certified upstream table to everything it feeds). Use Target when a specific group of downstream assets should pull metadata from whatever upstream sources contribute to them. After upgrading to 1.13.0, double-check existing automations — they keep the older Target behavior unless you switch them in Advance Config.
- Keep Optimized Propagation On: The optimized engine is faster and uses far less memory on large lineage graphs. Only turn it off if you need to reproduce a previous run with the original engine.