> ## Documentation Index
> Fetch the complete documentation index at: https://docs.getcollate.io/llms.txt
> Use this file to discover all available pages before exploring further.
# User Authentication | Collate SQL Studio Guide
> Learn how to connect to database services in SQL Studio using different authentication methods.
# User Authentication
Before you can execute queries in SQL Studio, you must authenticate and establish a connection to your database service. The authentication method depends on how your administrator configured SQL Studio for each service.
## Prerequisites
Before connecting to a database service in SQL Studio:
* SQL Studio (Query Runner) application must be installed by an administrator
* At least one database service must be configured for SQL Studio by your administrator
* You must have the necessary permissions to access the database service in Collate
* For Basic Authentication: You need your database credentials (Service Account JSON, Username + Password, or Key Pair)
## Accessing SQL Studio
1. Log in to Collate
2. Click **SQL Studio** in the main navigation menu
3. On first visit, you'll see a landing page with available services
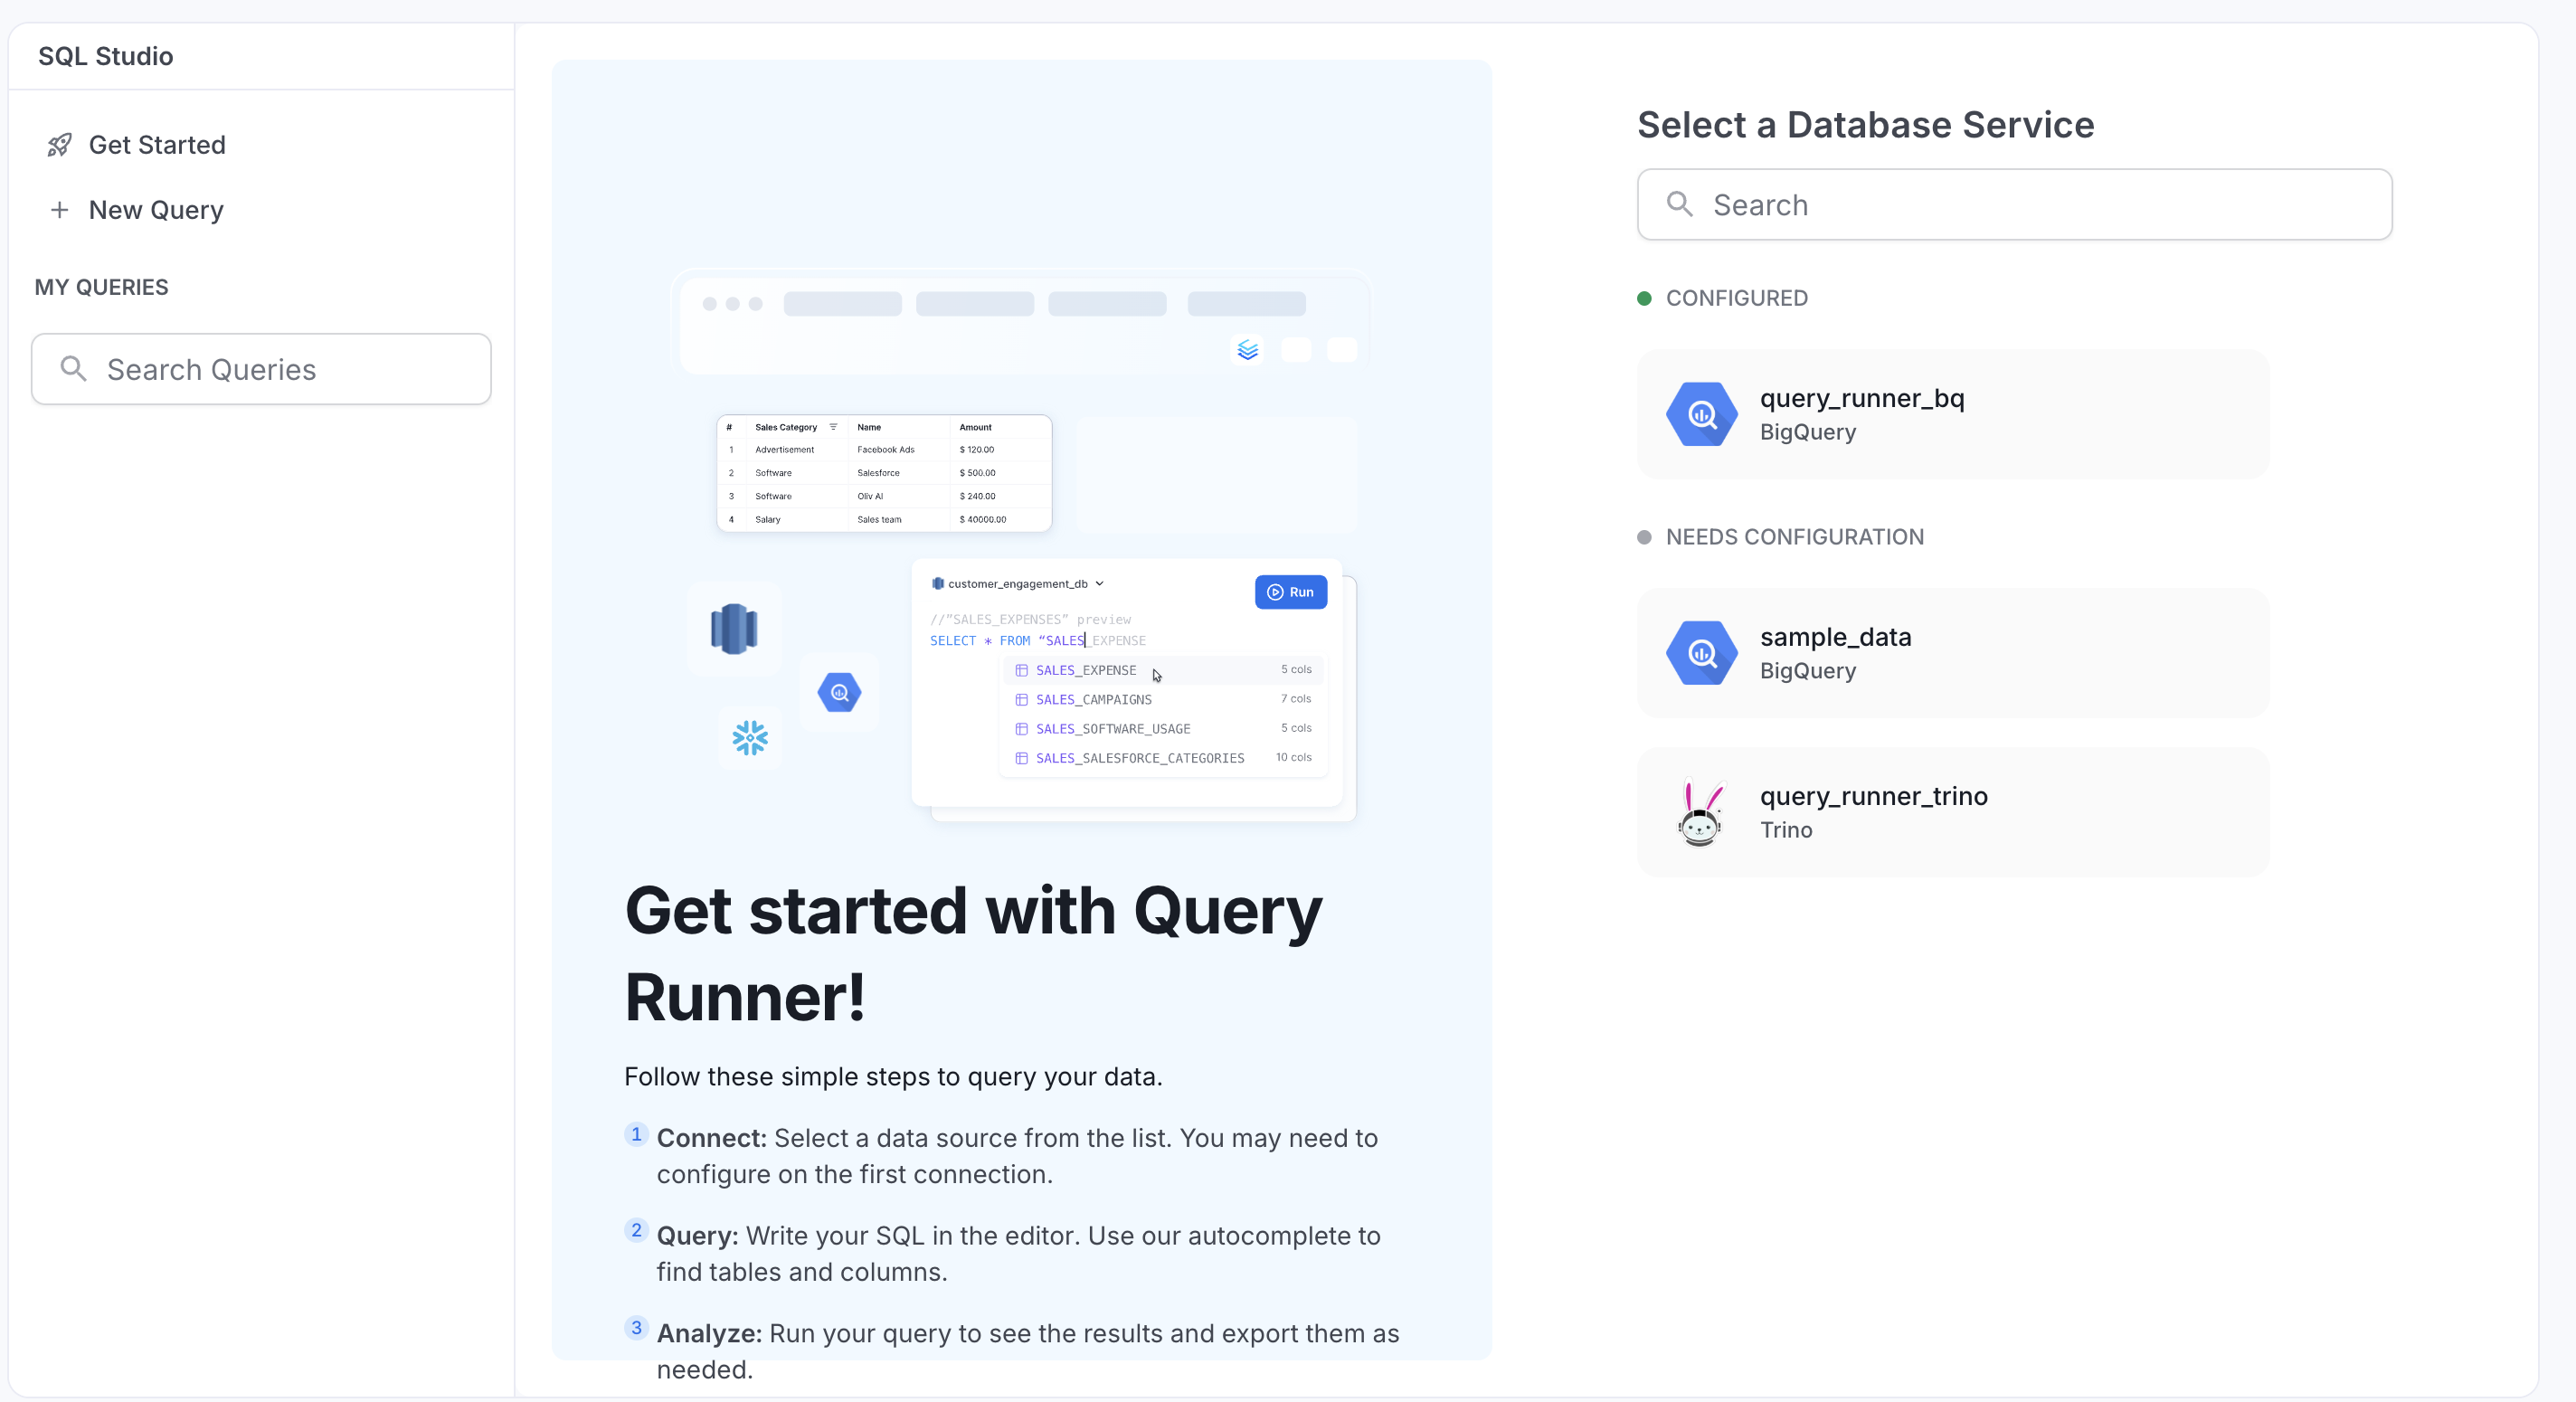 4. Services are grouped into:
* **Configured**: Services you've already connected to (ready to use)
* **Needs Configuration**: Services that require authentication
## Understanding Connection Status
Your connection to a service can be in one of these states:
| Status | Indicator | Meaning | Action Required |
| ----------------- | --------- | ---------------------------------------------- | --------------------------------------- |
| **Not Connected** | ⚪ Gray | No authentication attempted | Click service card to authenticate |
| **Pending** | 🟡 Yellow | Authentication in progress, testing connection | Wait a few seconds for test to complete |
| **Connected** | 🟢 Green | Connection active, ready to query | None - you can execute queries |
You can view your connection status in the SQL Studio interface:
* **Sidebar**: Next to each service name
* **Toolbar**: At the top of the SQL editor when a service is selected
***
## Authentication Methods
The authentication method available to you is determined by your administrator. This guide is organized by authentication type.
***
## Collate SSO Authentication
**Used when**: Your organization uses Google OIDC for Collate login and has configured Collate SSO for the database service.
**SSO Support**: As of now, Collate SSO flow is only supported for **Google OIDC (OpenID Connect)**.
## How Collate SSO Works
Collate SSO leverages your existing Google OIDC SSO configuration in Collate to authenticate with database services. When you log into Collate using Google SSO, SQL Studio reuses those same OAuth credentials to connect to services like BigQuery.
**Key Benefits**:
* No additional login required beyond your Collate Google SSO
* Seamless one-click authorization
* OAuth credentials automatically managed by Collate
## Connecting with Collate SSO
### Step 1: Access SQL Studio
1. Click **SQL Studio** from the main navigation menu
2. You'll see a landing page with available services
3. Find the service you want to connect to (e.g., `my-bigquery`)
### Step 2: Select Service
1. Click on the service card
2. A connection dialog appears
4. Services are grouped into:
* **Configured**: Services you've already connected to (ready to use)
* **Needs Configuration**: Services that require authentication
## Understanding Connection Status
Your connection to a service can be in one of these states:
| Status | Indicator | Meaning | Action Required |
| ----------------- | --------- | ---------------------------------------------- | --------------------------------------- |
| **Not Connected** | ⚪ Gray | No authentication attempted | Click service card to authenticate |
| **Pending** | 🟡 Yellow | Authentication in progress, testing connection | Wait a few seconds for test to complete |
| **Connected** | 🟢 Green | Connection active, ready to query | None - you can execute queries |
You can view your connection status in the SQL Studio interface:
* **Sidebar**: Next to each service name
* **Toolbar**: At the top of the SQL editor when a service is selected
***
## Authentication Methods
The authentication method available to you is determined by your administrator. This guide is organized by authentication type.
***
## Collate SSO Authentication
**Used when**: Your organization uses Google OIDC for Collate login and has configured Collate SSO for the database service.
**SSO Support**: As of now, Collate SSO flow is only supported for **Google OIDC (OpenID Connect)**.
## How Collate SSO Works
Collate SSO leverages your existing Google OIDC SSO configuration in Collate to authenticate with database services. When you log into Collate using Google SSO, SQL Studio reuses those same OAuth credentials to connect to services like BigQuery.
**Key Benefits**:
* No additional login required beyond your Collate Google SSO
* Seamless one-click authorization
* OAuth credentials automatically managed by Collate
## Connecting with Collate SSO
### Step 1: Access SQL Studio
1. Click **SQL Studio** from the main navigation menu
2. You'll see a landing page with available services
3. Find the service you want to connect to (e.g., `my-bigquery`)
### Step 2: Select Service
1. Click on the service card
2. A connection dialog appears
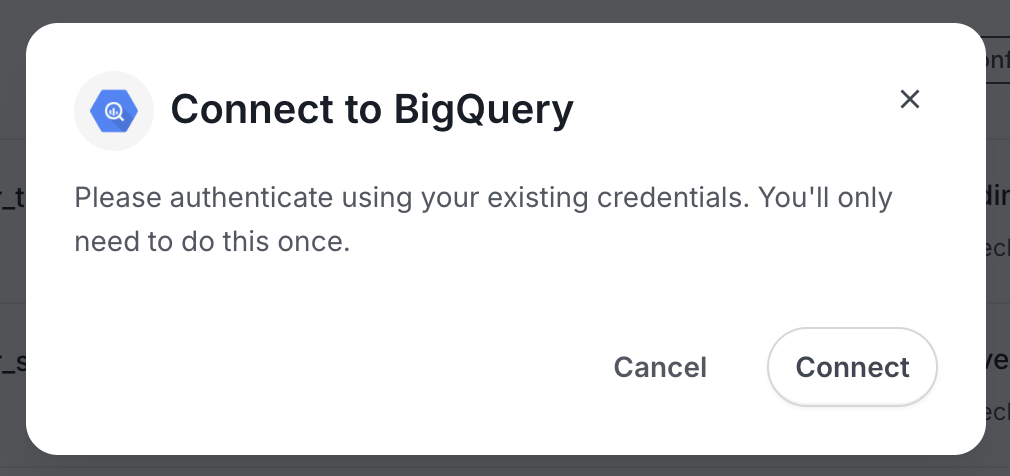 3. Click **Connect** to proceed
4. A popup window opens for Google OAuth authorization
5. You may already be signed in with your Google Workspace account
### Step 3: Grant Permissions
1. Review the permissions requested:
* Access to the database service (e.g., BigQuery)
* Your email and profile information
2. Click **Allow** to grant permissions
3. The popup closes automatically
### Step 4: Connection Established
1. You're redirected back to SQL Studio
2. Connection status changes to **Pending** 🟡 (testing connection)
3. SQL Studio runs a test query to verify access
4. After a few seconds, status changes to **Connected** 🟢
5. A new query tab opens automatically
### Step 5: Start Querying
1. The SQL Editor is now active
2. You can write and execute queries
3. Use the Database Explorer in the sidebar to browse tables
**What Happens Behind the Scenes**:
* OAuth token obtained from Google using your SSO session
* Token stored securely (encrypted) in Collate
* Project ID and service info pulled from service connection
* Connection tested automatically with `SELECT 1` query
## Troubleshooting Collate SSO
### Connection Fails After Clicking Connect
**Possible Causes**:
* SSO session expired
* Insufficient permissions in the database service
* Permissions not granted in the popup
**Solutions**:
* Log out of Collate and log back in to refresh SSO session
* Verify you have permissions in the database service (e.g., BigQuery `bigquery.jobs.create`)
* Ensure you clicked "Allow" in the permissions popup
* Contact your administrator to verify Google OIDC SSO configuration
***
## OAuth Authentication
**Used when**: Your organization has configured OAuth authentication with the database provider (Google, Snowflake, Azure AD), or uses a different SSO provider or email & password for Collate login.
### How OAuth Works
OAuth requires you to authenticate directly with the database service provider (Google for BigQuery, Snowflake, Azure AD for Trino). You'll be redirected to the provider's authentication page, grant permissions, and then SQL Studio securely stores your OAuth tokens for query execution.
**Key Benefits**:
* Industry-standard OAuth 2.0 security
* Direct authentication with database provider
* Works with any OAuth provider configured by your administrator
### Connecting with OAuth
#### Step 1: Access SQL Studio
1. Click **SQL Studio** from the main navigation menu
2. You'll see a landing page with available services
3. Find the service you want to connect to
#### Step 2: Select Service
1. Click on the service card (e.g., BigQuery, Snowflake, Trino)
2. A connection dialog appears
3. Click **Connect** to proceed
4. You are redirected to the OAuth provider's authentication page:
* **BigQuery**: Google authentication page
* **Snowflake**: Snowflake authentication page (e.g., `myorg.snowflakecomputing.com/oauth/authorize`)
* **Trino**: Azure AD or configured OAuth provider
#### Step 3: Authenticate with Provider
1. Sign in with your credentials:
* **BigQuery**: Google email and password
* **Snowflake**: Snowflake username and password
* **Trino**: Azure AD or organizational credentials
2. Complete any multi-factor authentication if required
3. You may be asked to select an account or role (follow the prompts)
#### Step 4: Grant Permissions
1. Review the permissions requested:
* **BigQuery**: "Allow access to BigQuery API"
* **Snowflake**: "Allow access to Snowflake resources"
* **Trino**: "Allow access to Trino/Starburst cluster"
2. Click **Allow**, **Accept**, or **Authorize** (wording varies by provider)
#### Step 5: Connection Established
1. After successful authentication, access token exchange happens automatically
2. You're redirected back to SQL Studio
3. OAuth tokens are securely stored (encrypted)
4. Connection status changes to **Pending** 🟡
5. SQL Studio runs a test query to verify access (`SELECT 1`)
6. After a few seconds, status changes to **Connected** 🟢
7. A new query tab opens automatically
#### Step 6: Start Querying
1. The SQL Editor is now active
2. You can write and execute queries
3. Use the Database Explorer to browse databases and tables
**What Happens Behind the Scenes**:
* OAuth access token obtained from provider
* Token stored securely (encrypted) in Collate
* Database connection parameters pulled from service configuration
* Connection tested automatically
### Troubleshooting External OAuth
#### "Redirect URI Mismatch" Error
**Problem**: Error message about redirect URI mismatch during OAuth flow
**Solutions**:
* Contact your administrator - OAuth app configuration needs correction
* Verify you're using the correct Collate URL (e.g., `https://collate.example.com`, not `http://localhost`)
#### Authentication Successful But Connection Fails
**Problem**: OAuth completes but test connection fails
**Solutions**:
* Verify you have permissions in the database service
* Check network connectivity to the database service
* Contact your administrator to review service configuration
#### Redirect Issues
**Problem**: Not redirected back to SQL Studio after authentication
**Solutions**:
* Check browser settings allow redirects
* Verify the OAuth redirect URL is correctly configured by your administrator
* Try a different browser (Chrome, Firefox, Edge)
***
## Basic Authentication
**Used when**: Your organization requires direct credential entry, typically for service accounts or when OAuth is not available.
### How Basic Authentication Works
Basic Authentication requires you to manually enter credentials such as Username + Password, Service Account JSON, or Key Pair. Credentials are encrypted and stored securely.
**Key Benefits**:
* Works with any credential type
* No dependency on OAuth providers
* Suitable for service accounts
***
### BigQuery Basic Authentication
#### Credentials Required
* **GCP Service Account JSON** file, containing:
* Private Key ID
* Private Key (PEM format)
* Client Email
* Client ID
#### Where to Get Credentials
1. Go to [Google Cloud Console](https://console.cloud.google.com/)
2. Navigate to **IAM & Admin** → **Service Accounts**
3. Create or select a service account
4. Grant BigQuery permissions:
* `BigQuery Data Viewer` or `BigQuery User` role
* Ensure `bigquery.jobs.create` permission
5. Go to **Keys** tab → **Add Key** → **Create new key** → **JSON**
6. Download the JSON file and store securely (e.g., 1Password)
#### Connecting with BigQuery Basic Auth
##### Step 1: Select Service
1. In SQL Studio, select the BigQuery service from the dropdown
2. Click **Configure Connection**
##### Step 2: Enter Credentials
You have two options:
**Option A: Upload JSON File**
1. Click **Upload Service Account JSON**
2. Select your downloaded `.json` file
3. All fields are automatically populated
**Option B: Manual Entry**
1. Open your service account JSON file in a text editor
2. Enter each field:
* **Private Key ID**: Copy from `private_key_id` field
* **Private Key**: Copy entire PEM key from `private_key` field (including `-----BEGIN PRIVATE KEY-----` and `-----END PRIVATE KEY-----`)
* **Client Email**: Copy from `client_email` field
* **Client ID**: Copy from `client_id` field
##### Step 3: (Optional) Configure Overrides
If your administrator enabled user-configurable fields:
* **Dataset**: Enter default BigQuery dataset (e.g., `analytics`, `marketing`)
##### Step 4: Test Connection
1. Click **Test Connection**
2. SQL Studio validates your credentials by:
* Connecting to BigQuery
* Executing a test query (`SELECT 1`)
3. Connection status changes to **Pending** 🟡
4. Wait for test to complete
##### Step 5: Save Configuration
1. If test succeeds, click **Save**
2. Your credentials are encrypted and stored
3. Connection status changes to **Connected** 🟢
4. You can now execute queries
***
## Snowflake Basic Authentication
### Credentials Required
Choose one of the following:
**Option A: Username + Password**
* Snowflake Username
* Snowflake Password
**Option B: Username + Key Pair (Private Key + Passphrase)**
* Snowflake Username
* RSA Private Key (PEM format)
* Private Key Passphrase (required)
### Where to Get Credentials
**For Username + Password**:
* Provided by your Snowflake administrator
* You can reset your password in Snowflake web UI
**For Username + Key Pair**:
1. Generate RSA key pair with passphrase:
```bash theme={null}
# Generate private key with passphrase encryption
openssl genrsa 2048 | openssl pkcs8 -topk8 -inform PEM -out rsa_key.p8
# Generate public key
openssl rsa -in rsa_key.p8 -pubout -out rsa_key.pub
```
The private key must be encrypted with a passphrase. When you run the command above, you'll be prompted to enter a passphrase. Make sure to remember it as you'll need it when connecting to Snowflake.
2. Upload public key to Snowflake:
```sql theme={null}
-- Run in Snowflake (replace with your username)
ALTER USER my_username SET RSA_PUBLIC_KEY='MIIBIjANBgkqhki...';
```
3. Store private key securely (`rsa_key.p8`)
### Connecting with Snowflake Basic Auth
#### Step 1: Select Service
1. In SQL Studio, select the Snowflake service from the dropdown
2. Click **Configure Connection**
#### Step 2: Enter Credentials
1. **Username**: Enter your Snowflake username (required)
2. **Choose Authentication Method**:
**For Password-based auth**:
* Enter **Password**
**For Key Pair auth**:
* Paste your **Private Key** (entire PEM key including headers)
* Enter **Passphrase** (required)
3. Click **Connect** to proceed
4. A popup window opens for Google OAuth authorization
5. You may already be signed in with your Google Workspace account
### Step 3: Grant Permissions
1. Review the permissions requested:
* Access to the database service (e.g., BigQuery)
* Your email and profile information
2. Click **Allow** to grant permissions
3. The popup closes automatically
### Step 4: Connection Established
1. You're redirected back to SQL Studio
2. Connection status changes to **Pending** 🟡 (testing connection)
3. SQL Studio runs a test query to verify access
4. After a few seconds, status changes to **Connected** 🟢
5. A new query tab opens automatically
### Step 5: Start Querying
1. The SQL Editor is now active
2. You can write and execute queries
3. Use the Database Explorer in the sidebar to browse tables
**What Happens Behind the Scenes**:
* OAuth token obtained from Google using your SSO session
* Token stored securely (encrypted) in Collate
* Project ID and service info pulled from service connection
* Connection tested automatically with `SELECT 1` query
## Troubleshooting Collate SSO
### Connection Fails After Clicking Connect
**Possible Causes**:
* SSO session expired
* Insufficient permissions in the database service
* Permissions not granted in the popup
**Solutions**:
* Log out of Collate and log back in to refresh SSO session
* Verify you have permissions in the database service (e.g., BigQuery `bigquery.jobs.create`)
* Ensure you clicked "Allow" in the permissions popup
* Contact your administrator to verify Google OIDC SSO configuration
***
## OAuth Authentication
**Used when**: Your organization has configured OAuth authentication with the database provider (Google, Snowflake, Azure AD), or uses a different SSO provider or email & password for Collate login.
### How OAuth Works
OAuth requires you to authenticate directly with the database service provider (Google for BigQuery, Snowflake, Azure AD for Trino). You'll be redirected to the provider's authentication page, grant permissions, and then SQL Studio securely stores your OAuth tokens for query execution.
**Key Benefits**:
* Industry-standard OAuth 2.0 security
* Direct authentication with database provider
* Works with any OAuth provider configured by your administrator
### Connecting with OAuth
#### Step 1: Access SQL Studio
1. Click **SQL Studio** from the main navigation menu
2. You'll see a landing page with available services
3. Find the service you want to connect to
#### Step 2: Select Service
1. Click on the service card (e.g., BigQuery, Snowflake, Trino)
2. A connection dialog appears
3. Click **Connect** to proceed
4. You are redirected to the OAuth provider's authentication page:
* **BigQuery**: Google authentication page
* **Snowflake**: Snowflake authentication page (e.g., `myorg.snowflakecomputing.com/oauth/authorize`)
* **Trino**: Azure AD or configured OAuth provider
#### Step 3: Authenticate with Provider
1. Sign in with your credentials:
* **BigQuery**: Google email and password
* **Snowflake**: Snowflake username and password
* **Trino**: Azure AD or organizational credentials
2. Complete any multi-factor authentication if required
3. You may be asked to select an account or role (follow the prompts)
#### Step 4: Grant Permissions
1. Review the permissions requested:
* **BigQuery**: "Allow access to BigQuery API"
* **Snowflake**: "Allow access to Snowflake resources"
* **Trino**: "Allow access to Trino/Starburst cluster"
2. Click **Allow**, **Accept**, or **Authorize** (wording varies by provider)
#### Step 5: Connection Established
1. After successful authentication, access token exchange happens automatically
2. You're redirected back to SQL Studio
3. OAuth tokens are securely stored (encrypted)
4. Connection status changes to **Pending** 🟡
5. SQL Studio runs a test query to verify access (`SELECT 1`)
6. After a few seconds, status changes to **Connected** 🟢
7. A new query tab opens automatically
#### Step 6: Start Querying
1. The SQL Editor is now active
2. You can write and execute queries
3. Use the Database Explorer to browse databases and tables
**What Happens Behind the Scenes**:
* OAuth access token obtained from provider
* Token stored securely (encrypted) in Collate
* Database connection parameters pulled from service configuration
* Connection tested automatically
### Troubleshooting External OAuth
#### "Redirect URI Mismatch" Error
**Problem**: Error message about redirect URI mismatch during OAuth flow
**Solutions**:
* Contact your administrator - OAuth app configuration needs correction
* Verify you're using the correct Collate URL (e.g., `https://collate.example.com`, not `http://localhost`)
#### Authentication Successful But Connection Fails
**Problem**: OAuth completes but test connection fails
**Solutions**:
* Verify you have permissions in the database service
* Check network connectivity to the database service
* Contact your administrator to review service configuration
#### Redirect Issues
**Problem**: Not redirected back to SQL Studio after authentication
**Solutions**:
* Check browser settings allow redirects
* Verify the OAuth redirect URL is correctly configured by your administrator
* Try a different browser (Chrome, Firefox, Edge)
***
## Basic Authentication
**Used when**: Your organization requires direct credential entry, typically for service accounts or when OAuth is not available.
### How Basic Authentication Works
Basic Authentication requires you to manually enter credentials such as Username + Password, Service Account JSON, or Key Pair. Credentials are encrypted and stored securely.
**Key Benefits**:
* Works with any credential type
* No dependency on OAuth providers
* Suitable for service accounts
***
### BigQuery Basic Authentication
#### Credentials Required
* **GCP Service Account JSON** file, containing:
* Private Key ID
* Private Key (PEM format)
* Client Email
* Client ID
#### Where to Get Credentials
1. Go to [Google Cloud Console](https://console.cloud.google.com/)
2. Navigate to **IAM & Admin** → **Service Accounts**
3. Create or select a service account
4. Grant BigQuery permissions:
* `BigQuery Data Viewer` or `BigQuery User` role
* Ensure `bigquery.jobs.create` permission
5. Go to **Keys** tab → **Add Key** → **Create new key** → **JSON**
6. Download the JSON file and store securely (e.g., 1Password)
#### Connecting with BigQuery Basic Auth
##### Step 1: Select Service
1. In SQL Studio, select the BigQuery service from the dropdown
2. Click **Configure Connection**
##### Step 2: Enter Credentials
You have two options:
**Option A: Upload JSON File**
1. Click **Upload Service Account JSON**
2. Select your downloaded `.json` file
3. All fields are automatically populated
**Option B: Manual Entry**
1. Open your service account JSON file in a text editor
2. Enter each field:
* **Private Key ID**: Copy from `private_key_id` field
* **Private Key**: Copy entire PEM key from `private_key` field (including `-----BEGIN PRIVATE KEY-----` and `-----END PRIVATE KEY-----`)
* **Client Email**: Copy from `client_email` field
* **Client ID**: Copy from `client_id` field
##### Step 3: (Optional) Configure Overrides
If your administrator enabled user-configurable fields:
* **Dataset**: Enter default BigQuery dataset (e.g., `analytics`, `marketing`)
##### Step 4: Test Connection
1. Click **Test Connection**
2. SQL Studio validates your credentials by:
* Connecting to BigQuery
* Executing a test query (`SELECT 1`)
3. Connection status changes to **Pending** 🟡
4. Wait for test to complete
##### Step 5: Save Configuration
1. If test succeeds, click **Save**
2. Your credentials are encrypted and stored
3. Connection status changes to **Connected** 🟢
4. You can now execute queries
***
## Snowflake Basic Authentication
### Credentials Required
Choose one of the following:
**Option A: Username + Password**
* Snowflake Username
* Snowflake Password
**Option B: Username + Key Pair (Private Key + Passphrase)**
* Snowflake Username
* RSA Private Key (PEM format)
* Private Key Passphrase (required)
### Where to Get Credentials
**For Username + Password**:
* Provided by your Snowflake administrator
* You can reset your password in Snowflake web UI
**For Username + Key Pair**:
1. Generate RSA key pair with passphrase:
```bash theme={null}
# Generate private key with passphrase encryption
openssl genrsa 2048 | openssl pkcs8 -topk8 -inform PEM -out rsa_key.p8
# Generate public key
openssl rsa -in rsa_key.p8 -pubout -out rsa_key.pub
```
The private key must be encrypted with a passphrase. When you run the command above, you'll be prompted to enter a passphrase. Make sure to remember it as you'll need it when connecting to Snowflake.
2. Upload public key to Snowflake:
```sql theme={null}
-- Run in Snowflake (replace with your username)
ALTER USER my_username SET RSA_PUBLIC_KEY='MIIBIjANBgkqhki...';
```
3. Store private key securely (`rsa_key.p8`)
### Connecting with Snowflake Basic Auth
#### Step 1: Select Service
1. In SQL Studio, select the Snowflake service from the dropdown
2. Click **Configure Connection**
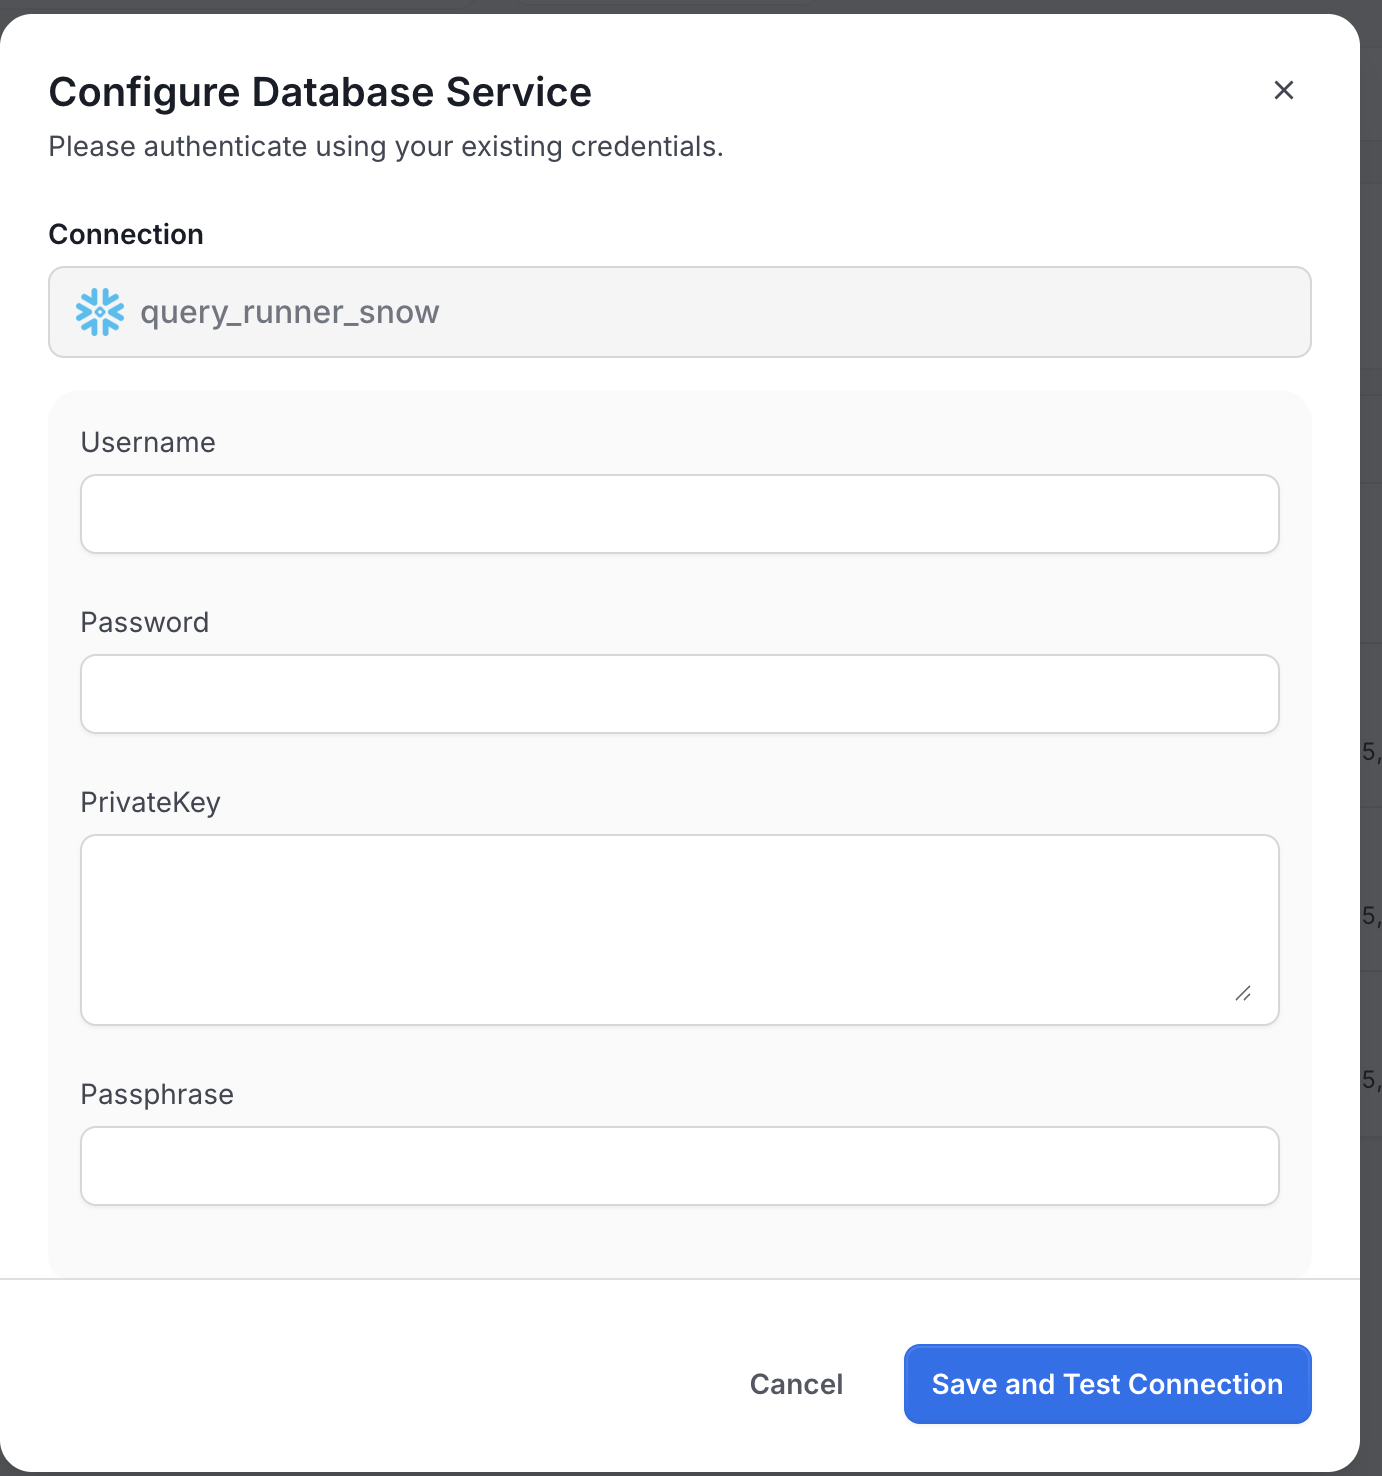
#### Step 2: Enter Credentials
1. **Username**: Enter your Snowflake username (required)
2. **Choose Authentication Method**:
**For Password-based auth**:
* Enter **Password**
**For Key Pair auth**:
* Paste your **Private Key** (entire PEM key including headers)
* Enter **Passphrase** (required)
 #### Step 3: (Optional) Configure Overrides
If your administrator enabled user-configurable fields:
* **Warehouse**: Compute warehouse (e.g., `COMPUTE_WH`, `LARGE_WH`)
* **Database**: Default database (e.g., `ANALYTICS`, `PROD`)
* **Schema**: Default schema (e.g., `PUBLIC`, `ANALYTICS`)
* **Role**: Snowflake role for access control (e.g., `ANALYST`, `ENGINEER`)
Leave these blank to use defaults from the service connection configuration.
#### Step 4: Test Connection
1. Click **Test Connection**
2. SQL Studio validates your credentials
3. Connection status changes to **Pending** 🟡
4. Wait for test to complete
#### Step 5: Save Configuration
1. If test succeeds, click **Save**
2. Your credentials are encrypted and stored
3. Connection status changes to **Connected** 🟢
***
## Trino / Redshift / PostgreSQL / MSSQL Basic Authentication
### Credentials Required
* Username
* Password
### Connecting with Basic Auth
#### Step 1: Select Service
1. In SQL Studio, select the database service (Trino, Redshift, PostgreSQL, or MSSQL) from the dropdown
2. Click **Configure Connection**
#### Step 2: Enter Credentials
1. **Username**: Enter your database username (required)
2. **Password**: Enter your database password (required)
#### Step 3: Test Connection
1. Click **Test Connection**
2. SQL Studio validates your credentials
3. Connection status changes to **Pending** 🟡
4. Wait for test to complete
#### Step 4: Save Configuration
1. If test succeeds, click **Save**
2. Your credentials are encrypted and stored
3. Connection status changes to **Connected** 🟢
***
## Troubleshooting Basic Authentication
### Test Connection Fails
**Problem**: "Invalid credentials" or "Authentication failed"
**Solutions**:
**For BigQuery**:
* Verify service account has BigQuery permissions (`bigquery.jobs.create`)
* Check that JSON file is complete and not corrupted
* Ensure Project ID in service connection matches your GCP project
**For Snowflake**:
* Verify username and password are correct
* Check that your account is not locked
* For Key Pair: Ensure public key is uploaded to Snowflake
* For Key Pair: Verify private key format (should be PKCS#8 format)
* Check that account, warehouse, database, schema exist
**For Redshift, PostgreSQL, MSSQL**:
* Verify username and password are correct
* Check that the database server is accessible from Collate
* Verify your user account has appropriate permissions
### "Permission Denied" Errors
**Problem**: Test connection succeeds but queries fail with permission errors
**Solutions**:
**For BigQuery**:
* Grant service account appropriate BigQuery dataset permissions
* Verify service account has `bigquery.jobs.create` permission
**For Snowflake**:
* Check role has `USAGE` permission on warehouse
* Verify role has `SELECT` permission on databases/schemas
* Run `SHOW GRANTS TO ROLE ;` in Snowflake to verify permissions
**For Redshift**:
* Verify user has `SELECT` permission on the target schemas/tables
* Check cluster security groups allow connections from Collate
**For PostgreSQL**:
* Verify user has `SELECT` permission on the target schemas/tables
* Check `pg_hba.conf` allows connections from Collate
**For MSSQL**:
* Verify user has `SELECT` permission on the target databases/schemas
* Check firewall rules allow connections from Collate
### Private Key Format Issues (Snowflake)
**Problem**: "Invalid private key format" error
**Solutions**:
* Ensure key is in PKCS#8 format (not PKCS#1)
* Key should start with `-----BEGIN PRIVATE KEY-----` (not `-----BEGIN RSA PRIVATE KEY-----`)
* Convert if needed:
```bash theme={null}
openssl rsa -in rsa_key_old.pem -out rsa_key.p8 -outform PEM
openssl pkcs8 -topk8 -inform PEM -in rsa_key.p8 -out rsa_key_pkcs8.p8 -nocrypt
```
***
## Managing Connections
### Viewing Your Connections
To see all services you've connected to:
1. In SQL Studio, look at the service list in the sidebar
2. Each service shows:
* Service name and type (BigQuery, Trino, Snowflake, Redshift, PostgreSQL, MSSQL)
* Connection status indicator (🟢 Connected, ⚪ Not Connected)
* Last connected timestamp (hover over status)
You can also view connection details by clicking the service and checking the toolbar.
### Updating Credentials (Basic Auth Only)
If your password or credentials change:
1. Click on the service in SQL Studio
2. If disconnected, click to authenticate again
3. Enter your new credentials in the modal form
4. Click **Test Connection** to verify
5. Click **Save** to update
Your saved queries remain intact when you update credentials.
### Reconnecting (All Auth Types)
If your connection is lost or you need to reconnect:
**For OAuth (Collate SSO or OAuth)**:
1. Click on the service card
2. OAuth flow initiates automatically
3. You may be re-authenticated automatically if your session is still valid
4. If not, sign in again and grant permissions
**For Basic Auth**:
1. Click on the service card
2. Modal form appears
3. Re-enter your credentials
4. Click **Test Connection**
5. Click **Save**
### Disconnecting from a Service
To remove your connection and delete stored credentials:
1. In SQL Studio sidebar, find the service
2. Right-click on the service name (or click the **⋮** menu icon)
3. Select **Disconnect** or **Delete Connection**
4. Confirm the action
**What happens when you disconnect**:
* ✅ Your saved queries are preserved and remain accessible
* ❌ Your authentication credentials are permanently deleted
* ❌ You'll need to re-authenticate to connect again
Disconnecting removes all stored credentials (OAuth tokens or Basic Auth credentials). You'll need to go through the full authentication process again to reconnect.
## Security Best Practices
### Credential Storage
* Store credentials in a secure password manager (e.g., 1Password, LastPass)
* Never share credentials via email or chat
* Use strong passwords for password-based authentication
* Rotate service account keys regularly
### OAuth Token Management
* OAuth tokens are stored encrypted in Collate
* Tokens are securely stored and used for query execution
* If you suspect token compromise, click "Disconnect" and reconnect to generate new tokens
### Least Privilege Access
* Use service accounts with minimal required permissions
* For Snowflake, use specific roles (not `ACCOUNTADMIN`)
* For BigQuery, grant dataset-level permissions (not project-wide)
***
## Tips for Successful Connections
### For OAuth (Collate SSO & OAuth)
✅ **Do**:
* Keep your SSO session active
* Allow popups for OAuth authorization (if popup appears)
* Re-authenticate promptly when connection is lost
❌ **Don't**:
* Block popup windows or redirects (OAuth won't work)
* Clear browser cookies frequently (may break OAuth session)
* Share your OAuth tokens or sessions with others
### For Basic Authentication
✅ **Do**:
* Use strong, unique passwords
* Store credentials securely (use a password manager like 1Password, LastPass)
* Update credentials in SQL Studio if they change in the database
* Use service accounts where possible (BigQuery)
❌ **Don't**:
* Share your credentials with others
* Use your personal credentials for shared/team queries
* Leave credentials in plain text files or unencrypted storage
### General Best Practices
1. **Test connection before important work**: Ensure you're connected before writing complex queries
2. **Monitor connection status**: Glance at the status indicator before running queries
3. **Reconnect if needed**: Don't wait until query execution to discover connection issues
4. **Log out when done**: Close SQL Studio tab when finished to secure your session
5. **Report issues promptly**: If connection consistently fails, notify your administrator
***
## Frequently Asked Questions
**Q: Are my credentials stored securely?**
A: Yes. All credentials (OAuth tokens and Basic Auth credentials) are encrypted before storage using industry-standard encryption.
**Q: Can I use multiple services at once?**
A: Yes! Connect to multiple services and switch between them using the service selector in SQL Studio.
**Q: What happens if I disconnect?**
A: Your saved queries remain intact. You can reconnect anytime to access them again. Only your authentication credentials are deleted.
**Q: Can I share my connection with teammates?**
A: No. Each user has their own personal connection with their own credentials/tokens. Connections cannot be shared for security reasons.
**Q: What if my administrator disables SQL Studio?**
A: The service will disappear from SQL Studio. Your saved queries are preserved and will be accessible if SQL Studio is re-enabled.
**Q: How do I get help with connection issues?**
A: Check the [Troubleshooting](#troubleshooting-collate-sso) sections above for your authentication method. If issues persist, contact your Collate administrator.
***
## Next Steps
Now that you're connected, you're ready to execute queries:
* **Learn Query Execution**: Read the [Query Execution](/how-to-guides/sql-studio/query-execution) guide to master SQL Studio
* **Explore Database Explorer**: Browse your databases, schemas, and tables in the sidebar
* **Save Queries**: Start building your library of reusable queries
***
**Ready to run your first query?** Head to [Query Execution](/how-to-guides/sql-studio/query-execution) to learn how to write and execute SQL queries in SQL Studio.
#### Step 3: (Optional) Configure Overrides
If your administrator enabled user-configurable fields:
* **Warehouse**: Compute warehouse (e.g., `COMPUTE_WH`, `LARGE_WH`)
* **Database**: Default database (e.g., `ANALYTICS`, `PROD`)
* **Schema**: Default schema (e.g., `PUBLIC`, `ANALYTICS`)
* **Role**: Snowflake role for access control (e.g., `ANALYST`, `ENGINEER`)
Leave these blank to use defaults from the service connection configuration.
#### Step 4: Test Connection
1. Click **Test Connection**
2. SQL Studio validates your credentials
3. Connection status changes to **Pending** 🟡
4. Wait for test to complete
#### Step 5: Save Configuration
1. If test succeeds, click **Save**
2. Your credentials are encrypted and stored
3. Connection status changes to **Connected** 🟢
***
## Trino / Redshift / PostgreSQL / MSSQL Basic Authentication
### Credentials Required
* Username
* Password
### Connecting with Basic Auth
#### Step 1: Select Service
1. In SQL Studio, select the database service (Trino, Redshift, PostgreSQL, or MSSQL) from the dropdown
2. Click **Configure Connection**
#### Step 2: Enter Credentials
1. **Username**: Enter your database username (required)
2. **Password**: Enter your database password (required)
#### Step 3: Test Connection
1. Click **Test Connection**
2. SQL Studio validates your credentials
3. Connection status changes to **Pending** 🟡
4. Wait for test to complete
#### Step 4: Save Configuration
1. If test succeeds, click **Save**
2. Your credentials are encrypted and stored
3. Connection status changes to **Connected** 🟢
***
## Troubleshooting Basic Authentication
### Test Connection Fails
**Problem**: "Invalid credentials" or "Authentication failed"
**Solutions**:
**For BigQuery**:
* Verify service account has BigQuery permissions (`bigquery.jobs.create`)
* Check that JSON file is complete and not corrupted
* Ensure Project ID in service connection matches your GCP project
**For Snowflake**:
* Verify username and password are correct
* Check that your account is not locked
* For Key Pair: Ensure public key is uploaded to Snowflake
* For Key Pair: Verify private key format (should be PKCS#8 format)
* Check that account, warehouse, database, schema exist
**For Redshift, PostgreSQL, MSSQL**:
* Verify username and password are correct
* Check that the database server is accessible from Collate
* Verify your user account has appropriate permissions
### "Permission Denied" Errors
**Problem**: Test connection succeeds but queries fail with permission errors
**Solutions**:
**For BigQuery**:
* Grant service account appropriate BigQuery dataset permissions
* Verify service account has `bigquery.jobs.create` permission
**For Snowflake**:
* Check role has `USAGE` permission on warehouse
* Verify role has `SELECT` permission on databases/schemas
* Run `SHOW GRANTS TO ROLE ;` in Snowflake to verify permissions
**For Redshift**:
* Verify user has `SELECT` permission on the target schemas/tables
* Check cluster security groups allow connections from Collate
**For PostgreSQL**:
* Verify user has `SELECT` permission on the target schemas/tables
* Check `pg_hba.conf` allows connections from Collate
**For MSSQL**:
* Verify user has `SELECT` permission on the target databases/schemas
* Check firewall rules allow connections from Collate
### Private Key Format Issues (Snowflake)
**Problem**: "Invalid private key format" error
**Solutions**:
* Ensure key is in PKCS#8 format (not PKCS#1)
* Key should start with `-----BEGIN PRIVATE KEY-----` (not `-----BEGIN RSA PRIVATE KEY-----`)
* Convert if needed:
```bash theme={null}
openssl rsa -in rsa_key_old.pem -out rsa_key.p8 -outform PEM
openssl pkcs8 -topk8 -inform PEM -in rsa_key.p8 -out rsa_key_pkcs8.p8 -nocrypt
```
***
## Managing Connections
### Viewing Your Connections
To see all services you've connected to:
1. In SQL Studio, look at the service list in the sidebar
2. Each service shows:
* Service name and type (BigQuery, Trino, Snowflake, Redshift, PostgreSQL, MSSQL)
* Connection status indicator (🟢 Connected, ⚪ Not Connected)
* Last connected timestamp (hover over status)
You can also view connection details by clicking the service and checking the toolbar.
### Updating Credentials (Basic Auth Only)
If your password or credentials change:
1. Click on the service in SQL Studio
2. If disconnected, click to authenticate again
3. Enter your new credentials in the modal form
4. Click **Test Connection** to verify
5. Click **Save** to update
Your saved queries remain intact when you update credentials.
### Reconnecting (All Auth Types)
If your connection is lost or you need to reconnect:
**For OAuth (Collate SSO or OAuth)**:
1. Click on the service card
2. OAuth flow initiates automatically
3. You may be re-authenticated automatically if your session is still valid
4. If not, sign in again and grant permissions
**For Basic Auth**:
1. Click on the service card
2. Modal form appears
3. Re-enter your credentials
4. Click **Test Connection**
5. Click **Save**
### Disconnecting from a Service
To remove your connection and delete stored credentials:
1. In SQL Studio sidebar, find the service
2. Right-click on the service name (or click the **⋮** menu icon)
3. Select **Disconnect** or **Delete Connection**
4. Confirm the action
**What happens when you disconnect**:
* ✅ Your saved queries are preserved and remain accessible
* ❌ Your authentication credentials are permanently deleted
* ❌ You'll need to re-authenticate to connect again
Disconnecting removes all stored credentials (OAuth tokens or Basic Auth credentials). You'll need to go through the full authentication process again to reconnect.
## Security Best Practices
### Credential Storage
* Store credentials in a secure password manager (e.g., 1Password, LastPass)
* Never share credentials via email or chat
* Use strong passwords for password-based authentication
* Rotate service account keys regularly
### OAuth Token Management
* OAuth tokens are stored encrypted in Collate
* Tokens are securely stored and used for query execution
* If you suspect token compromise, click "Disconnect" and reconnect to generate new tokens
### Least Privilege Access
* Use service accounts with minimal required permissions
* For Snowflake, use specific roles (not `ACCOUNTADMIN`)
* For BigQuery, grant dataset-level permissions (not project-wide)
***
## Tips for Successful Connections
### For OAuth (Collate SSO & OAuth)
✅ **Do**:
* Keep your SSO session active
* Allow popups for OAuth authorization (if popup appears)
* Re-authenticate promptly when connection is lost
❌ **Don't**:
* Block popup windows or redirects (OAuth won't work)
* Clear browser cookies frequently (may break OAuth session)
* Share your OAuth tokens or sessions with others
### For Basic Authentication
✅ **Do**:
* Use strong, unique passwords
* Store credentials securely (use a password manager like 1Password, LastPass)
* Update credentials in SQL Studio if they change in the database
* Use service accounts where possible (BigQuery)
❌ **Don't**:
* Share your credentials with others
* Use your personal credentials for shared/team queries
* Leave credentials in plain text files or unencrypted storage
### General Best Practices
1. **Test connection before important work**: Ensure you're connected before writing complex queries
2. **Monitor connection status**: Glance at the status indicator before running queries
3. **Reconnect if needed**: Don't wait until query execution to discover connection issues
4. **Log out when done**: Close SQL Studio tab when finished to secure your session
5. **Report issues promptly**: If connection consistently fails, notify your administrator
***
## Frequently Asked Questions
**Q: Are my credentials stored securely?**
A: Yes. All credentials (OAuth tokens and Basic Auth credentials) are encrypted before storage using industry-standard encryption.
**Q: Can I use multiple services at once?**
A: Yes! Connect to multiple services and switch between them using the service selector in SQL Studio.
**Q: What happens if I disconnect?**
A: Your saved queries remain intact. You can reconnect anytime to access them again. Only your authentication credentials are deleted.
**Q: Can I share my connection with teammates?**
A: No. Each user has their own personal connection with their own credentials/tokens. Connections cannot be shared for security reasons.
**Q: What if my administrator disables SQL Studio?**
A: The service will disappear from SQL Studio. Your saved queries are preserved and will be accessible if SQL Studio is re-enabled.
**Q: How do I get help with connection issues?**
A: Check the [Troubleshooting](#troubleshooting-collate-sso) sections above for your authentication method. If issues persist, contact your Collate administrator.
***
## Next Steps
Now that you're connected, you're ready to execute queries:
* **Learn Query Execution**: Read the [Query Execution](/how-to-guides/sql-studio/query-execution) guide to master SQL Studio
* **Explore Database Explorer**: Browse your databases, schemas, and tables in the sidebar
* **Save Queries**: Start building your library of reusable queries
***
**Ready to run your first query?** Head to [Query Execution](/how-to-guides/sql-studio/query-execution) to learn how to write and execute SQL queries in SQL Studio.