> ## Documentation Index
> Fetch the complete documentation index at: https://docs.getcollate.io/llms.txt
> Use this file to discover all available pages before exploring further.
# SQL Studio Admin Configuration | Collate SQL Studio Guide
> Configure SQL Studio for database services, set up authentication methods, and control user access.
# Admin Configuration
After installing the Query Runner application, administrators must configure SQL Studio for each database service. This configuration determines which authentication methods are available to users and what connection settings they can override.
## Configuration Overview
### Prerequisites
Before configuring SQL Studio for any database service:
1. Ensure the database service is already configured in Collate
2. Service connection should be working (metadata ingestion successful)
3. For Collate SSO: Google OIDC SSO must be configured in Collate (Settings → Security → SSO)
4. For OAuth: You must have OAuth credentials (Client ID and Client Secret) from your OAuth provider
### Accessing Service Configuration
1. Navigate to **Settings** → **Services** → **Database Services**
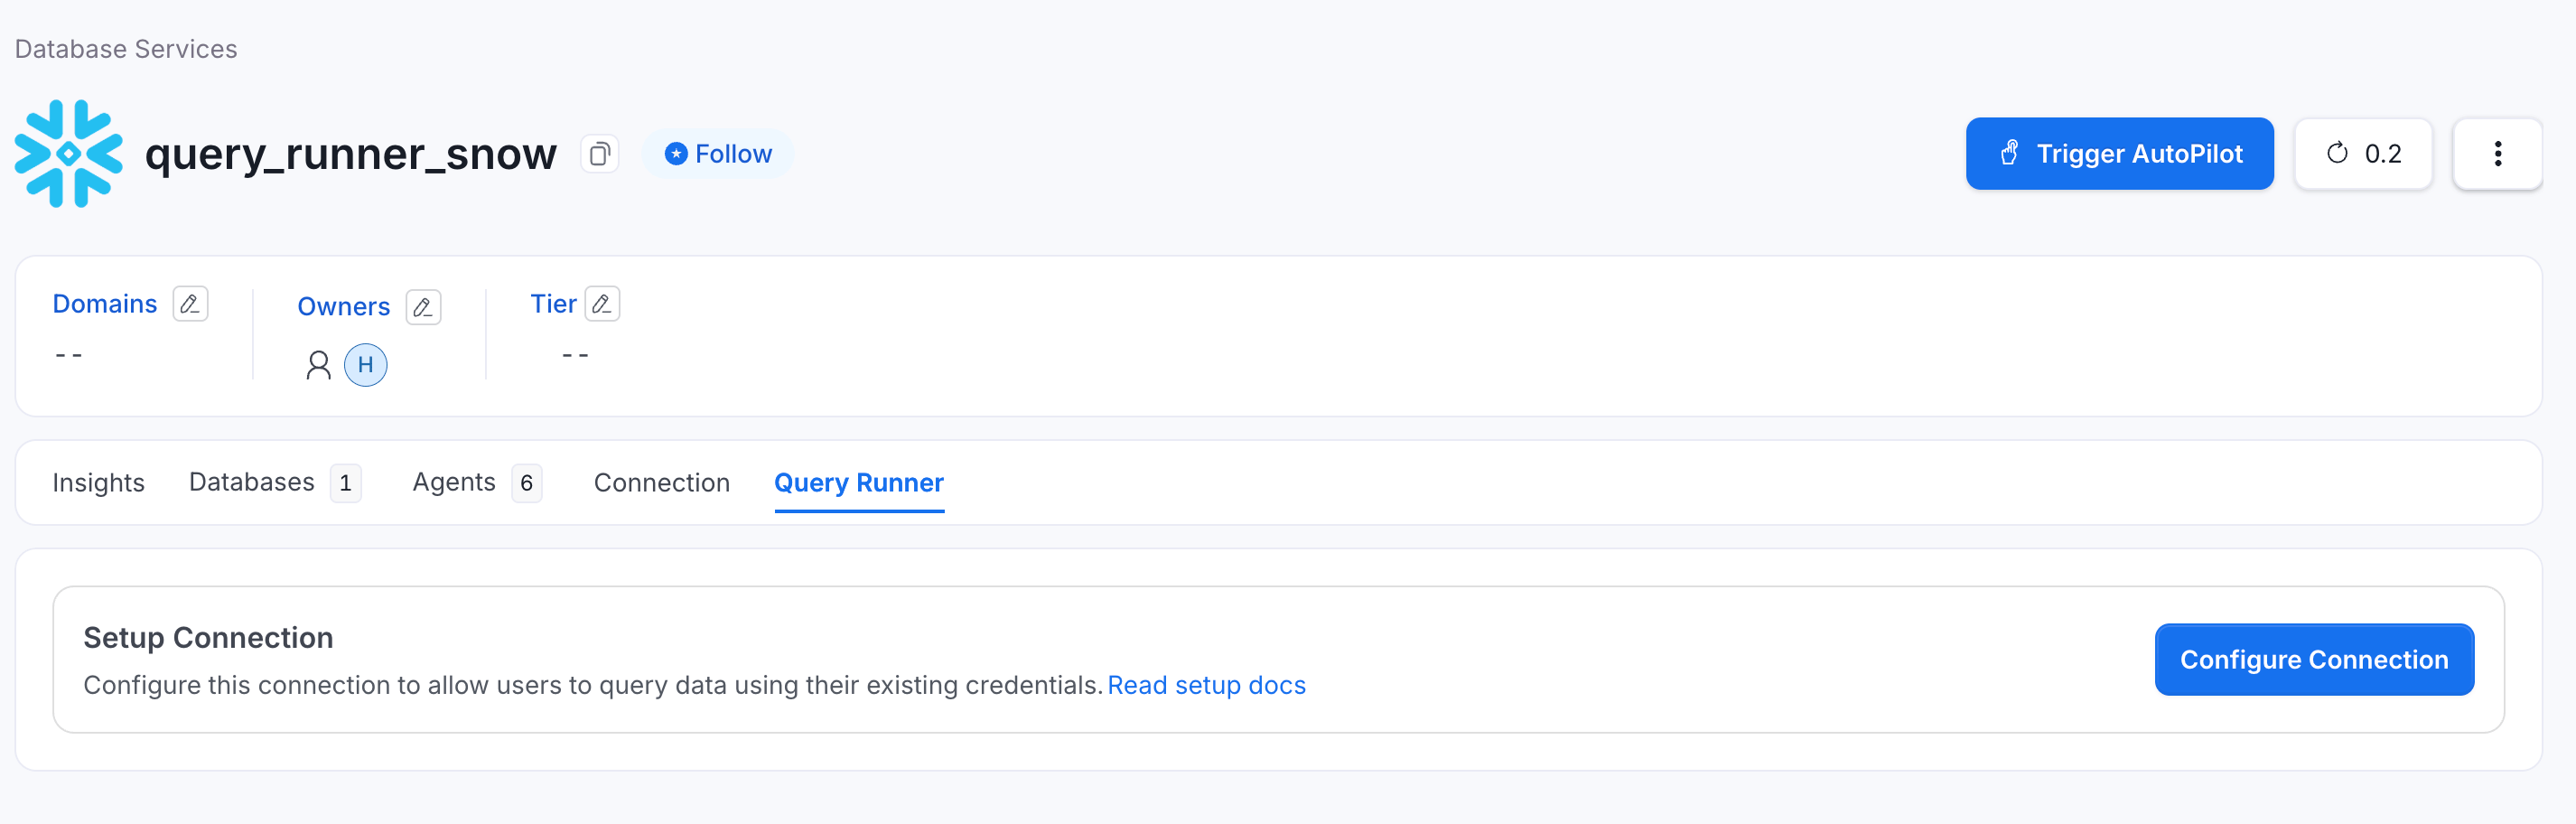 2. Select the database service you want to configure (e.g., `my-bigquery`, `production-snowflake`)
3. Click on the **Query Runner** tab
4. Click **Configure Connection** to begin setup
2. Select the database service you want to configure (e.g., `my-bigquery`, `production-snowflake`)
3. Click on the **Query Runner** tab
4. Click **Configure Connection** to begin setup
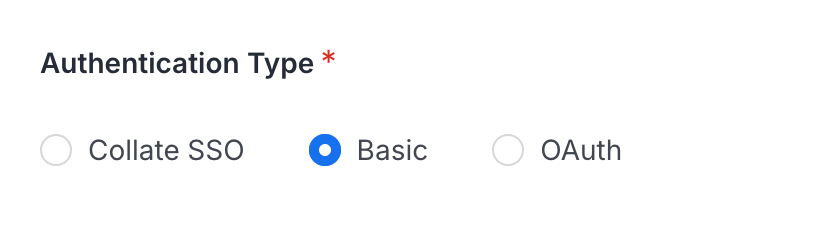 SQL Studio must be configured separately for each database service. You can configure multiple services with different authentication methods based on your security requirements.
### Common Configuration Settings
All services share these configuration options:
| Setting | Description | Default | Allowed Values |
| ----------------------- | --------------------------------------------- | ------- | ------------------------ |
| **Authentication Type** | How users authenticate to the service | Varies | CollateSSO, OAuth, Basic |
| **Enabled** | Whether SQL Studio is active for this service | `false` | `true` / `false` |
**Important**: SQL Studio is disabled by default. You must toggle **Enabled** to ON to make it available to users after configuration.
## BigQuery Configuration
BigQuery supports three authentication methods: Collate SSO, OAuth, and Basic Authentication.
### Authentication Method 1: Collate SSO
**Recommended for**: Organizations using Google OIDC for Collate login
Collate SSO leverages your existing Google SSO configuration in Collate to authenticate with database services. Instead of configuring separate OAuth credentials, SQL Studio automatically uses already configured fields from Collate login.
**SSO Support**: As of now, Collate SSO flow is only supported for **Google OIDC (OpenID Connect)**.
**Configuration Steps**:
1. In the Query Runner configuration form, select **Authentication Type** → **Collate SSO**
2. **OAuth Credentials** (auto-populated):
* Client ID: (automatically fetched from Google OIDC SSO configuration)
* Client Secret: (automatically fetched from Google OIDC SSO configuration)
* Scope: (automatically set to include BigQuery scope: `https://www.googleapis.com/auth/bigquery`)
* Redirect URL: (auto-generated based on your Collate domain)
SQL Studio must be configured separately for each database service. You can configure multiple services with different authentication methods based on your security requirements.
### Common Configuration Settings
All services share these configuration options:
| Setting | Description | Default | Allowed Values |
| ----------------------- | --------------------------------------------- | ------- | ------------------------ |
| **Authentication Type** | How users authenticate to the service | Varies | CollateSSO, OAuth, Basic |
| **Enabled** | Whether SQL Studio is active for this service | `false` | `true` / `false` |
**Important**: SQL Studio is disabled by default. You must toggle **Enabled** to ON to make it available to users after configuration.
## BigQuery Configuration
BigQuery supports three authentication methods: Collate SSO, OAuth, and Basic Authentication.
### Authentication Method 1: Collate SSO
**Recommended for**: Organizations using Google OIDC for Collate login
Collate SSO leverages your existing Google SSO configuration in Collate to authenticate with database services. Instead of configuring separate OAuth credentials, SQL Studio automatically uses already configured fields from Collate login.
**SSO Support**: As of now, Collate SSO flow is only supported for **Google OIDC (OpenID Connect)**.
**Configuration Steps**:
1. In the Query Runner configuration form, select **Authentication Type** → **Collate SSO**
2. **OAuth Credentials** (auto-populated):
* Client ID: (automatically fetched from Google OIDC SSO configuration)
* Client Secret: (automatically fetched from Google OIDC SSO configuration)
* Scope: (automatically set to include BigQuery scope: `https://www.googleapis.com/auth/bigquery`)
* Redirect URL: (auto-generated based on your Collate domain)
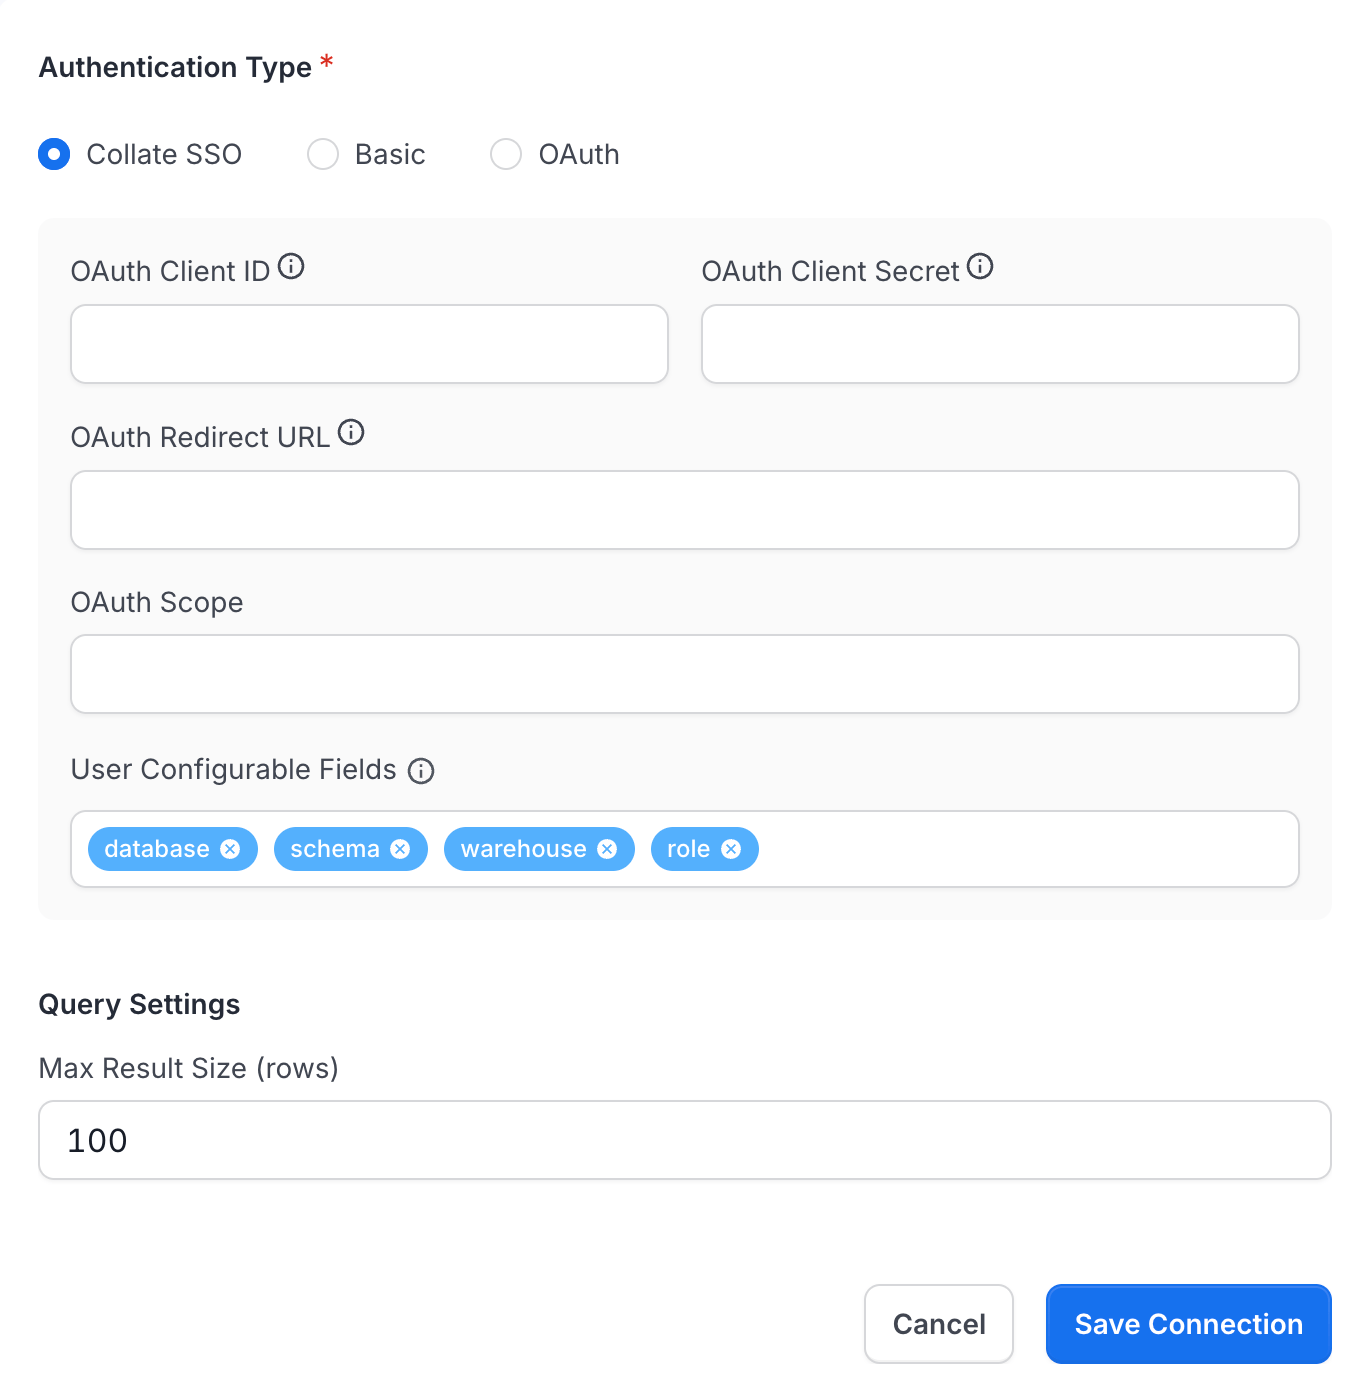 3. Click **Save Configuration**
4. OAuth credentials are automatically prefetched from your Collate's Google SSO settings
5. After saving, you can view the auto-enriched values in the configuration
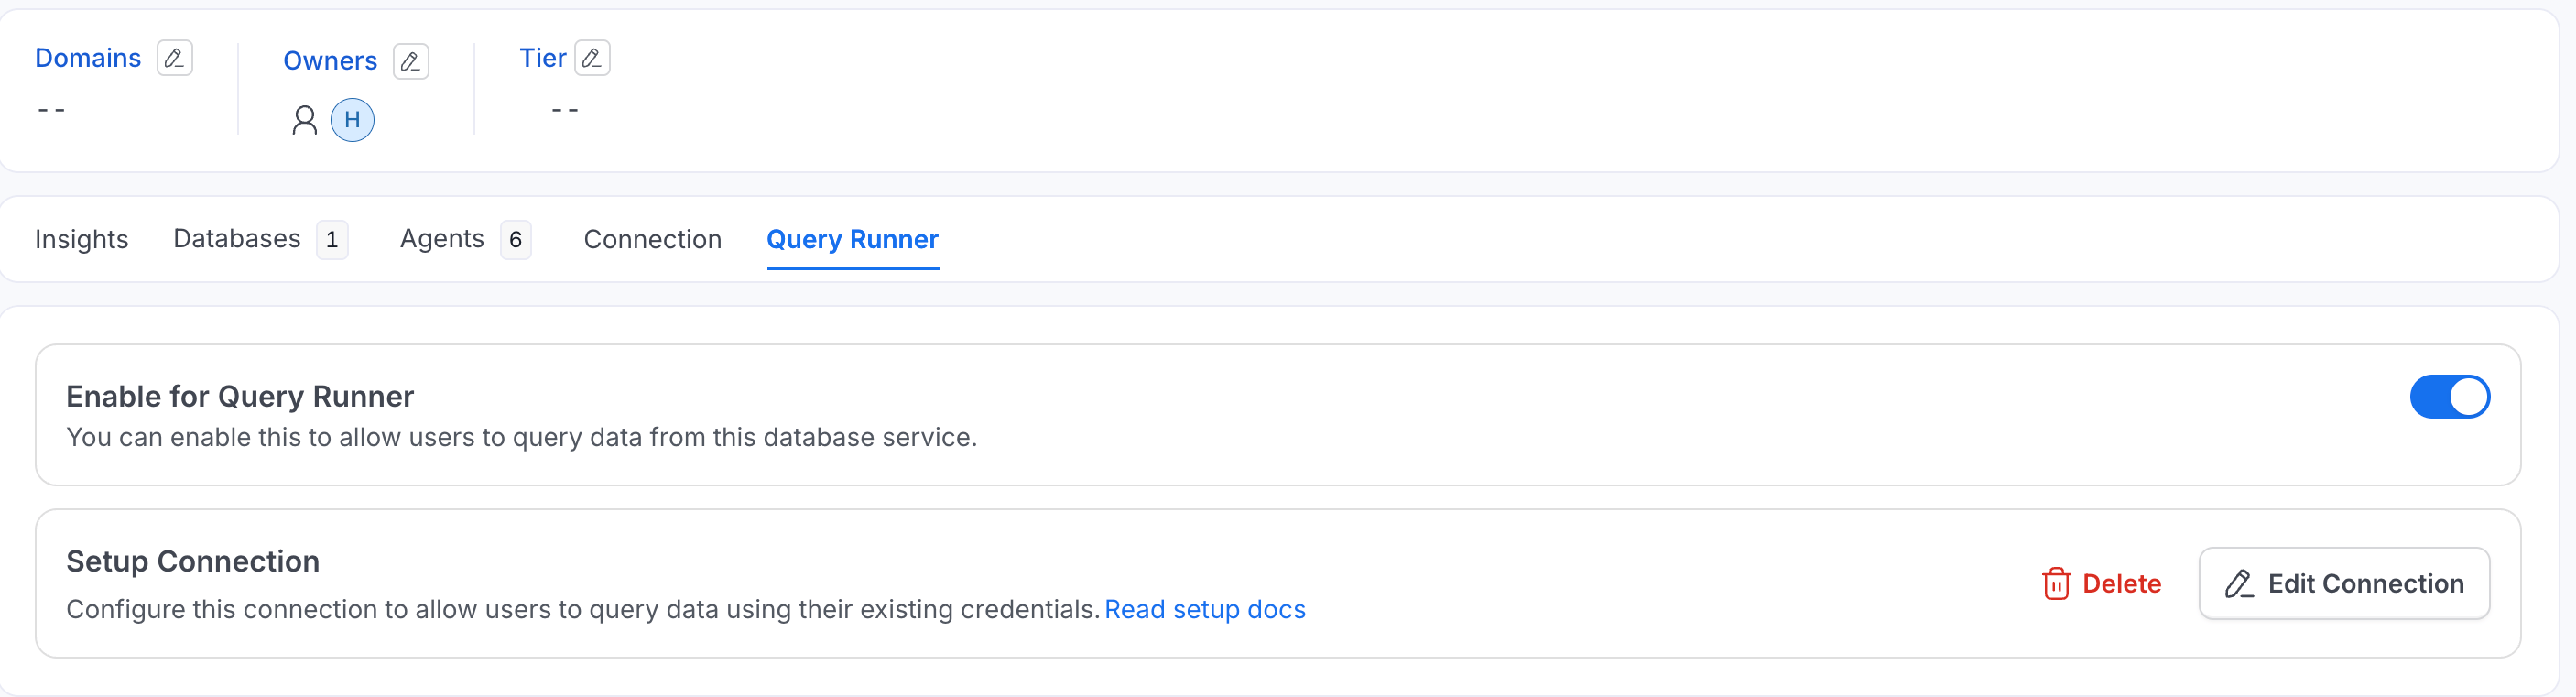
6. Toggle **Enabled** to ON to activate SQL Studio for this service
7. Click **Save** again to apply changes
3. Click **Save Configuration**
4. OAuth credentials are automatically prefetched from your Collate's Google SSO settings
5. After saving, you can view the auto-enriched values in the configuration
6. Toggle **Enabled** to ON to activate SQL Studio for this service
7. Click **Save** again to apply changes
 **Prerequisites**:
* Google OIDC SSO must be configured in Collate (Settings → Security → SSO)
* SSO OAuth app must have BigQuery API scope enabled
* Users must have BigQuery permissions in their Google Cloud projects
***
### Authentication Method 2: OAuth
**Recommended for**: Organizations that want OAuth but use a different SSO provider or email & password for Collate login (e.g., Okta, Auth0, Email/Password)
OAuth allows users to authenticate directly with Google OAuth 2.0, separate from their Collate login.
**Configuration Steps**:
**Step 1: Create Google OAuth App** (if not already created)
1. Go to [Google Cloud Console](https://console.cloud.google.com/)
2. Navigate to **APIs & Services** → **Credentials**
3. Click **Create Credentials** → **OAuth 2.0 Client ID**
4. Application type: **Web application**
5. Name: `Collate SQL Studio - BigQuery`
6. Authorized redirect URIs: Add `https://your-collate-domain.com/api/v1/queryRunner/oauth/callback`
* Replace `your-collate-domain.com` with your actual Collate domain
* Ensure the URL is exactly `https://` (not `http://`) for production
7. Click **Create**
8. Copy the **Client ID** and **Client Secret** (you'll need these in Step 2)
**Keep credentials secure**: Store your Client ID and Client Secret in a secure location (e.g., 1Password, AWS Secrets Manager). Never commit them to version control.
**Step 2: Configure in Collate**
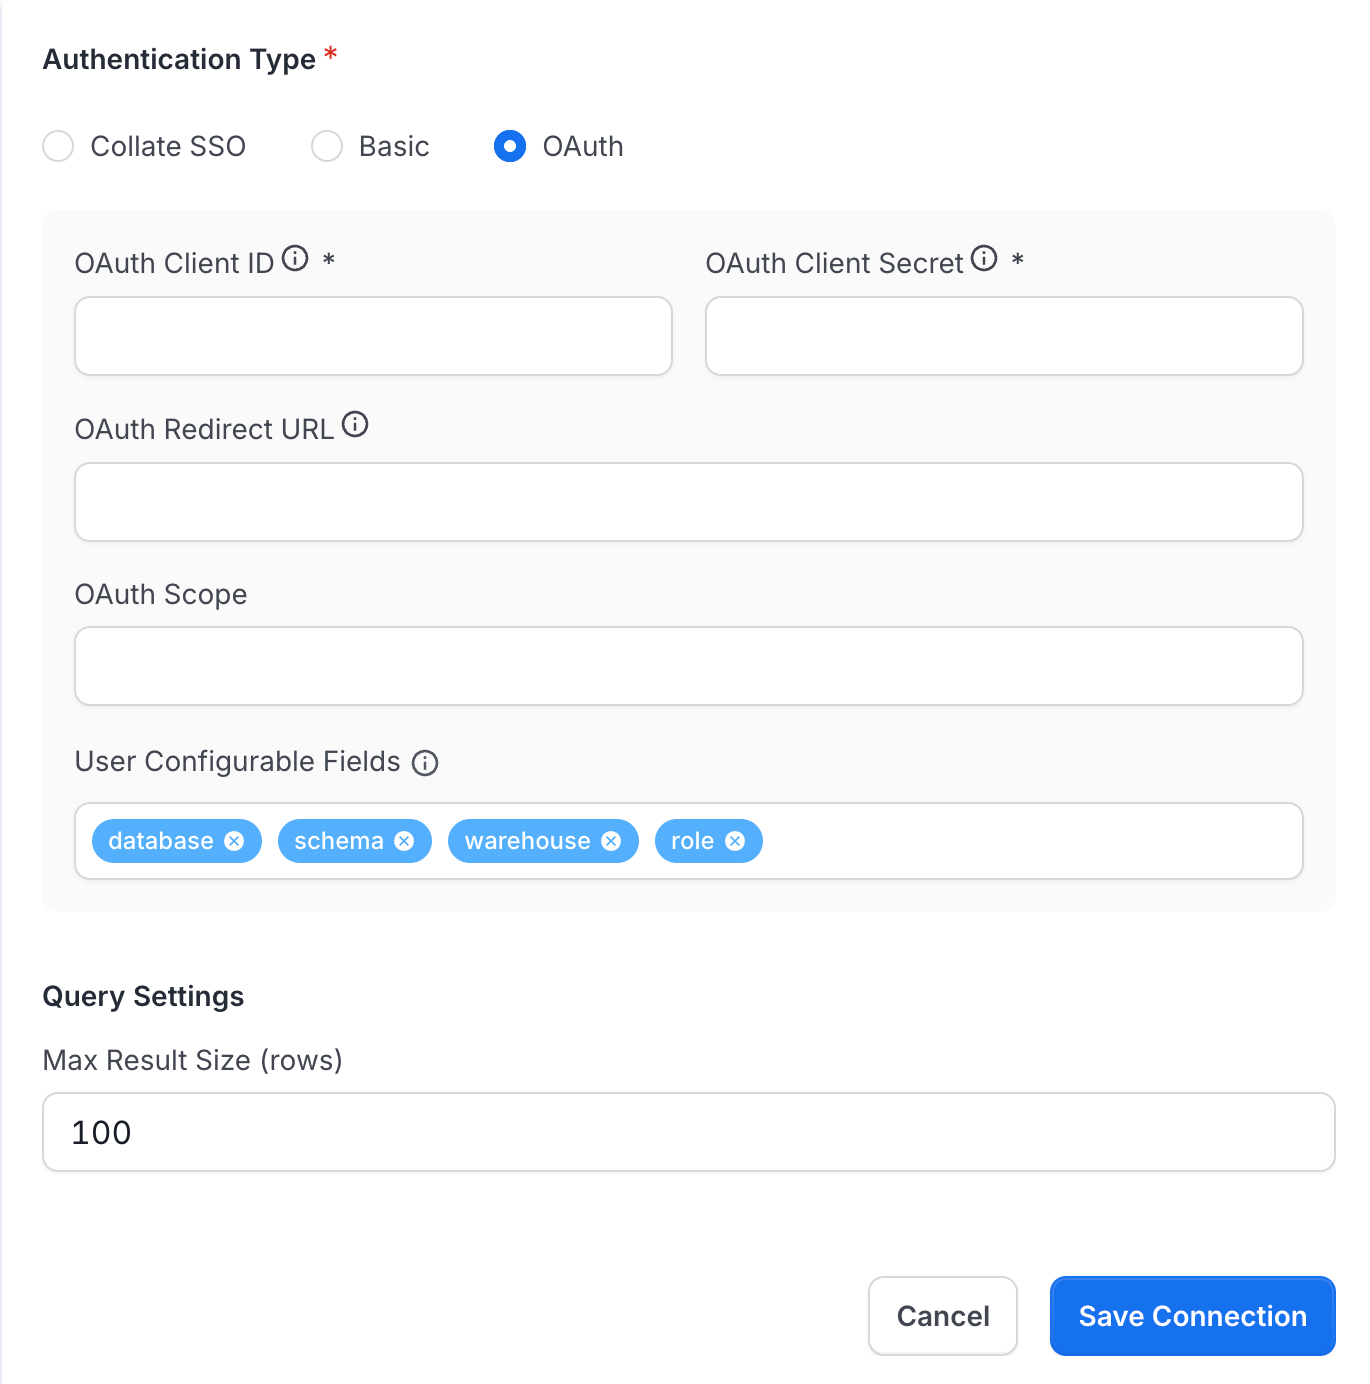
1. In the Query Runner configuration form, select **Authentication Type** → **OAuth**
2. Enter **OAuth Client Credentials**:
* **Client ID**: Paste from Google Cloud Console
* **Client Secret**: Paste from Google Cloud Console
* **Redirect URL**: `https://your-collate-domain.com/api/v1/queryRunner/oauth/callback` (verify exact match)
* **Scope**: `https://www.googleapis.com/auth/bigquery` (default)
**Prerequisites**:
* Google OIDC SSO must be configured in Collate (Settings → Security → SSO)
* SSO OAuth app must have BigQuery API scope enabled
* Users must have BigQuery permissions in their Google Cloud projects
***
### Authentication Method 2: OAuth
**Recommended for**: Organizations that want OAuth but use a different SSO provider or email & password for Collate login (e.g., Okta, Auth0, Email/Password)
OAuth allows users to authenticate directly with Google OAuth 2.0, separate from their Collate login.
**Configuration Steps**:
**Step 1: Create Google OAuth App** (if not already created)
1. Go to [Google Cloud Console](https://console.cloud.google.com/)
2. Navigate to **APIs & Services** → **Credentials**
3. Click **Create Credentials** → **OAuth 2.0 Client ID**
4. Application type: **Web application**
5. Name: `Collate SQL Studio - BigQuery`
6. Authorized redirect URIs: Add `https://your-collate-domain.com/api/v1/queryRunner/oauth/callback`
* Replace `your-collate-domain.com` with your actual Collate domain
* Ensure the URL is exactly `https://` (not `http://`) for production
7. Click **Create**
8. Copy the **Client ID** and **Client Secret** (you'll need these in Step 2)
**Keep credentials secure**: Store your Client ID and Client Secret in a secure location (e.g., 1Password, AWS Secrets Manager). Never commit them to version control.
**Step 2: Configure in Collate**
1. In the Query Runner configuration form, select **Authentication Type** → **OAuth**
2. Enter **OAuth Client Credentials**:
* **Client ID**: Paste from Google Cloud Console
* **Client Secret**: Paste from Google Cloud Console
* **Redirect URL**: `https://your-collate-domain.com/api/v1/queryRunner/oauth/callback` (verify exact match)
* **Scope**: `https://www.googleapis.com/auth/bigquery` (default)
 3. Toggle **Enabled** to ON to activate
4. Click **Save Configuration**
***
### Authentication Method 3: Basic Authentication (Service Account)
**Recommended for**: Service accounts, automated access, or when OAuth is not feasible
Basic Authentication allows users to provide their own GCP Service Account credentials.
**Setup Steps**:
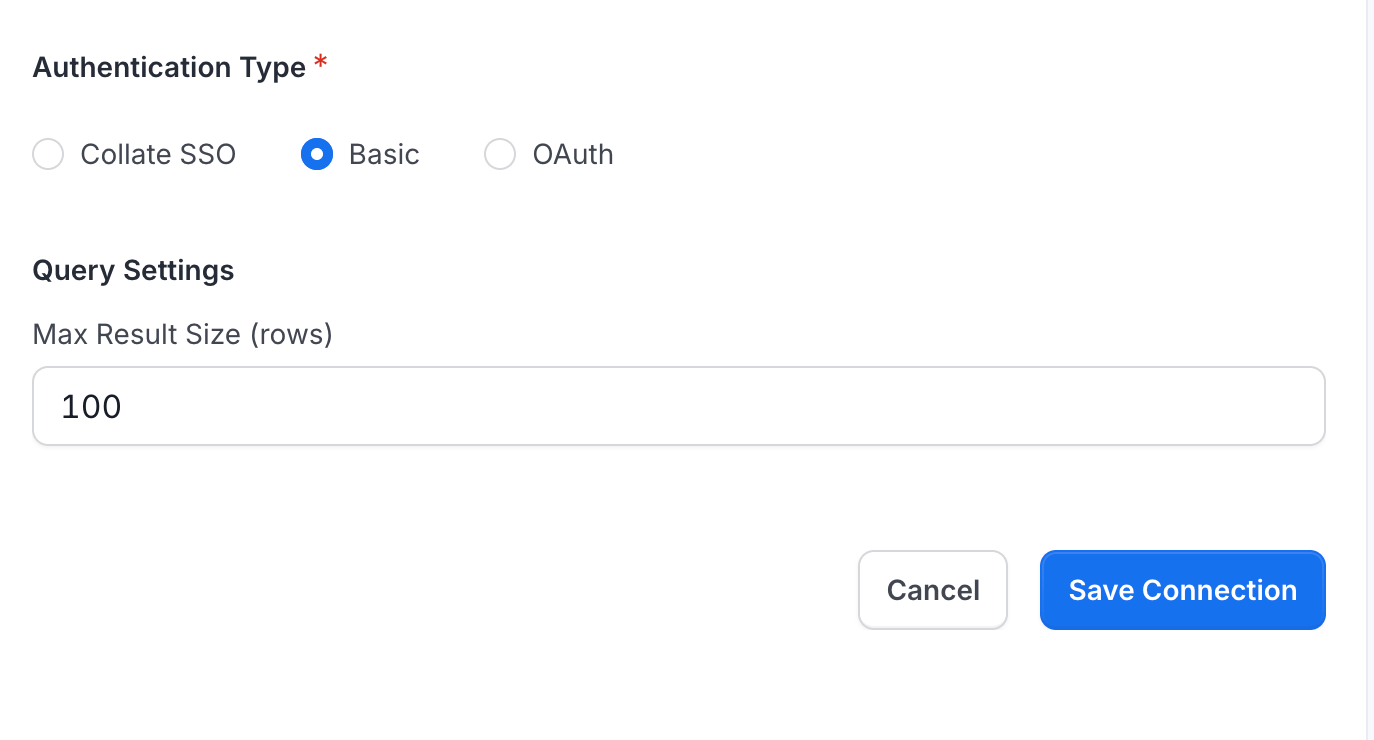
1. In the Query Runner configuration form, select **Authentication Type** → **Basic**
3. Toggle **Enabled** to ON to activate
4. Click **Save Configuration**
***
### Authentication Method 3: Basic Authentication (Service Account)
**Recommended for**: Service accounts, automated access, or when OAuth is not feasible
Basic Authentication allows users to provide their own GCP Service Account credentials.
**Setup Steps**:
1. In the Query Runner configuration form, select **Authentication Type** → **Basic**
 2. Toggle **Enabled** to ON to activate
3. Click **Save Configuration**
**User Requirements**:
* Each user must have a GCP Service Account with BigQuery permissions
* Service Account must have `bigquery.jobs.create` permission
* Users will upload their Service Account JSON file or enter credentials manually
***
## Snowflake Configuration
Snowflake supports OAuth and Basic Authentication.
### Authentication Method 1: OAuth
**Recommended for**: Organizations with Snowflake OAuth integration configured
**Prerequisites**:
* Snowflake OAuth Security Integration must be created (see setup below)
**Setup Steps**:
1. **Create Snowflake OAuth Security Integration** (run in Snowflake):
```sql theme={null}
CREATE OR REPLACE SECURITY INTEGRATION COLLATE_SQL_STUDIO_OAUTH
TYPE = OAUTH
OAUTH_CLIENT = CUSTOM
OAUTH_CLIENT_TYPE = 'CONFIDENTIAL'
OAUTH_REDIRECT_URI = 'https://your-collate-domain.com/api/v1/queryRunner/oauth/callback'
OAUTH_ALLOW_NON_TLS_REDIRECT_URI = FALSE -- Set TRUE for localhost/dev only
OAUTH_ISSUE_REFRESH_TOKENS = TRUE
OAUTH_REFRESH_TOKEN_VALIDITY = 86400 -- 24 hours
OAUTH_USE_SECONDARY_ROLES = 'IMPLICIT'
ENABLED = TRUE;
```
2. **Retrieve OAuth Credentials** (run in Snowflake):
```sql theme={null}
SELECT SYSTEM$SHOW_OAUTH_CLIENT_SECRETS('COLLATE_SQL_STUDIO_OAUTH');
```
This returns JSON with `OAUTH_CLIENT_ID` and `OAUTH_CLIENT_SECRET`.
3. **Configure in Collate**:
* In the Query Runner configuration form, select **Authentication Type** → **OAuth**
* Enter **OAuth Client Credentials**:
* **Client ID**: From step 2
* **Client Secret**: From step 2
* **Redirect URL**: `https://your-collate-domain.com/api/v1/queryRunner/oauth/callback`
* **Scope**: `session:role-any` (or specific role scope like `session:role:ANALYST`)
* **(Optional)** Enable **User Configurable Fields**:
* ☑️ **Warehouse**: Allow users to select compute warehouse
* ☑️ **Database**: Allow users to select default database
* ☑️ **Schema**: Allow users to select default schema
* ☑️ **Role**: Allow users to select their Snowflake role
* Toggle **Enabled** to ON to activate
* Click **Save Configuration**
***
### Authentication Method 2: Basic Authentication
**Recommended for**: Username + Password OR Username + Key Pair authentication
**Setup Steps**:
1. In the Query Runner configuration form, select **Authentication Type** → **Basic**
2. **(Optional)** Enable **User Configurable Fields**:
* ☑️ **Warehouse**: Allow users to override warehouse
* ☑️ **Database**: Allow users to override database
* ☑️ **Schema**: Allow users to override schema
* ☑️ **Role**: Allow users to override role
3. Toggle **Enabled** to ON to activate
4. Click **Save Configuration**
**User Requirements**:
* Users must have Snowflake credentials (Username + Password OR Username + Key Pair)
* For Key Pair auth, users must upload their public key to Snowflake
***
## Trino Configuration
Trino (Starburst) supports OAuth and Basic Authentication.
### Authentication Method 1: OAuth
**Recommended for**: Starburst Galaxy or Trino clusters with OAuth configured (typically Azure AD)
**Prerequisites**:
* Trino/Starburst cluster must have OAuth authentication enabled
* OAuth provider (e.g., Azure AD, Okta) must be configured
**Setup Steps**:
1. **Create OAuth App in Azure AD** (example for Starburst):
* Go to [Azure Portal](https://portal.azure.com) → **Azure Active Directory** → **App registrations**
* Click **New registration**
* Name: `Collate SQL Studio - Trino`
* Redirect URI: `https://your-collate-domain.com/api/v1/queryRunner/oauth/callback`
* Click **Register**
* Go to **Certificates & secrets** → **New client secret**
* Copy the Application (client) ID and Client secret value
2. **Configure in Collate**:
* In the Query Runner configuration form, select **Authentication Type** → **OAuth**
* **Host Port**: Auto-populated from database service connection (e.g., `ometa.galaxy.starburst.io:443`)
* Enter **OAuth Client Credentials**:
* **Client ID**: From Azure AD
* **Client Secret**: From Azure AD
* **Redirect URL**: `https://your-collate-domain.com/api/v1/queryRunner/oauth/callback`
* **Scope**: `openid profile email` (or custom scope)
* Toggle **Enabled** to ON to activate
* Click **Save Configuration**
***
### Authentication Method 2: Basic Authentication
**Recommended for**: Username + Password authentication when OAuth is not available
**Setup Steps**:
1. In the Query Runner configuration form, select **Authentication Type** → **Basic**
2. Toggle **Enabled** to ON to activate
3. Click **Save Configuration**
**User Requirements**:
* Users must have Trino credentials (Username + Password)
***
## Redshift / PostgreSQL / MSSQL Configuration
Redshift, PostgreSQL, and MSSQL support Basic Authentication only.
### Authentication Method: Basic Authentication
**Recommended for**: Username + Password authentication
**Setup Steps**:
1. In the Query Runner configuration form, select **Authentication Type** → **Basic**
2. Toggle **Enabled** to ON to activate
3. Click **Save Configuration**
**User Requirements**:
* Users must have valid credentials (Username + Password) for the respective database service
* Users must have appropriate permissions on the database
***
## Configuration Best Practices
### Choosing Authentication Methods
| Scenario | Recommended Method |
| ------------------------------------------ | -------------------- |
| **Collate uses Google SSO + BigQuery** | Collate SSO |
| **Collate uses non-Google SSO + BigQuery** | OAuth |
| **Automated/service account access** | Basic Authentication |
| **Snowflake with OAuth integration** | OAuth |
| **Snowflake without OAuth** | Basic Authentication |
| **Trino/Starburst with OAuth** | OAuth |
| **Trino/Starburst without OAuth** | Basic Authentication |
| **Redshift** | Basic Authentication |
| **PostgreSQL** | Basic Authentication |
| **MSSQL** | Basic Authentication |
### User Configurable Fields
Enable user-configurable fields to give users flexibility while maintaining security:
| Field | Use Case | Example |
| ------------------------- | ---------------------------------- | --------------------------------- |
| **Dataset** (BigQuery) | Users work in different datasets | `analytics`, `marketing`, `sales` |
| **Warehouse** (Snowflake) | Users have different compute needs | `COMPUTE_WH`, `LARGE_WH` |
| **Database** (Snowflake) | Users access different databases | `PROD`, `DEV`, `STAGING` |
| **Schema** (Snowflake) | Users work in different schemas | `PUBLIC`, `ANALYTICS` |
| **Role** (Snowflake) | Users have different access levels | `ANALYST`, `ENGINEER`, `ADMIN` |
Allowing users to configure **Role** gives them flexibility but ensure Snowflake role permissions are properly configured to prevent unauthorized access.
### Security Recommendations
1. **Use OAuth when possible**: OAuth provides better security with token-based authentication
2. **Rotate OAuth credentials**: Regularly rotate Client Secrets for OAuth apps
3. **Limit Max Result Size**: Set to 100 or lower to prevent excessive data retrieval
4. **Audit configuration changes**: Monitor who changes Query Runner configurations
5. **Test connections**: Always test connections after configuration changes
### Max Result Size Guidelines
| Use Case | Recommended Max Result Size |
| ----------------------- | --------------------------- |
| **General querying** | `100` rows (default) |
| **Data exploration** | `50` rows |
| **Production analysis** | `100` rows |
| **Large datasets** | `25` - `50` rows |
Users should use `LIMIT` clauses in their queries to control result size further.
***
## Updating Configuration
To update an existing Query Runner configuration:
1. Navigate to the service's **Query Runner** tab
2. Click **Edit Configuration**
3. Modify settings as needed
4. Click **Save**
**Changing Authentication Type**: If you change the authentication type (e.g., from OAuth to Basic), all existing user connections will be **deleted**. Users will need to re-authenticate using the new method.
***
## Enabling/Disabling SQL Studio
### Enabling SQL Studio
After configuring authentication, you must enable SQL Studio for users:
1. In the Query Runner configuration, toggle **Enabled** to ON
2. Click **Save Configuration**
2. Toggle **Enabled** to ON to activate
3. Click **Save Configuration**
**User Requirements**:
* Each user must have a GCP Service Account with BigQuery permissions
* Service Account must have `bigquery.jobs.create` permission
* Users will upload their Service Account JSON file or enter credentials manually
***
## Snowflake Configuration
Snowflake supports OAuth and Basic Authentication.
### Authentication Method 1: OAuth
**Recommended for**: Organizations with Snowflake OAuth integration configured
**Prerequisites**:
* Snowflake OAuth Security Integration must be created (see setup below)
**Setup Steps**:
1. **Create Snowflake OAuth Security Integration** (run in Snowflake):
```sql theme={null}
CREATE OR REPLACE SECURITY INTEGRATION COLLATE_SQL_STUDIO_OAUTH
TYPE = OAUTH
OAUTH_CLIENT = CUSTOM
OAUTH_CLIENT_TYPE = 'CONFIDENTIAL'
OAUTH_REDIRECT_URI = 'https://your-collate-domain.com/api/v1/queryRunner/oauth/callback'
OAUTH_ALLOW_NON_TLS_REDIRECT_URI = FALSE -- Set TRUE for localhost/dev only
OAUTH_ISSUE_REFRESH_TOKENS = TRUE
OAUTH_REFRESH_TOKEN_VALIDITY = 86400 -- 24 hours
OAUTH_USE_SECONDARY_ROLES = 'IMPLICIT'
ENABLED = TRUE;
```
2. **Retrieve OAuth Credentials** (run in Snowflake):
```sql theme={null}
SELECT SYSTEM$SHOW_OAUTH_CLIENT_SECRETS('COLLATE_SQL_STUDIO_OAUTH');
```
This returns JSON with `OAUTH_CLIENT_ID` and `OAUTH_CLIENT_SECRET`.
3. **Configure in Collate**:
* In the Query Runner configuration form, select **Authentication Type** → **OAuth**
* Enter **OAuth Client Credentials**:
* **Client ID**: From step 2
* **Client Secret**: From step 2
* **Redirect URL**: `https://your-collate-domain.com/api/v1/queryRunner/oauth/callback`
* **Scope**: `session:role-any` (or specific role scope like `session:role:ANALYST`)
* **(Optional)** Enable **User Configurable Fields**:
* ☑️ **Warehouse**: Allow users to select compute warehouse
* ☑️ **Database**: Allow users to select default database
* ☑️ **Schema**: Allow users to select default schema
* ☑️ **Role**: Allow users to select their Snowflake role
* Toggle **Enabled** to ON to activate
* Click **Save Configuration**
***
### Authentication Method 2: Basic Authentication
**Recommended for**: Username + Password OR Username + Key Pair authentication
**Setup Steps**:
1. In the Query Runner configuration form, select **Authentication Type** → **Basic**
2. **(Optional)** Enable **User Configurable Fields**:
* ☑️ **Warehouse**: Allow users to override warehouse
* ☑️ **Database**: Allow users to override database
* ☑️ **Schema**: Allow users to override schema
* ☑️ **Role**: Allow users to override role
3. Toggle **Enabled** to ON to activate
4. Click **Save Configuration**
**User Requirements**:
* Users must have Snowflake credentials (Username + Password OR Username + Key Pair)
* For Key Pair auth, users must upload their public key to Snowflake
***
## Trino Configuration
Trino (Starburst) supports OAuth and Basic Authentication.
### Authentication Method 1: OAuth
**Recommended for**: Starburst Galaxy or Trino clusters with OAuth configured (typically Azure AD)
**Prerequisites**:
* Trino/Starburst cluster must have OAuth authentication enabled
* OAuth provider (e.g., Azure AD, Okta) must be configured
**Setup Steps**:
1. **Create OAuth App in Azure AD** (example for Starburst):
* Go to [Azure Portal](https://portal.azure.com) → **Azure Active Directory** → **App registrations**
* Click **New registration**
* Name: `Collate SQL Studio - Trino`
* Redirect URI: `https://your-collate-domain.com/api/v1/queryRunner/oauth/callback`
* Click **Register**
* Go to **Certificates & secrets** → **New client secret**
* Copy the Application (client) ID and Client secret value
2. **Configure in Collate**:
* In the Query Runner configuration form, select **Authentication Type** → **OAuth**
* **Host Port**: Auto-populated from database service connection (e.g., `ometa.galaxy.starburst.io:443`)
* Enter **OAuth Client Credentials**:
* **Client ID**: From Azure AD
* **Client Secret**: From Azure AD
* **Redirect URL**: `https://your-collate-domain.com/api/v1/queryRunner/oauth/callback`
* **Scope**: `openid profile email` (or custom scope)
* Toggle **Enabled** to ON to activate
* Click **Save Configuration**
***
### Authentication Method 2: Basic Authentication
**Recommended for**: Username + Password authentication when OAuth is not available
**Setup Steps**:
1. In the Query Runner configuration form, select **Authentication Type** → **Basic**
2. Toggle **Enabled** to ON to activate
3. Click **Save Configuration**
**User Requirements**:
* Users must have Trino credentials (Username + Password)
***
## Redshift / PostgreSQL / MSSQL Configuration
Redshift, PostgreSQL, and MSSQL support Basic Authentication only.
### Authentication Method: Basic Authentication
**Recommended for**: Username + Password authentication
**Setup Steps**:
1. In the Query Runner configuration form, select **Authentication Type** → **Basic**
2. Toggle **Enabled** to ON to activate
3. Click **Save Configuration**
**User Requirements**:
* Users must have valid credentials (Username + Password) for the respective database service
* Users must have appropriate permissions on the database
***
## Configuration Best Practices
### Choosing Authentication Methods
| Scenario | Recommended Method |
| ------------------------------------------ | -------------------- |
| **Collate uses Google SSO + BigQuery** | Collate SSO |
| **Collate uses non-Google SSO + BigQuery** | OAuth |
| **Automated/service account access** | Basic Authentication |
| **Snowflake with OAuth integration** | OAuth |
| **Snowflake without OAuth** | Basic Authentication |
| **Trino/Starburst with OAuth** | OAuth |
| **Trino/Starburst without OAuth** | Basic Authentication |
| **Redshift** | Basic Authentication |
| **PostgreSQL** | Basic Authentication |
| **MSSQL** | Basic Authentication |
### User Configurable Fields
Enable user-configurable fields to give users flexibility while maintaining security:
| Field | Use Case | Example |
| ------------------------- | ---------------------------------- | --------------------------------- |
| **Dataset** (BigQuery) | Users work in different datasets | `analytics`, `marketing`, `sales` |
| **Warehouse** (Snowflake) | Users have different compute needs | `COMPUTE_WH`, `LARGE_WH` |
| **Database** (Snowflake) | Users access different databases | `PROD`, `DEV`, `STAGING` |
| **Schema** (Snowflake) | Users work in different schemas | `PUBLIC`, `ANALYTICS` |
| **Role** (Snowflake) | Users have different access levels | `ANALYST`, `ENGINEER`, `ADMIN` |
Allowing users to configure **Role** gives them flexibility but ensure Snowflake role permissions are properly configured to prevent unauthorized access.
### Security Recommendations
1. **Use OAuth when possible**: OAuth provides better security with token-based authentication
2. **Rotate OAuth credentials**: Regularly rotate Client Secrets for OAuth apps
3. **Limit Max Result Size**: Set to 100 or lower to prevent excessive data retrieval
4. **Audit configuration changes**: Monitor who changes Query Runner configurations
5. **Test connections**: Always test connections after configuration changes
### Max Result Size Guidelines
| Use Case | Recommended Max Result Size |
| ----------------------- | --------------------------- |
| **General querying** | `100` rows (default) |
| **Data exploration** | `50` rows |
| **Production analysis** | `100` rows |
| **Large datasets** | `25` - `50` rows |
Users should use `LIMIT` clauses in their queries to control result size further.
***
## Updating Configuration
To update an existing Query Runner configuration:
1. Navigate to the service's **Query Runner** tab
2. Click **Edit Configuration**
3. Modify settings as needed
4. Click **Save**
**Changing Authentication Type**: If you change the authentication type (e.g., from OAuth to Basic), all existing user connections will be **deleted**. Users will need to re-authenticate using the new method.
***
## Enabling/Disabling SQL Studio
### Enabling SQL Studio
After configuring authentication, you must enable SQL Studio for users:
1. In the Query Runner configuration, toggle **Enabled** to ON
2. Click **Save Configuration**
 Once enabled, the service will appear in SQL Studio for all users with appropriate permissions.
### Disabling SQL Studio
To temporarily disable SQL Studio for a service:
1. Navigate to the service's **Query Runner** tab
2. Toggle **Enabled** to OFF
3. Click **Save**
This prevents new user connections without deleting existing configurations. Users will see "Service not available" in SQL Studio.
***
## Connection Status Indicators
Understanding connection status helps you troubleshoot user issues:
| Status | Color | Meaning | User Action Required |
| ----------------- | --------- | ------------------------------------------------ | --------------------------- |
| **Connected** | 🟢 Green | Active connection, ready to execute queries | None - user can run queries |
| **Pending** | 🟡 Yellow | Connection test in progress after authentication | Wait a few seconds |
| **Not Connected** | ⚪ Gray | No connection established | Click to authenticate |
### Connection Flow
```
Not Connected
↓
User Clicks Service
↓
Authentication (OAuth popup or credentials modal)
↓
Pending (Testing connection)
↓
Connection Test (SELECT 1)
↓
Connected (Ready to query)
```
**Connection Testing**:
* After initial authentication, SQL Studio runs a test query (`SELECT 1`)
* This verifies credentials, permissions, and network connectivity
* If successful, status changes to **Connected** (green)
* If failed, error message displayed with details
***
## Managing User Access
### Who Can Use SQL Studio?
Users can access SQL Studio if they have:
1. **View Basic** permission on the database service in Collate
2. SQL Studio is **enabled** by administrator for that service
3. They have successfully authenticated their connection
### Controlling Access
Use Collate's role-based access control (RBAC):
* Assign users to teams with appropriate policies
* Grant **View Basic** permission on database services
* Users without permission won't see the service in SQL Studio
***
## Deleting Configuration
To completely remove Query Runner configuration:
1. Navigate to the service's **Query Runner** tab
2. Click **Delete Configuration**
3. **Warning**: This will permanently delete:
* Admin configuration
* All user connections for this service
* All saved queries for this service
4. Type the service name to confirm
5. Click **Confirm Delete**
***
## Troubleshooting Configuration
### OAuth Callback URL Mismatch
**Problem**: "Redirect URI mismatch" error during OAuth setup
**Solution**:
* Verify the redirect URL in Collate matches exactly: `https://your-collate-domain.com/api/v1/queryRunner/oauth/callback`
* Check for trailing slashes (shouldn't have any)
* Ensure protocol is `https` (not `http` in production)
* Update the OAuth app configuration in the provider
### Collate SSO Credentials Not Auto-Populating
**Problem**: Collate SSO option doesn't show OAuth credentials
**Solution**:
* Verify Google OIDC SSO is configured correctly (Settings → Security → SSO)
* Collate SSO currently only supports Google OIDC
* Check that the SSO provider is Google:
* Google OIDC → BigQuery
* Ensure Google SSO OAuth app has required scopes (e.g., BigQuery API scope)
### Users Cannot Connect After Configuration
**Problem**: Configuration saved successfully but users see "Service not available"
**Solution**:
* Verify **Enabled** is checked
* Check that users are accessing the correct service in SQL Studio
* Review backend logs for configuration errors
* Test the connection using test credentials
***
## Next Steps
After configuring SQL Studio:
1. **Inform Users**: Let users know SQL Studio is available for the configured services
2. **Share Authentication Guide**: Direct users to [User Authentication](/how-to-guides/sql-studio/user-authentication)
3. **Monitor Usage**: Review query logs and audit trails in Settings → Audit Logs
4. **Optimize Settings**: Adjust Max Result Size and user-configurable fields based on usage patterns
***
**Ready for users to connect?** Guide them through [User Authentication](/how-to-guides/sql-studio/user-authentication) to establish their first connection.
Once enabled, the service will appear in SQL Studio for all users with appropriate permissions.
### Disabling SQL Studio
To temporarily disable SQL Studio for a service:
1. Navigate to the service's **Query Runner** tab
2. Toggle **Enabled** to OFF
3. Click **Save**
This prevents new user connections without deleting existing configurations. Users will see "Service not available" in SQL Studio.
***
## Connection Status Indicators
Understanding connection status helps you troubleshoot user issues:
| Status | Color | Meaning | User Action Required |
| ----------------- | --------- | ------------------------------------------------ | --------------------------- |
| **Connected** | 🟢 Green | Active connection, ready to execute queries | None - user can run queries |
| **Pending** | 🟡 Yellow | Connection test in progress after authentication | Wait a few seconds |
| **Not Connected** | ⚪ Gray | No connection established | Click to authenticate |
### Connection Flow
```
Not Connected
↓
User Clicks Service
↓
Authentication (OAuth popup or credentials modal)
↓
Pending (Testing connection)
↓
Connection Test (SELECT 1)
↓
Connected (Ready to query)
```
**Connection Testing**:
* After initial authentication, SQL Studio runs a test query (`SELECT 1`)
* This verifies credentials, permissions, and network connectivity
* If successful, status changes to **Connected** (green)
* If failed, error message displayed with details
***
## Managing User Access
### Who Can Use SQL Studio?
Users can access SQL Studio if they have:
1. **View Basic** permission on the database service in Collate
2. SQL Studio is **enabled** by administrator for that service
3. They have successfully authenticated their connection
### Controlling Access
Use Collate's role-based access control (RBAC):
* Assign users to teams with appropriate policies
* Grant **View Basic** permission on database services
* Users without permission won't see the service in SQL Studio
***
## Deleting Configuration
To completely remove Query Runner configuration:
1. Navigate to the service's **Query Runner** tab
2. Click **Delete Configuration**
3. **Warning**: This will permanently delete:
* Admin configuration
* All user connections for this service
* All saved queries for this service
4. Type the service name to confirm
5. Click **Confirm Delete**
***
## Troubleshooting Configuration
### OAuth Callback URL Mismatch
**Problem**: "Redirect URI mismatch" error during OAuth setup
**Solution**:
* Verify the redirect URL in Collate matches exactly: `https://your-collate-domain.com/api/v1/queryRunner/oauth/callback`
* Check for trailing slashes (shouldn't have any)
* Ensure protocol is `https` (not `http` in production)
* Update the OAuth app configuration in the provider
### Collate SSO Credentials Not Auto-Populating
**Problem**: Collate SSO option doesn't show OAuth credentials
**Solution**:
* Verify Google OIDC SSO is configured correctly (Settings → Security → SSO)
* Collate SSO currently only supports Google OIDC
* Check that the SSO provider is Google:
* Google OIDC → BigQuery
* Ensure Google SSO OAuth app has required scopes (e.g., BigQuery API scope)
### Users Cannot Connect After Configuration
**Problem**: Configuration saved successfully but users see "Service not available"
**Solution**:
* Verify **Enabled** is checked
* Check that users are accessing the correct service in SQL Studio
* Review backend logs for configuration errors
* Test the connection using test credentials
***
## Next Steps
After configuring SQL Studio:
1. **Inform Users**: Let users know SQL Studio is available for the configured services
2. **Share Authentication Guide**: Direct users to [User Authentication](/how-to-guides/sql-studio/user-authentication)
3. **Monitor Usage**: Review query logs and audit trails in Settings → Audit Logs
4. **Optimize Settings**: Adjust Max Result Size and user-configurable fields based on usage patterns
***
**Ready for users to connect?** Guide them through [User Authentication](/how-to-guides/sql-studio/user-authentication) to establish their first connection.