> ## Documentation Index
> Fetch the complete documentation index at: https://docs.getcollate.io/llms.txt
> Use this file to discover all available pages before exploring further.
# Hybrid Ingestion Runner
> Deploy and configure the Hybrid Ingestion Runner to securely execute metadata workflows inside your own cloud infrastructure using AWS, Azure, or GCP.
# Hybrid Ingestion Runner
The Hybrid Ingestion Runner lets Collate trigger and manage ingestion workflows inside your own cloud infrastructure. Your Collate SaaS instance stays hosted on Collate's cloud, while workflows run in your private environment. Collate never stores or accesses your secrets directly — only the runner retrieves them at runtime.
**Before you start**: Contact [Collate Support](mailto:support@getcollate.io) to have the Hybrid Runner installed in your infrastructure. Your DevOps team handles the initial Kubernetes deployment.
## Prerequisites
* Kubernetes cluster running version 1.28 or later
* Helm and kubectl installed
* AWS credentials provided by Collate for pulling Docker images from ECR
* Secrets manager configured in your cloud (AWS, Azure, or GCP). See [Manage Secrets](#manage-secrets).
## Set Up Hybrid Ingestion Runner
Follow these steps to deploy, validate, and connect your Hybrid Runner to a data source.
### Step 1: Get Collate Authentication Token
The Hybrid Runner authenticates to the Collate API using a JWT token from the ingestion bot. To obtain a JSON Web Token (JWT), follow these steps:
1. Log in to the Collate platform as an administrator.
2. Navigate to **Settings** > **Bots**, then click **Add Bot**.
3. Enter **Email**, **Display Name**, **Token Expiration**, and **Description**, then click **Create**.
4. Assign the appropriate roles – typically **DefaultBotPolicy** and **Ingestion Bot Policy**.
5. Copy the generated JWT token and save it for use in step 2 below.
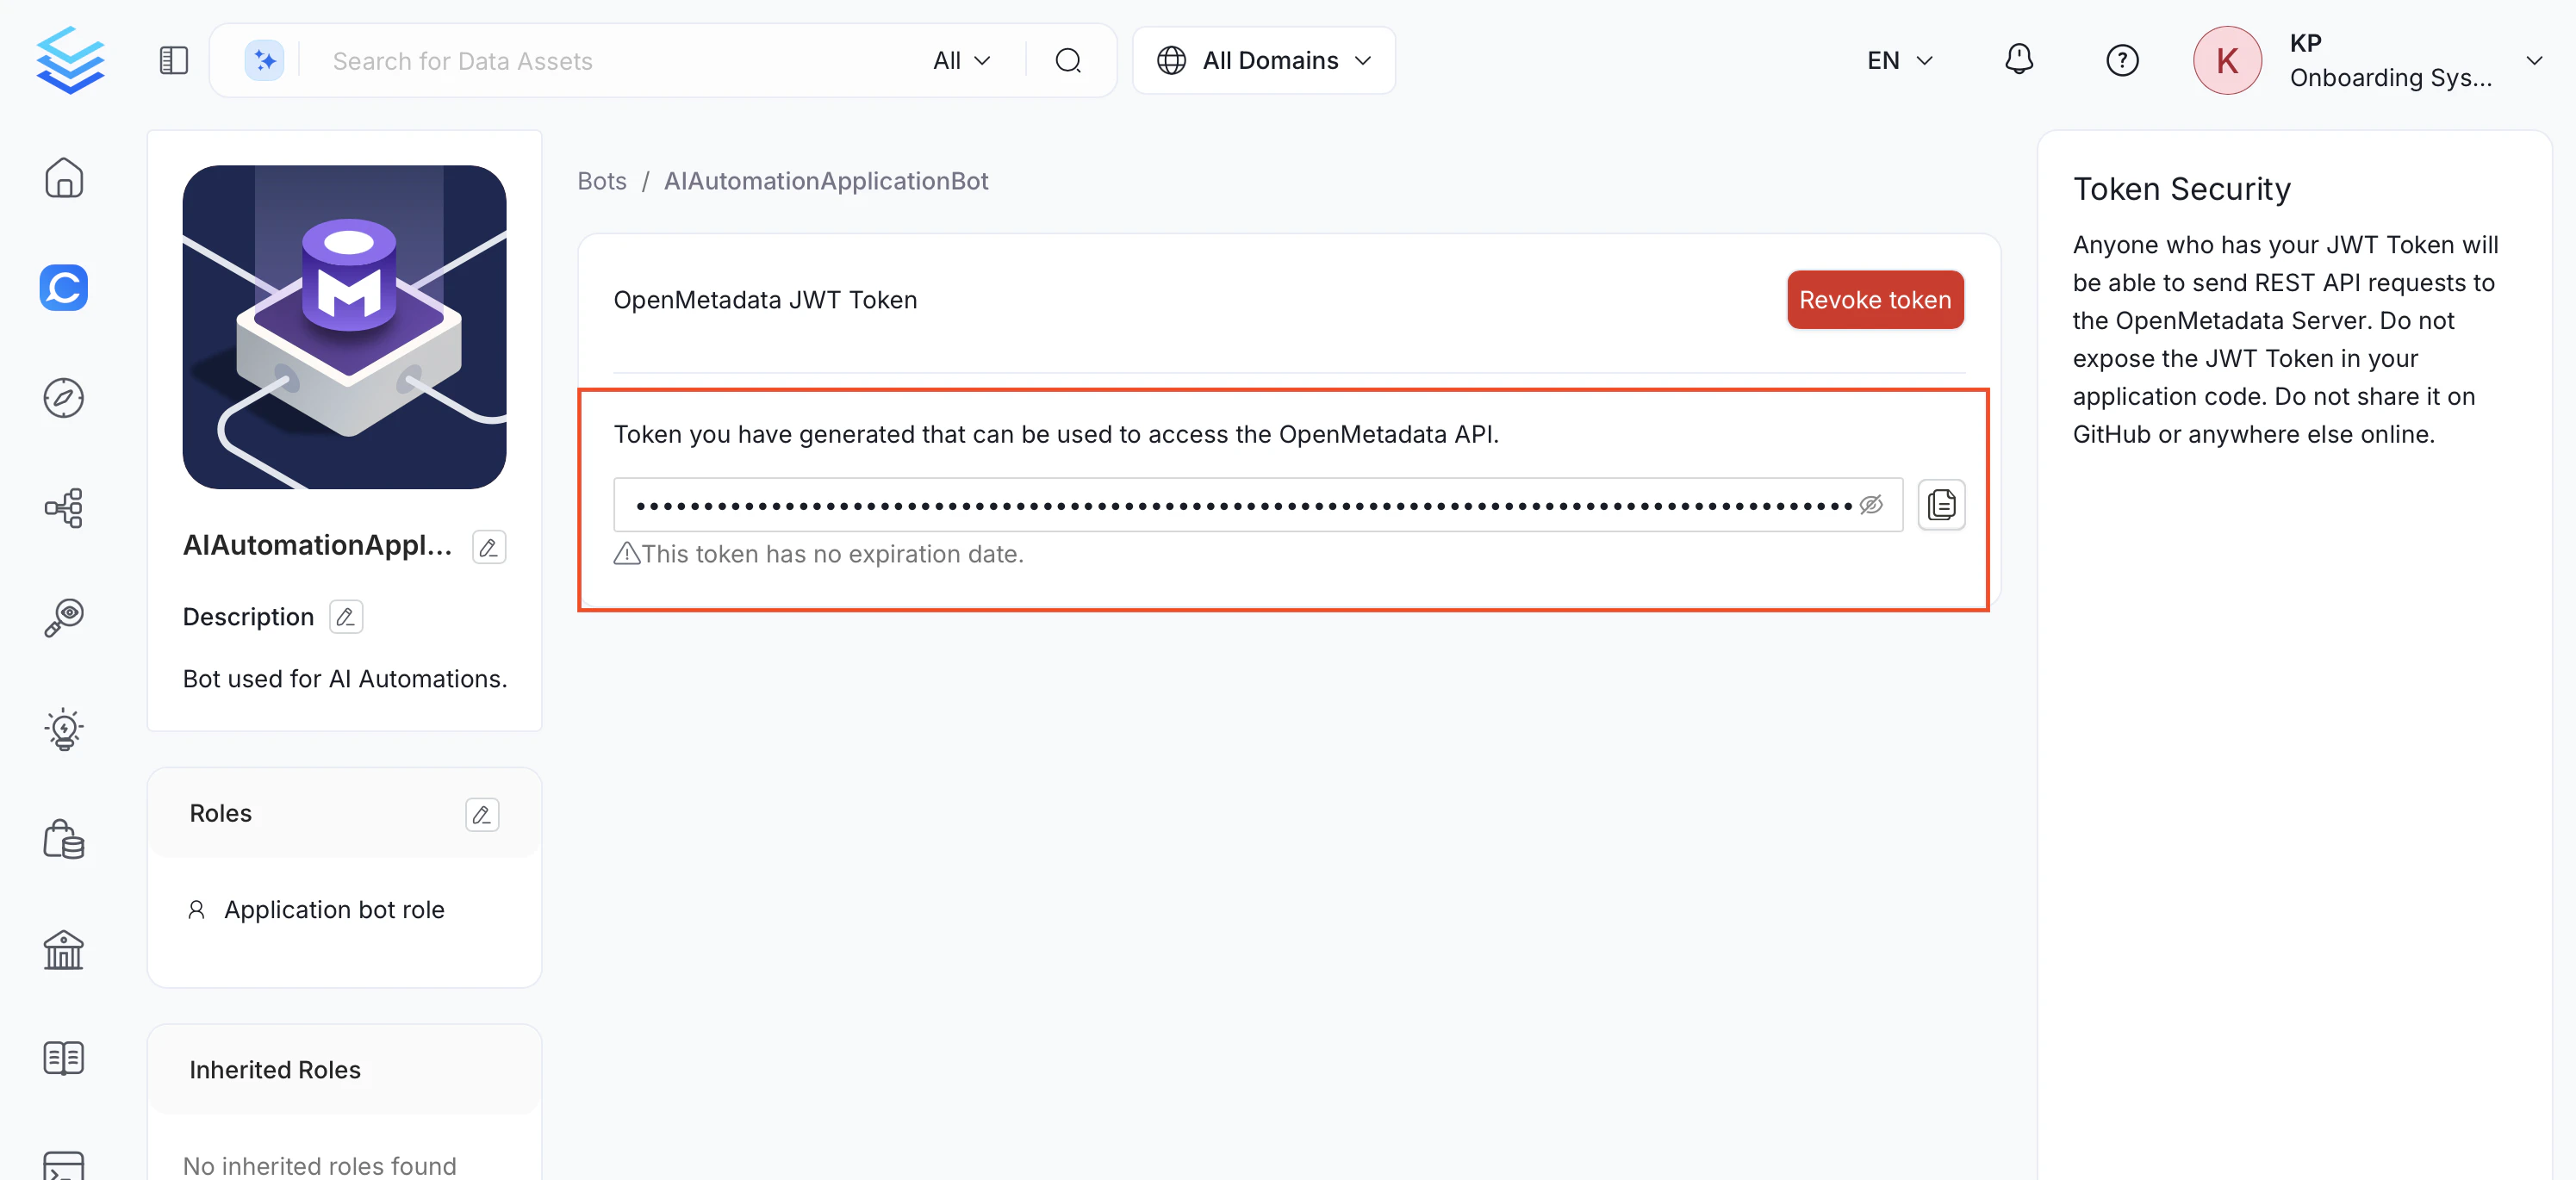 **Note**: This token has no expiration date. Store it securely and treat it as a secret.
### Step 2: Deploy via Helm
Use Helm to install the Hybrid Runner chart into your Kubernetes cluster with your authentication token and ECR credentials.
1. **Create a `values.yaml` file**
Use the following minimal configuration:
```yaml theme={null}
config:
agentId: "aws-prod"
authToken:
serverHost: .getcollate.io
ecrRegistryHelper:
collateCredentials:
values:
accessKeyId:
secretAccessKey:
installArgoWorkflows: true
```
2. **Install the Helm chart**
```bash theme={null}
helm repo add collate-hybrid https://open-metadata.github.io/hybrid-ingestion-runner-helm-chart
helm repo update
helm install collate-prod collate-hybrid/hybrid-ingestion-runner \
--namespace argo-workflows --create-namespace \
--values values.yaml
```
### Step 3: Validate the Runner
Confirm the runner is live and reachable from your Collate instance before configuring any services.
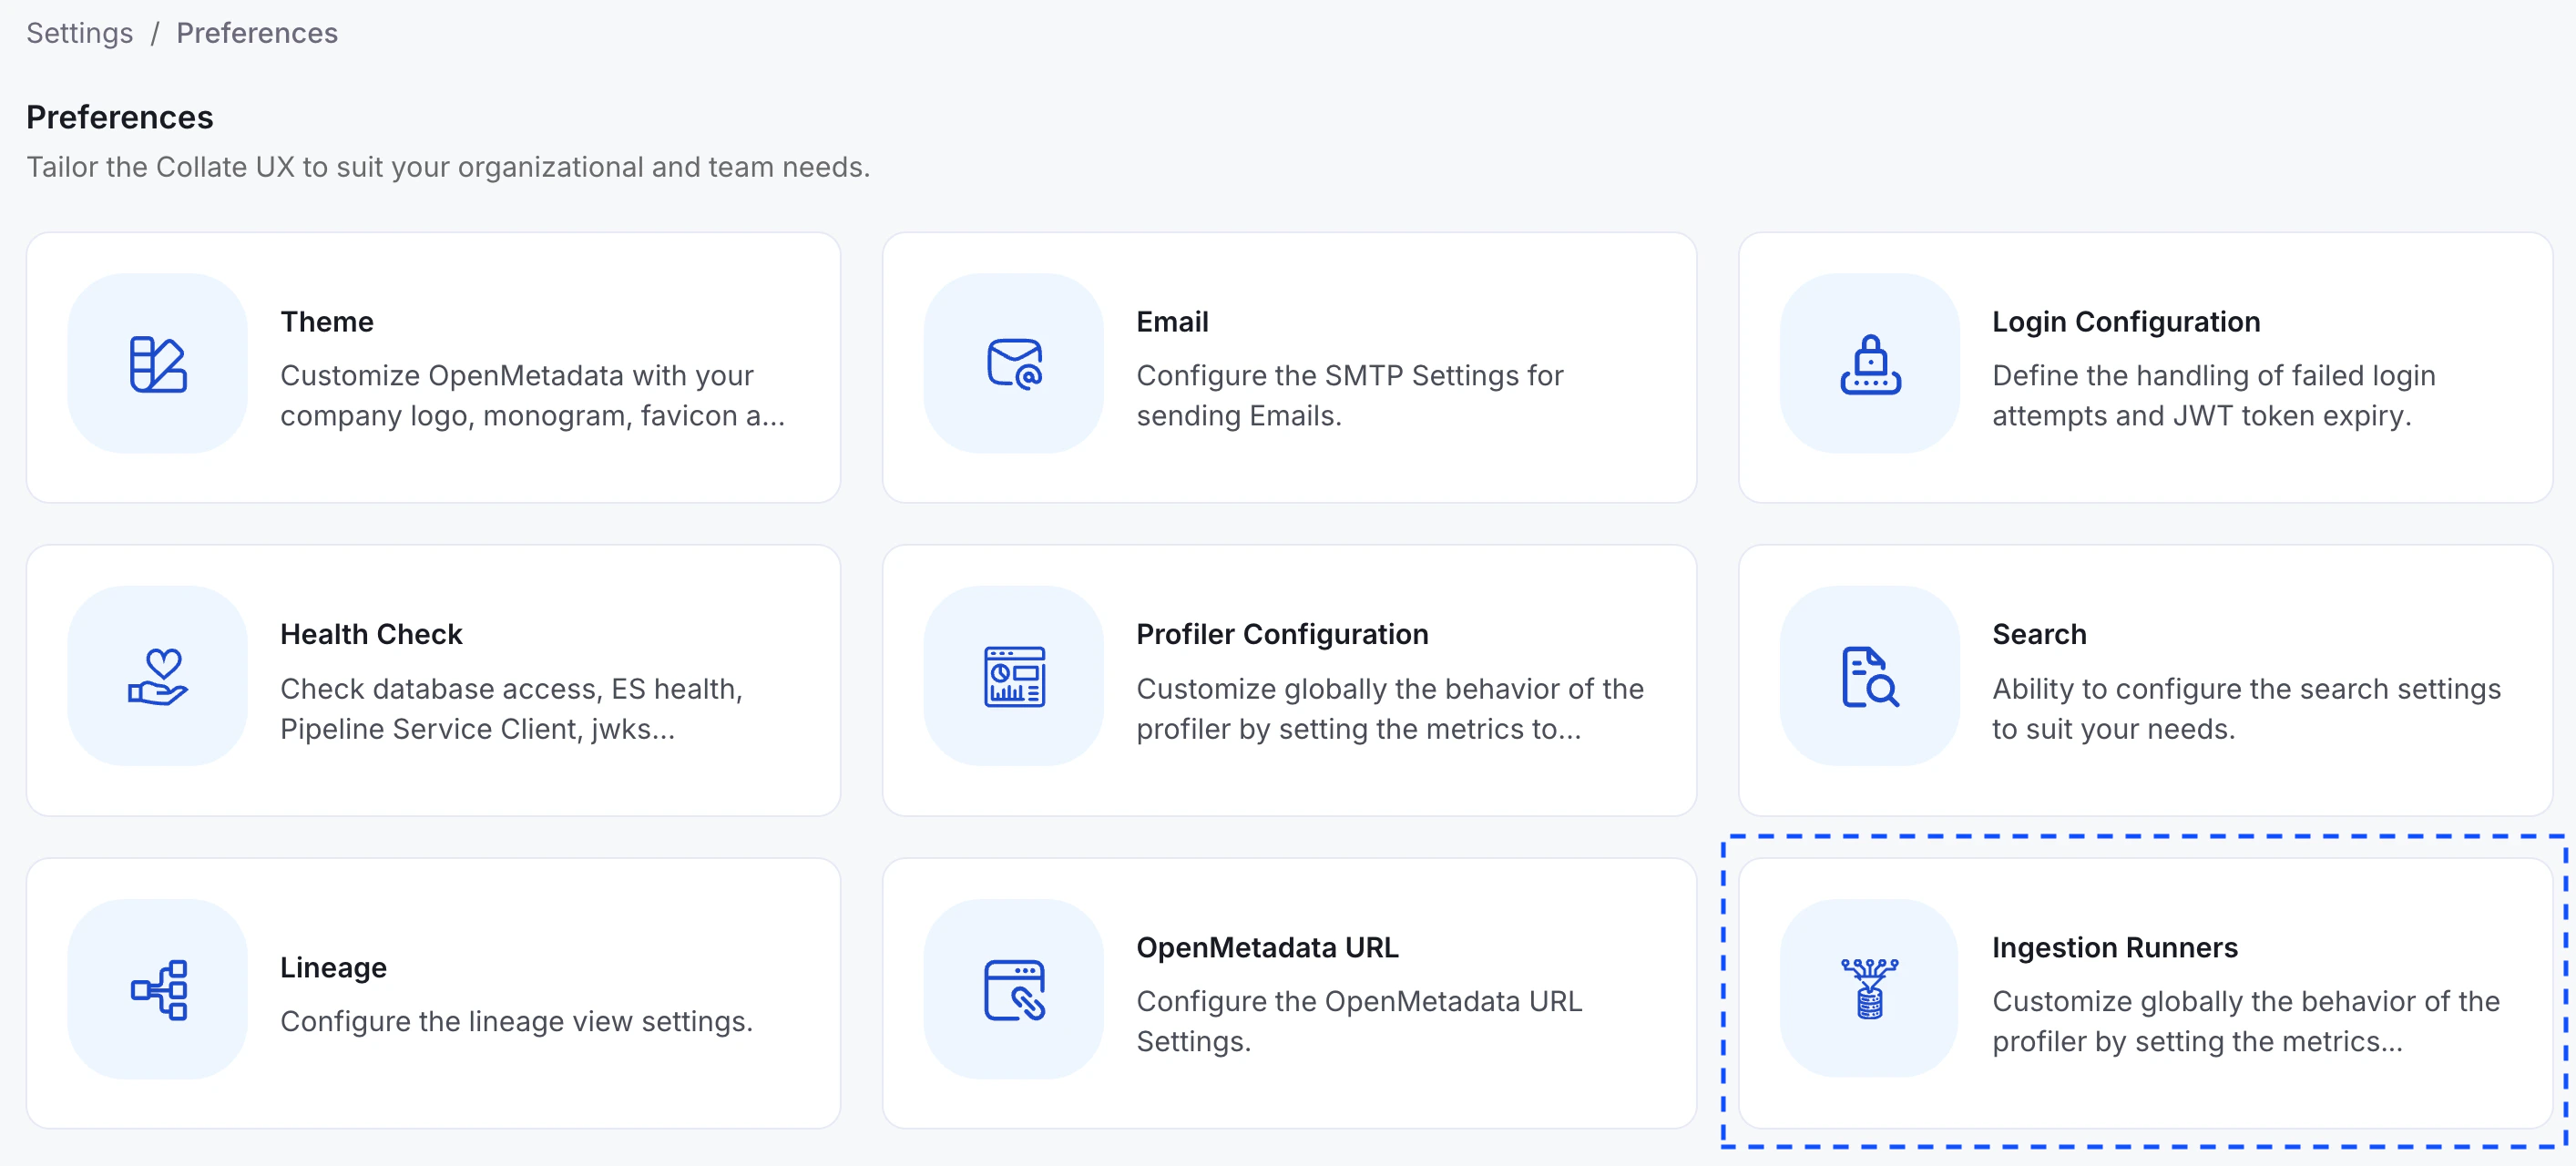
1. Navigate to **Settings** > **Preferences** > **Ingestion Runners**.
**Note**: This token has no expiration date. Store it securely and treat it as a secret.
### Step 2: Deploy via Helm
Use Helm to install the Hybrid Runner chart into your Kubernetes cluster with your authentication token and ECR credentials.
1. **Create a `values.yaml` file**
Use the following minimal configuration:
```yaml theme={null}
config:
agentId: "aws-prod"
authToken:
serverHost: .getcollate.io
ecrRegistryHelper:
collateCredentials:
values:
accessKeyId:
secretAccessKey:
installArgoWorkflows: true
```
2. **Install the Helm chart**
```bash theme={null}
helm repo add collate-hybrid https://open-metadata.github.io/hybrid-ingestion-runner-helm-chart
helm repo update
helm install collate-prod collate-hybrid/hybrid-ingestion-runner \
--namespace argo-workflows --create-namespace \
--values values.yaml
```
### Step 3: Validate the Runner
Confirm the runner is live and reachable from your Collate instance before configuring any services.
1. Navigate to **Settings** > **Preferences** > **Ingestion Runners**.
 2. Confirm your runner appears in the list with a status of **Active**.
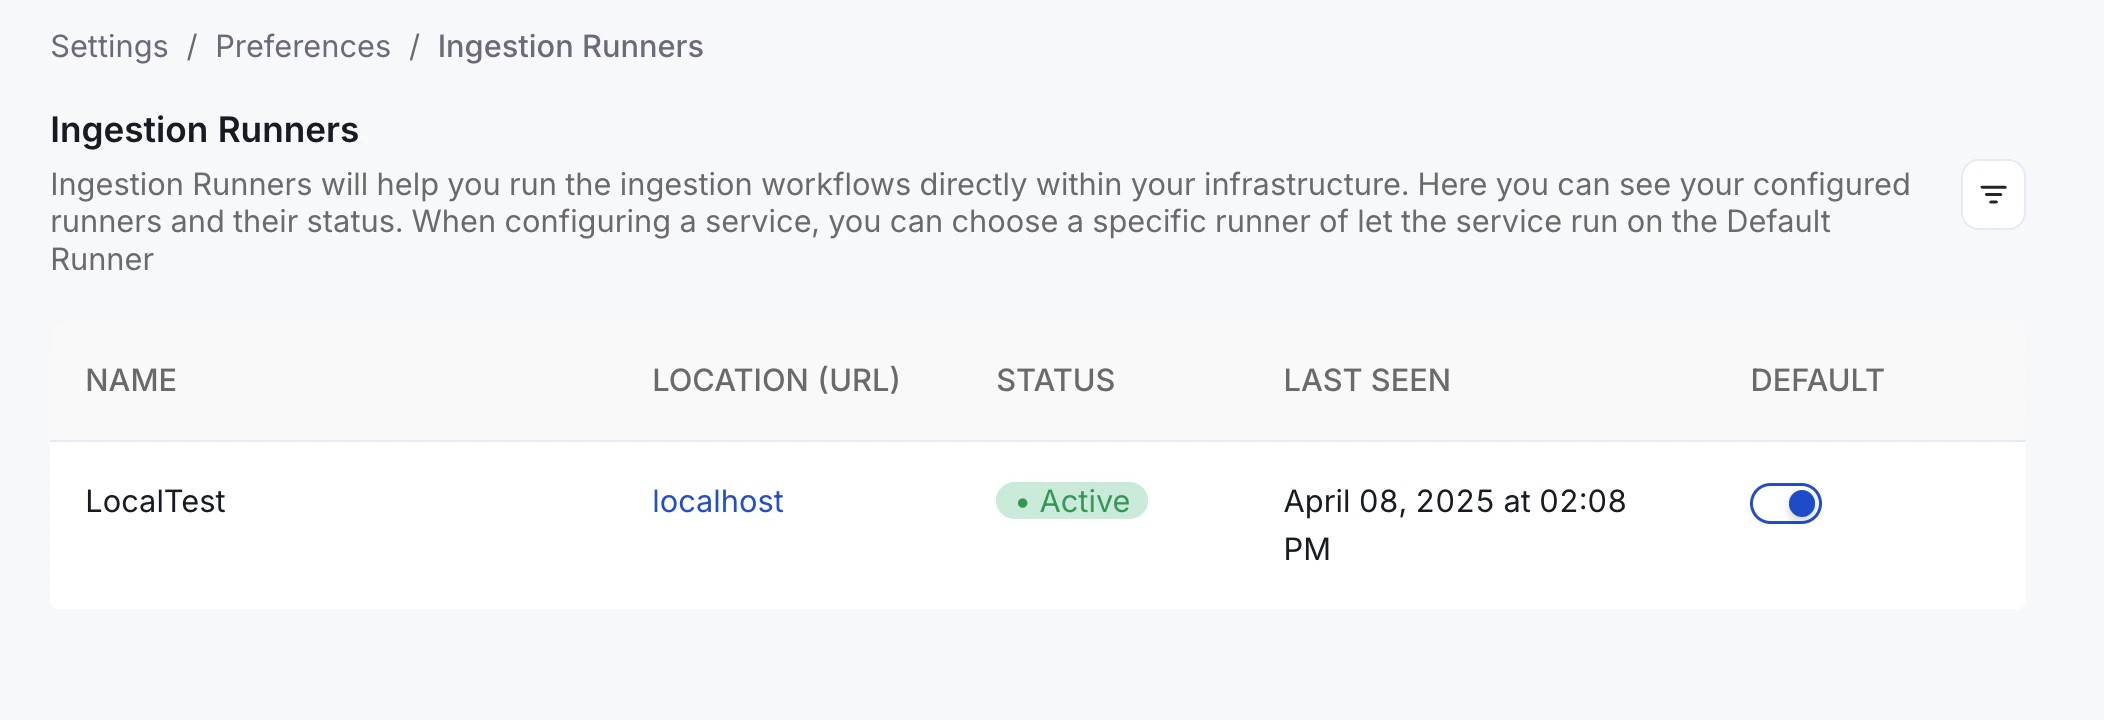 If the runner shows as **Inactive**, contact [Collate support](mailto:support@getcollate.io).
### Step 4: Create a Service
Connect your first data source and route its ingestion through your Hybrid Runner. To create a service, follow these steps:
1. Navigate to **Settings** > **Services** and select your service type (for example, Databases).
2. Click **+ Add New Service** and choose your connector type, then click **Next**.
3. Enter the unique **Name** and **Description**, then click **Next**.
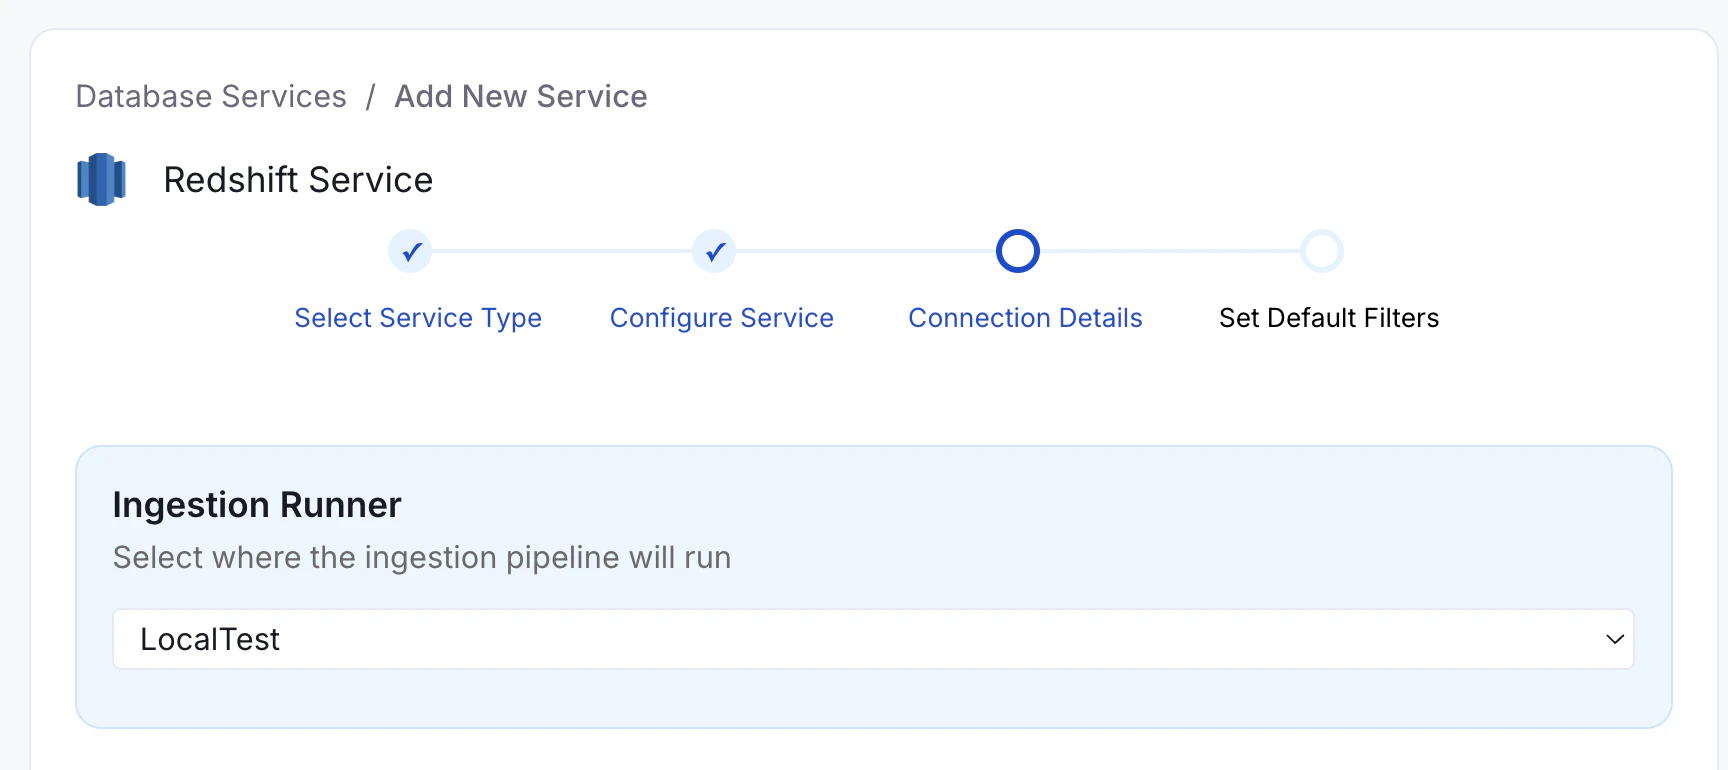
4. In the **Ingestion Runner** dropdown, select your Hybrid Runner.
If the runner shows as **Inactive**, contact [Collate support](mailto:support@getcollate.io).
### Step 4: Create a Service
Connect your first data source and route its ingestion through your Hybrid Runner. To create a service, follow these steps:
1. Navigate to **Settings** > **Services** and select your service type (for example, Databases).
2. Click **+ Add New Service** and choose your connector type, then click **Next**.
3. Enter the unique **Name** and **Description**, then click **Next**.
4. In the **Ingestion Runner** dropdown, select your Hybrid Runner.
 5. Fill the connection details. For any credential field that shows a hide or show icon, enter the secret reference path from your secrets store instead of the actual value.
```
secret:
```
**Important:** The secret must be stored in your secrets store before you can reference it here. See [Manage Secrets](#manage-secrets).
6. Click **Test Connection** to verify the connection is successful.
**Note**: You can also select **Collate SaaS Runner** in the dropdown at any time to run a specific ingestion via Collate's cloud instead of your Hybrid Runner.
### Step 5: Configure Metadata Ingestion
After your runner is connected and your service is set up, proceed to [Step 2 - Configure Metadata Ingestion](/getting-started/ingest-metadata) to schedule your first ingestion pipeline.
## Manage Secrets
When running workflows in your hybrid environment, store sensitive credentials—like passwords or tokens—in your cloud provider's secrets manager and reference them securely in Collate via the Hybrid Runner.
**Note**: Collate doesn't store or access your secrets directly. Only the Hybrid Runner retrieves them at runtime from your own infrastructure.
The Hybrid Runner supports two approaches for secrets management. Kubernetes Secrets is the default and requires no additional configuration.
### Kubernetes Secrets (Default)
The Helm chart uses native Kubernetes Secrets and automatically installs the
required RBAC (Role-Based Access Control) permissions on your cluster. This
works for most customers without any additional setup.
**Storing a Secret**:
Create a Kubernetes Secret in the `argo-workflows` namespace:
```bash theme={null}
kubectl create secret generic my-db-password \
--from-literal=value='your-secret-value'
```
### Cloud Secret Stores
1. Open your secrets manager of choice:
* Amazon Web Services (AWS) Secrets Manager. See [AWS Secret Manager](https://docs.getcollate.io/how-to-guides/deployment/hybrid-runner/aws#option-2-—-aws-secrets-manager-optional).
* Azure Key Vault. See [Azure Key Vault](https://docs.getcollate.io/how-to-guides/deployment/hybrid-runner/azure#option-2-—-azure-key-vault-optional).
* Google Cloud Platform (GCP) Secret Manager. See [GCP Secret Manager](https://docs.getcollate.io/how-to-guides/deployment/hybrid-runner/gke#option-2-—-gcp-secret-manager-optional).
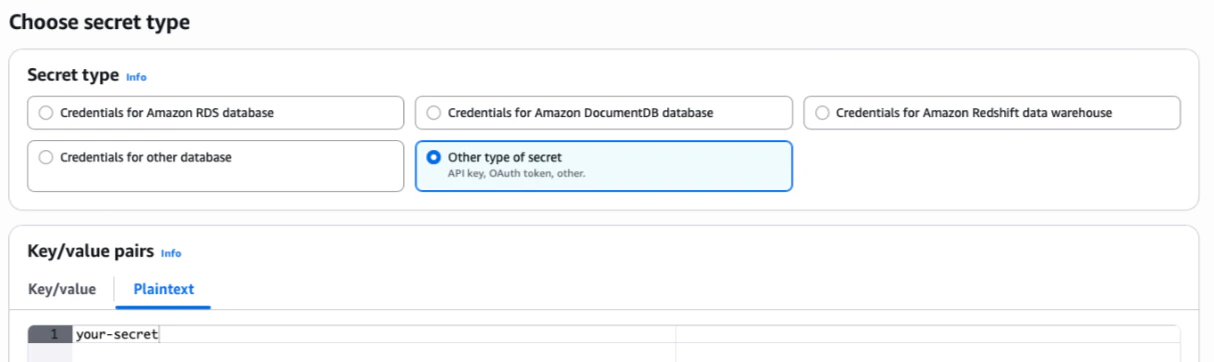
2. Store the secret value as plain text—for example, `password123`— without any formatting or encoding. The Hybrid Runner retrieves and decrypts the value at runtime.
For example, in AWS Secrets Manager: select **Store a new secret > Other type of secret > Plaintext**, then paste the value as-is, without quotes, JSON, or other formatting.
5. Fill the connection details. For any credential field that shows a hide or show icon, enter the secret reference path from your secrets store instead of the actual value.
```
secret:
```
**Important:** The secret must be stored in your secrets store before you can reference it here. See [Manage Secrets](#manage-secrets).
6. Click **Test Connection** to verify the connection is successful.
**Note**: You can also select **Collate SaaS Runner** in the dropdown at any time to run a specific ingestion via Collate's cloud instead of your Hybrid Runner.
### Step 5: Configure Metadata Ingestion
After your runner is connected and your service is set up, proceed to [Step 2 - Configure Metadata Ingestion](/getting-started/ingest-metadata) to schedule your first ingestion pipeline.
## Manage Secrets
When running workflows in your hybrid environment, store sensitive credentials—like passwords or tokens—in your cloud provider's secrets manager and reference them securely in Collate via the Hybrid Runner.
**Note**: Collate doesn't store or access your secrets directly. Only the Hybrid Runner retrieves them at runtime from your own infrastructure.
The Hybrid Runner supports two approaches for secrets management. Kubernetes Secrets is the default and requires no additional configuration.
### Kubernetes Secrets (Default)
The Helm chart uses native Kubernetes Secrets and automatically installs the
required RBAC (Role-Based Access Control) permissions on your cluster. This
works for most customers without any additional setup.
**Storing a Secret**:
Create a Kubernetes Secret in the `argo-workflows` namespace:
```bash theme={null}
kubectl create secret generic my-db-password \
--from-literal=value='your-secret-value'
```
### Cloud Secret Stores
1. Open your secrets manager of choice:
* Amazon Web Services (AWS) Secrets Manager. See [AWS Secret Manager](https://docs.getcollate.io/how-to-guides/deployment/hybrid-runner/aws#option-2-—-aws-secrets-manager-optional).
* Azure Key Vault. See [Azure Key Vault](https://docs.getcollate.io/how-to-guides/deployment/hybrid-runner/azure#option-2-—-azure-key-vault-optional).
* Google Cloud Platform (GCP) Secret Manager. See [GCP Secret Manager](https://docs.getcollate.io/how-to-guides/deployment/hybrid-runner/gke#option-2-—-gcp-secret-manager-optional).
2. Store the secret value as plain text—for example, `password123`— without any formatting or encoding. The Hybrid Runner retrieves and decrypts the value at runtime.
For example, in AWS Secrets Manager: select **Store a new secret > Other type of secret > Plaintext**, then paste the value as-is, without quotes, JSON, or other formatting.
 #### AWS (EKS Pod Identity or IRSA)
Configure Pod Identity via EKS Pod Identity or IRSA to assume an IAM role. The `serviceAccount` name is `ingestion` by default.
**Required IAM permissions:**
* `secretsmanager:GetSecretValue`
* `secretsmanager:DescribeSecret`
* `secretsmanager:ListSecrets`
For IRSA, add the following to your `values.yaml`:
```yaml theme={null}
config:
secretsManager: "managed-aws"
ingestionPods:
serviceAccount:
annotations:
eks.amazonaws.com/role-arn: arn:aws:iam:::role/
```
#### Azure (Workload Identity)
Configure Workload Identity with a User Assigned Managed Identity. The required role is **Key Vault Secrets Officer**.
```yaml theme={null}
config:
secretsManager: "managed-azure-kv"
ingestionPods:
serviceAccount:
annotations:
"azure.workload.identity/client-id":
extraEnvs:
- "AZURE_KEY_VAULT_NAME:"
argoWorkflows:
controller:
workflowDefaults:
spec:
podMetadata:
labels:
azure.workload.identity/use: "true"
```
The `argoWorkflows:` section above is only required when `installArgoWorkflows: true`. Remove it if you are using the Simple Kubernetes executor.
#### GKE (GCP Secret Manager)
Use [Workload Identity](https://cloud.google.com/kubernetes-engine/docs/how-to/workload-identity) to grant ingestion pods access to GCP Secret Manager without managing service account keys. The required IAM role is `roles/secretmanager.secretAccessor`.
Add the following to your `values.yaml`:
```yaml theme={null}
config:
secretsManager: "gcp"
ingestionPods:
serviceAccount:
annotations:
iam.gke.io/gcp-service-account: @.iam.gserviceaccount.com
```
Replace `` and `` with your GCP values. You can restrict Secret Manager access to a specific path prefix, for example: `projects//secrets/collate/*`.
**Storing a Secret**
In the GCP Console, navigate to **Secret Manager** and select **Create Secret**. Store the raw secret value without quotes or JSON wrapping.
### Reference the Secret in Collate
In the service connection form in Collate, reference the secret using the `secret:` prefix followed by the full path to your secret.
```
secret:
```
**Example:** If your secret is stored in AWS Secrets Manager at `/my/database/password`, enter the following in the password field:
```
secret:/my/database/password
```
Secret references only work for masked fields—those with a hide or show icon.
## Configure Node Scheduling
**Important**:
**Common production issue:** If every node in your Kubernetes cluster has a `NoSchedule` taint, ingestion pods fail to schedule with a `FailedScheduling` error. This is the most frequent cause of pods stuck in `Pending` state after deploying the Hybrid Runner.
Ingestion pods run as independent Kubernetes pods. If your cluster uses node taints to isolate workloads, configure tolerations and node affinity so ingestion pods schedule on the correct nodes. Configuration differs by executor type — use the section that matches your setup:
* **Argo Workflows executor** (Hybrid Runner with Argo): use `ARGO_PIPELINE_TYPE_CONFIGS`
* **Simple Kubernetes executor** (default, Hybrid Runner without Argo): use `SIMPLEK8S_PIPELINE_TYPE_CONFIGS`
Don't mix these two environment variables. Each executor reads from its own configuration key. Setting `SIMPLEK8S_PIPELINE_TYPE_CONFIGS` when using Argo has no effect, and vice versa.
The configuration value is a JSON string scoped by pipeline type: `automation`, `metadata`, `profiler`, and `lineage`.
### Argo Workflows Executor
Add the following to your `values.yaml`:
```yaml theme={null}
extraEnvs:
- name: ARGO_PIPELINE_TYPE_CONFIGS
value: >-
{
"automation": {
"toleration": "openmetadata-hybrid-runner",
"affinity": {
"nodeAffinity": {
"requiredDuringSchedulingIgnoredDuringExecution": {
"nodeSelectorTerms": [
{
"matchExpressions": [
{
"key": "nodetype",
"operator": "In",
"values": ["openmetadata-hybrid-runner"]
}
]
}
]
}
}
}
},
"metadata": {
"toleration": "openmetadata-hybrid-runner"
},
"profiler": {
"toleration": "openmetadata-hybrid-runner"
},
"lineage": {
"toleration": "openmetadata-hybrid-runner"
}
}
```
`toleration` accepts a single string value. The runner creates a `dedicated=` Kubernetes toleration for all ingestion pods of that type. For full Kubernetes toleration objects (multiple taints, custom operators, or effects), use `config.ingestionPods.customConfig.workflowParams` instead.
Replace `openmetadata-hybrid-runner` with the taint value used in your cluster. Check your node taints by running:
```bash theme={null}
kubectl get nodes -o=custom-columns=NAME:.metadata.name,TAINTS:.spec.taints
```
### Simple Kubernetes Executor
If you're using the default Simple Kubernetes executor (no Argo Workflows), use `SIMPLEK8S_PIPELINE_TYPE_CONFIGS` instead:
```yaml theme={null}
extraEnvs:
- name: SIMPLEK8S_PIPELINE_TYPE_CONFIGS
value: >-
{
"automation": {
"tolerations": [
{
"key": "nodetype",
"operator": "Equal",
"value": "openmetadata-hybrid-runner",
"effect": "NoSchedule"
}
],
"nodeSelector": {
"nodetype": "openmetadata-hybrid-runner"
}
}
}
```
### Supported Configuration Fields per Pipeline Type
Each pipeline type entry (`automation`, `metadata`, `profiler`, `lineage`) supports the following fields:
| Field | Executor | Description |
| --------------- | ---------- | --------------------------------------------------------------------------------------------------------------------------------------------------------------------------------- |
| `toleration` | Argo | A single taint value string. The runner creates a `dedicated=` Kubernetes toleration. For full toleration control, use `config.ingestionPods.customConfig.workflowParams`. |
| `tolerations` | Simple K8s | List of Kubernetes toleration objects to allow scheduling on tainted nodes |
| `affinity` | Argo | Node and pod affinity rules (`nodeAffinity`, `podAffinity`, `podAntiAffinity`) |
| `nodeSelector` | Both | Key-value labels to target specific nodes |
| `priorityClass` | Both | Kubernetes priority class for the pod |
| `resources` | Both | CPU and memory requests and limits |
## Monitor the Runner
The Hybrid Runner exposes operational metrics in Prometheus-compatible format via an HTTP endpoint. These metrics provide insight into agent state, activity, and performance.
**Example metric**
```
# HELP collate_hybrid_agent_connected Is the agent connected to the server? (0 = No, 1 = Yes)
# TYPE collate_hybrid_agent_connected gauge
collate_hybrid_agent_connected 1.0
```
### Configure Metrics Exposure
```yaml theme={null}
metricsServerConfiguration:
port: 8989
path: /metrics
```
* `port` — port on which the metrics endpoint is served (default: `8989`)
* `path` — HTTP path for accessing metrics (default: `/metrics`)
Both parameters support environment variable overrides for flexibility across deployment environments.
### Access Metrics
Once configured, access metrics at:
```
http://:/
```
For example, with default settings:
```
http://localhost:8989/metrics
```
## Additional Settings
### Hosting Your Own Docker Images
To use your own Docker registry instead of Collate's ECR, update the following Helm values.
For the **Hybrid Runner** pod:
```yaml theme={null}
image:
repository: my-repo.com/my-image
tag: my-tag
imagePullSecrets:
- name: my-credentials
```
For **ingestion pods**:
```yaml theme={null}
config:
ingestionPods:
repository: my-repo.com/my-image
tag: my-tag
imagePullSecrets: my-credentials
```
**Note**: Update images for **both** the Hybrid Runner and ingestion pods. Updating only one will cause version mismatches.
By default, the Hybrid Runner dynamically resolves ingestion pod image tags to match the Collate server version (for example, server version `1.11.1` maps to image tag `om-1.11.1-cl-1.11.1`). To manage your own tags, disable this behavior:
```yaml theme={null}
extraEnvs:
- name: DYNAMIC_INGESTION_VERSION_ENABLED
value: 'false'
```
#### AWS (EKS Pod Identity or IRSA)
Configure Pod Identity via EKS Pod Identity or IRSA to assume an IAM role. The `serviceAccount` name is `ingestion` by default.
**Required IAM permissions:**
* `secretsmanager:GetSecretValue`
* `secretsmanager:DescribeSecret`
* `secretsmanager:ListSecrets`
For IRSA, add the following to your `values.yaml`:
```yaml theme={null}
config:
secretsManager: "managed-aws"
ingestionPods:
serviceAccount:
annotations:
eks.amazonaws.com/role-arn: arn:aws:iam:::role/
```
#### Azure (Workload Identity)
Configure Workload Identity with a User Assigned Managed Identity. The required role is **Key Vault Secrets Officer**.
```yaml theme={null}
config:
secretsManager: "managed-azure-kv"
ingestionPods:
serviceAccount:
annotations:
"azure.workload.identity/client-id":
extraEnvs:
- "AZURE_KEY_VAULT_NAME:"
argoWorkflows:
controller:
workflowDefaults:
spec:
podMetadata:
labels:
azure.workload.identity/use: "true"
```
The `argoWorkflows:` section above is only required when `installArgoWorkflows: true`. Remove it if you are using the Simple Kubernetes executor.
#### GKE (GCP Secret Manager)
Use [Workload Identity](https://cloud.google.com/kubernetes-engine/docs/how-to/workload-identity) to grant ingestion pods access to GCP Secret Manager without managing service account keys. The required IAM role is `roles/secretmanager.secretAccessor`.
Add the following to your `values.yaml`:
```yaml theme={null}
config:
secretsManager: "gcp"
ingestionPods:
serviceAccount:
annotations:
iam.gke.io/gcp-service-account: @.iam.gserviceaccount.com
```
Replace `` and `` with your GCP values. You can restrict Secret Manager access to a specific path prefix, for example: `projects//secrets/collate/*`.
**Storing a Secret**
In the GCP Console, navigate to **Secret Manager** and select **Create Secret**. Store the raw secret value without quotes or JSON wrapping.
### Reference the Secret in Collate
In the service connection form in Collate, reference the secret using the `secret:` prefix followed by the full path to your secret.
```
secret:
```
**Example:** If your secret is stored in AWS Secrets Manager at `/my/database/password`, enter the following in the password field:
```
secret:/my/database/password
```
Secret references only work for masked fields—those with a hide or show icon.
## Configure Node Scheduling
**Important**:
**Common production issue:** If every node in your Kubernetes cluster has a `NoSchedule` taint, ingestion pods fail to schedule with a `FailedScheduling` error. This is the most frequent cause of pods stuck in `Pending` state after deploying the Hybrid Runner.
Ingestion pods run as independent Kubernetes pods. If your cluster uses node taints to isolate workloads, configure tolerations and node affinity so ingestion pods schedule on the correct nodes. Configuration differs by executor type — use the section that matches your setup:
* **Argo Workflows executor** (Hybrid Runner with Argo): use `ARGO_PIPELINE_TYPE_CONFIGS`
* **Simple Kubernetes executor** (default, Hybrid Runner without Argo): use `SIMPLEK8S_PIPELINE_TYPE_CONFIGS`
Don't mix these two environment variables. Each executor reads from its own configuration key. Setting `SIMPLEK8S_PIPELINE_TYPE_CONFIGS` when using Argo has no effect, and vice versa.
The configuration value is a JSON string scoped by pipeline type: `automation`, `metadata`, `profiler`, and `lineage`.
### Argo Workflows Executor
Add the following to your `values.yaml`:
```yaml theme={null}
extraEnvs:
- name: ARGO_PIPELINE_TYPE_CONFIGS
value: >-
{
"automation": {
"toleration": "openmetadata-hybrid-runner",
"affinity": {
"nodeAffinity": {
"requiredDuringSchedulingIgnoredDuringExecution": {
"nodeSelectorTerms": [
{
"matchExpressions": [
{
"key": "nodetype",
"operator": "In",
"values": ["openmetadata-hybrid-runner"]
}
]
}
]
}
}
}
},
"metadata": {
"toleration": "openmetadata-hybrid-runner"
},
"profiler": {
"toleration": "openmetadata-hybrid-runner"
},
"lineage": {
"toleration": "openmetadata-hybrid-runner"
}
}
```
`toleration` accepts a single string value. The runner creates a `dedicated=` Kubernetes toleration for all ingestion pods of that type. For full Kubernetes toleration objects (multiple taints, custom operators, or effects), use `config.ingestionPods.customConfig.workflowParams` instead.
Replace `openmetadata-hybrid-runner` with the taint value used in your cluster. Check your node taints by running:
```bash theme={null}
kubectl get nodes -o=custom-columns=NAME:.metadata.name,TAINTS:.spec.taints
```
### Simple Kubernetes Executor
If you're using the default Simple Kubernetes executor (no Argo Workflows), use `SIMPLEK8S_PIPELINE_TYPE_CONFIGS` instead:
```yaml theme={null}
extraEnvs:
- name: SIMPLEK8S_PIPELINE_TYPE_CONFIGS
value: >-
{
"automation": {
"tolerations": [
{
"key": "nodetype",
"operator": "Equal",
"value": "openmetadata-hybrid-runner",
"effect": "NoSchedule"
}
],
"nodeSelector": {
"nodetype": "openmetadata-hybrid-runner"
}
}
}
```
### Supported Configuration Fields per Pipeline Type
Each pipeline type entry (`automation`, `metadata`, `profiler`, `lineage`) supports the following fields:
| Field | Executor | Description |
| --------------- | ---------- | --------------------------------------------------------------------------------------------------------------------------------------------------------------------------------- |
| `toleration` | Argo | A single taint value string. The runner creates a `dedicated=` Kubernetes toleration. For full toleration control, use `config.ingestionPods.customConfig.workflowParams`. |
| `tolerations` | Simple K8s | List of Kubernetes toleration objects to allow scheduling on tainted nodes |
| `affinity` | Argo | Node and pod affinity rules (`nodeAffinity`, `podAffinity`, `podAntiAffinity`) |
| `nodeSelector` | Both | Key-value labels to target specific nodes |
| `priorityClass` | Both | Kubernetes priority class for the pod |
| `resources` | Both | CPU and memory requests and limits |
## Monitor the Runner
The Hybrid Runner exposes operational metrics in Prometheus-compatible format via an HTTP endpoint. These metrics provide insight into agent state, activity, and performance.
**Example metric**
```
# HELP collate_hybrid_agent_connected Is the agent connected to the server? (0 = No, 1 = Yes)
# TYPE collate_hybrid_agent_connected gauge
collate_hybrid_agent_connected 1.0
```
### Configure Metrics Exposure
```yaml theme={null}
metricsServerConfiguration:
port: 8989
path: /metrics
```
* `port` — port on which the metrics endpoint is served (default: `8989`)
* `path` — HTTP path for accessing metrics (default: `/metrics`)
Both parameters support environment variable overrides for flexibility across deployment environments.
### Access Metrics
Once configured, access metrics at:
```
http://:/
```
For example, with default settings:
```
http://localhost:8989/metrics
```
## Additional Settings
### Hosting Your Own Docker Images
To use your own Docker registry instead of Collate's ECR, update the following Helm values.
For the **Hybrid Runner** pod:
```yaml theme={null}
image:
repository: my-repo.com/my-image
tag: my-tag
imagePullSecrets:
- name: my-credentials
```
For **ingestion pods**:
```yaml theme={null}
config:
ingestionPods:
repository: my-repo.com/my-image
tag: my-tag
imagePullSecrets: my-credentials
```
**Note**: Update images for **both** the Hybrid Runner and ingestion pods. Updating only one will cause version mismatches.
By default, the Hybrid Runner dynamically resolves ingestion pod image tags to match the Collate server version (for example, server version `1.11.1` maps to image tag `om-1.11.1-cl-1.11.1`). To manage your own tags, disable this behavior:
```yaml theme={null}
extraEnvs:
- name: DYNAMIC_INGESTION_VERSION_ENABLED
value: 'false'
```