> ## Documentation Index
> Fetch the complete documentation index at: https://docs.getcollate.io/llms.txt
> Use this file to discover all available pages before exploring further.
# Upgrade on Kubernetes | Official Documentation
> Upgrade Kubernetes deployments efficiently using version-specific instructions, Helm values, and best practices for safe rollout.
# Upgrade on Kubernetes
This guide will help you upgrade your OpenMetadata Kubernetes Application with automated helm hooks.
## Requirements
This guide assumes that you have an OpenMetadata deployment that you installed and configured following the
[Kubernetes Deployment](/deployment/kubernetes) guide.
We also assume that your helm chart release names are `openmetadata` and `openmetadata-dependencies` and namespace used is `default`.
## Prerequisites
Everytime that you plan on upgrading OpenMetadata to a newer version, make sure to go over all these steps:
### Backup your Metadata
Before upgrading your OpenMetadata version we strongly recommend backing up the metadata.
The source of truth is stored in the underlying database (MySQL and Postgres supported). During each version upgrade there
is a database migration process that needs to run. It will directly attack your database and update the shape of the
data to the newest OpenMetadata release.
It is important that we backup the data because if we face any unexpected issues during the upgrade process,
you will be able to get back to the previous version without any loss.
You can learn more about how the migration process works [here](/deployment/upgrade/how-does-it-work).
**During the upgrade, please note that the backup is only for safety and should not be used to restore data to a higher version**.
Since version 1.4.0, **OpenMetadata encourages using the builtin-tools for creating logical backups of the metadata**:
* [mysqldump](https://dev.mysql.com/doc/refman/8.0/en/mysqldump.html) for MySQL
* [pg\_dump](https://www.postgresql.org/docs/current/app-pgdump.html) for Postgres
For PROD deployment we recommend users to rely on cloud services for their databases, be it [AWS RDS](https://docs.aws.amazon.com/rds/),
[Azure SQL](https://azure.microsoft.com/en-in/products/azure-sql/database) or [GCP Cloud SQL](https://cloud.google.com/sql/).
If you're a user of these services, you can leverage their backup capabilities directly:
* [Creating a DB snapshot in AWS](https://docs.aws.amazon.com/AmazonRDS/latest/UserGuide/USER_CreateSnapshot.html)
* [Backup and restore in Azure MySQL](https://learn.microsoft.com/en-us/azure/mysql/single-server/concepts-backup)
* [About GCP Cloud SQL backup](https://cloud.google.com/sql/docs/mysql/backup-recovery/backups)
You can refer to the following guide to get more details about the backup and restore:
Learn how to back up MySQL or Postgres data.
### Understanding the "Running" State in OpenMetadata
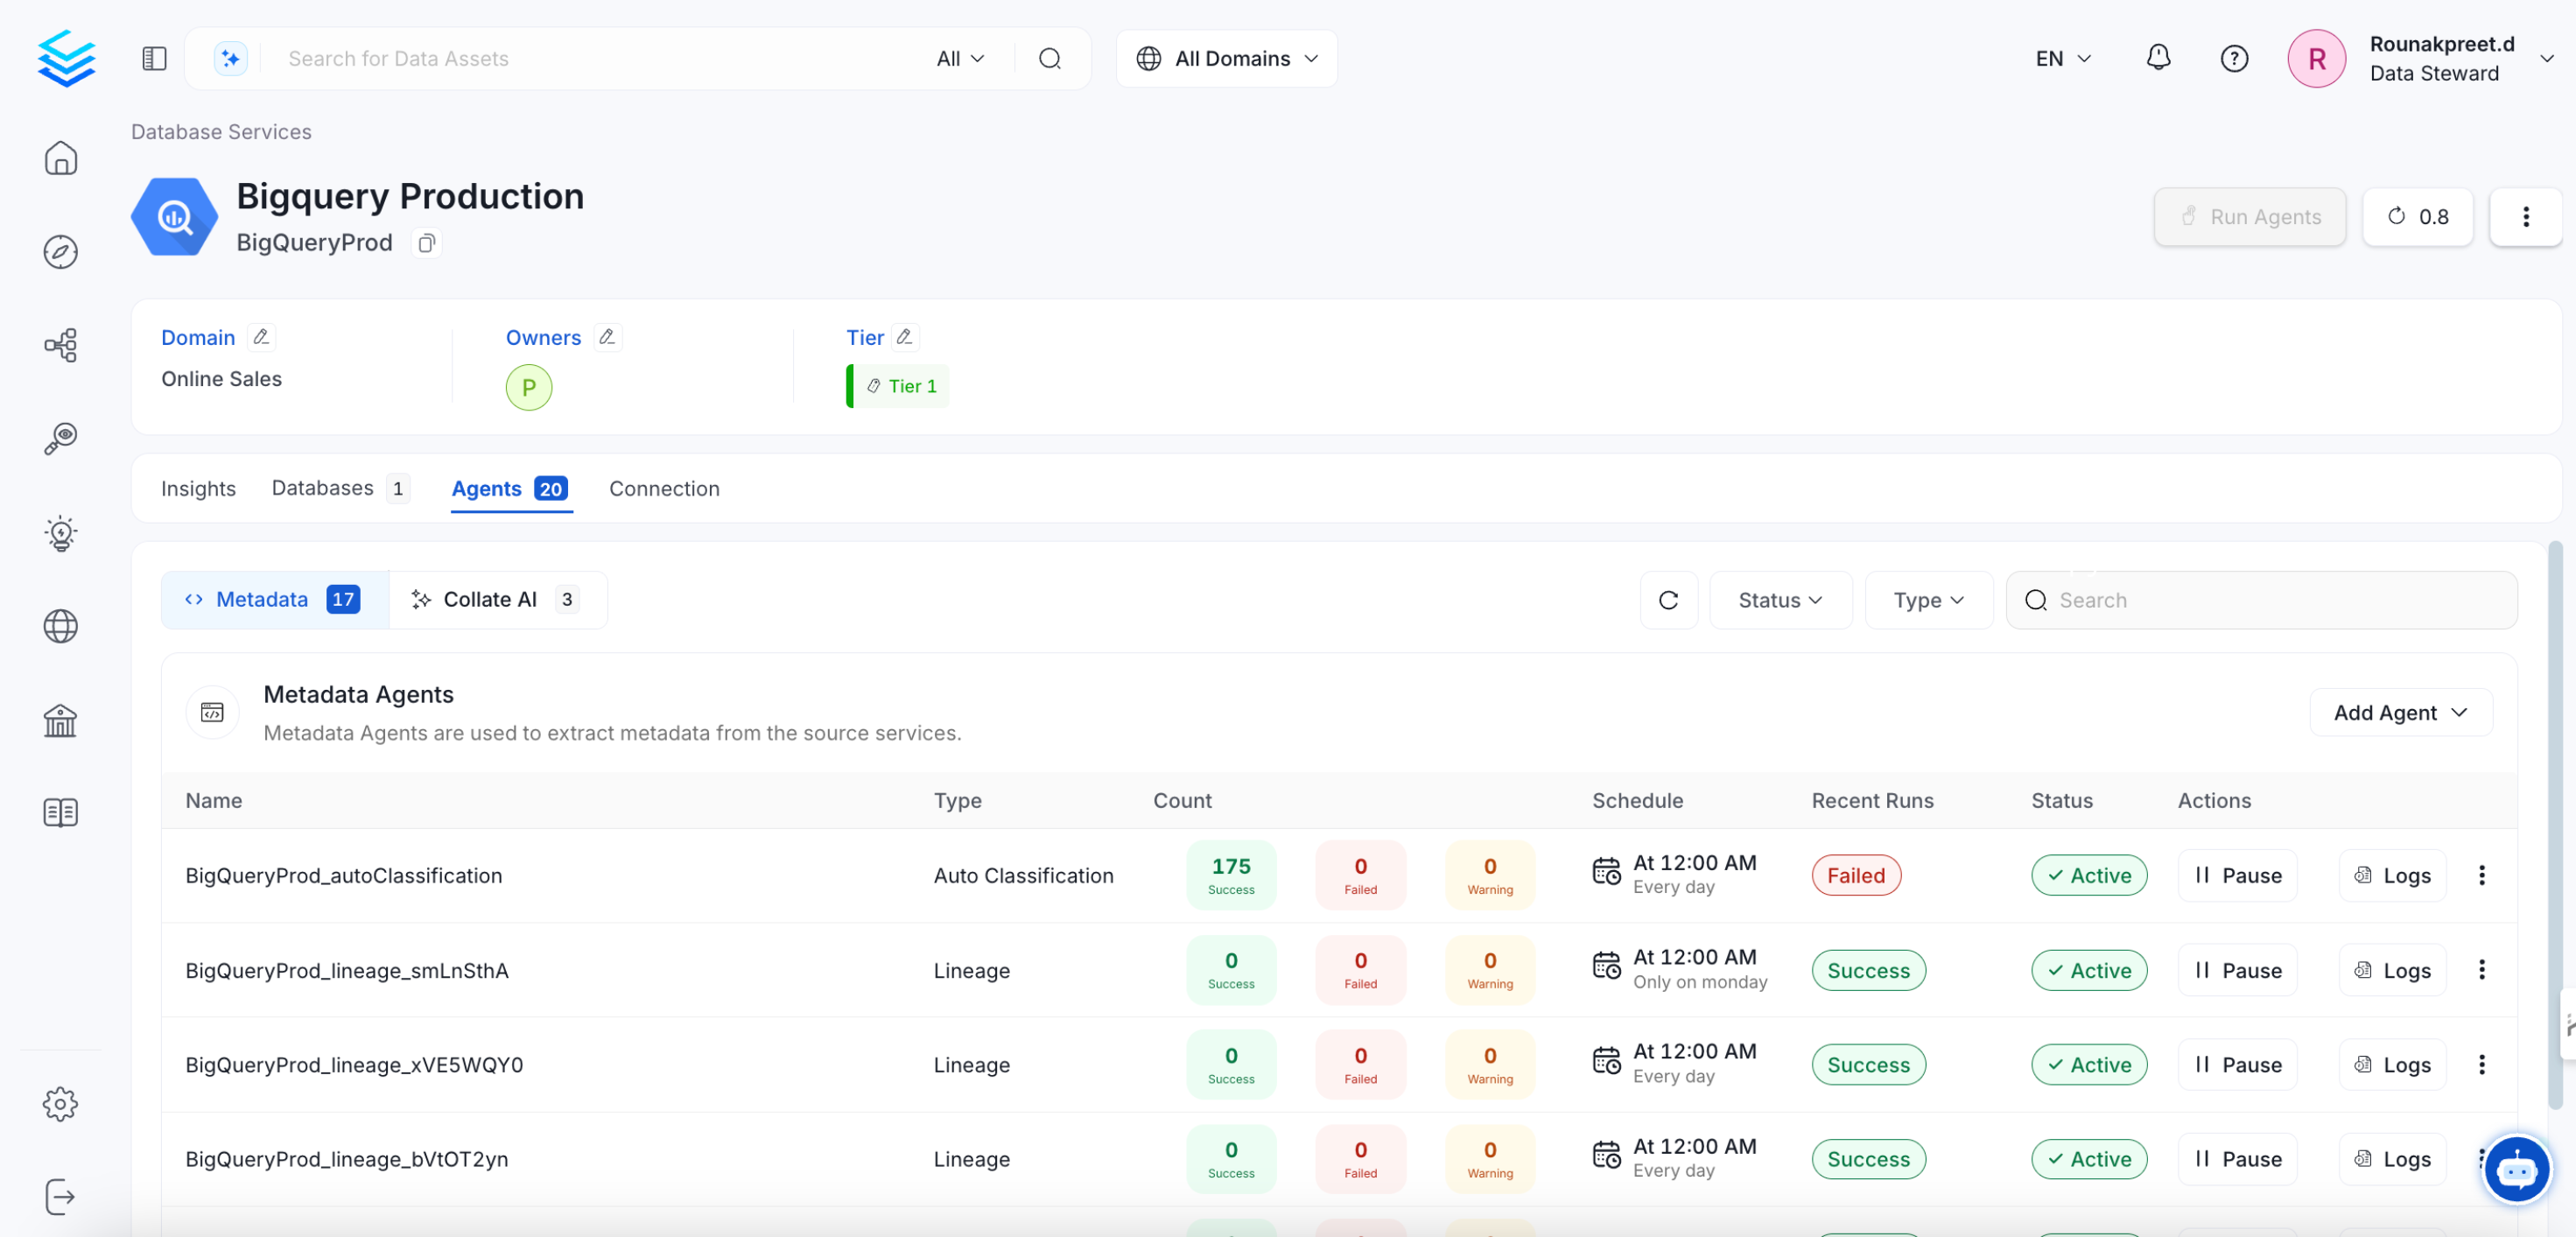
In OpenMetadata, the **"Running"** state indicates that the Collate server has received a response from Airflow confirming that a workflow is in progress. However, if Airflow unexpectedly stops or crashes before it can send a failure status update through the **Failure Callback**, OpenMetadata remains unaware of the workflow’s actual state. As a result, the workflow may appear to be stuck in **"Running"** even though it is no longer executing.
This situation can also occur during an OpenMetadata upgrade. If an ingestion pipeline was running at the time of the upgrade and the process caused Airflow to shut down, OpenMetadata would not receive any further updates from Airflow. Consequently, the pipeline status remains **"Running"** indefinitely.
 ### Expected Steps to Resolve
To resolve this issue:
* Ensure that Airflow is restarted properly after an unexpected shutdown.
* Manually update the pipeline status if necessary.
* Check Airflow logs to verify if the DAG execution was interrupted.
#### Update `sort_buffer_size` (MySQL) or `work_mem` (Postgres)
Before running the migrations, it is important to update these parameters to ensure there are no runtime errors.
A safe value would be setting them to 20MB.
**If using MySQL**
You can update it via SQL (note that it will reset after the server restarts):
```sql theme={null}
SET GLOBAL sort_buffer_size = 20971520
```
To make the configuration persistent, you'd need to navigate to your MySQL Server install directory and update the
`my.ini` or `my.cnf` [files](https://dev.mysql.com/doc/refman/8.0/en/option-files.html) with `sort_buffer_size = 20971520`.
If using RDS, you will need to update your instance's [Parameter Group](https://docs.aws.amazon.com/AmazonRDS/latest/UserGuide/USER_WorkingWithParamGroups.html)
to include the above change.
**If using Postgres**
You can update it via SQL (not that it will reset after the server restarts):
```sql theme={null}
SET work_mem = '20MB';
```
To make the configuration persistent, you'll need to update the `postgresql.conf` [file](https://www.postgresql.org/docs/9.3/config-setting.html)
with `work_mem = 20MB`.
If using RDS, you will need to update your instance's [Parameter Group](https://docs.aws.amazon.com/AmazonRDS/latest/UserGuide/USER_WorkingWithParamGroups.html)
to include the above change.
Note that this value would depend on the size of your `query_entity` table. If you still see `Out of Sort Memory Error`s
during the migration after bumping this value, you can increase them further.
After the migration is finished, you can revert this changes.
## Backward Incompatible Changes
### 2.0.0
#### Great Expectations requires version 1.3 or later
The validation action now requires **Great Expectations 1.3 or later**. Collate 2.0 drops support for the 0.18 line, and
`openmetadata-ingestion[great-expectations]` now installs `great-expectations~=1.3`. The separate `great-expectations-1xx`
extra no longer exists.
If you adopted the interim GX 1.x module, rename it in your checkpoint. `metadata.great_expectations.action1xx` and
`OpenMetadataValidationAction1xx` have been removed:
```python theme={null}
# Before
from metadata.great_expectations.action1xx import OpenMetadataValidationAction1xx
# After
from metadata.great_expectations.action import OpenMetadataValidationAction
```
Checkpoints that already reference `metadata.great_expectations.action` and `OpenMetadataValidationAction` keep those
names. The surrounding checkpoint definition still has to move to the GX 1.x API. Pass actions as objects to
`Checkpoint(actions=[...])` rather than as an `action_list` of dictionaries, and call `checkpoint.run()` instead of
`great_expectations checkpoint run`. See the [Great Expectations](/connectors/ingestion/great-expectations) guide for
the updated configuration.
#### Great Expectations test results report counts instead of percentages
Test case results now report row counts only — `unexpected_count`, `missing_count`, `element_count`, and
`observed_value`. The percentage values (`unexpected_percent`, `unexpected_percent_total`, `missing_percent`, and
`success_rate`) are no longer sent, because Collate charts every result value of a test case on a single axis and
percentages plotted next to row counts were flattened into the baseline. Percentages remain derivable as
`unexpected_count / element_count`.
Existing test cases keep their historical percentage series until those data points age out of the chart window.
### 1.9.0
#### Strong validation of test case parameters
`parameterValues` name of a testCase will be strongly validated against the name of the `parameterDefinition` in the testDefinition.
If both parameter names do not match an error will be thrown on testCase creation
#### Multi-domain Support
**All entities now support multi-domains**. Their `domain` field is now renamed to `domains` and modelled as a list of domains instead of a single domain.
If you're using the API or the SDK, you will need to update your code to use the new `domains` field instead of `domain`.
We have also updated the `patch_domain` implementation, which now has a new signature to support the new `domains` field.
While the schema and APIs are all updated, the Multi-domain support is not enabled by default.
If you want to allow your assets to belong to multiple domains, you need to go to Settings > Preferences > Data Asset Rules and disable the `Multiple Domains are not allowed` rule.
## Upgrade Process
### Step 1: Get an overview of what has changed in Helm Values
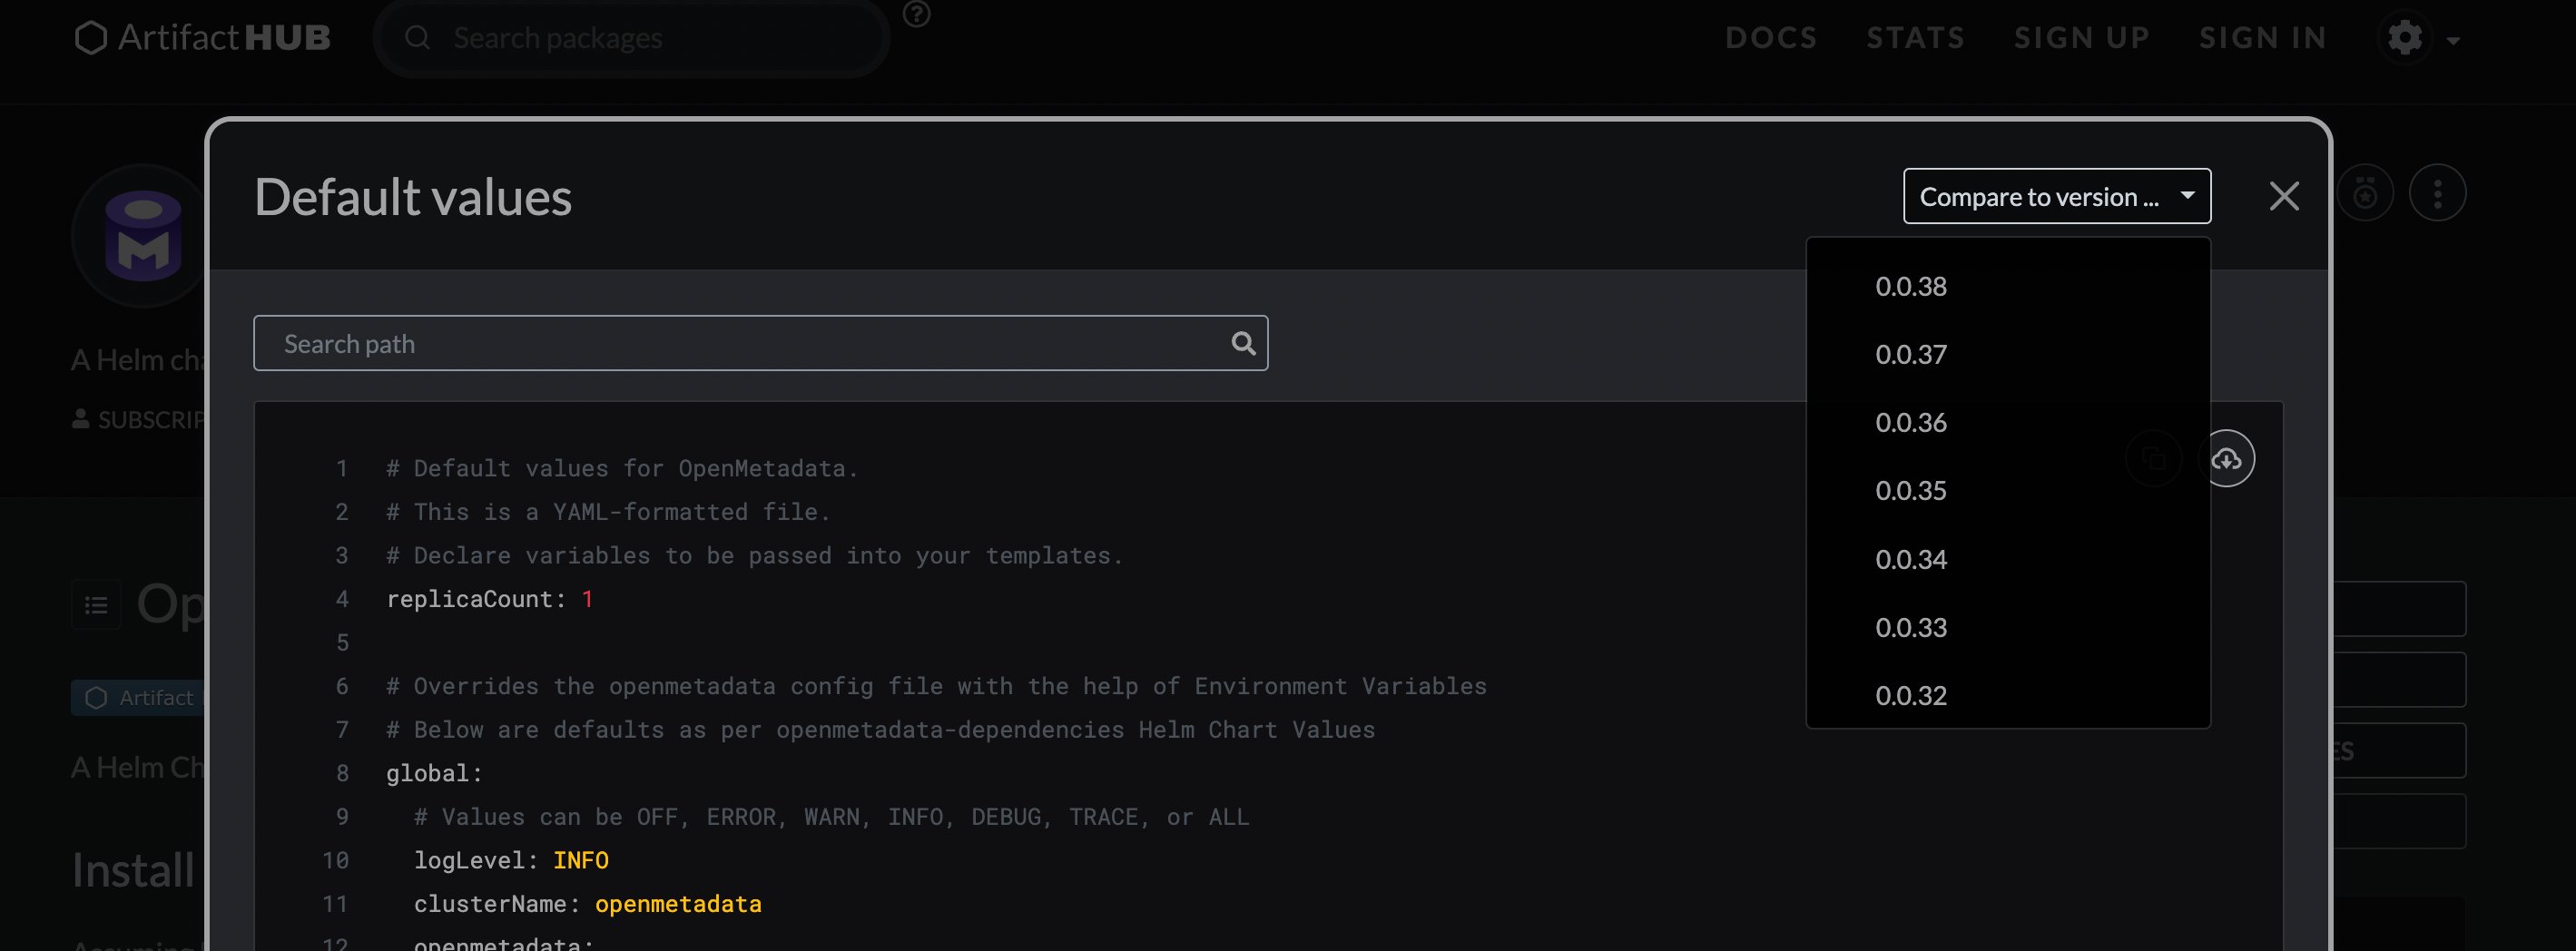
You can get changes from artifact hub of [openmetadata helm chart](https://artifacthub.io/packages/helm/open-metadata/openmetadata) release. Click on Default Values >> Compare to Version.
### Expected Steps to Resolve
To resolve this issue:
* Ensure that Airflow is restarted properly after an unexpected shutdown.
* Manually update the pipeline status if necessary.
* Check Airflow logs to verify if the DAG execution was interrupted.
#### Update `sort_buffer_size` (MySQL) or `work_mem` (Postgres)
Before running the migrations, it is important to update these parameters to ensure there are no runtime errors.
A safe value would be setting them to 20MB.
**If using MySQL**
You can update it via SQL (note that it will reset after the server restarts):
```sql theme={null}
SET GLOBAL sort_buffer_size = 20971520
```
To make the configuration persistent, you'd need to navigate to your MySQL Server install directory and update the
`my.ini` or `my.cnf` [files](https://dev.mysql.com/doc/refman/8.0/en/option-files.html) with `sort_buffer_size = 20971520`.
If using RDS, you will need to update your instance's [Parameter Group](https://docs.aws.amazon.com/AmazonRDS/latest/UserGuide/USER_WorkingWithParamGroups.html)
to include the above change.
**If using Postgres**
You can update it via SQL (not that it will reset after the server restarts):
```sql theme={null}
SET work_mem = '20MB';
```
To make the configuration persistent, you'll need to update the `postgresql.conf` [file](https://www.postgresql.org/docs/9.3/config-setting.html)
with `work_mem = 20MB`.
If using RDS, you will need to update your instance's [Parameter Group](https://docs.aws.amazon.com/AmazonRDS/latest/UserGuide/USER_WorkingWithParamGroups.html)
to include the above change.
Note that this value would depend on the size of your `query_entity` table. If you still see `Out of Sort Memory Error`s
during the migration after bumping this value, you can increase them further.
After the migration is finished, you can revert this changes.
## Backward Incompatible Changes
### 2.0.0
#### Great Expectations requires version 1.3 or later
The validation action now requires **Great Expectations 1.3 or later**. Collate 2.0 drops support for the 0.18 line, and
`openmetadata-ingestion[great-expectations]` now installs `great-expectations~=1.3`. The separate `great-expectations-1xx`
extra no longer exists.
If you adopted the interim GX 1.x module, rename it in your checkpoint. `metadata.great_expectations.action1xx` and
`OpenMetadataValidationAction1xx` have been removed:
```python theme={null}
# Before
from metadata.great_expectations.action1xx import OpenMetadataValidationAction1xx
# After
from metadata.great_expectations.action import OpenMetadataValidationAction
```
Checkpoints that already reference `metadata.great_expectations.action` and `OpenMetadataValidationAction` keep those
names. The surrounding checkpoint definition still has to move to the GX 1.x API. Pass actions as objects to
`Checkpoint(actions=[...])` rather than as an `action_list` of dictionaries, and call `checkpoint.run()` instead of
`great_expectations checkpoint run`. See the [Great Expectations](/connectors/ingestion/great-expectations) guide for
the updated configuration.
#### Great Expectations test results report counts instead of percentages
Test case results now report row counts only — `unexpected_count`, `missing_count`, `element_count`, and
`observed_value`. The percentage values (`unexpected_percent`, `unexpected_percent_total`, `missing_percent`, and
`success_rate`) are no longer sent, because Collate charts every result value of a test case on a single axis and
percentages plotted next to row counts were flattened into the baseline. Percentages remain derivable as
`unexpected_count / element_count`.
Existing test cases keep their historical percentage series until those data points age out of the chart window.
### 1.9.0
#### Strong validation of test case parameters
`parameterValues` name of a testCase will be strongly validated against the name of the `parameterDefinition` in the testDefinition.
If both parameter names do not match an error will be thrown on testCase creation
#### Multi-domain Support
**All entities now support multi-domains**. Their `domain` field is now renamed to `domains` and modelled as a list of domains instead of a single domain.
If you're using the API or the SDK, you will need to update your code to use the new `domains` field instead of `domain`.
We have also updated the `patch_domain` implementation, which now has a new signature to support the new `domains` field.
While the schema and APIs are all updated, the Multi-domain support is not enabled by default.
If you want to allow your assets to belong to multiple domains, you need to go to Settings > Preferences > Data Asset Rules and disable the `Multiple Domains are not allowed` rule.
## Upgrade Process
### Step 1: Get an overview of what has changed in Helm Values
You can get changes from artifact hub of [openmetadata helm chart](https://artifacthub.io/packages/helm/open-metadata/openmetadata) release. Click on Default Values >> Compare to Version.
 ### Step 2: Upgrade Helm Repository with a new release
Update Helm Chart Locally for OpenMetadata with the below command:
```commandline theme={null}
helm repo update open-metadata
```
It will result in the below output on screen.
```commandline theme={null}
Hang tight while we grab the latest from your chart repositories...
...Successfully got an update from the "open-metadata" chart repository
Update Complete. ⎈Happy Helming!⎈
```
Verify with the below command to see the latest release available locally.
```commandline theme={null}
helm search repo open-metadata --versions
> NAME CHART VERSION APP VERSION DESCRIPTION
open-metadata/openmetadata 2.0.2 2.0.2 A Helm chart for OpenMetadata on Kubernetes
open-metadata/openmetadata 1.12.11 1.12.11 A Helm chart for OpenMetadata on Kubernetes
...
open-metadata/openmetadata-dependencies 2.0.2 2.0.2 Helm Dependencies for OpenMetadata
open-metadata/openmetadata-dependencies 1.12.11 1.12.11 Helm Dependencies for OpenMetadata
...
```
### Step 3: Upgrade OpenMetadata Dependencies
You can run the below command to upgrade the dependencies with the new chart
```commandline theme={null}
helm upgrade openmetadata-dependencies open-metadata/openmetadata-dependencies
```
The above command uses configurations defined [here](https://raw.githubusercontent.com/open-metadata/openmetadata-helm-charts/main/charts/deps/values.yaml).
You can modify any configuration and deploy by passing your own `values.yaml`.
Make sure that, when using your own `values.yaml`, you are not overwriting elements such as the `image` of the containers.
This would prevent your new deployment to use the latest containers when running the upgrade.
If you are running into any issues, double-check what are the default values of the helm revision.
### Step 4: Upgrade OpenMetadata
Finally, we upgrade OpenMetadata with the below command:
```commandline theme={null}
helm upgrade openmetadata open-metadata/openmetadata
```
You might need to pass your own `values.yaml` with the `--values` flag.
Note that in every version upgrade there is a migration process that updates your database to the newest version.
For kubernetes, this process will happen automatically as an upgrade hook.
You can learn more about how the migration process works [here](/deployment/upgrade/how-does-it-work).
## Post-Upgrade Steps
### Reindex
#### With UI
Go to `Settings` -> `Applications` -> `Search Indexing`
### Step 2: Upgrade Helm Repository with a new release
Update Helm Chart Locally for OpenMetadata with the below command:
```commandline theme={null}
helm repo update open-metadata
```
It will result in the below output on screen.
```commandline theme={null}
Hang tight while we grab the latest from your chart repositories...
...Successfully got an update from the "open-metadata" chart repository
Update Complete. ⎈Happy Helming!⎈
```
Verify with the below command to see the latest release available locally.
```commandline theme={null}
helm search repo open-metadata --versions
> NAME CHART VERSION APP VERSION DESCRIPTION
open-metadata/openmetadata 2.0.2 2.0.2 A Helm chart for OpenMetadata on Kubernetes
open-metadata/openmetadata 1.12.11 1.12.11 A Helm chart for OpenMetadata on Kubernetes
...
open-metadata/openmetadata-dependencies 2.0.2 2.0.2 Helm Dependencies for OpenMetadata
open-metadata/openmetadata-dependencies 1.12.11 1.12.11 Helm Dependencies for OpenMetadata
...
```
### Step 3: Upgrade OpenMetadata Dependencies
You can run the below command to upgrade the dependencies with the new chart
```commandline theme={null}
helm upgrade openmetadata-dependencies open-metadata/openmetadata-dependencies
```
The above command uses configurations defined [here](https://raw.githubusercontent.com/open-metadata/openmetadata-helm-charts/main/charts/deps/values.yaml).
You can modify any configuration and deploy by passing your own `values.yaml`.
Make sure that, when using your own `values.yaml`, you are not overwriting elements such as the `image` of the containers.
This would prevent your new deployment to use the latest containers when running the upgrade.
If you are running into any issues, double-check what are the default values of the helm revision.
### Step 4: Upgrade OpenMetadata
Finally, we upgrade OpenMetadata with the below command:
```commandline theme={null}
helm upgrade openmetadata open-metadata/openmetadata
```
You might need to pass your own `values.yaml` with the `--values` flag.
Note that in every version upgrade there is a migration process that updates your database to the newest version.
For kubernetes, this process will happen automatically as an upgrade hook.
You can learn more about how the migration process works [here](/deployment/upgrade/how-does-it-work).
## Post-Upgrade Steps
### Reindex
#### With UI
Go to `Settings` -> `Applications` -> `Search Indexing`
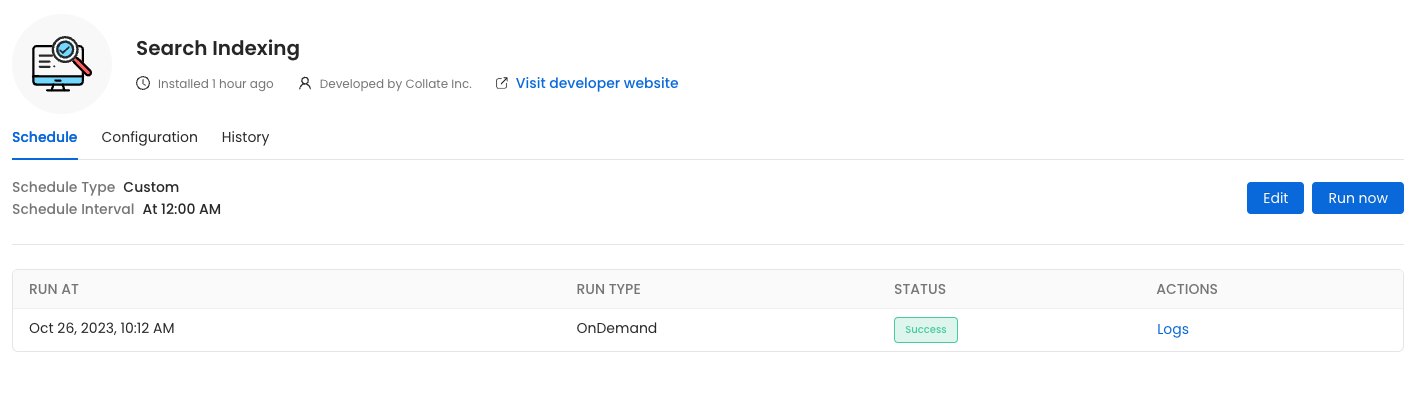 Before initiating the process by clicking `Run Now`, ensure that the `Recreate Indexes` option is enabled to allow rebuilding the indexes as needed.
In the configuration section, you can select the entities you want to reindex.
Before initiating the process by clicking `Run Now`, ensure that the `Recreate Indexes` option is enabled to allow rebuilding the indexes as needed.
In the configuration section, you can select the entities you want to reindex.
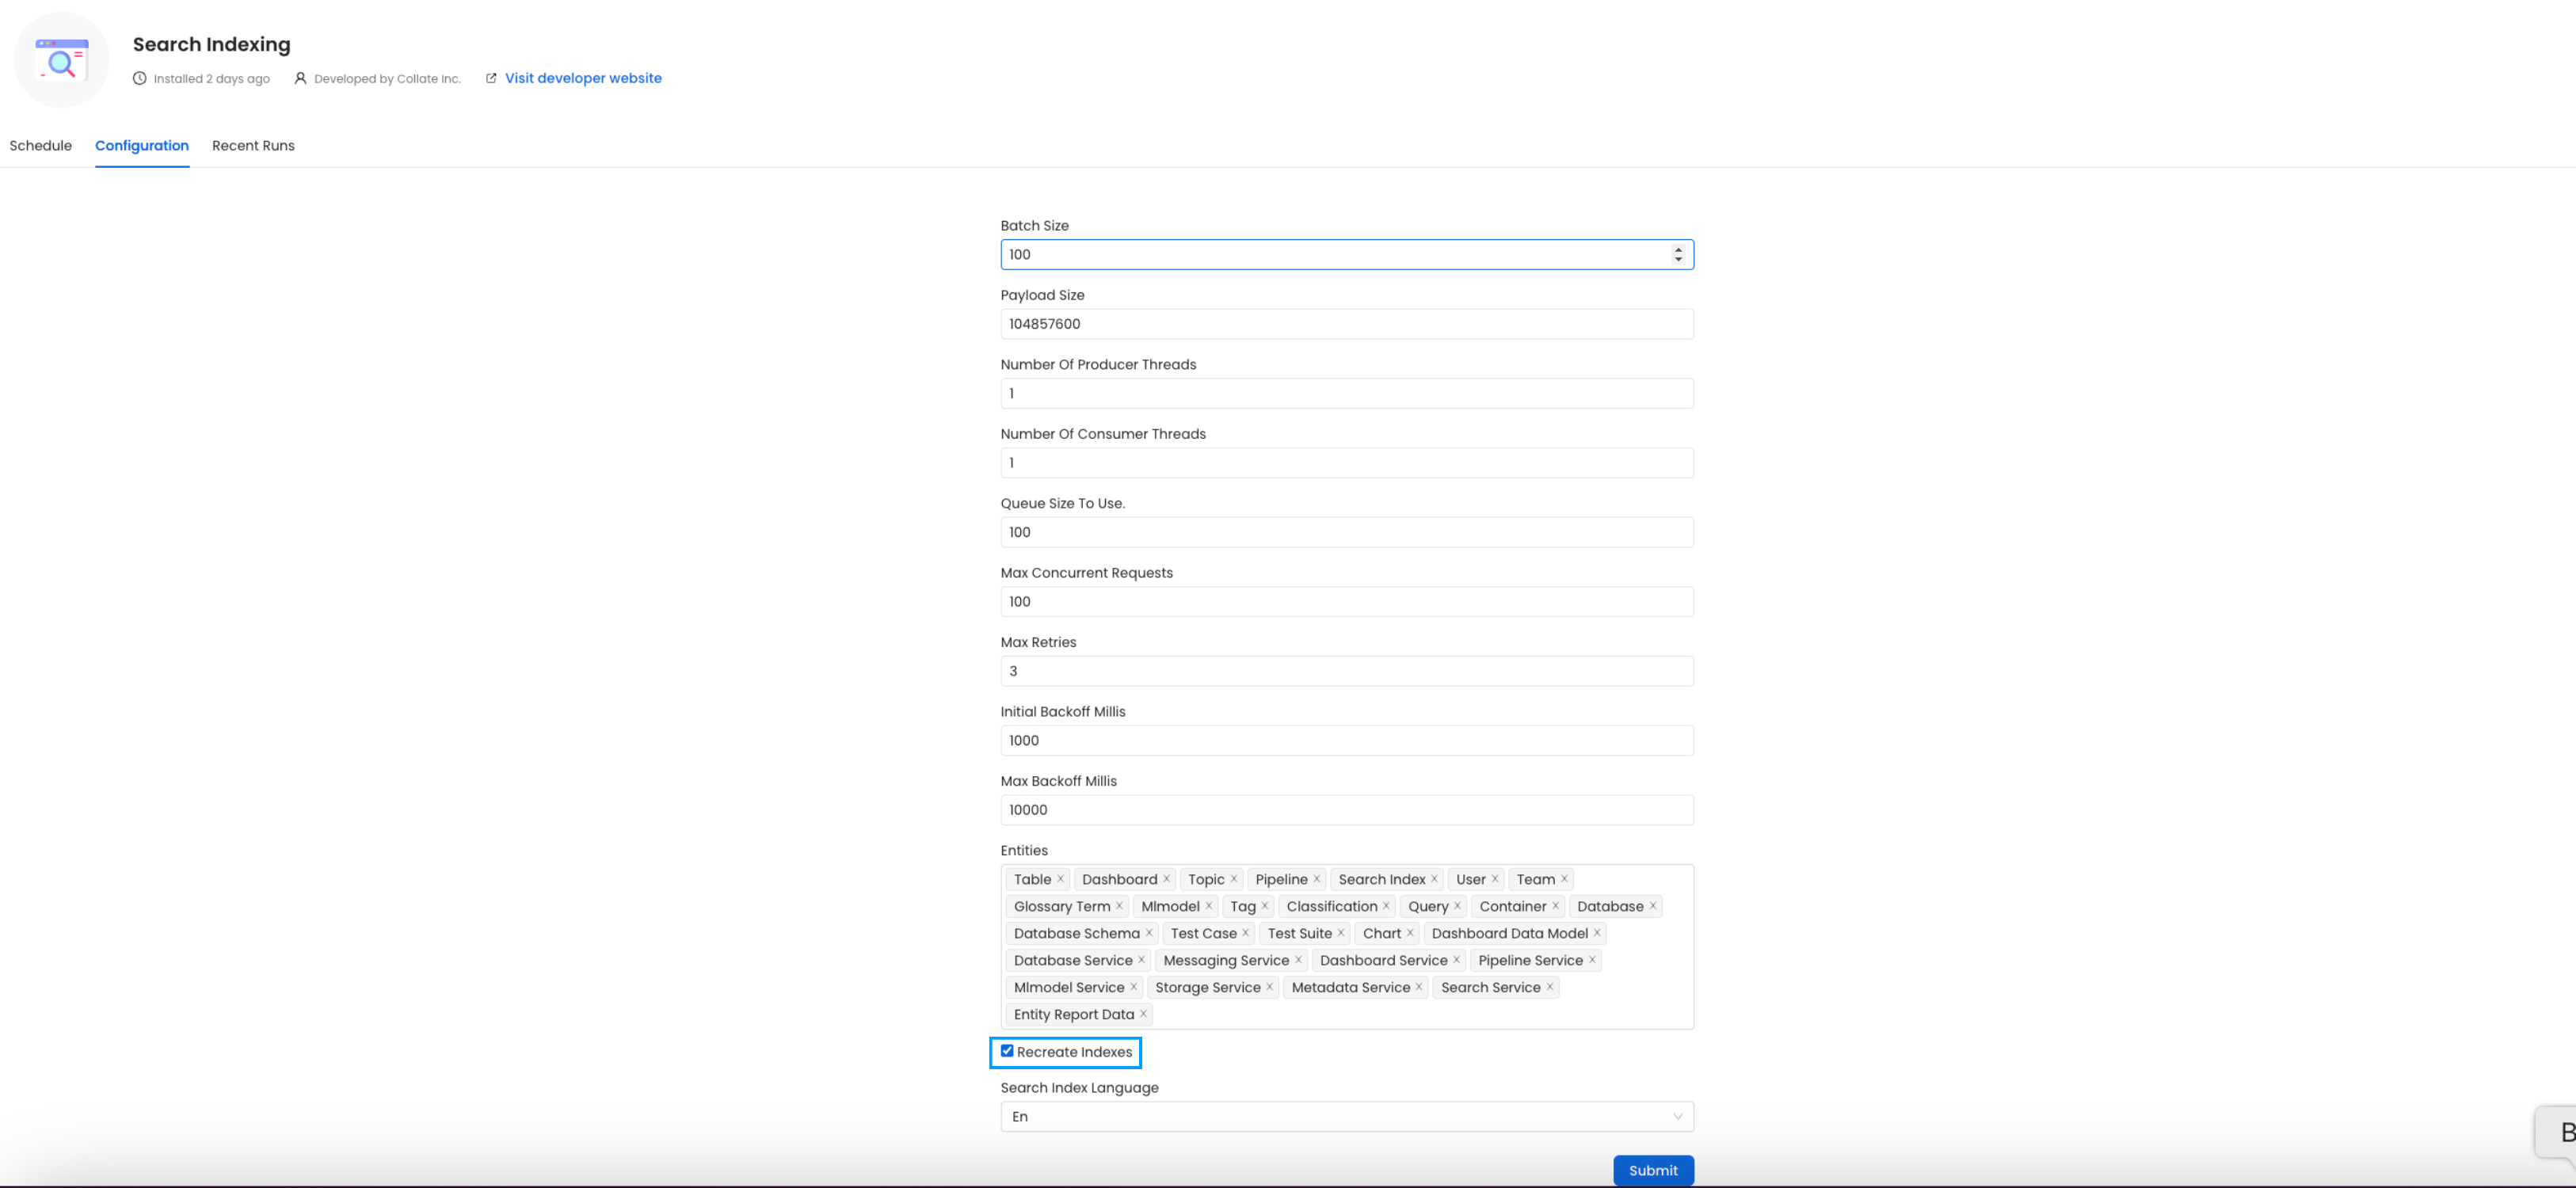 Since this is required after the upgrade, we want to reindex `All` the entities.
### (Optional) Update your OpenMetadata Ingestion Client
If you are running the ingestion workflows **externally** or using a custom Airflow installation, you need to make sure that the Python Client you use is aligned
with the Collate server version.
For example, if you are upgrading the server to the version `x.y.z`, you will need to update your client with
```bash theme={null}
pip install openmetadata-ingestion[]==x.y.z
```
#### With Kubernetes
Follow these steps to reindex using the CLI:
1. List the CronJobs
Use the following command to check the available CronJobs:
```bash theme={null}
kubectl get cronjobs
```
Upon running this command you should see output similar to the following.
```CommandLine theme={null}
kubectl get cronjobs
NAME SCHEDULE TIMEZONE SUSPEND ACTIVE LAST SCHEDULE AGE
cron-reindex 0/5 * * * * True 0 31m
```
2. Create a Job from a CronJob
Create a one-time job from an existing CronJob using the following command:
```bash theme={null}
kubectl create job --from=cronjob/cron-reindex
```
Replace `` with the actual name of the job.
Upon running this command you should see output similar to the following.
```CommandLine theme={null}
kubectl create job --from=cronjob/cron-reindex cron-reindex-one
job.batch/cron-reindex-one created
```
3. Check the Job Status
Verify the status of the created job with:
```bash theme={null}
kubectl get jobs
```
Upon running this command you should see output similar to the following.
```CommandLine theme={null}
kubectl get jobs
NAME STATUS COMPLETIONS DURATION AGE
cron-reindex-one Complete 1/1 20s 109s
```
4. View logs
To view the logs use the below command.
```bash theme={null}
kubectl logs job/
```
Replace `` with the actual job name.
The `plugin` parameter is a list of the sources that we want to ingest. An example would look like this `openmetadata-ingestion[mysql,snowflake,s3]~=2.0.2.0`.
You will find specific instructions for each connector [here](/connectors).
Moreover, if working with your own Airflow deployment - not the `openmetadata-ingestion` image - you will need to upgrade
as well the `openmetadata-managed-apis` version:
```bash theme={null}
pip install openmetadata-managed-apis==x.y.z
```
### Re Deploy Ingestion Pipelines
#### With UI
Go to `Settings` -> `{Services}` -> `{Databases}` -> `Pipelines`
Since this is required after the upgrade, we want to reindex `All` the entities.
### (Optional) Update your OpenMetadata Ingestion Client
If you are running the ingestion workflows **externally** or using a custom Airflow installation, you need to make sure that the Python Client you use is aligned
with the Collate server version.
For example, if you are upgrading the server to the version `x.y.z`, you will need to update your client with
```bash theme={null}
pip install openmetadata-ingestion[]==x.y.z
```
#### With Kubernetes
Follow these steps to reindex using the CLI:
1. List the CronJobs
Use the following command to check the available CronJobs:
```bash theme={null}
kubectl get cronjobs
```
Upon running this command you should see output similar to the following.
```CommandLine theme={null}
kubectl get cronjobs
NAME SCHEDULE TIMEZONE SUSPEND ACTIVE LAST SCHEDULE AGE
cron-reindex 0/5 * * * * True 0 31m
```
2. Create a Job from a CronJob
Create a one-time job from an existing CronJob using the following command:
```bash theme={null}
kubectl create job --from=cronjob/cron-reindex
```
Replace `` with the actual name of the job.
Upon running this command you should see output similar to the following.
```CommandLine theme={null}
kubectl create job --from=cronjob/cron-reindex cron-reindex-one
job.batch/cron-reindex-one created
```
3. Check the Job Status
Verify the status of the created job with:
```bash theme={null}
kubectl get jobs
```
Upon running this command you should see output similar to the following.
```CommandLine theme={null}
kubectl get jobs
NAME STATUS COMPLETIONS DURATION AGE
cron-reindex-one Complete 1/1 20s 109s
```
4. View logs
To view the logs use the below command.
```bash theme={null}
kubectl logs job/
```
Replace `` with the actual job name.
The `plugin` parameter is a list of the sources that we want to ingest. An example would look like this `openmetadata-ingestion[mysql,snowflake,s3]~=2.0.2.0`.
You will find specific instructions for each connector [here](/connectors).
Moreover, if working with your own Airflow deployment - not the `openmetadata-ingestion` image - you will need to upgrade
as well the `openmetadata-managed-apis` version:
```bash theme={null}
pip install openmetadata-managed-apis==x.y.z
```
### Re Deploy Ingestion Pipelines
#### With UI
Go to `Settings` -> `{Services}` -> `{Databases}` -> `Pipelines`
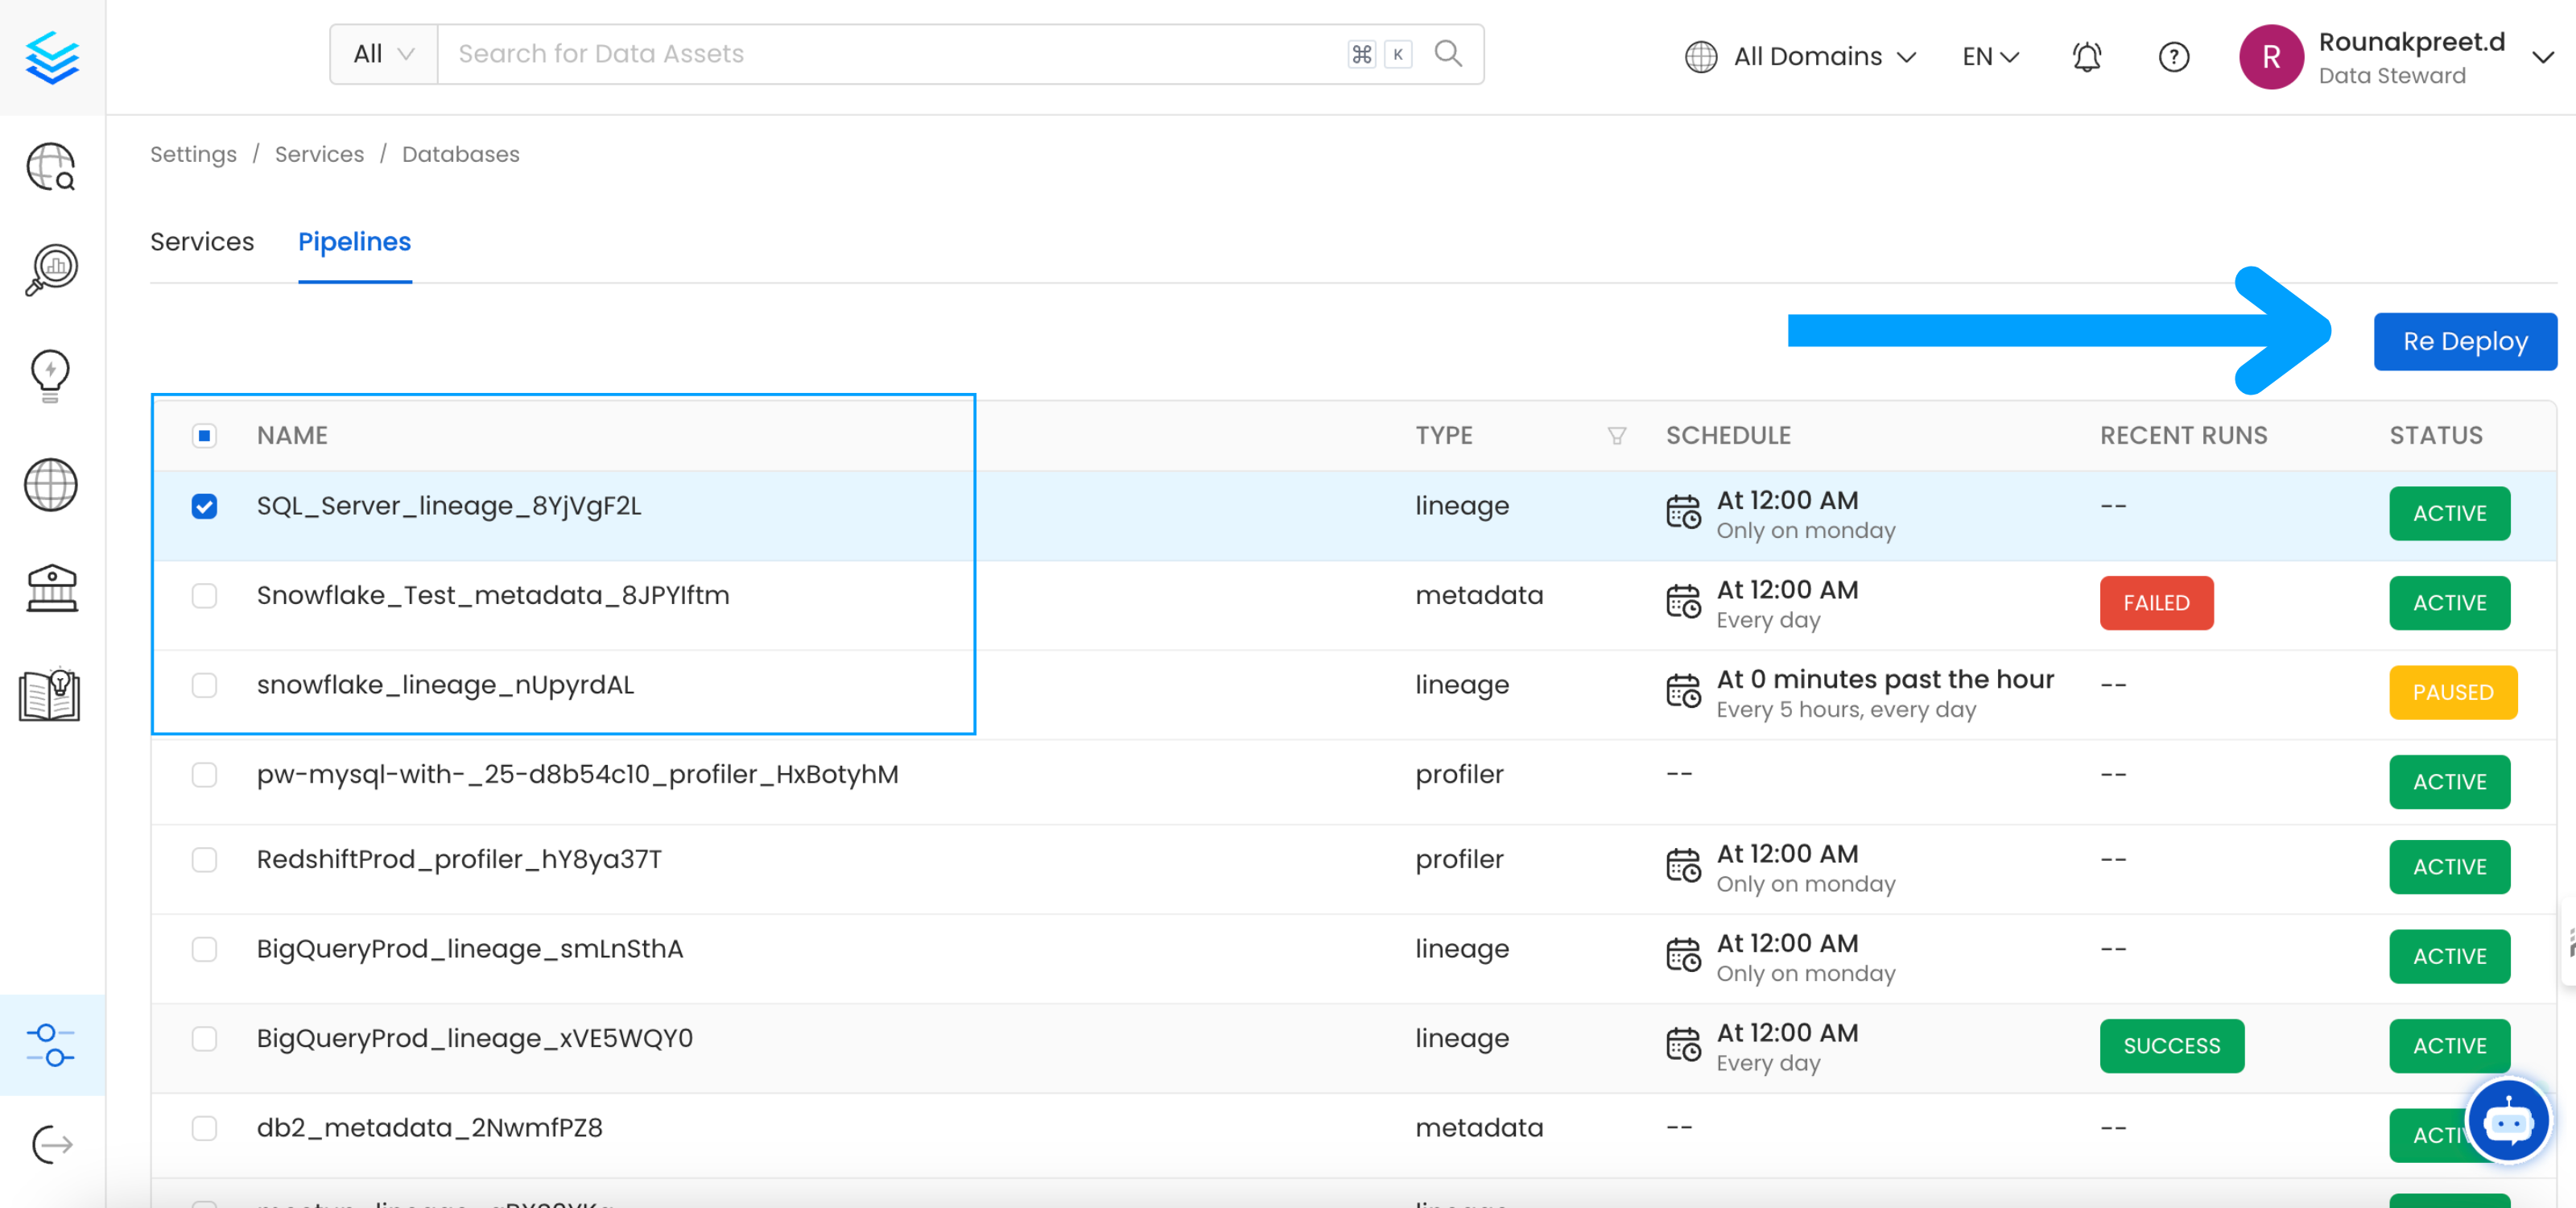 Select the pipelines you want to Re Deploy click `Re Deploy`.
#### With Kubernetes
Follow these steps to deploy pipelines using the CLI:
1. List the CronJobs
Use the following command to check the available CronJobs:
```bash theme={null}
kubectl get cronjobs
```
Upon running this command you should see output similar to the following.
```commandline theme={null}
kubectl get cronjobs
NAME SCHEDULE TIMEZONE SUSPEND ACTIVE LAST SCHEDULE AGE
cron-deploy-pipelines 0/5 * * * * True 0 4m7s
```
2. Create a Job from a CronJob
Create a one-time job from an existing CronJob using the following command:
```bash theme={null}
kubectl create job --from=cronjob/cron-reindex
```
Replace `` with the actual name of the job.
Upon running this command you should see output similar to the following.
```commandline theme={null}
kubectl create job --from=cronjob/cron-deploy-pipelines cron-deploy-pipeline-one
job.batch/cron-deploy-pipeline-one created
```
3. Check the Job Status
Verify the status of the created job with:
```bash theme={null}
kubectl get jobs
```
Upon running this command you should see output similar to the following.
```CommandLine theme={null}
kubectl get jobs
NAME STATUS COMPLETIONS DURATION AGE
cron-deploy-pipeline-one Complete 1/1 13s 3m35s
```
4. view logs
To view the logs use the below command.
```bash theme={null}
kubectl logs job/
```
Replace `` with the actual job name.
If you are seeing broken DAGs, select all pipelines from all services and redeploy them.
## OpenMetadata Ops Script
### Overview
The `openmetadata-ops` script is designed to manage and migrate databases and search indexes, reindex existing data into Elastic Search or OpenSearch, and redeploy service pipelines.
### Usage
```bash theme={null}
sh openmetadata-ops.sh [-dhV] [COMMAND]
```
#### Commands
* analyze-tables
Migrates secrets from the database to the configured Secrets Manager. Note that this command does not support migrating between external Secrets Managers.
* changelog
Prints the change log of database migration.
* check-connection
Checks if a connection can be successfully obtained for the target database.
* deploy-pipelines
Deploys all the service pipelines.
* drop-create
Deletes any tables in the configured database and creates new tables based on the current version of OpenMetadata. This command also re-creates the search indexes.
* info
Shows the list of migrations applied and the pending migrations waiting to be applied on the target database.
* migrate
Migrates the OpenMetadata database schema and search index mappings.
* migrate-secrets
Migrates secrets from the database to the configured Secrets Manager. Note that this command does not support migrating between external Secrets Managers.
* reindex
Reindexes data into the search engine from the command line.
* repair
Repairs the DATABASE\_CHANGE\_LOG table, which is used to track all the migrations on the target database. This involves removing entries for the failed migrations and updating the checksum of migrations already applied on the target database.
* validate
Checks if all the migrations have been applied on the target database.
### Examples
Display Help To display the help message:
```bash theme={null}
sh openmetadata-ops.sh --help
```
### Migrate Database Schema
To migrate the database schema and search index mappings:
```bash theme={null}
sh openmetadata-ops.sh migrate
```
### Reindex Data
To reindex data into the search engine:
```bash theme={null}
sh openmetadata-ops.sh reindex
```
## Troubleshooting
### Helm Upgrade fails with additional property airflow not allowed
With Release 1.0.0, if you see your helm charts failing to deploy with the below issue -
```
Error: INSTALLATION FAILED: values don't meet the specifications of the schema(s) in the following chart(s):
openmetadata:
- global: Additional property airflow is not allowed
```
This means the values passed to the helm charts has a section `global.airflow`. Airflow configs are replaced with pipelineServiceClient for Helm Charts.
The Helm Chart Values JSON Schema helps to catch the above breaking changes and this section will help you resolve and update your configurations for the same. You can read more about JSON Schema with Helm Charts [here](https://helm.sh/docs/topics/charts/#schema-files).
You will need to update the existing section of `global.airflow` values to match the new configurations.
⛔ Before 1.0.0 Helm Chart Release, the `global.airflow` section would be like -
```yaml theme={null}
global:
...
airflow:
enabled: true
# endpoint url for airflow
host: http://openmetadata-dependencies-web.default.svc.cluster.local:8080
# possible values are "no-ssl", "ignore", "validate"
verifySsl: "no-ssl"
# Local path in Airflow Pod
sslCertificatePath: "/no/path"
auth:
username: admin
password:
secretRef: airflow-secrets
secretKey: openmetadata-airflow-password
openmetadata:
# this will be the api endpoint url of OpenMetadata Server
serverHostApiUrl: "http://openmetadata.default.svc.cluster.local:8585/api"
...
```
✅ After 1.0.0 Helm Chart Release, the `global.pipelineServiceClient` section will replace the above `airflow` section -
```yaml theme={null}
openmetadata:
config:
...
pipelineServiceClientConfig:
enabled: true
className: "org.openmetadata.service.clients.pipeline.airflow.AirflowRESTClient"
# endpoint url for airflow
apiEndpoint: http://openmetadata-dependencies-web.default.svc.cluster.local:8080
# this will be the api endpoint url of OpenMetadata Server
metadataApiEndpoint: http://openmetadata.default.svc.cluster.local:8585/api
# possible values are "no-ssl", "ignore", "validate"
verifySsl: "no-ssl"
ingestionIpInfoEnabled: false
# local path in Airflow Pod
sslCertificatePath: "/no/path"
auth:
username: admin
password:
secretRef: airflow-secrets
secretKey: openmetadata-airflow-password
...
...
```
Run the [helm lint](https://helm.sh/docs/helm/helm_lint/) command on your custom values after making the changes to validate with the JSON Schema.
### MySQL Pod fails on Upgrade
This issue will only occur if you are using openmetadata-dependencies helm chart version `0.0.49` and `0.0.50` and upgrading to latest helm chart release.
If your helm dependencies upgrade fails with the below command result -
```
Startup probe failed: mysqladmin: [Warning] Using a password on the command line interface can be insecure. mysqladmin:
connect to server at 'localhost' failed error: 'Can't connect to local MySQL server through socket '/opt/bitnami/mysql/tmp/mysql.sock' (2)'
Check that mysqld is running and that the socket: '/opt/bitnami/mysql/tmp/mysql.sock' exists!
```
This issue is related to a minor change that affected the MySQL Database Engine version upgrade from `8.0.28` to `8.0.29` for the Helm Chart Release `0.0.49` and `0.0.50`. Then the registry url was updated as we found a work around to fetch previous versions of [bitnami/mysql](https://github.com/bitnami/charts/issues/10833) Helm Releases.
As a result of the above fixes, anyone who is on OpenMetadata Dependencies Helm Chart Version `0.0.49` and `0.0.50` is affected with the above issue when upgrading for mysql. In order to fix this issue, make sure to follow the below steps -
1. Backup the Database using Metadata Backup CLI as mentioned [here](/deployment/backup-restore-metadata)
2. Uninstall OpenMetadata Dependencies Helm Chart (`helm uninstall openmetadata-dependencies`)
3. Remove the unmanaged volume for MySQL Stateful Set Kubernetes Object (`kubectl delete pvc data-mysql-0`)
4. Install the latest version of [OpenMetadata Dependencies Helm Chart](/deployment/kubernetes)
5. Restore the Database using Metadata Restore CLI as mentioned [here](/deployment/backup-restore-metadata)
6. Next, Proceed with upgrade for OpenMetadata Helm Chart as mentioned [here](#step-4-upgrade-openmetadata)
Select the pipelines you want to Re Deploy click `Re Deploy`.
#### With Kubernetes
Follow these steps to deploy pipelines using the CLI:
1. List the CronJobs
Use the following command to check the available CronJobs:
```bash theme={null}
kubectl get cronjobs
```
Upon running this command you should see output similar to the following.
```commandline theme={null}
kubectl get cronjobs
NAME SCHEDULE TIMEZONE SUSPEND ACTIVE LAST SCHEDULE AGE
cron-deploy-pipelines 0/5 * * * * True 0 4m7s
```
2. Create a Job from a CronJob
Create a one-time job from an existing CronJob using the following command:
```bash theme={null}
kubectl create job --from=cronjob/cron-reindex
```
Replace `` with the actual name of the job.
Upon running this command you should see output similar to the following.
```commandline theme={null}
kubectl create job --from=cronjob/cron-deploy-pipelines cron-deploy-pipeline-one
job.batch/cron-deploy-pipeline-one created
```
3. Check the Job Status
Verify the status of the created job with:
```bash theme={null}
kubectl get jobs
```
Upon running this command you should see output similar to the following.
```CommandLine theme={null}
kubectl get jobs
NAME STATUS COMPLETIONS DURATION AGE
cron-deploy-pipeline-one Complete 1/1 13s 3m35s
```
4. view logs
To view the logs use the below command.
```bash theme={null}
kubectl logs job/
```
Replace `` with the actual job name.
If you are seeing broken DAGs, select all pipelines from all services and redeploy them.
## OpenMetadata Ops Script
### Overview
The `openmetadata-ops` script is designed to manage and migrate databases and search indexes, reindex existing data into Elastic Search or OpenSearch, and redeploy service pipelines.
### Usage
```bash theme={null}
sh openmetadata-ops.sh [-dhV] [COMMAND]
```
#### Commands
* analyze-tables
Migrates secrets from the database to the configured Secrets Manager. Note that this command does not support migrating between external Secrets Managers.
* changelog
Prints the change log of database migration.
* check-connection
Checks if a connection can be successfully obtained for the target database.
* deploy-pipelines
Deploys all the service pipelines.
* drop-create
Deletes any tables in the configured database and creates new tables based on the current version of OpenMetadata. This command also re-creates the search indexes.
* info
Shows the list of migrations applied and the pending migrations waiting to be applied on the target database.
* migrate
Migrates the OpenMetadata database schema and search index mappings.
* migrate-secrets
Migrates secrets from the database to the configured Secrets Manager. Note that this command does not support migrating between external Secrets Managers.
* reindex
Reindexes data into the search engine from the command line.
* repair
Repairs the DATABASE\_CHANGE\_LOG table, which is used to track all the migrations on the target database. This involves removing entries for the failed migrations and updating the checksum of migrations already applied on the target database.
* validate
Checks if all the migrations have been applied on the target database.
### Examples
Display Help To display the help message:
```bash theme={null}
sh openmetadata-ops.sh --help
```
### Migrate Database Schema
To migrate the database schema and search index mappings:
```bash theme={null}
sh openmetadata-ops.sh migrate
```
### Reindex Data
To reindex data into the search engine:
```bash theme={null}
sh openmetadata-ops.sh reindex
```
## Troubleshooting
### Helm Upgrade fails with additional property airflow not allowed
With Release 1.0.0, if you see your helm charts failing to deploy with the below issue -
```
Error: INSTALLATION FAILED: values don't meet the specifications of the schema(s) in the following chart(s):
openmetadata:
- global: Additional property airflow is not allowed
```
This means the values passed to the helm charts has a section `global.airflow`. Airflow configs are replaced with pipelineServiceClient for Helm Charts.
The Helm Chart Values JSON Schema helps to catch the above breaking changes and this section will help you resolve and update your configurations for the same. You can read more about JSON Schema with Helm Charts [here](https://helm.sh/docs/topics/charts/#schema-files).
You will need to update the existing section of `global.airflow` values to match the new configurations.
⛔ Before 1.0.0 Helm Chart Release, the `global.airflow` section would be like -
```yaml theme={null}
global:
...
airflow:
enabled: true
# endpoint url for airflow
host: http://openmetadata-dependencies-web.default.svc.cluster.local:8080
# possible values are "no-ssl", "ignore", "validate"
verifySsl: "no-ssl"
# Local path in Airflow Pod
sslCertificatePath: "/no/path"
auth:
username: admin
password:
secretRef: airflow-secrets
secretKey: openmetadata-airflow-password
openmetadata:
# this will be the api endpoint url of OpenMetadata Server
serverHostApiUrl: "http://openmetadata.default.svc.cluster.local:8585/api"
...
```
✅ After 1.0.0 Helm Chart Release, the `global.pipelineServiceClient` section will replace the above `airflow` section -
```yaml theme={null}
openmetadata:
config:
...
pipelineServiceClientConfig:
enabled: true
className: "org.openmetadata.service.clients.pipeline.airflow.AirflowRESTClient"
# endpoint url for airflow
apiEndpoint: http://openmetadata-dependencies-web.default.svc.cluster.local:8080
# this will be the api endpoint url of OpenMetadata Server
metadataApiEndpoint: http://openmetadata.default.svc.cluster.local:8585/api
# possible values are "no-ssl", "ignore", "validate"
verifySsl: "no-ssl"
ingestionIpInfoEnabled: false
# local path in Airflow Pod
sslCertificatePath: "/no/path"
auth:
username: admin
password:
secretRef: airflow-secrets
secretKey: openmetadata-airflow-password
...
...
```
Run the [helm lint](https://helm.sh/docs/helm/helm_lint/) command on your custom values after making the changes to validate with the JSON Schema.
### MySQL Pod fails on Upgrade
This issue will only occur if you are using openmetadata-dependencies helm chart version `0.0.49` and `0.0.50` and upgrading to latest helm chart release.
If your helm dependencies upgrade fails with the below command result -
```
Startup probe failed: mysqladmin: [Warning] Using a password on the command line interface can be insecure. mysqladmin:
connect to server at 'localhost' failed error: 'Can't connect to local MySQL server through socket '/opt/bitnami/mysql/tmp/mysql.sock' (2)'
Check that mysqld is running and that the socket: '/opt/bitnami/mysql/tmp/mysql.sock' exists!
```
This issue is related to a minor change that affected the MySQL Database Engine version upgrade from `8.0.28` to `8.0.29` for the Helm Chart Release `0.0.49` and `0.0.50`. Then the registry url was updated as we found a work around to fetch previous versions of [bitnami/mysql](https://github.com/bitnami/charts/issues/10833) Helm Releases.
As a result of the above fixes, anyone who is on OpenMetadata Dependencies Helm Chart Version `0.0.49` and `0.0.50` is affected with the above issue when upgrading for mysql. In order to fix this issue, make sure to follow the below steps -
1. Backup the Database using Metadata Backup CLI as mentioned [here](/deployment/backup-restore-metadata)
2. Uninstall OpenMetadata Dependencies Helm Chart (`helm uninstall openmetadata-dependencies`)
3. Remove the unmanaged volume for MySQL Stateful Set Kubernetes Object (`kubectl delete pvc data-mysql-0`)
4. Install the latest version of [OpenMetadata Dependencies Helm Chart](/deployment/kubernetes)
5. Restore the Database using Metadata Restore CLI as mentioned [here](/deployment/backup-restore-metadata)
6. Next, Proceed with upgrade for OpenMetadata Helm Chart as mentioned [here](#step-4-upgrade-openmetadata)