> ## Documentation Index
> Fetch the complete documentation index at: https://docs.getcollate.io/llms.txt
> Use this file to discover all available pages before exploring further.
# Create and Manage Templates
> Step-by-step guide to creating, linking, and testing notification templates.
# Create and Manage Templates
This guide walks you through the complete workflow of creating, configuring, and managing notification templates in Collate.
## Creating a Custom Template
Use the steps below to create a new notification template.
1. Click the **Profile** icon and navigate to **Settings** > **Notifications** > **Templates**.
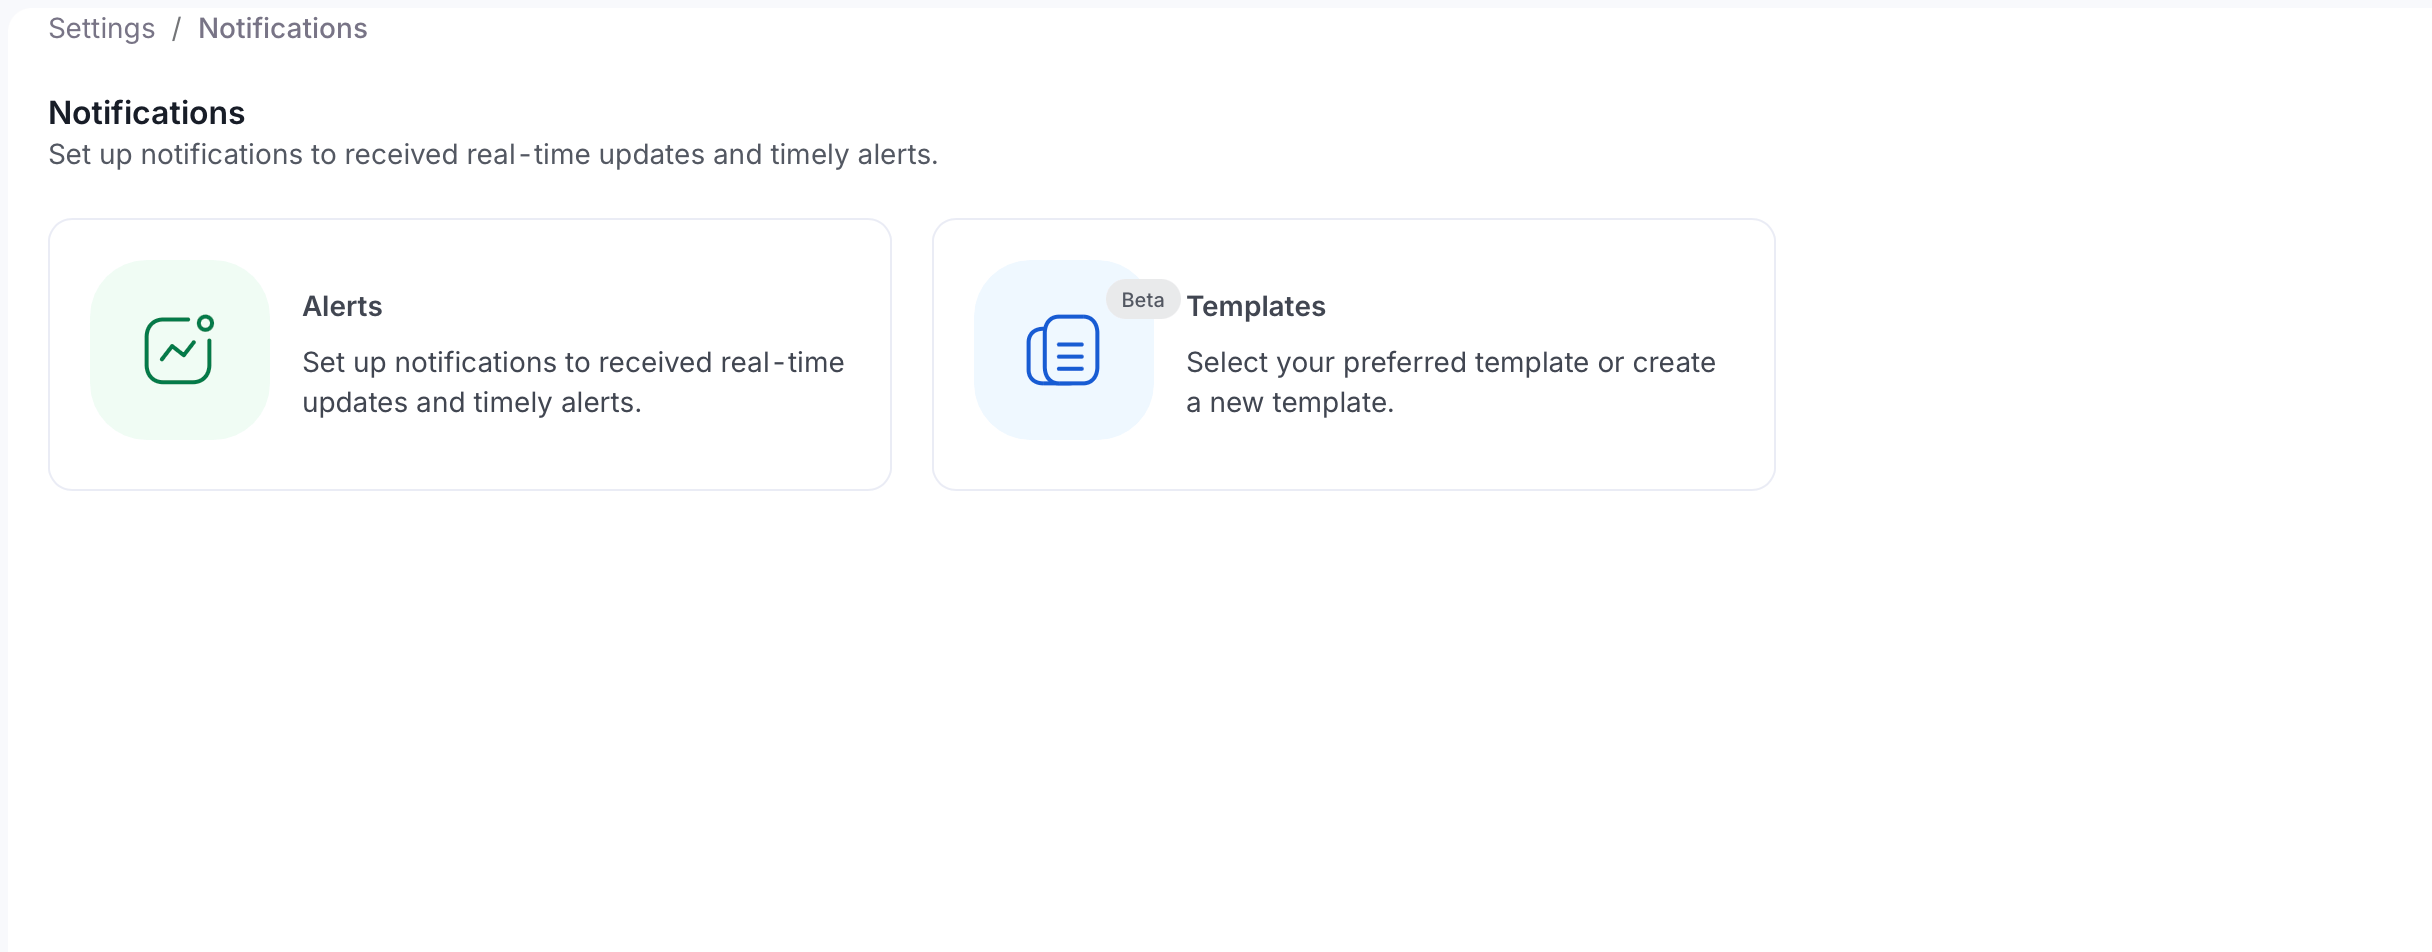 2. Click **Add Template**.
3. Enter the required details. See [Template Details](#template-details).
2. Click **Add Template**.
3. Enter the required details. See [Template Details](#template-details).
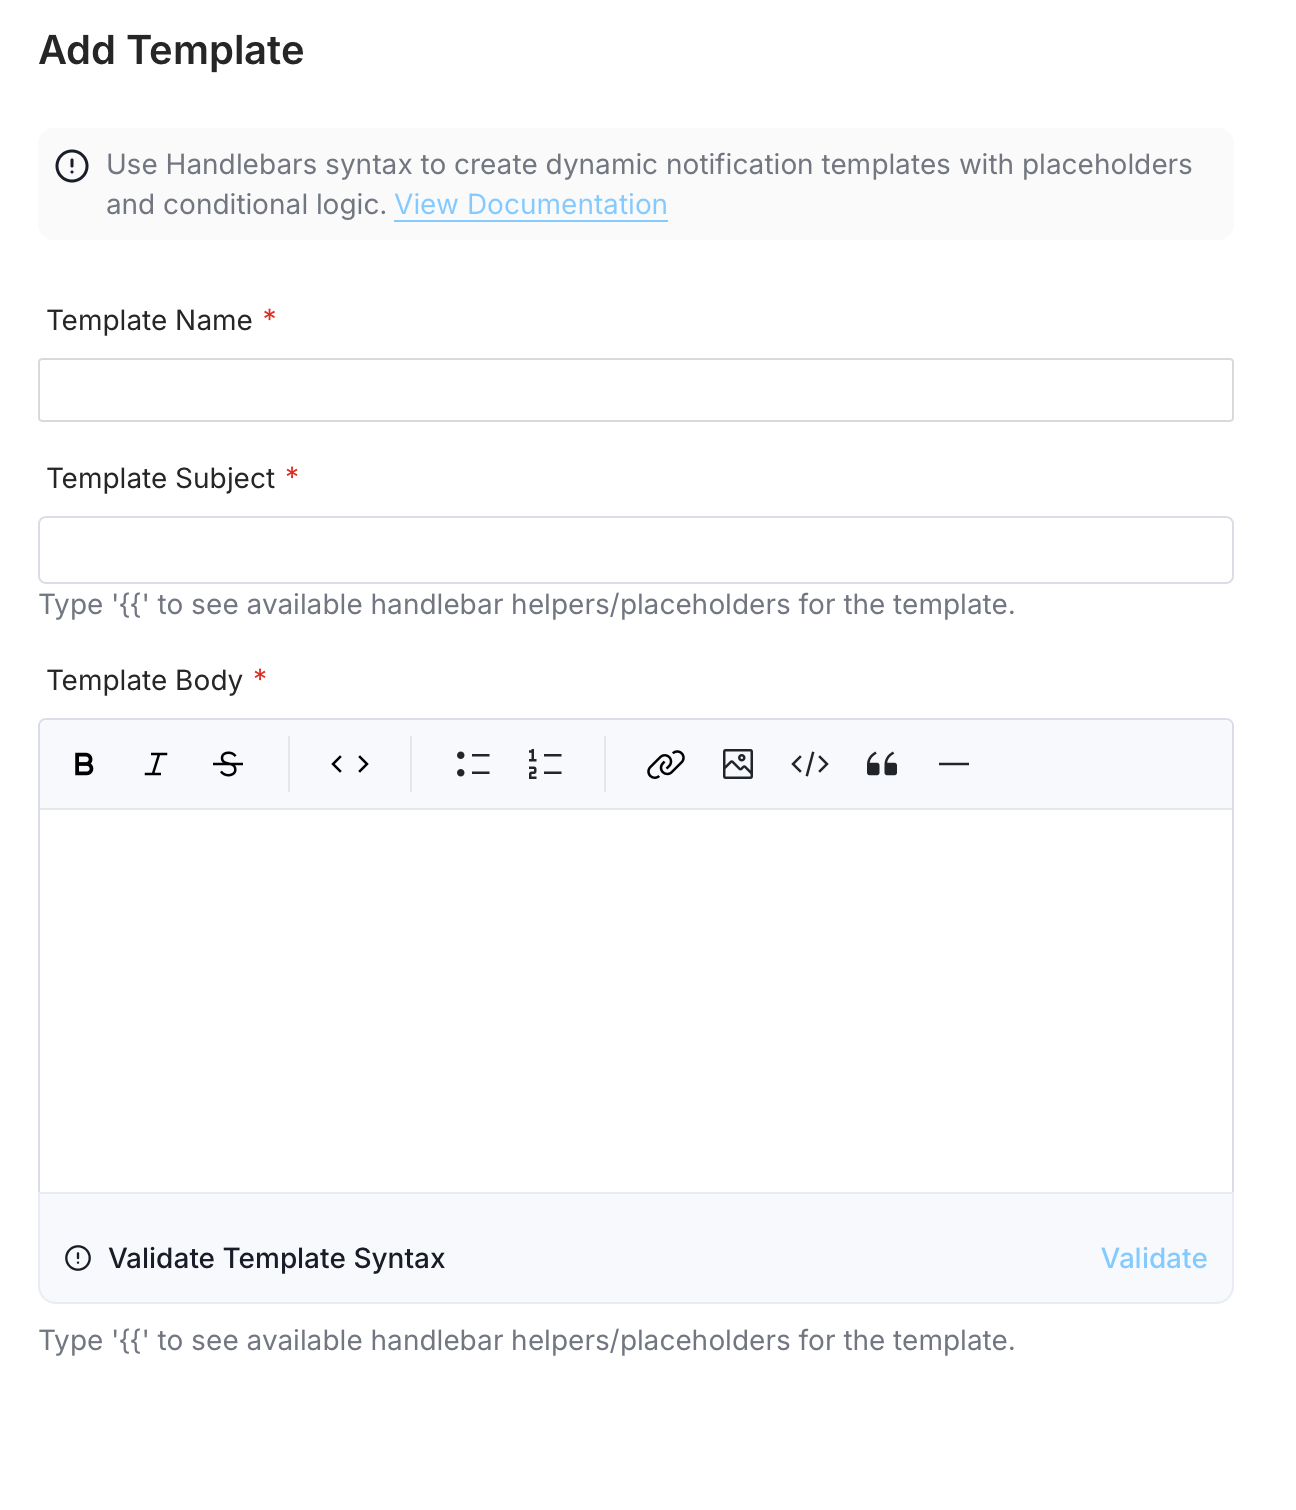 4. Click **Save**.
Alternatively, create a custom template while creating a notification:
1. Navigate to **Settings** > **Notifications** > **Alerts**.
2. Click **Add Alert**.
3. In the **Notification Template** dropdown field, select **Create Custom Template** and enter the required details. See [Template Details](#template-details).
4. Click **Save**.
Alternatively, create a custom template while creating a notification:
1. Navigate to **Settings** > **Notifications** > **Alerts**.
2. Click **Add Alert**.
3. In the **Notification Template** dropdown field, select **Create Custom Template** and enter the required details. See [Template Details](#template-details).
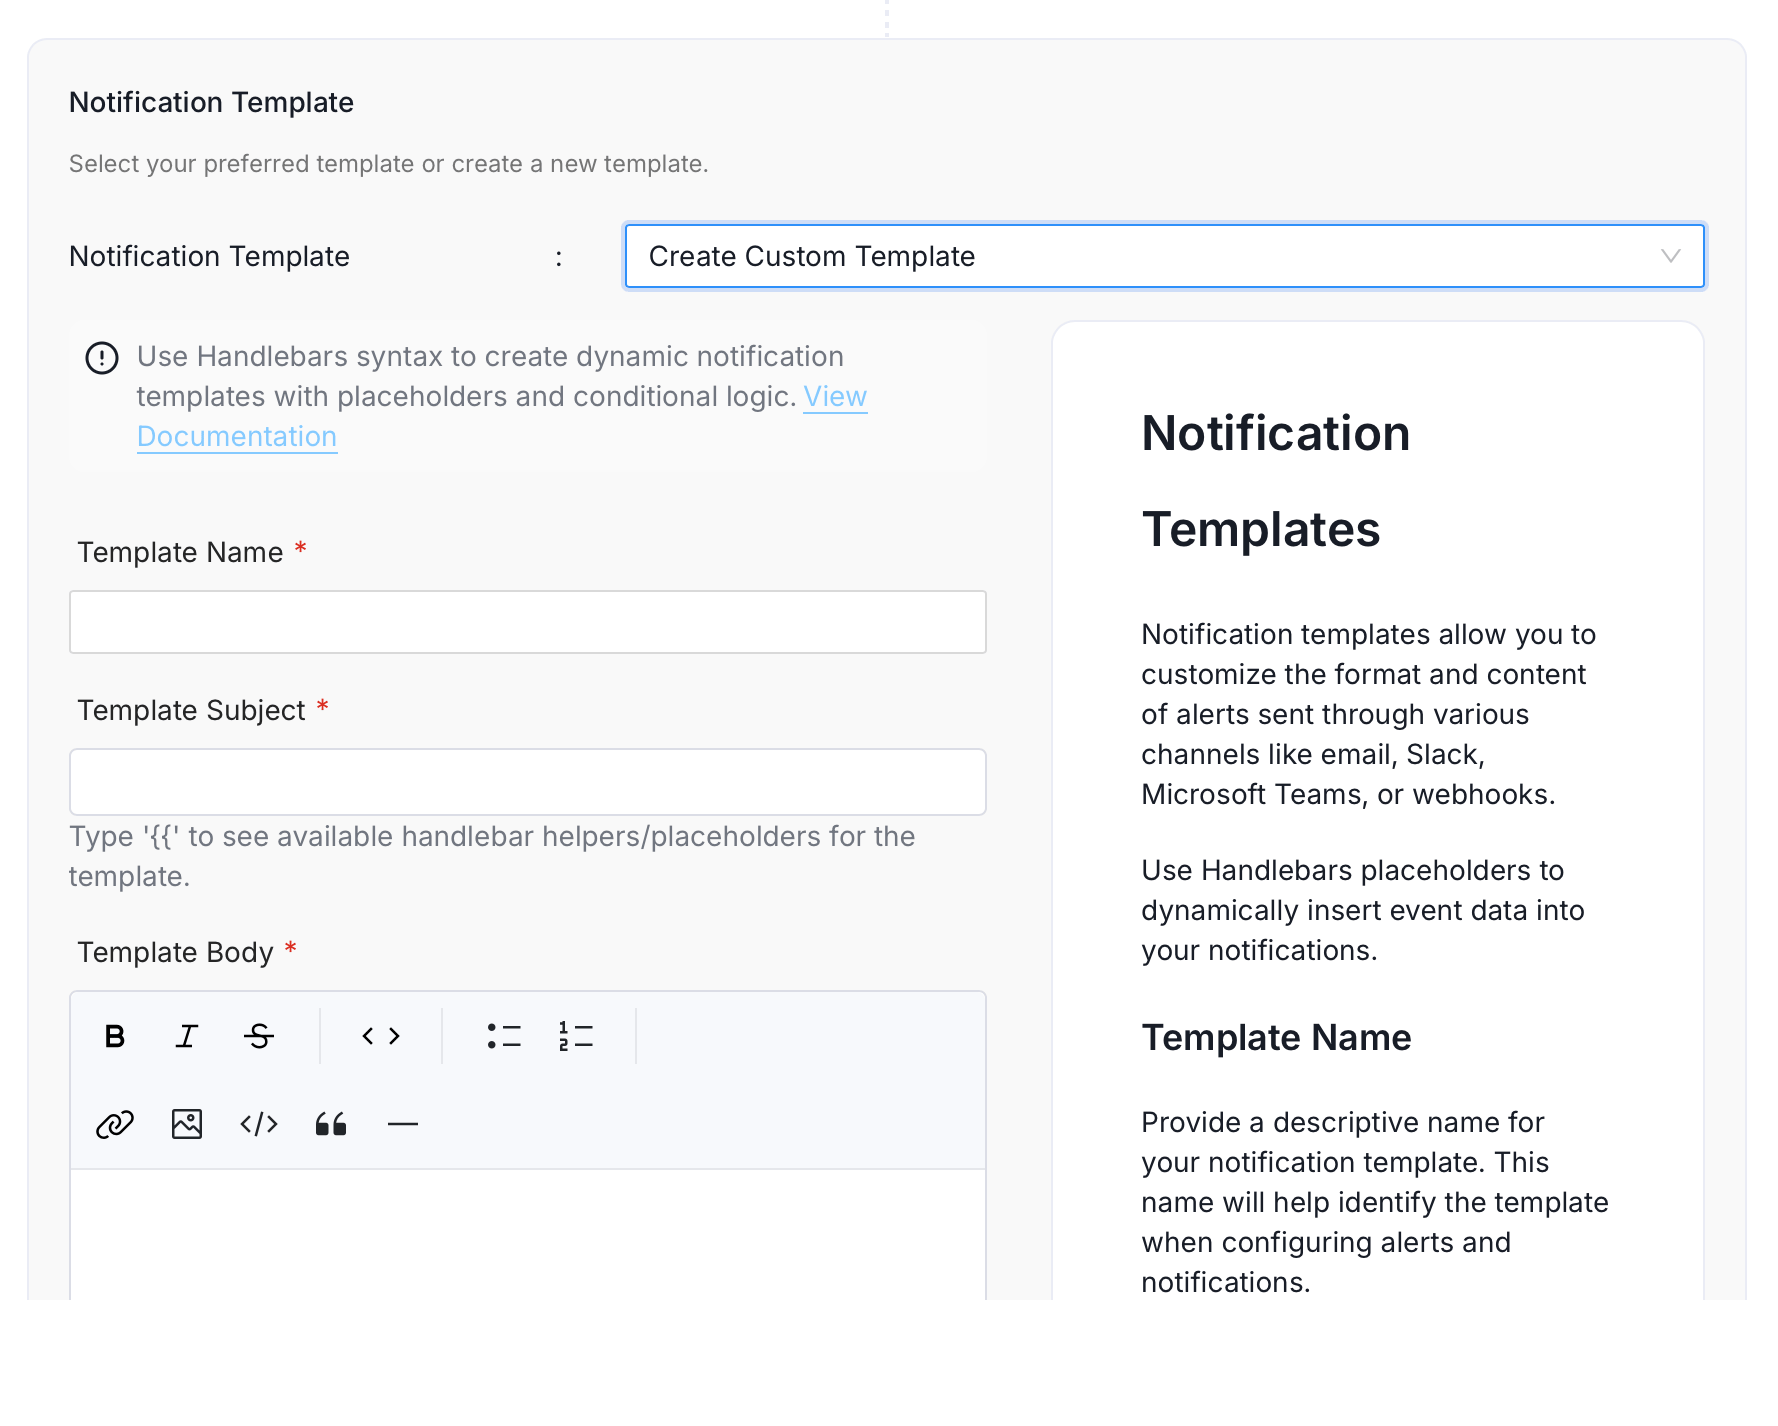 4. Click **Save**.
### Template Details
The **Add Template** form has three required fields. Type `{{` in the Subject or Body field to browse available Handlebars placeholders and helpers.
#### Template Name
Enter a descriptive name that identifies the template's purpose. This name appears in the template picker when configuring alerts.
**Guidelines**:
* Use a clear, descriptive name that indicates the template's purpose.
* Examples: `Data Quality Alert`, `Incident Notification`, `Weekly Report`
#### Template Subject
Define the subject line for your notification. This appears as the email subject or message header.
Type `{{` to access available placeholders:
* `{{eventType}}` — The type of event that triggered the notification.
* `{{entityType}}` — The type of entity involved (Table, Pipeline, Dashboard, and so on)
* `{{entityName}}` — The name of the affected entity.
* `{{entityUrl}}` — Direct link to the entity.
* `{{timestamp}}` — When the event occurred.
**Example**:
```
[{{eventType}}] {{entityType}}: {{entityName}}
```
#### Template Body
Create the main content of your notification using the rich text editor. The editor supports bold, italic, strikethrough, inline code, lists, links, images, code blocks, quotes, and dividers.
**Available Placeholders**:
| Placeholder | Description |
| ----------------- | -------------------------------------------------- |
| `{{eventType}}` | Type of event (e.g., entityCreated, entityUpdated) |
| `{{entityType}}` | Type of entity (Table, Pipeline, etc.) |
| `{{entityName}}` | Name of the entity |
| `{{entityFqn}}` | Fully qualified name of the entity |
| `{{entityUrl}}` | Link to the entity in Collate |
| `{{description}}` | Event description |
| `{{updatedBy}}` | User who made the change |
| `{{timestamp}}` | Event timestamp |
**Conditional Blocks**:
Use `{{#if condition}}...{{/if}}` for conditional content:
```
{{#if description}}
Description: {{description}}
{{/if}}
```
**Iteration**:
Use `{{#each items}}...{{/each}}` to iterate over lists:
```
{{#each changes}}
- {{this.fieldName}}: {{this.oldValue}} → {{this.newValue}}
{{/each}}
```
#### Best Practices
* Keep templates concise and actionable.
* Include relevant links for quick access to affected entities.
* Use conditional blocks for optional information.
* Select **Validate** before saving to check Handlebars syntax.
## Modifying Templates
### Editing User Templates
User templates (those you created) can be fully edited:
1. Navigate to **Settings** > **Notifications** > **Templates**.
2. Find the template in the list.
3. Click the **Edit** button.
4. Modify any fields (Name, Display Name, Description, Subject, Body).
5. Click **Save**.
Changes take effect immediately for any subscriptions using the template.
### Editing System Templates
System templates (pre-built by Collate) can be partially edited:
* You can modify: Subject and Body.
* You cannot modify: Name and Display Name.
* System templates track if you've customized them.
**Important**: If you don't customize a system template, it automatically updates when Collate releases improvements. Once you customize it, you're responsible for maintaining it.
## Linking Templates to Event Subscriptions
Templates become useful when connected to event subscriptions. Here's how to use them:
### Step 1: Navigate to Subscriptions
1. Go to **Settings** > **Notifications** > **Subscriptions**.
2. Create a new subscription or edit an existing one.
### Step 2: Select a Template
1. In the subscription form, find the **Notification Template** dropdown.
2. Choose from:
* **System Templates** - Pre-built templates for common entity types.
* **User Templates** - Custom templates you've created.
* **(blank)** - Use default formatting per channel.
### Step 3: Configure Other Settings
Complete the rest of the subscription setup:
* **Event Type** - Which changes trigger the notification.
* **Destinations** - Where to send notifications (email, Slack, Teams, etc.)
* **Filters** - Optional conditions for when to send.
### Step 4: Save the Subscription
Your template is now active and will be used for all notifications from this subscription.
## Template Preview and Testing
### Previewing Templates
Before deploying a template to production, use the Preview feature to see how it looks:
1. In the template editor, click **Preview**.
2. The system renders the template with sample data.
3. Review the formatted output.
4. See how it appears across different channels.
5. Make adjustments if needed.
**Tip**: Always preview before saving templates to catch formatting issues early.
### Sending Test Notifications
Test your template with real data:
1. In the template editor, click **Send Test**.
2. Select destinations where you want to send the test:
* Email addresses.
* Slack channels.
* Teams channels.
* Google Chat spaces.
3. Click **Send**.
4. The system sends a real notification with mock event data.
5. Check your destinations to verify formatting and content.
Test notifications help you:
* Verify links and dynamic content render correctly.
* Check channel-specific formatting.
* Test with your actual notification destinations.
## Modifying vs. Duplicating Templates
### When to Modify
Modify a template when you want to update all existing subscriptions using it:
* Impact: All active subscriptions using this template immediately get new formatting.
* Use when: Improving a template everyone already uses.
### When to Duplicate
Create a new template based on an existing one when:
* You want a variation for a specific use case.
* You want to test changes before affecting production subscriptions.
* Different teams need different formatting.
**How to duplicate**:
You can't automatically duplicate, but you can:
1. Copy the template content.
2. Create a new template.
3. Paste the content as a starting point.
4. Modify as needed.
## Deleting Templates
### Delete User Templates
You can safely delete user templates you created:
1. Go to **Settings** > **Notifications** > **Templates**.
2. Find your template.
3. Click the **Delete** button.
4. Confirm the deletion.
**Note**: If the template is actively used in subscriptions, consider what will happen to those subscriptions when you delete it.
### System Templates
System templates cannot be deleted (they're read-only by default).
If you've customized a system template and want to revert to the original, click Restore. After restoring, the template will once again stay synchronized with the Collate-provided system default (unless you modify it manually).
## Troubleshooting Template Issues
### Template Won't Save
**Common causes**:
* Body exceeds 10,240 characters - simplify the content.
* Subject exceeds 256 characters - shorten the subject.
* Invalid Handlebars syntax - check brackets are balanced.
* Required fields are empty - fill in Name, Display Name, Subject, and Body.
### Notifications Not Using Template
**Check**:
1. Is the template selected in the subscription settings?
2. Is the subscription active?
3. For system templates, do the subscription's event type and entity type match your template name?
### Template Shows Wrong Data
**Check**:
1. Are you using the correct property names? See [Template Context Reference](/ai-2-0/how-to-guides/data-quality-observability/alerts-notifications/notification-templates/template-context-reference)
2. Is the data available for this entity type?
3. Are you using conditionals for optional fields?
## Next Steps
* **Learn about available data** → [Template Context Reference](/ai-2-0/how-to-guides/data-quality-observability/alerts-notifications/notification-templates/template-context-reference)
* **Master Handlebars** → [Handlebars Templating Guide](/ai-2-0/how-to-guides/data-quality-observability/alerts-notifications/notification-templates/handlebars-templating-guide)
* **Get help with issues** → [Troubleshooting Guide](/ai-2-0/how-to-guides/data-quality-observability/alerts-notifications/notification-templates/troubleshooting)
4. Click **Save**.
### Template Details
The **Add Template** form has three required fields. Type `{{` in the Subject or Body field to browse available Handlebars placeholders and helpers.
#### Template Name
Enter a descriptive name that identifies the template's purpose. This name appears in the template picker when configuring alerts.
**Guidelines**:
* Use a clear, descriptive name that indicates the template's purpose.
* Examples: `Data Quality Alert`, `Incident Notification`, `Weekly Report`
#### Template Subject
Define the subject line for your notification. This appears as the email subject or message header.
Type `{{` to access available placeholders:
* `{{eventType}}` — The type of event that triggered the notification.
* `{{entityType}}` — The type of entity involved (Table, Pipeline, Dashboard, and so on)
* `{{entityName}}` — The name of the affected entity.
* `{{entityUrl}}` — Direct link to the entity.
* `{{timestamp}}` — When the event occurred.
**Example**:
```
[{{eventType}}] {{entityType}}: {{entityName}}
```
#### Template Body
Create the main content of your notification using the rich text editor. The editor supports bold, italic, strikethrough, inline code, lists, links, images, code blocks, quotes, and dividers.
**Available Placeholders**:
| Placeholder | Description |
| ----------------- | -------------------------------------------------- |
| `{{eventType}}` | Type of event (e.g., entityCreated, entityUpdated) |
| `{{entityType}}` | Type of entity (Table, Pipeline, etc.) |
| `{{entityName}}` | Name of the entity |
| `{{entityFqn}}` | Fully qualified name of the entity |
| `{{entityUrl}}` | Link to the entity in Collate |
| `{{description}}` | Event description |
| `{{updatedBy}}` | User who made the change |
| `{{timestamp}}` | Event timestamp |
**Conditional Blocks**:
Use `{{#if condition}}...{{/if}}` for conditional content:
```
{{#if description}}
Description: {{description}}
{{/if}}
```
**Iteration**:
Use `{{#each items}}...{{/each}}` to iterate over lists:
```
{{#each changes}}
- {{this.fieldName}}: {{this.oldValue}} → {{this.newValue}}
{{/each}}
```
#### Best Practices
* Keep templates concise and actionable.
* Include relevant links for quick access to affected entities.
* Use conditional blocks for optional information.
* Select **Validate** before saving to check Handlebars syntax.
## Modifying Templates
### Editing User Templates
User templates (those you created) can be fully edited:
1. Navigate to **Settings** > **Notifications** > **Templates**.
2. Find the template in the list.
3. Click the **Edit** button.
4. Modify any fields (Name, Display Name, Description, Subject, Body).
5. Click **Save**.
Changes take effect immediately for any subscriptions using the template.
### Editing System Templates
System templates (pre-built by Collate) can be partially edited:
* You can modify: Subject and Body.
* You cannot modify: Name and Display Name.
* System templates track if you've customized them.
**Important**: If you don't customize a system template, it automatically updates when Collate releases improvements. Once you customize it, you're responsible for maintaining it.
## Linking Templates to Event Subscriptions
Templates become useful when connected to event subscriptions. Here's how to use them:
### Step 1: Navigate to Subscriptions
1. Go to **Settings** > **Notifications** > **Subscriptions**.
2. Create a new subscription or edit an existing one.
### Step 2: Select a Template
1. In the subscription form, find the **Notification Template** dropdown.
2. Choose from:
* **System Templates** - Pre-built templates for common entity types.
* **User Templates** - Custom templates you've created.
* **(blank)** - Use default formatting per channel.
### Step 3: Configure Other Settings
Complete the rest of the subscription setup:
* **Event Type** - Which changes trigger the notification.
* **Destinations** - Where to send notifications (email, Slack, Teams, etc.)
* **Filters** - Optional conditions for when to send.
### Step 4: Save the Subscription
Your template is now active and will be used for all notifications from this subscription.
## Template Preview and Testing
### Previewing Templates
Before deploying a template to production, use the Preview feature to see how it looks:
1. In the template editor, click **Preview**.
2. The system renders the template with sample data.
3. Review the formatted output.
4. See how it appears across different channels.
5. Make adjustments if needed.
**Tip**: Always preview before saving templates to catch formatting issues early.
### Sending Test Notifications
Test your template with real data:
1. In the template editor, click **Send Test**.
2. Select destinations where you want to send the test:
* Email addresses.
* Slack channels.
* Teams channels.
* Google Chat spaces.
3. Click **Send**.
4. The system sends a real notification with mock event data.
5. Check your destinations to verify formatting and content.
Test notifications help you:
* Verify links and dynamic content render correctly.
* Check channel-specific formatting.
* Test with your actual notification destinations.
## Modifying vs. Duplicating Templates
### When to Modify
Modify a template when you want to update all existing subscriptions using it:
* Impact: All active subscriptions using this template immediately get new formatting.
* Use when: Improving a template everyone already uses.
### When to Duplicate
Create a new template based on an existing one when:
* You want a variation for a specific use case.
* You want to test changes before affecting production subscriptions.
* Different teams need different formatting.
**How to duplicate**:
You can't automatically duplicate, but you can:
1. Copy the template content.
2. Create a new template.
3. Paste the content as a starting point.
4. Modify as needed.
## Deleting Templates
### Delete User Templates
You can safely delete user templates you created:
1. Go to **Settings** > **Notifications** > **Templates**.
2. Find your template.
3. Click the **Delete** button.
4. Confirm the deletion.
**Note**: If the template is actively used in subscriptions, consider what will happen to those subscriptions when you delete it.
### System Templates
System templates cannot be deleted (they're read-only by default).
If you've customized a system template and want to revert to the original, click Restore. After restoring, the template will once again stay synchronized with the Collate-provided system default (unless you modify it manually).
## Troubleshooting Template Issues
### Template Won't Save
**Common causes**:
* Body exceeds 10,240 characters - simplify the content.
* Subject exceeds 256 characters - shorten the subject.
* Invalid Handlebars syntax - check brackets are balanced.
* Required fields are empty - fill in Name, Display Name, Subject, and Body.
### Notifications Not Using Template
**Check**:
1. Is the template selected in the subscription settings?
2. Is the subscription active?
3. For system templates, do the subscription's event type and entity type match your template name?
### Template Shows Wrong Data
**Check**:
1. Are you using the correct property names? See [Template Context Reference](/ai-2-0/how-to-guides/data-quality-observability/alerts-notifications/notification-templates/template-context-reference)
2. Is the data available for this entity type?
3. Are you using conditionals for optional fields?
## Next Steps
* **Learn about available data** → [Template Context Reference](/ai-2-0/how-to-guides/data-quality-observability/alerts-notifications/notification-templates/template-context-reference)
* **Master Handlebars** → [Handlebars Templating Guide](/ai-2-0/how-to-guides/data-quality-observability/alerts-notifications/notification-templates/handlebars-templating-guide)
* **Get help with issues** → [Troubleshooting Guide](/ai-2-0/how-to-guides/data-quality-observability/alerts-notifications/notification-templates/troubleshooting)