> ## Documentation Index
> Fetch the complete documentation index at: https://docs.getcollate.io/llms.txt
> Use this file to discover all available pages before exploring further.
# Data Observability Alerts
> Configure alerts for data quality failures, schema changes, and pipeline issues.
# Data Observability Alerts
Monitor the health of your data systems by setting up alerts for pipeline failures, data quality issues, and schema changes.
**Tip**: Use Data Observability Alerts for data health monitoring — test failures, schema changes, pipeline issues, and metric updates on data assets. For platform-wide metadata events, governance actions, or collaboration activity, use [System & Governance Notifications](/ai-2-0/how-to-guides/data-quality-observability/alerts-notifications/system-governance-notifications) instead.
## Add an Alert
Follow these steps to create and configure a data observability alert in Collate.
### Step 1: Navigate to the Alerts Page
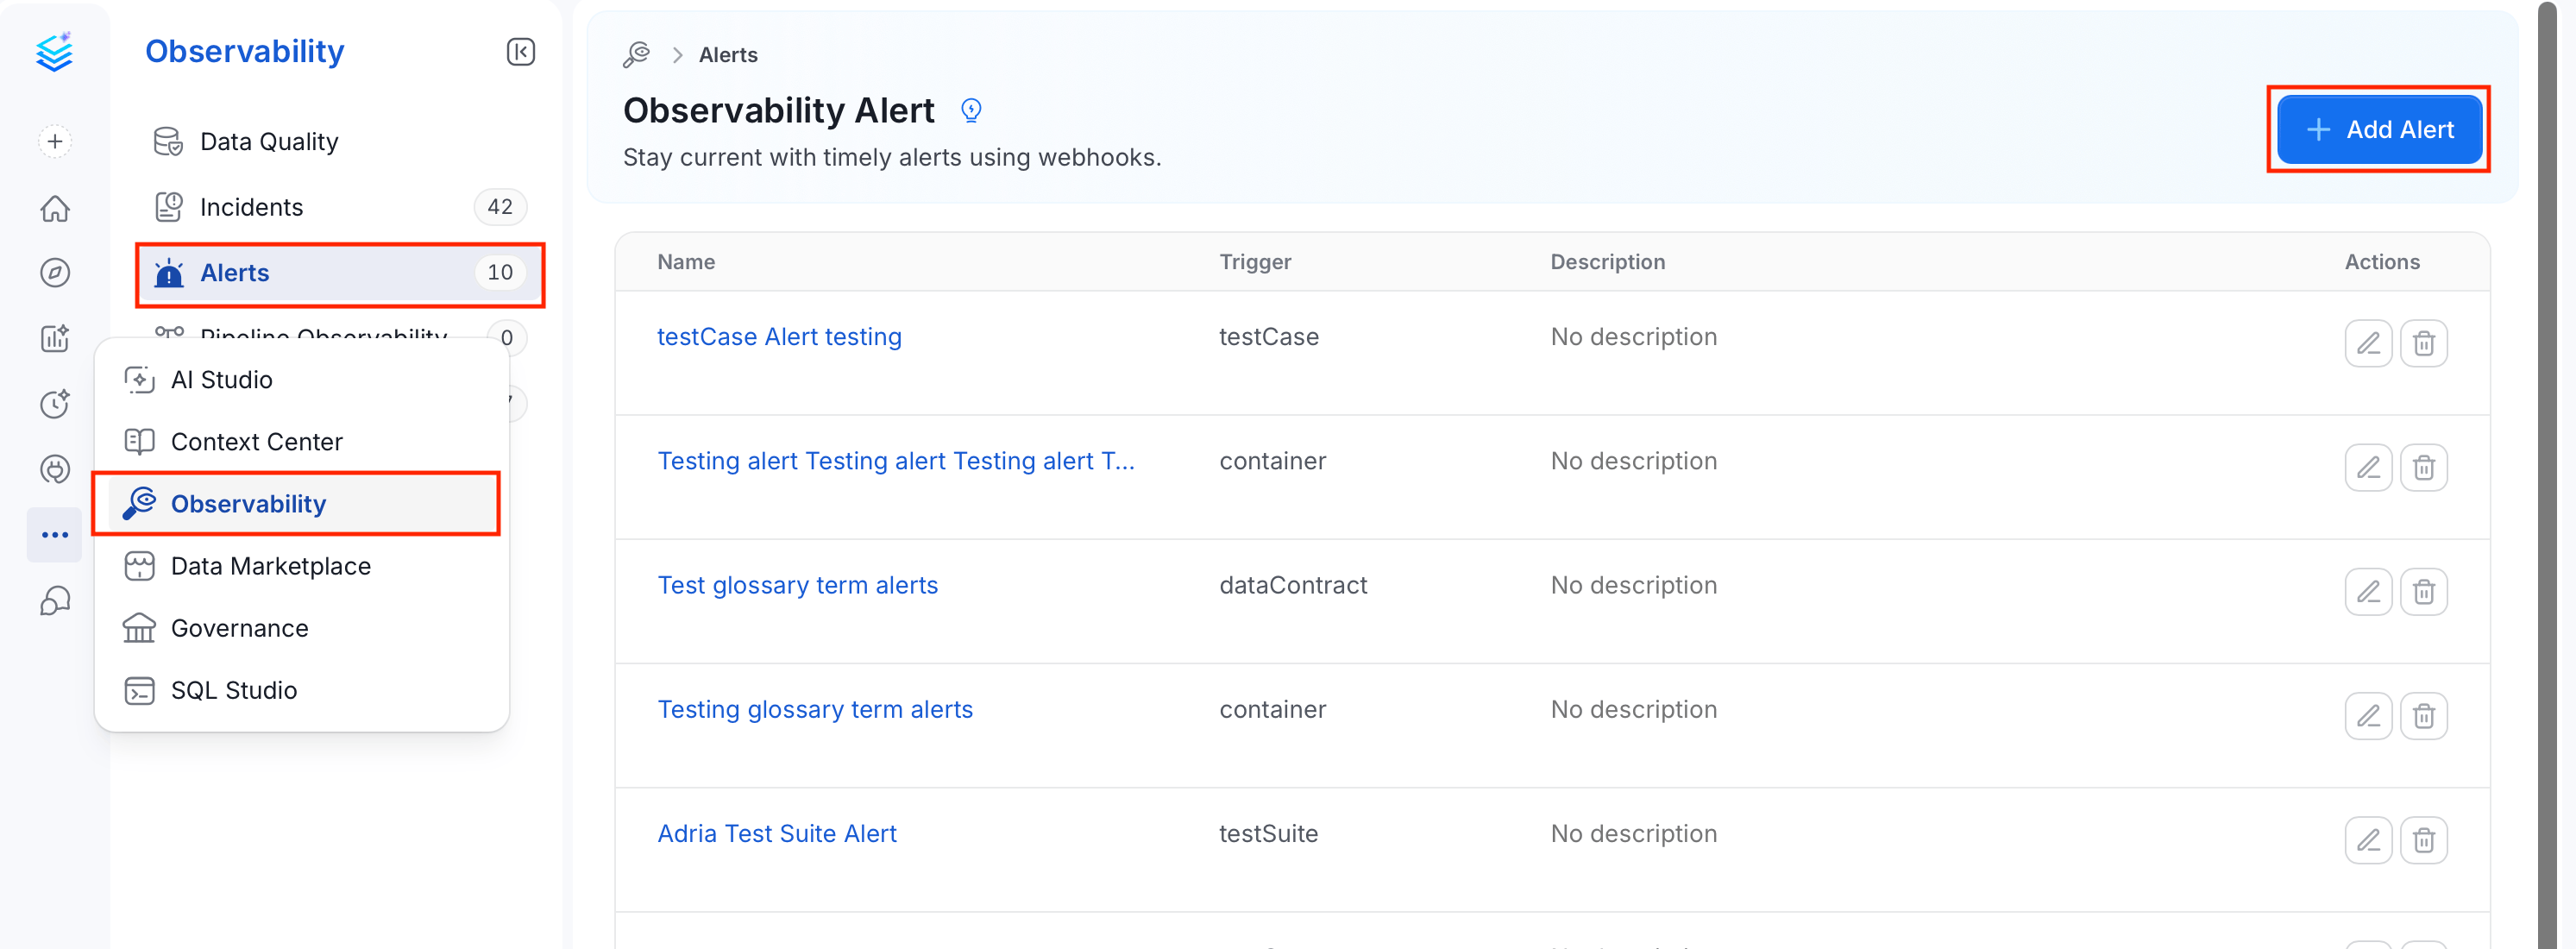
1. From the left navigation bar, select **Observability** > **Alerts**.
2. Click **Add Alert**.
 ### Step 2: Name the Alert and Add Context
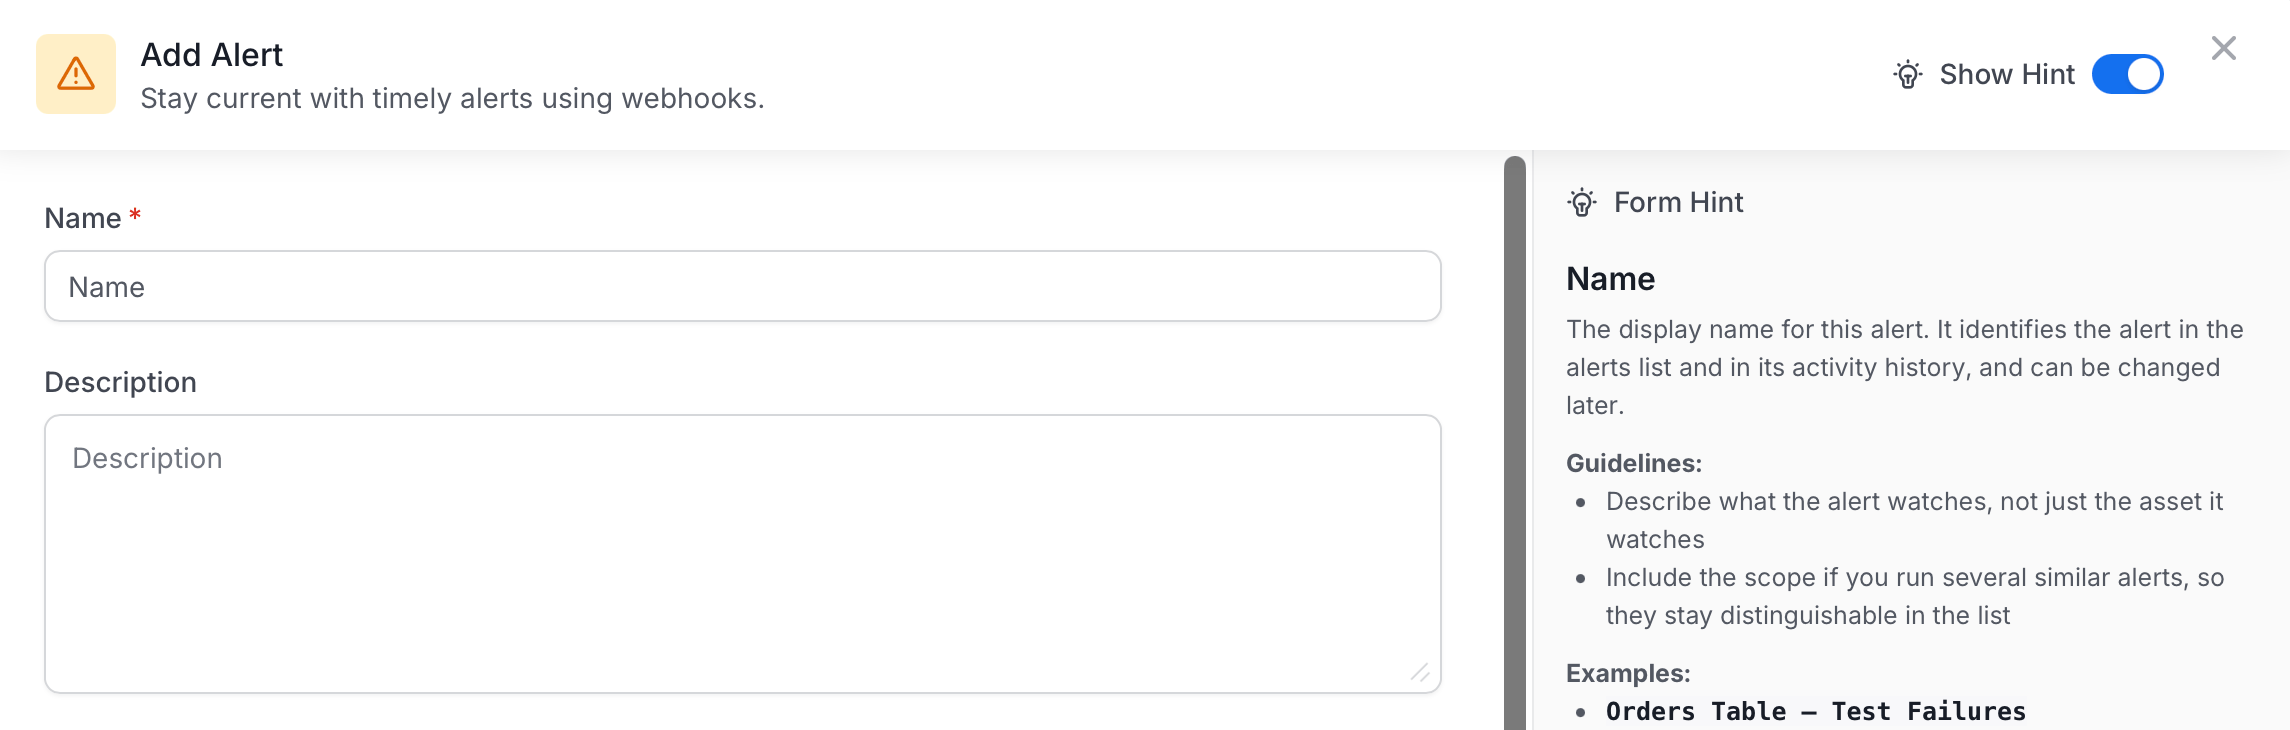
1. Enter a unique, descriptive **Name** for your alert.
2. (Optional) Add **Description** to provide further context and clarity regarding the alert's intent.
### Step 2: Name the Alert and Add Context
1. Enter a unique, descriptive **Name** for your alert.
2. (Optional) Add **Description** to provide further context and clarity regarding the alert's intent.
 ### Step 3: Select a Source
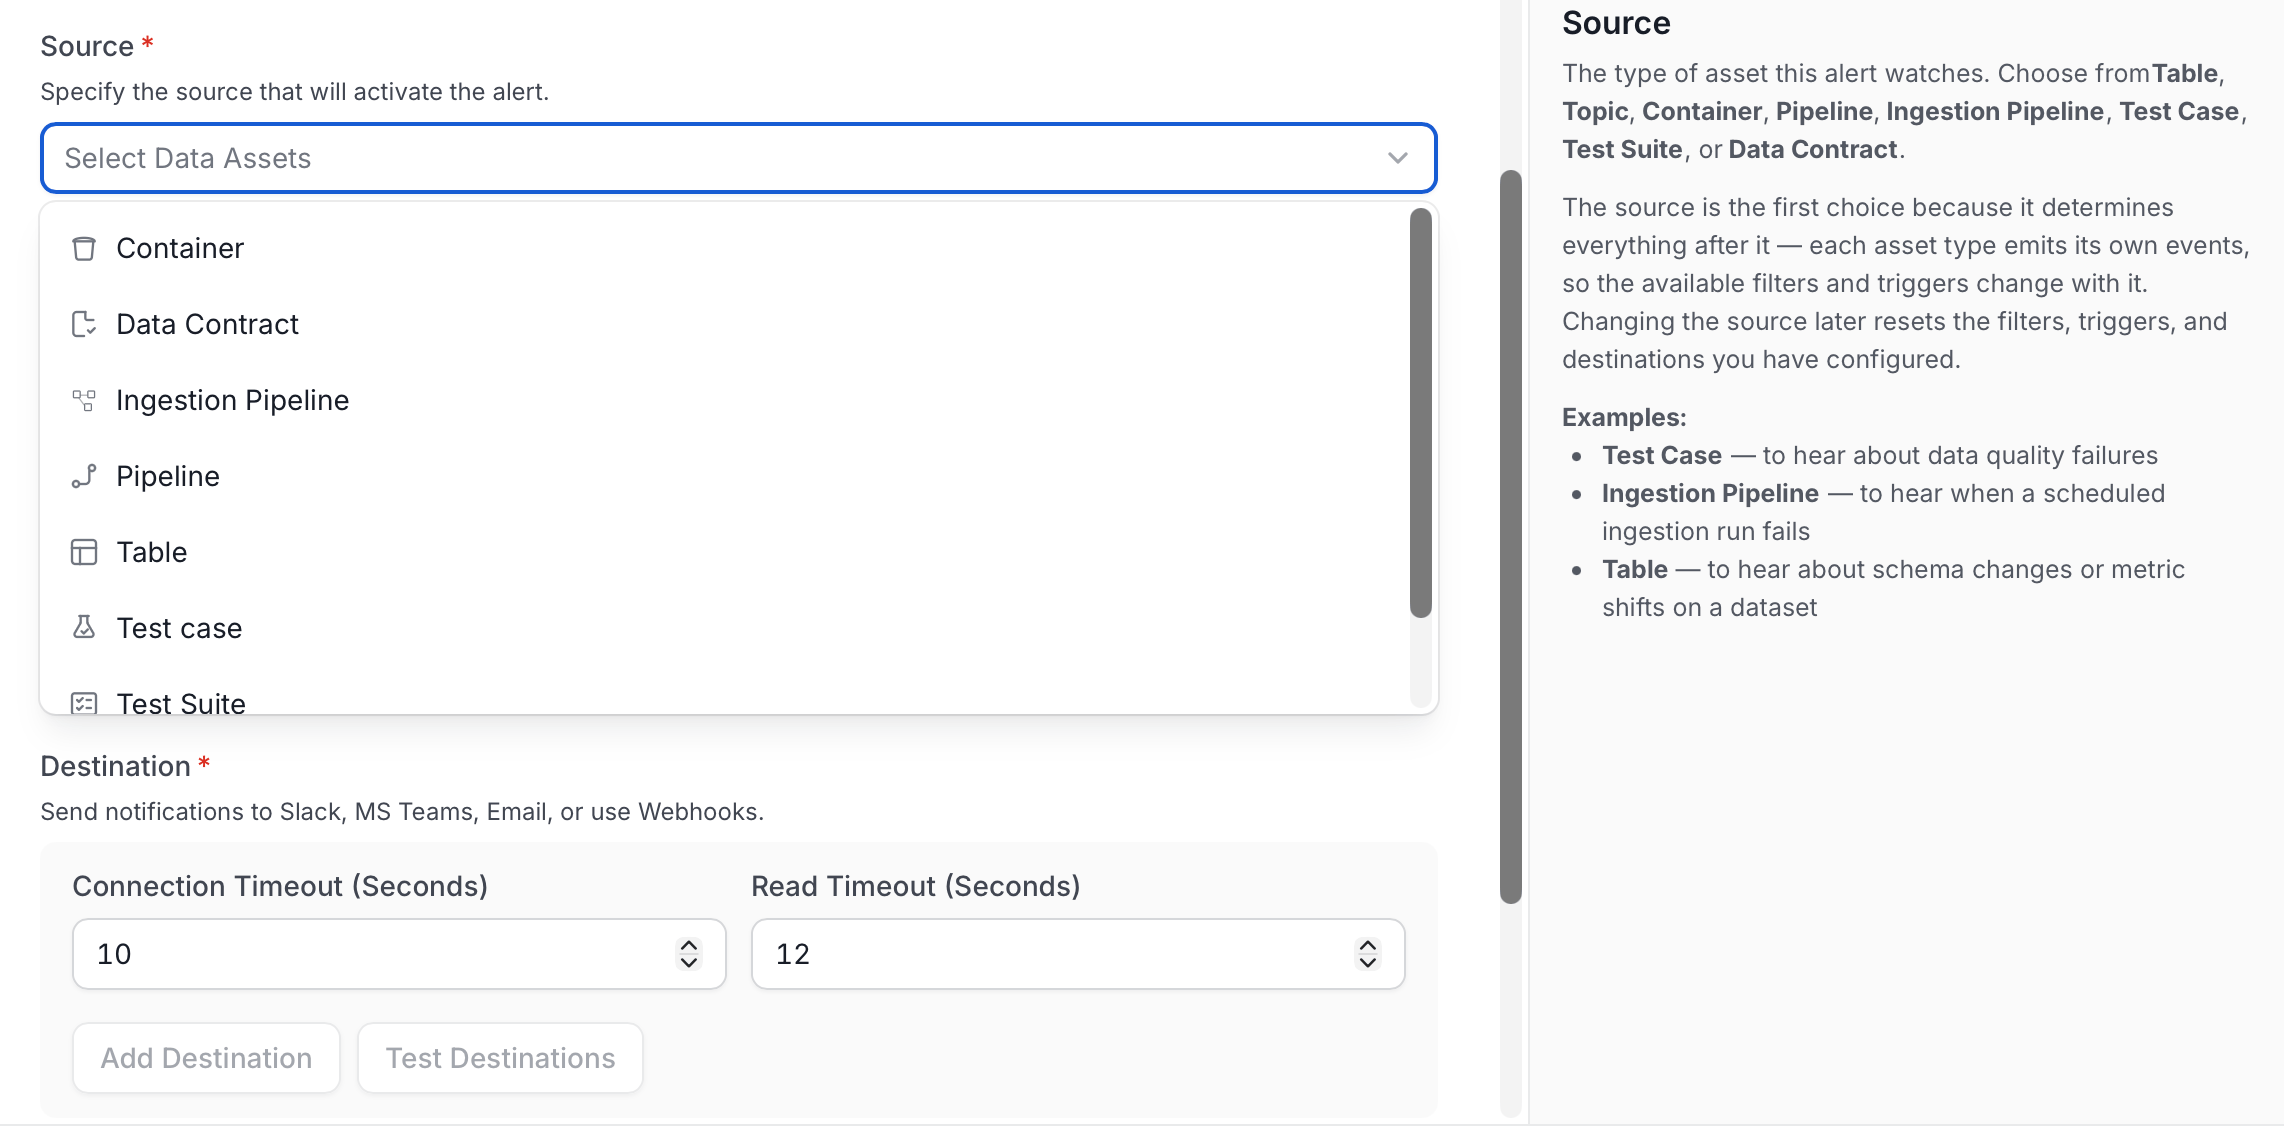
Choose the operational entity you want to monitor:
* **Container** - Monitors schema changes for the container asset
* **Data Contract** - Triggers an alert when a data contract status changes
* **Ingestion Pipeline** - Monitors status changes to your Collate ingestion pipelines
* **Pipeline** - Monitors updates to pipeline assets that you have ingested
* **Table** - Monitors schema changes and table metrics changes
* **Test Case** - Triggers an alert for the specific test case selected
* **Test Suite** - Triggers an alert for any test case event linked to the test suite. This is a great way to group alerts and reduce notification fatigue
* **Topic** - Monitors schema changes for the topic asset
### Step 3: Select a Source
Choose the operational entity you want to monitor:
* **Container** - Monitors schema changes for the container asset
* **Data Contract** - Triggers an alert when a data contract status changes
* **Ingestion Pipeline** - Monitors status changes to your Collate ingestion pipelines
* **Pipeline** - Monitors updates to pipeline assets that you have ingested
* **Table** - Monitors schema changes and table metrics changes
* **Test Case** - Triggers an alert for the specific test case selected
* **Test Suite** - Triggers an alert for any test case event linked to the test suite. This is a great way to group alerts and reduce notification fatigue
* **Topic** - Monitors schema changes for the topic asset
 ### Step 4: Configure Filters (Optional)
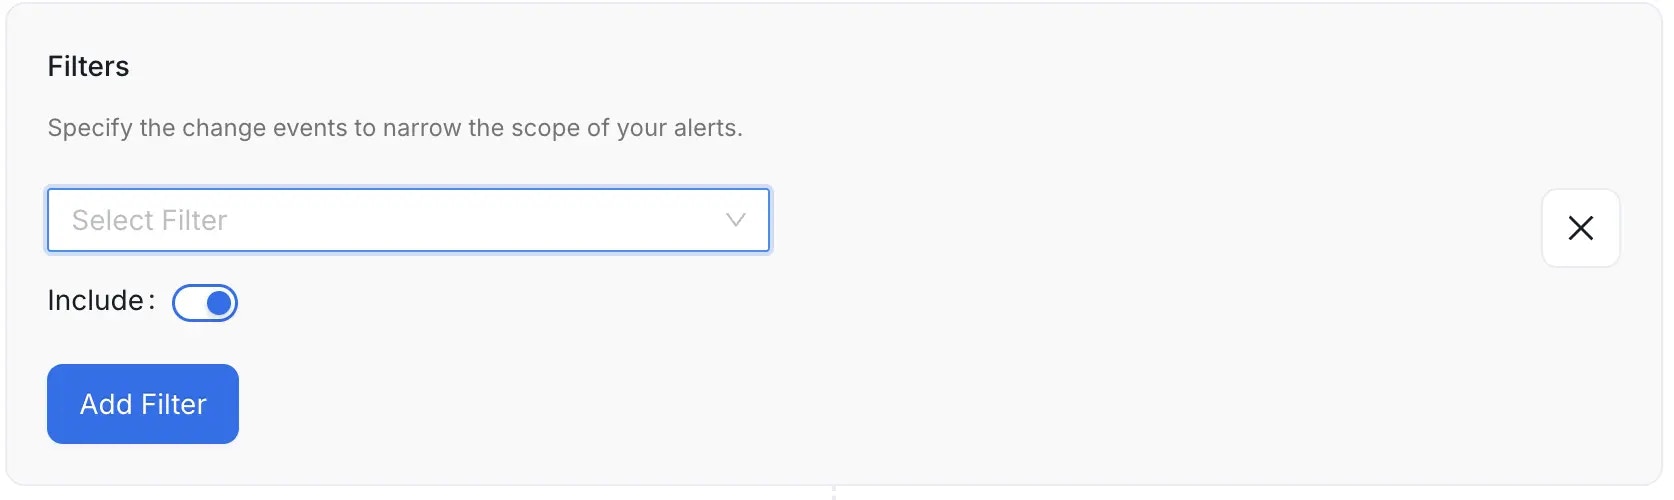
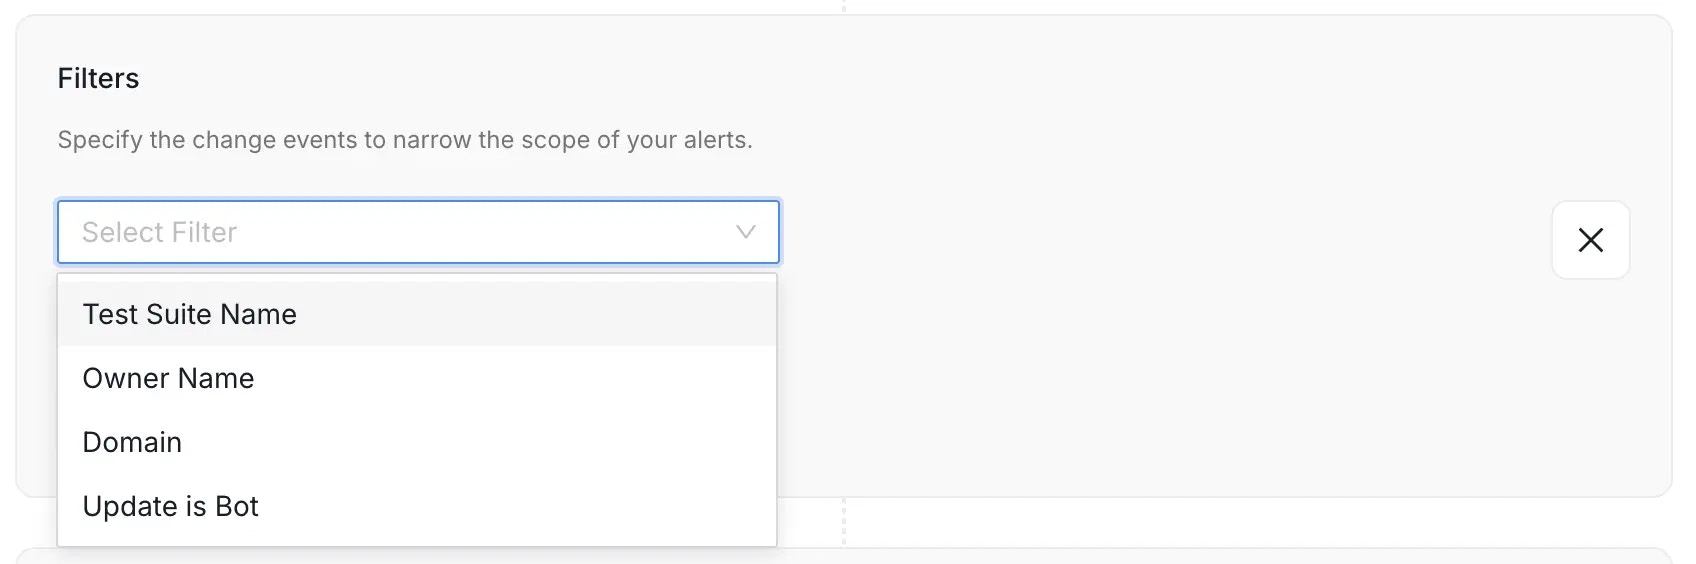
Filters let you refine the scope of the alert to focus only on relevant changes, significantly improving the signal-to-noise ratio. Narrow down events based on a variety of criteria, including:
* **Entity Specific Name**: Filter by the defined specific name of the entity.
* **Owner Name**: Filter events based on the designated owner of the asset.
* **Domain**: Filter events based on the Data Domain the entity belongs to.
* **Filter By Updater Is Bot**: Filter to include or exclude changes made by automated ingestion or system processes.
Use the **Include** toggle to define the logic for the filter condition:
* **Include (Toggle ON)**: If the event meets the filter condition, the alert is **sent**.
* **Exclude (Toggle OFF)**: If the event meets the filter condition, the alert is **silenced** (not sent).
**Note**: If you do not set any filter, the alert will apply to **all** relevant events over the selected source entity type, which may lead to excessive notifications.
### Step 4: Configure Filters (Optional)
Filters let you refine the scope of the alert to focus only on relevant changes, significantly improving the signal-to-noise ratio. Narrow down events based on a variety of criteria, including:
* **Entity Specific Name**: Filter by the defined specific name of the entity.
* **Owner Name**: Filter events based on the designated owner of the asset.
* **Domain**: Filter events based on the Data Domain the entity belongs to.
* **Filter By Updater Is Bot**: Filter to include or exclude changes made by automated ingestion or system processes.
Use the **Include** toggle to define the logic for the filter condition:
* **Include (Toggle ON)**: If the event meets the filter condition, the alert is **sent**.
* **Exclude (Toggle OFF)**: If the event meets the filter condition, the alert is **silenced** (not sent).
**Note**: If you do not set any filter, the alert will apply to **all** relevant events over the selected source entity type, which may lead to excessive notifications.
 ### Step 5: Select Trigger Conditions (Optional)
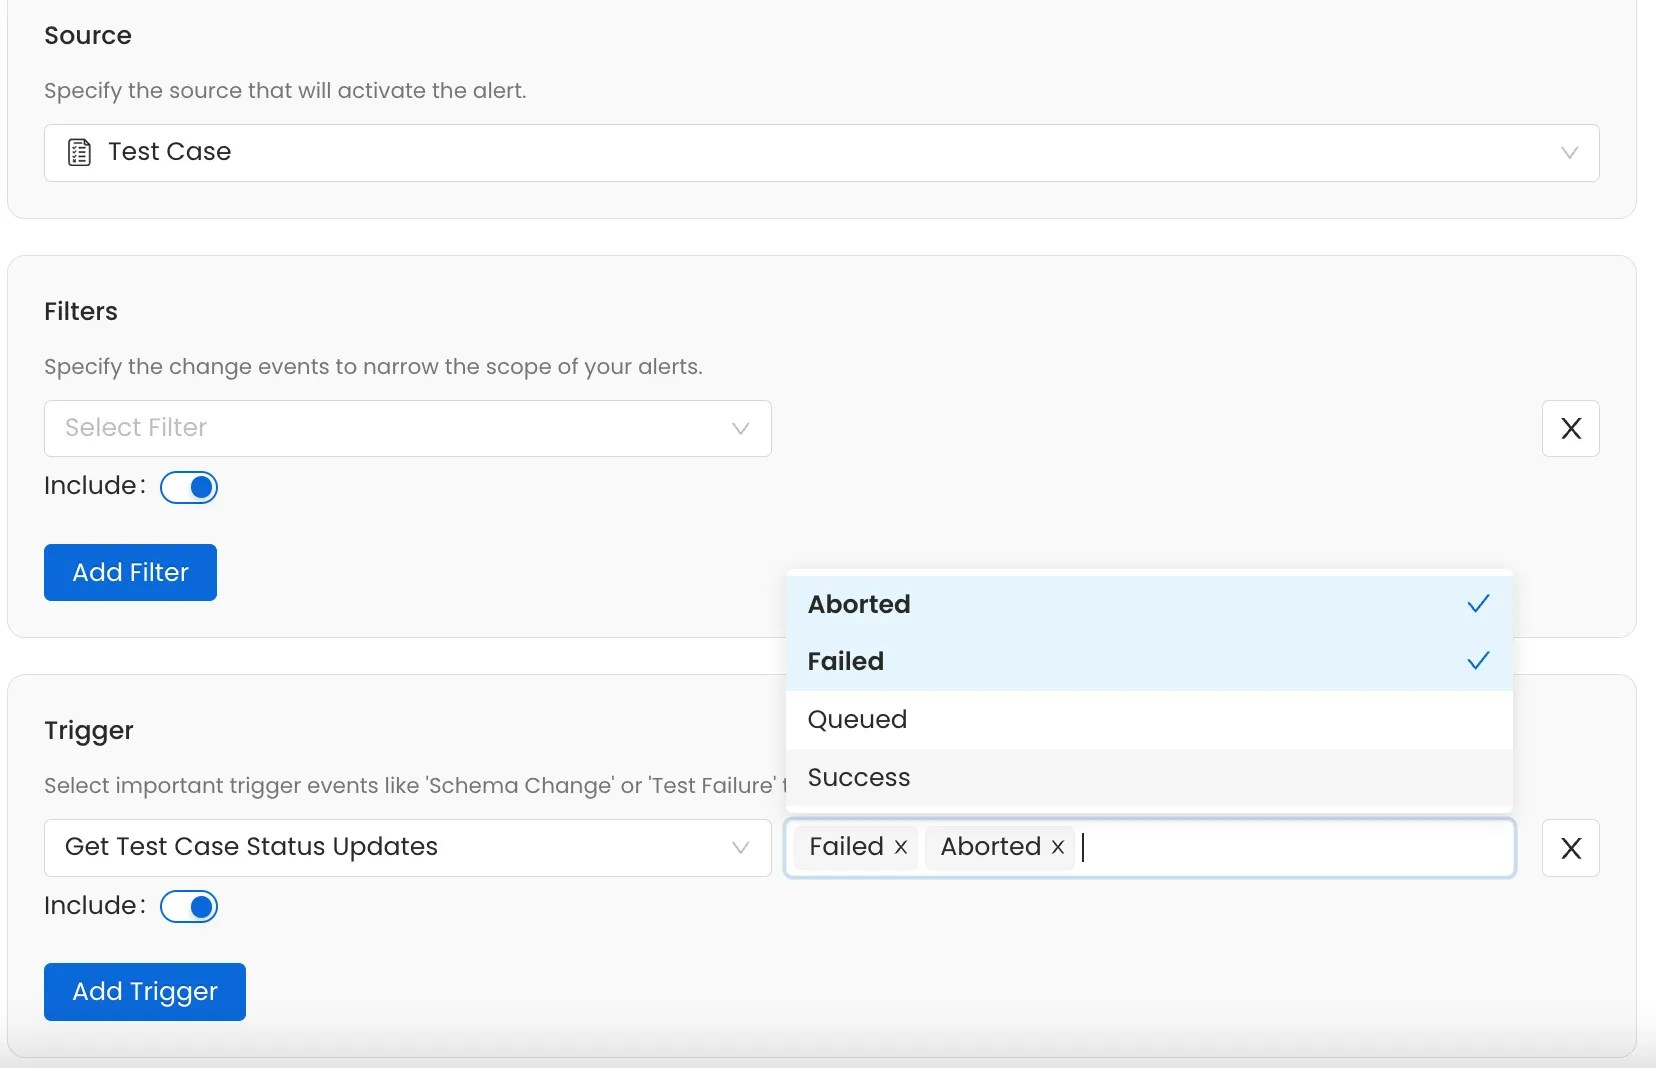
Define the specific conditions that will trigger the alert:
* **Schema Changes** - Alert on added, deleted, or updated columns
* **Test Case Status** - Trigger when tests are `Failed`, `Aborted`, or `Queued`
* **Pipeline Status** - Alert when pipeline execution is `Failed` or `Pending`
* **Metric Updates** - Notify when table metrics are updated
**Tip**: Select multiple trigger conditions to create comprehensive monitoring coverage.
### Step 5: Select Trigger Conditions (Optional)
Define the specific conditions that will trigger the alert:
* **Schema Changes** - Alert on added, deleted, or updated columns
* **Test Case Status** - Trigger when tests are `Failed`, `Aborted`, or `Queued`
* **Pipeline Status** - Alert when pipeline execution is `Failed` or `Pending`
* **Metric Updates** - Notify when table metrics are updated
**Tip**: Select multiple trigger conditions to create comprehensive monitoring coverage.
 ### Step 6: Select Destination
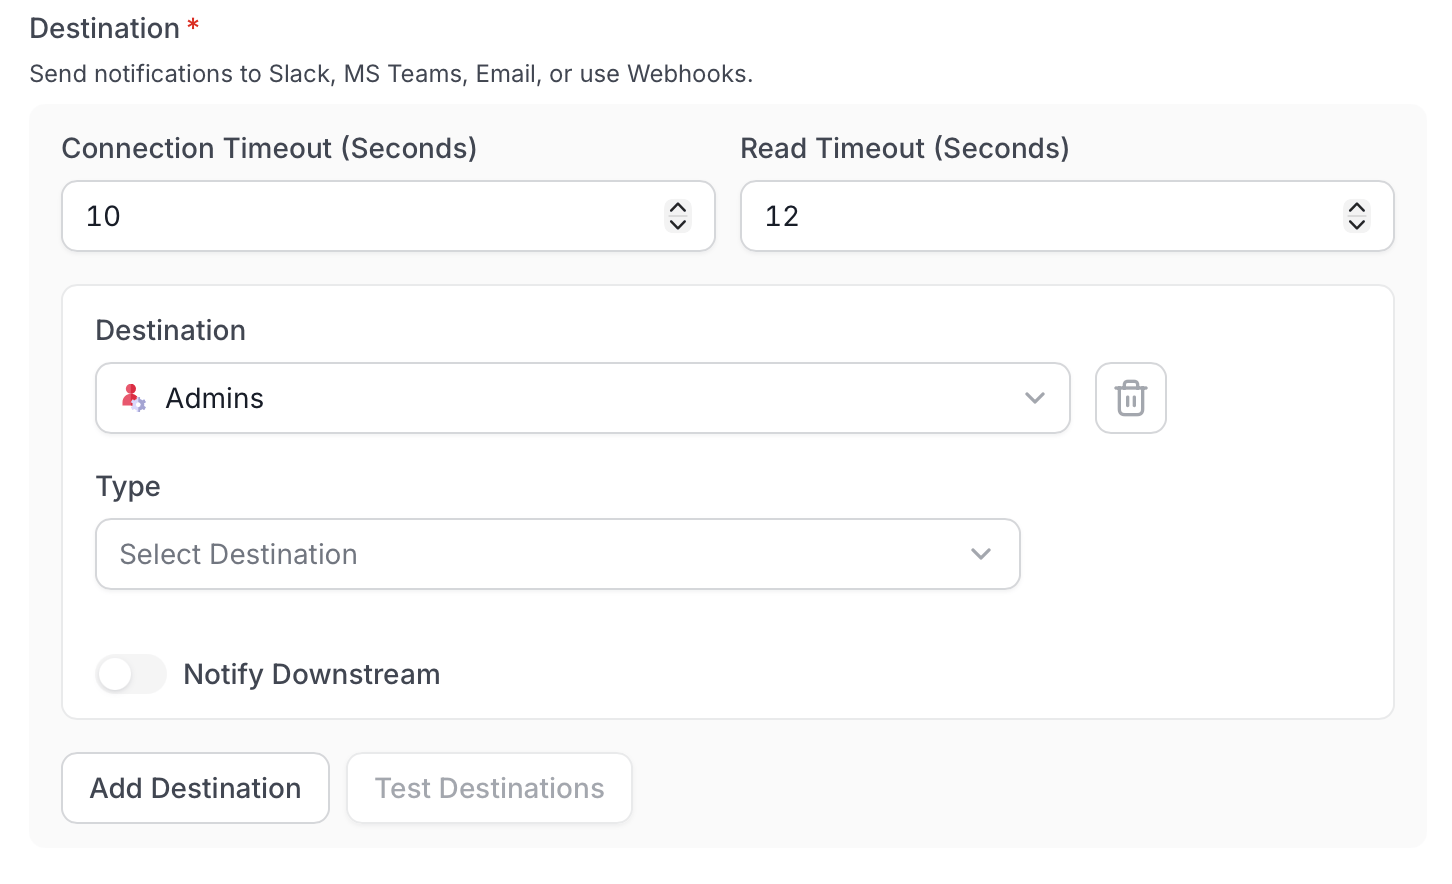
1. Set the **Connection Timeout (Seconds)** (default: 10) and **Read Timeout (Seconds)** (default: 12) to control how long Collate waits when connecting to external endpoints.
2. Select **Add Destination** to add one or more notification targets.
3. Select from **Internal** or external notification channels:
* **Internal**:
* **Admins** - Notify all platform administrators
* **Assignees** - Notify users assigned to the asset
* **Followers** - Notify users following the asset
* **Mentions** - Notify users mentioned on the asset
* **Owners** - Notify the owners of the asset
* **Teams or Specific Users** - Target specific teams or individual users
* **External** — select a **Type**:
* **Email**
* **G Chat**
* **Ms Teams**
* **Slack**
* **Webhook**
4. (Optional) Enable **Notify Downstream** to propagate notifications to downstream assets linked to the monitored entity.
### Step 6: Select Destination
1. Set the **Connection Timeout (Seconds)** (default: 10) and **Read Timeout (Seconds)** (default: 12) to control how long Collate waits when connecting to external endpoints.
2. Select **Add Destination** to add one or more notification targets.
3. Select from **Internal** or external notification channels:
* **Internal**:
* **Admins** - Notify all platform administrators
* **Assignees** - Notify users assigned to the asset
* **Followers** - Notify users following the asset
* **Mentions** - Notify users mentioned on the asset
* **Owners** - Notify the owners of the asset
* **Teams or Specific Users** - Target specific teams or individual users
* **External** — select a **Type**:
* **Email**
* **G Chat**
* **Ms Teams**
* **Slack**
* **Webhook**
4. (Optional) Enable **Notify Downstream** to propagate notifications to downstream assets linked to the monitored entity.
 ### Step 7: Select a Notification Template
The **Notification Template** controls the wording of the message this alert sends — its subject line and body. The alert fires on exactly the same events regardless of which template is chosen; only the text changes.
### Step 7: Select a Notification Template
The **Notification Template** controls the wording of the message this alert sends — its subject line and body. The alert fires on exactly the same events regardless of which template is chosen; only the text changes.
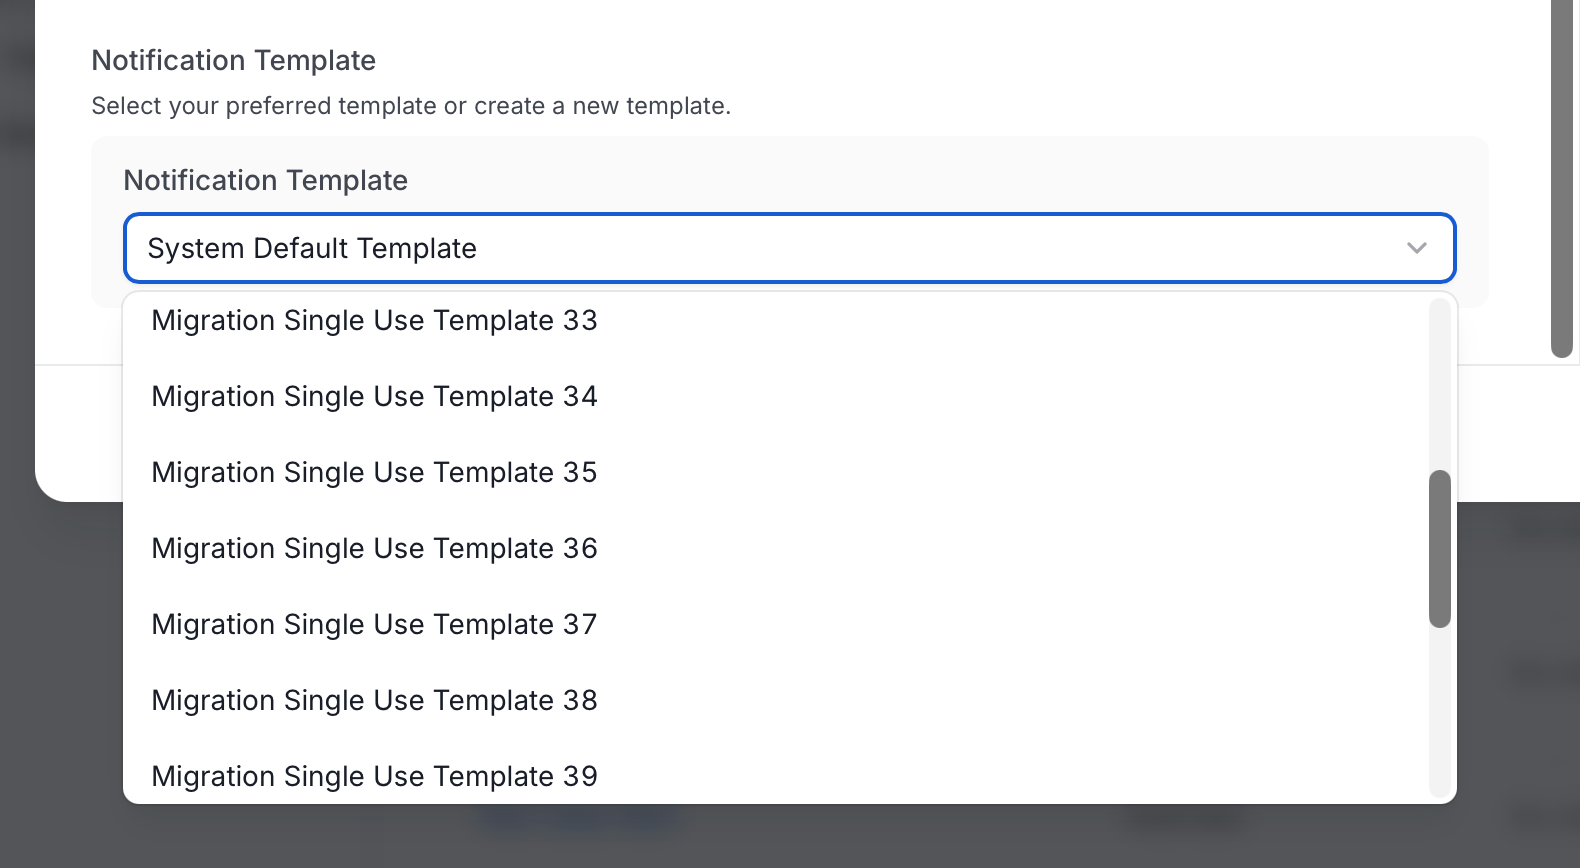 Choose one of three options from the **Notification Template** dropdown:
* **System Default Template** — the built-in wording, used when nothing else is selected. Suitable for most alerts and requires no upkeep.
* **A saved template** — a template already created in Notification Templates and reusable across alerts. Its name, subject, and body appear below the picker for reference (read-only). Edit it from Notification Templates to update it everywhere it is used.
* **Create Custom Template** — wording written here and belonging to this alert alone. Editing it affects no other alert.
#### Writing a Custom Template
Subject and body support Handlebars placeholders, so one template adapts to whatever event fired it. Values are nested under two objects:
* **`entity`** — the asset the event happened to: `{{entity.name}}`, `{{entity.displayName}}`, `{{entity.fullyQualifiedName}}`, `{{entity.updatedBy}}`
* **`event`** — the event itself: `{{event.eventType}}`, `{{event.entityType}}`, `{{event.userName}}`, `{{event.timestamp}}`
`{{publisherName}}` (the alert's own name) and `{{emailingEntity}}` are also available at the top level.
Three helpers are available for values a plain placeholder cannot produce:
* `{{buildEntityUrl entity}}` — a link back to the asset
* `{{formatDate event.timestamp}}` — a human-readable timestamp
* `{{camelCaseToTitle name}}` — converts a field name into a readable label
Each helper requires an argument; writing one on its own resolves to nothing. Type `{{` in either field to browse the full set of available helpers.
**Example**:
```
Subject: [{{event.eventType}}] {{entity.displayName}} needs attention
Body: {{event.entityType}} {{entity.fullyQualifiedName}} changed. View it at {{buildEntityUrl entity}}.
```
Select **Validate** before saving. It checks Handlebars syntax only — a misspelt or non-existent placeholder passes validation and renders as empty text in the delivered message.
For full details on creating and managing templates, including Handlebars placeholders, helpers, and examples, see [Notification Templates](/ai-2-0/how-to-guides/data-quality-observability/alerts-notifications/notification-templates).
Choose one of three options from the **Notification Template** dropdown:
* **System Default Template** — the built-in wording, used when nothing else is selected. Suitable for most alerts and requires no upkeep.
* **A saved template** — a template already created in Notification Templates and reusable across alerts. Its name, subject, and body appear below the picker for reference (read-only). Edit it from Notification Templates to update it everywhere it is used.
* **Create Custom Template** — wording written here and belonging to this alert alone. Editing it affects no other alert.
#### Writing a Custom Template
Subject and body support Handlebars placeholders, so one template adapts to whatever event fired it. Values are nested under two objects:
* **`entity`** — the asset the event happened to: `{{entity.name}}`, `{{entity.displayName}}`, `{{entity.fullyQualifiedName}}`, `{{entity.updatedBy}}`
* **`event`** — the event itself: `{{event.eventType}}`, `{{event.entityType}}`, `{{event.userName}}`, `{{event.timestamp}}`
`{{publisherName}}` (the alert's own name) and `{{emailingEntity}}` are also available at the top level.
Three helpers are available for values a plain placeholder cannot produce:
* `{{buildEntityUrl entity}}` — a link back to the asset
* `{{formatDate event.timestamp}}` — a human-readable timestamp
* `{{camelCaseToTitle name}}` — converts a field name into a readable label
Each helper requires an argument; writing one on its own resolves to nothing. Type `{{` in either field to browse the full set of available helpers.
**Example**:
```
Subject: [{{event.eventType}}] {{entity.displayName}} needs attention
Body: {{event.entityType}} {{entity.fullyQualifiedName}} changed. View it at {{buildEntityUrl entity}}.
```
Select **Validate** before saving. It checks Handlebars syntax only — a misspelt or non-existent placeholder passes validation and renders as empty text in the delivered message.
For full details on creating and managing templates, including Handlebars placeholders, helpers, and examples, see [Notification Templates](/ai-2-0/how-to-guides/data-quality-observability/alerts-notifications/notification-templates).