> ## Documentation Index
> Fetch the complete documentation index at: https://docs.getcollate.io/llms.txt
> Use this file to discover all available pages before exploring further.
# Data Products
> Define and manage data products as part of your data marketplace strategy to track ownership, value, and metadata lineage efficiently.
# Data Products
Data products package curated data assets under a single entity with defined ownership, type, and visibility. Use them to make data discoverable and accessible within your organization's data marketplace.
## Add a Data Product
Follow these steps to create a new data product in Collate.
### Step 1: Access Data Products
1. In the left navigation bar, click **Data Marketplace** > **Data Products**.
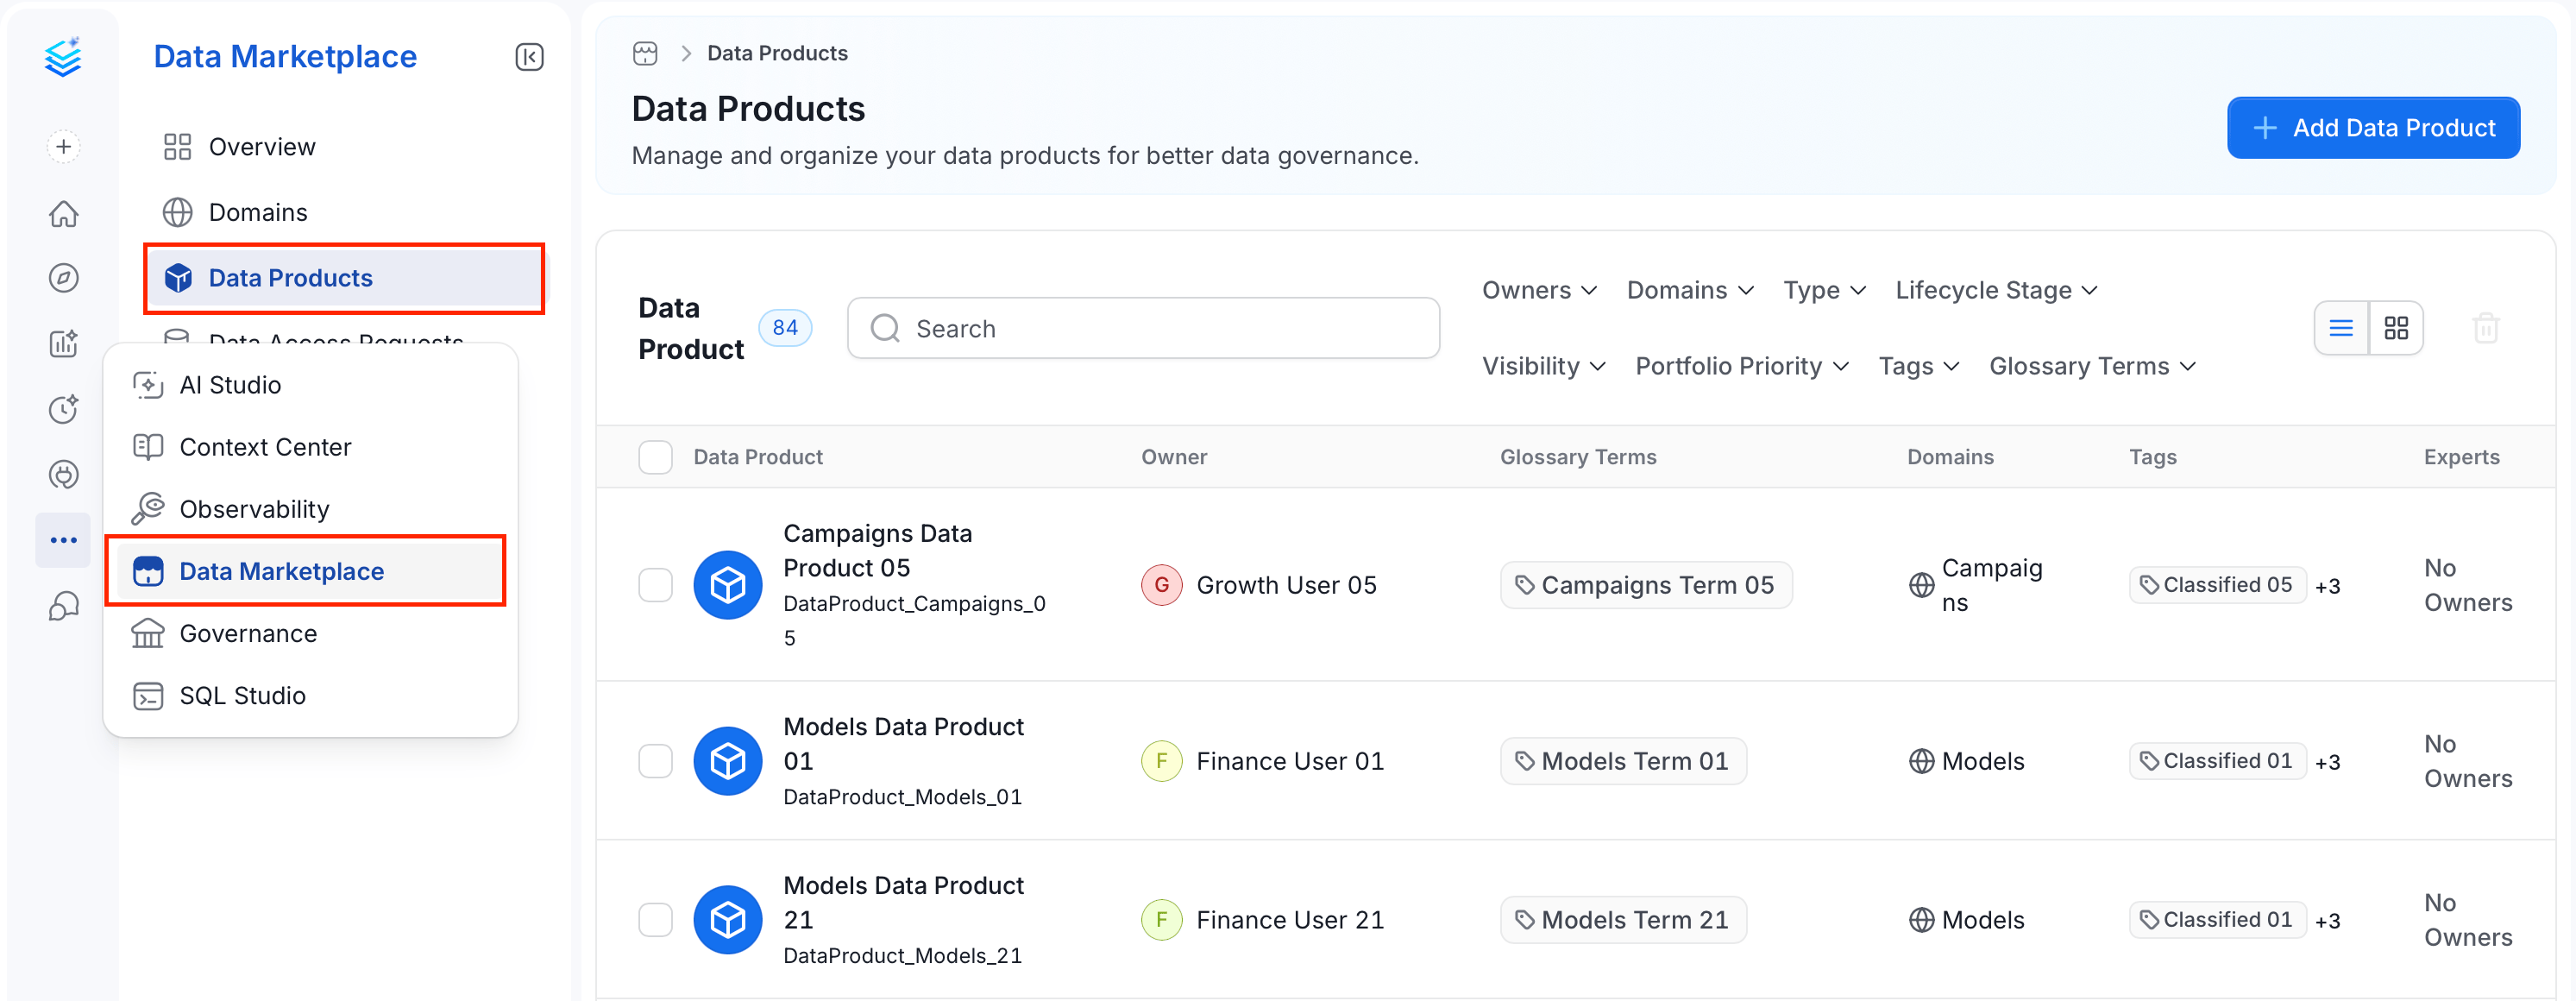 2. Click **Add Data Product**. The Add Data Product panel opens.
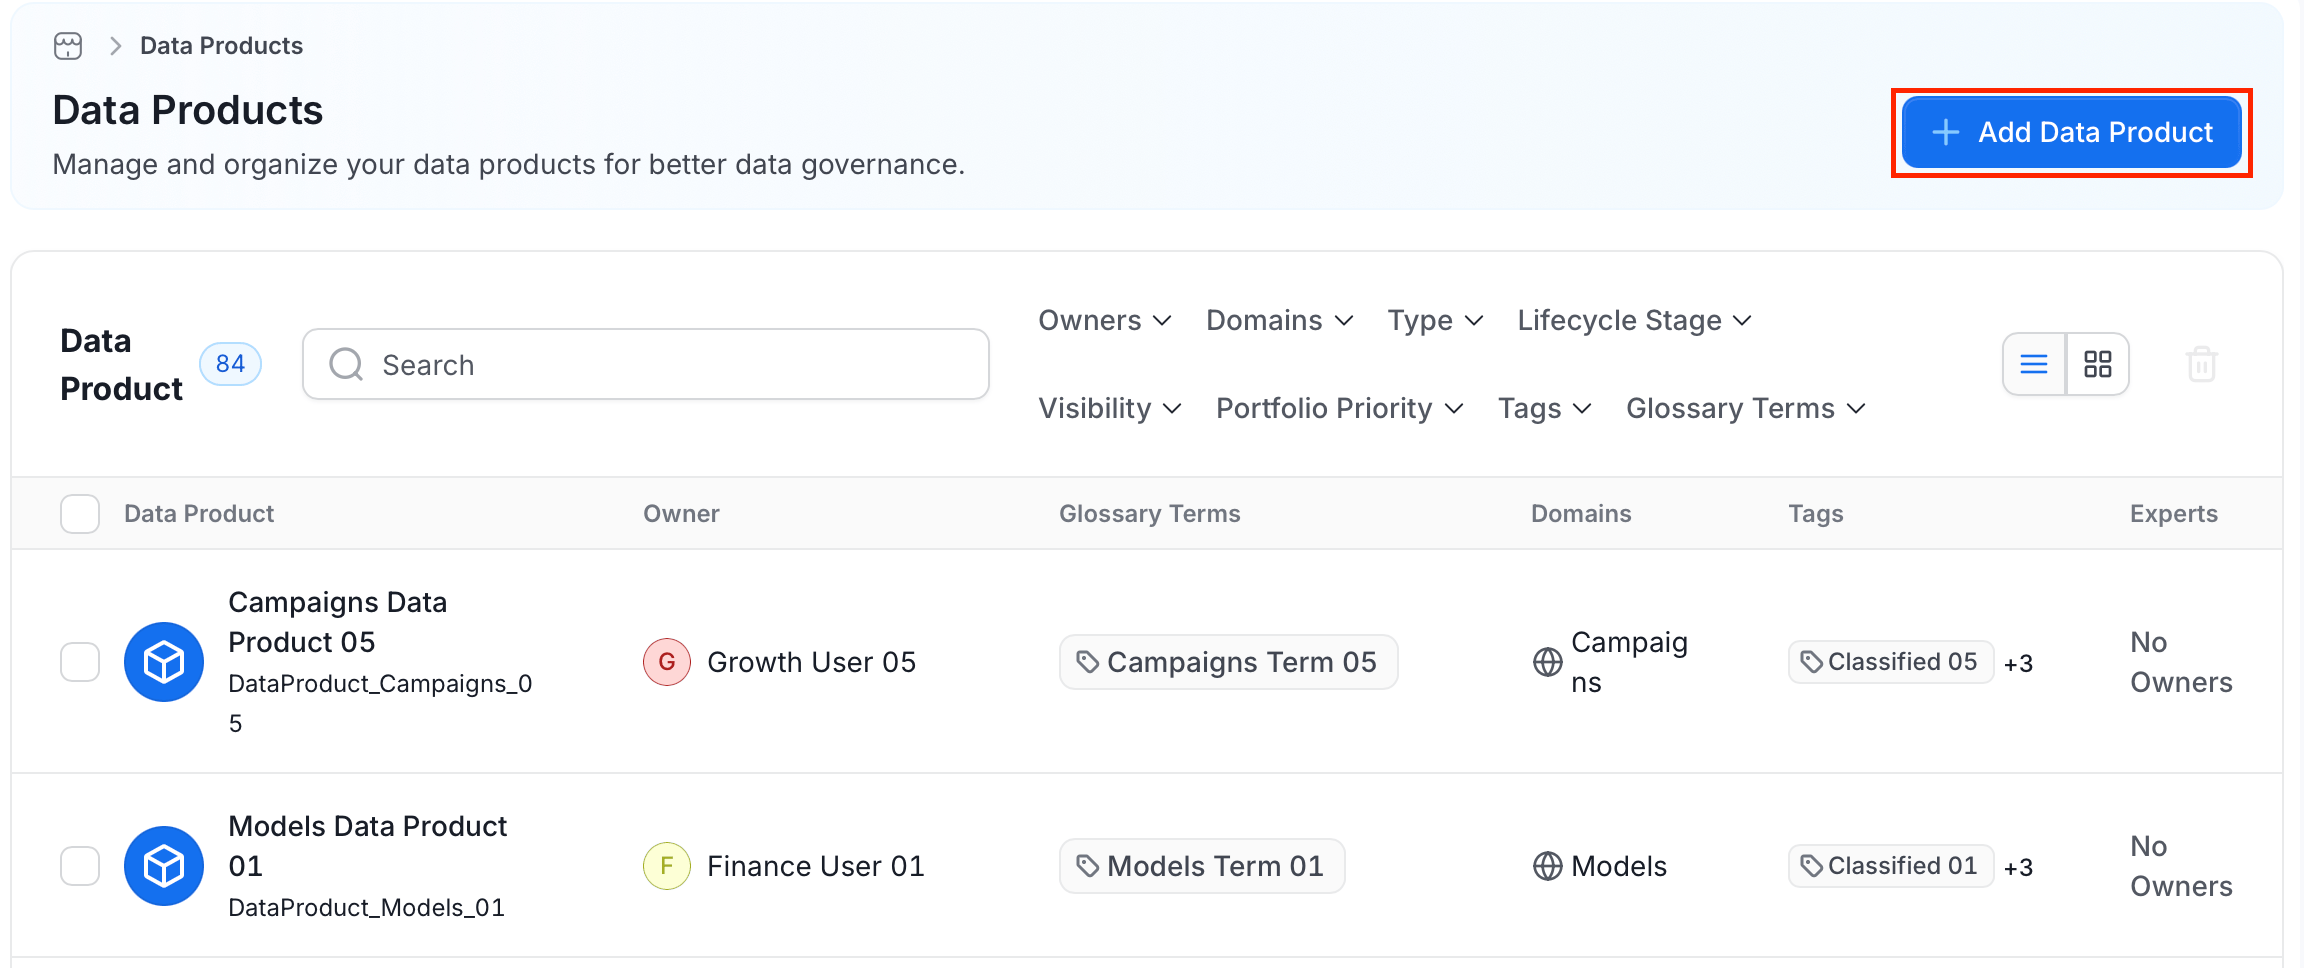 ### Step 2: Enter Data Product Details
* **Cover**: Upload a banner image for the data product page (SVG, PNG, JPEG, or GIF; max 800×400 px; 5 MB).
* **Icon** and **Color**: Select an icon and color to visually identify the data product in the catalog.
* **Name** (required): Enter a unique identifier. Letters, numbers, hyphens, and underscores only; maximum 128 characters.
* **Display Name** (required): Enter a human-readable label shown throughout the Collate UI.
* **Description** (required): Write a description that explains the data product's purpose, the data it contains, and any relevant context for other users.
### Step 3: Add Tags and Glossary Terms
* **Tags**: Select classification tags to categorize the data product.
* **Glossary Terms**: Link the data product to relevant glossary terms.
### Step 4: Configure Data Product Settings
* **Domain** (required): Select the domain this data product belongs to.
* **Type** (required): Select the data product type from the ODPS-aligned taxonomy — for example, Dataset, Raw Data, Derived Data, Reports, or Analytic View.
* **Visibility** (required): Control who can discover this data product:
| Visibility | Access |
| ---------------- | ----------------------------------------- |
| **Private** | Visible to the creator only. |
| **Invitation** | Visible to invited users. |
| **Dataspace** | Visible within the dataspace. |
| **Organisation** | Visible to all users in the organization. |
| **Public** | Visible to anyone. |
* **Portfolio Priority**: Indicate the data product's importance in your portfolio — Critical, High, Medium, or Low.
### Step 5: Assign People
* **Owners**: Select users or teams responsible for managing the data product.
* **Experts**: Select individual users with deep knowledge of the data product.
* **Reviewers**: Select users who review and approve changes to the data product.
### Step 6: Add Custom Properties
If your administrator has configured custom properties for data products, complete any additional fields shown at the bottom of the panel.
### Step 7: Save Data Product
Click **Save**. The data product appears in the Data Products list.
## Add a Data Product from a Domain Details Page
If a data product belongs to a specific domain, create it directly from that domain instead:
1. Navigate to **Data Marketplace** > **Domains**, then open the domain the data product should belong to.
2. Click **Add** and select **Data Products**.
### Step 2: Enter Data Product Details
* **Cover**: Upload a banner image for the data product page (SVG, PNG, JPEG, or GIF; max 800×400 px; 5 MB).
* **Icon** and **Color**: Select an icon and color to visually identify the data product in the catalog.
* **Name** (required): Enter a unique identifier. Letters, numbers, hyphens, and underscores only; maximum 128 characters.
* **Display Name** (required): Enter a human-readable label shown throughout the Collate UI.
* **Description** (required): Write a description that explains the data product's purpose, the data it contains, and any relevant context for other users.
### Step 3: Add Tags and Glossary Terms
* **Tags**: Select classification tags to categorize the data product.
* **Glossary Terms**: Link the data product to relevant glossary terms.
### Step 4: Configure Data Product Settings
* **Domain** (required): Select the domain this data product belongs to.
* **Type** (required): Select the data product type from the ODPS-aligned taxonomy — for example, Dataset, Raw Data, Derived Data, Reports, or Analytic View.
* **Visibility** (required): Control who can discover this data product:
| Visibility | Access |
| ---------------- | ----------------------------------------- |
| **Private** | Visible to the creator only. |
| **Invitation** | Visible to invited users. |
| **Dataspace** | Visible within the dataspace. |
| **Organisation** | Visible to all users in the organization. |
| **Public** | Visible to anyone. |
* **Portfolio Priority**: Indicate the data product's importance in your portfolio — Critical, High, Medium, or Low.
### Step 5: Assign People
* **Owners**: Select users or teams responsible for managing the data product.
* **Experts**: Select individual users with deep knowledge of the data product.
* **Reviewers**: Select users who review and approve changes to the data product.
### Step 6: Add Custom Properties
If your administrator has configured custom properties for data products, complete any additional fields shown at the bottom of the panel.
### Step 7: Save Data Product
Click **Save**. The data product appears in the Data Products list.
## Add a Data Product from a Domain Details Page
If a data product belongs to a specific domain, create it directly from that domain instead:
1. Navigate to **Data Marketplace** > **Domains**, then open the domain the data product should belong to.
2. Click **Add** and select **Data Products**.
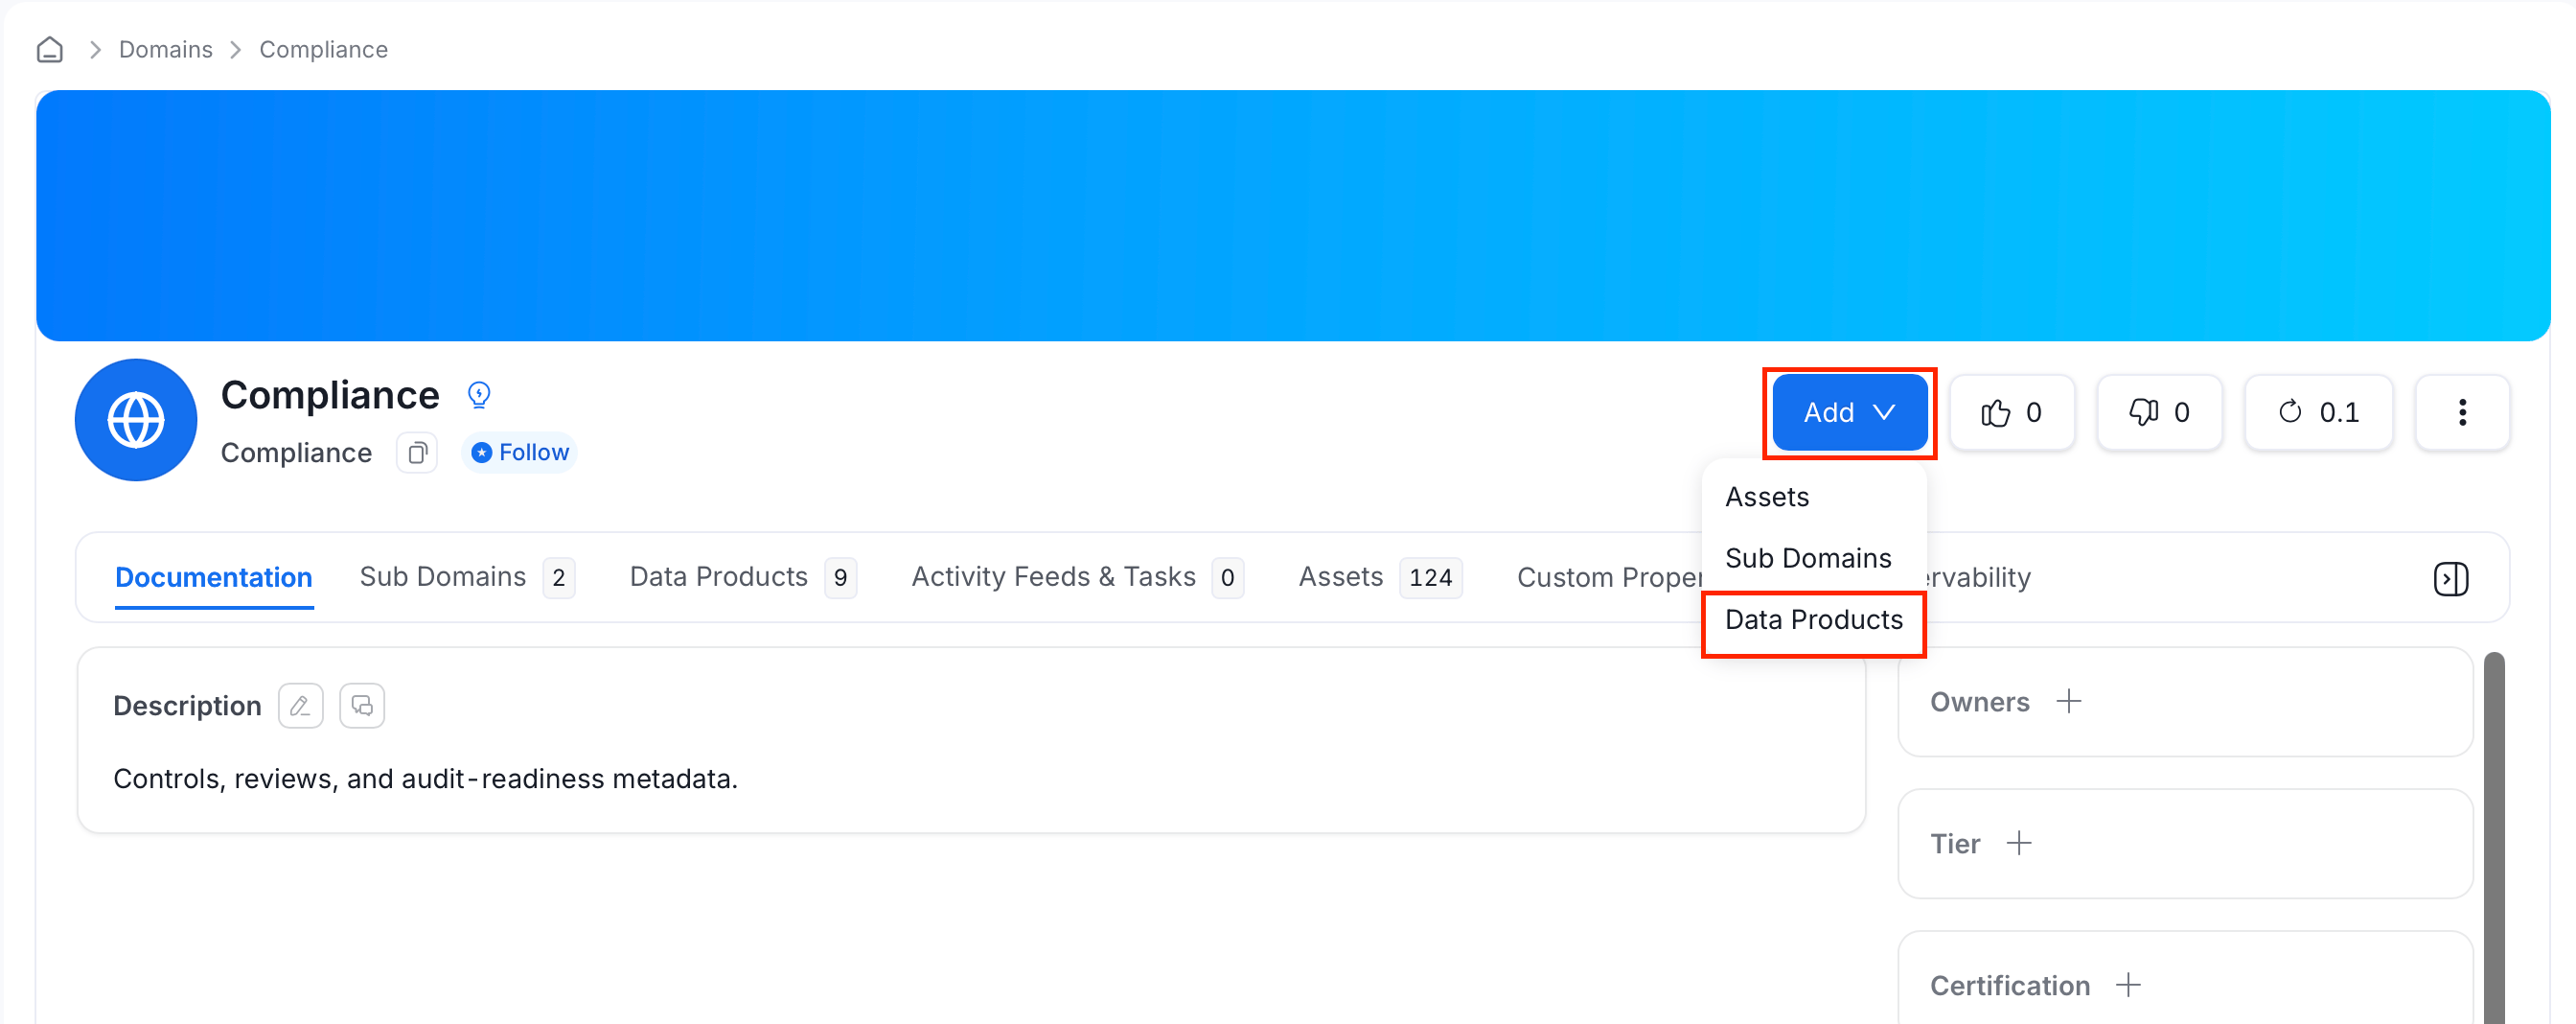 3. Follow [Add a Data Product](#add-a-data-product) steps 2 to 7.
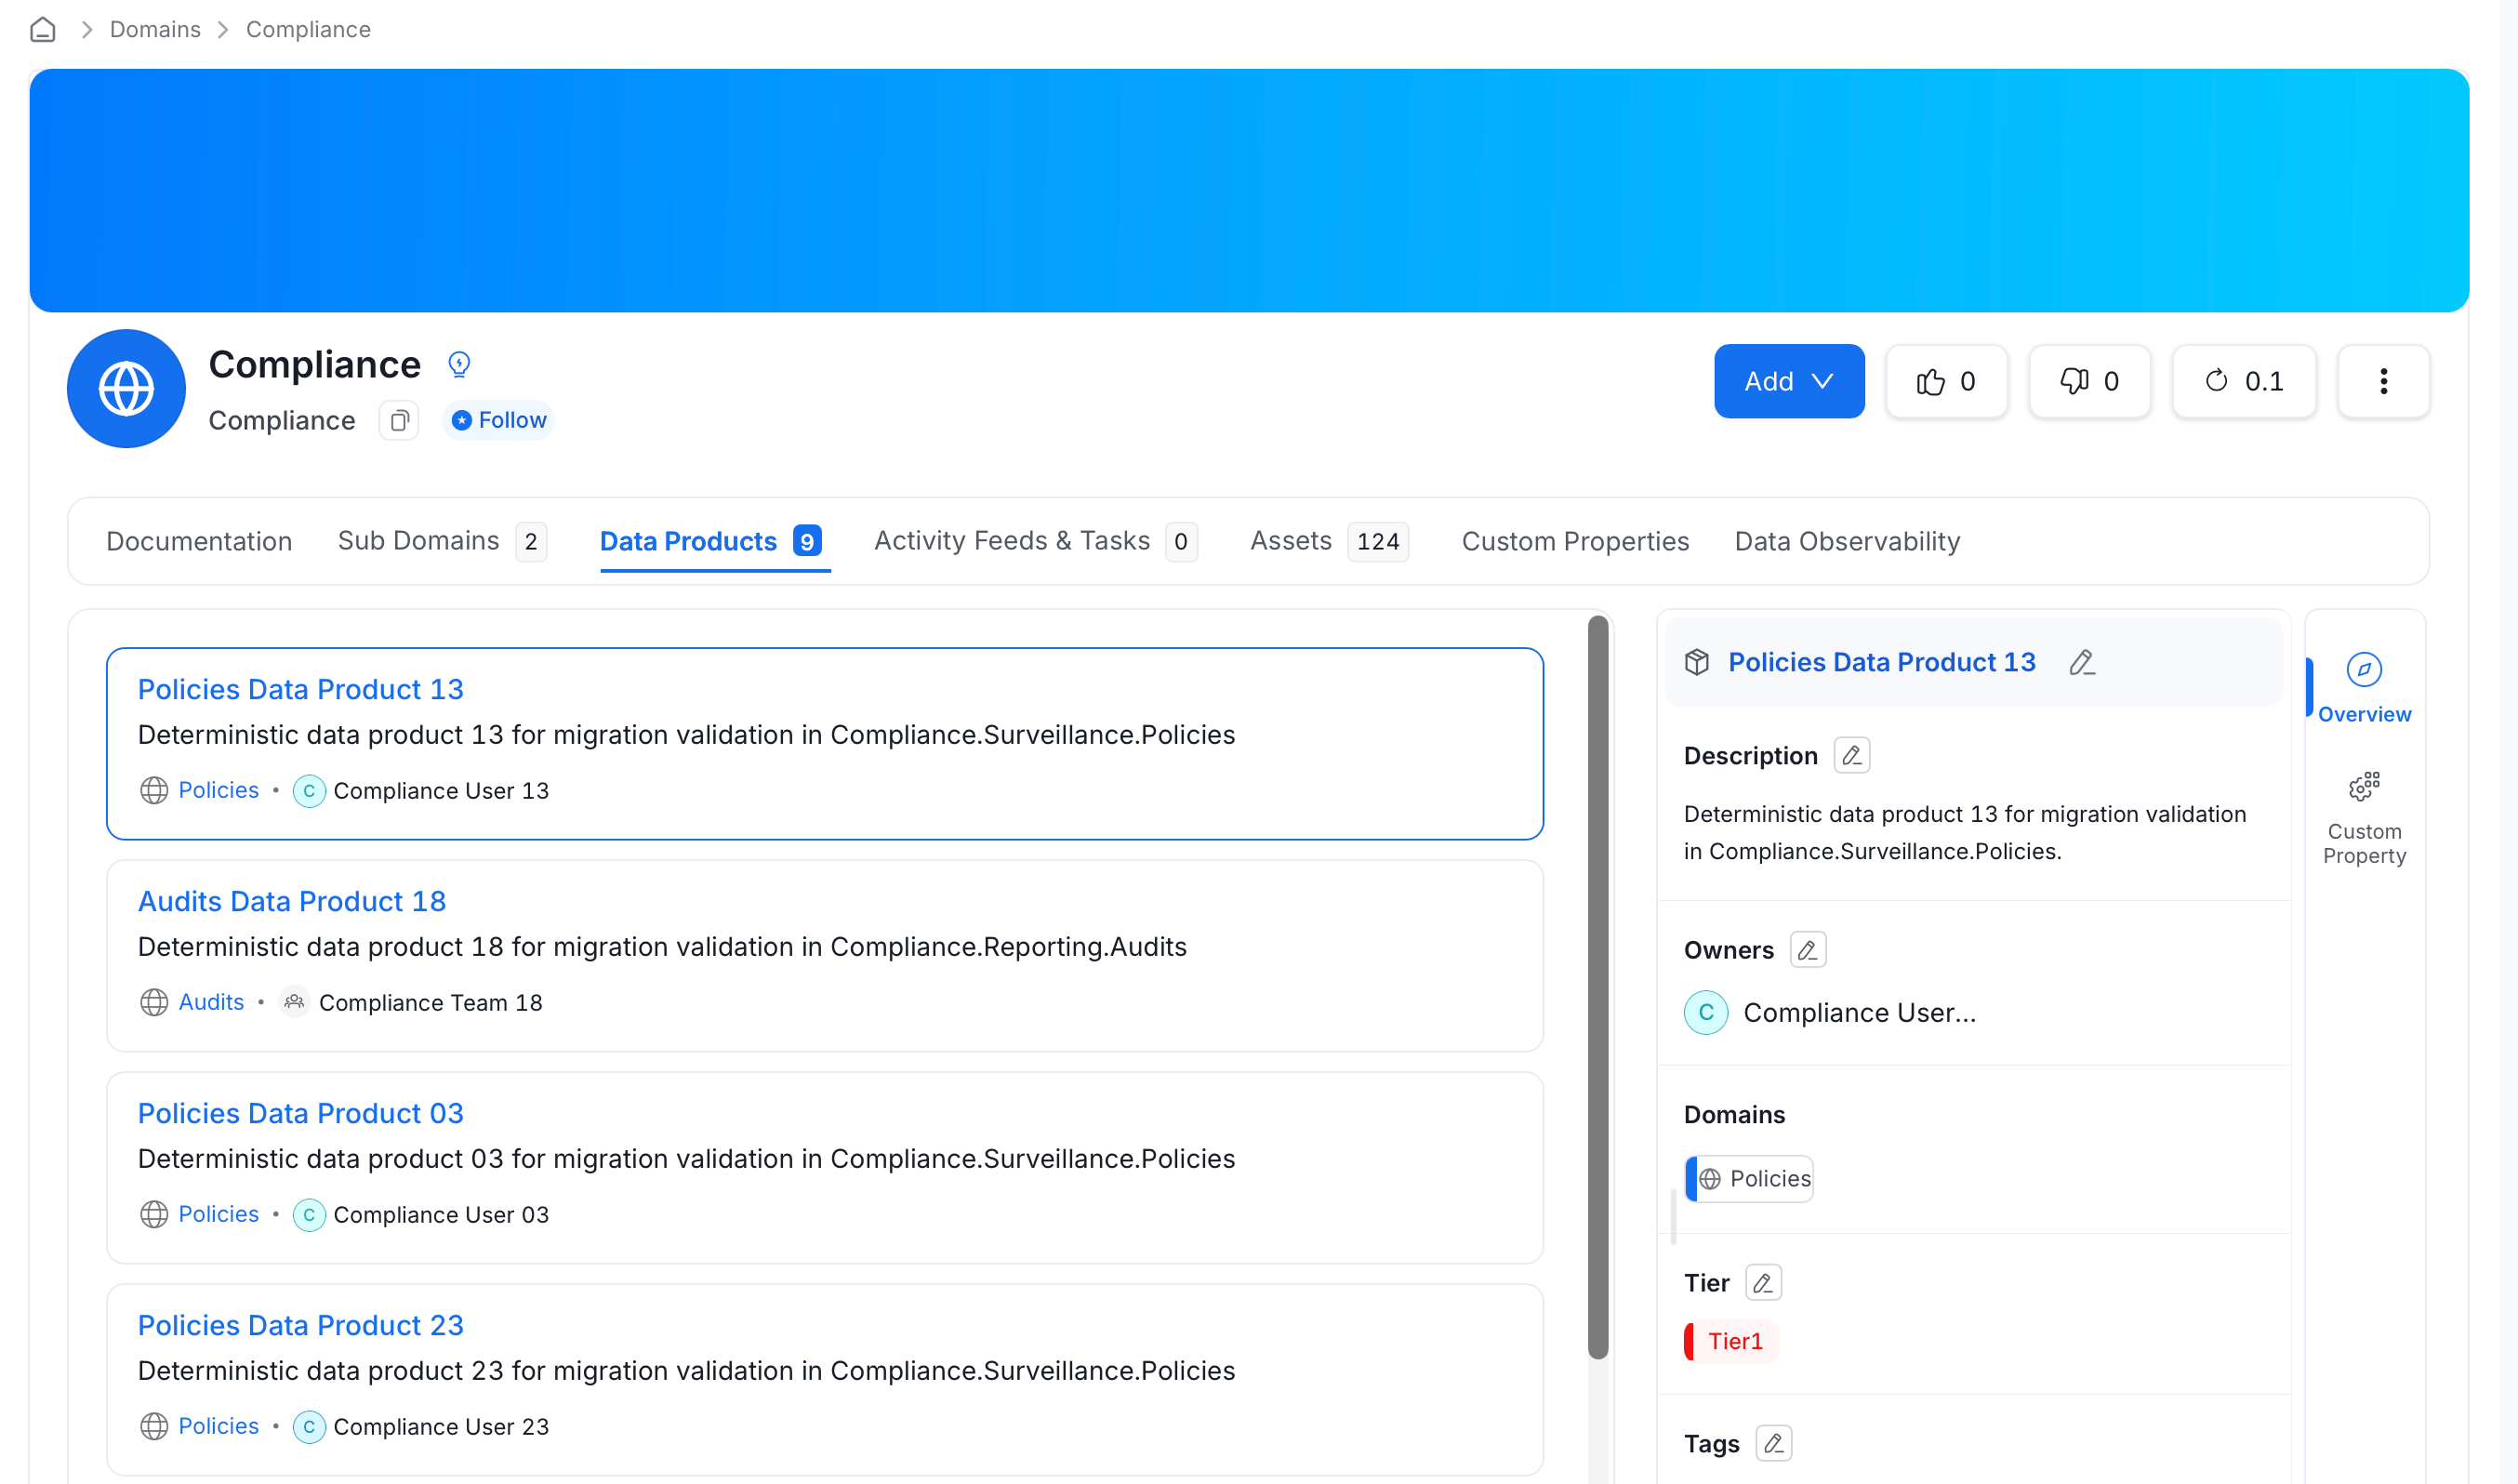
In the **Data Products** tab, you can view the list of all data products related to the selected domain.
3. Follow [Add a Data Product](#add-a-data-product) steps 2 to 7.
In the **Data Products** tab, you can view the list of all data products related to the selected domain.
 ## Add Data Assets
1. From the Data Products list, click the data product to open its detail page.
2. Click **Add Assets**.
## Add Data Assets
1. From the Data Products list, click the data product to open its detail page.
2. Click **Add Assets**.
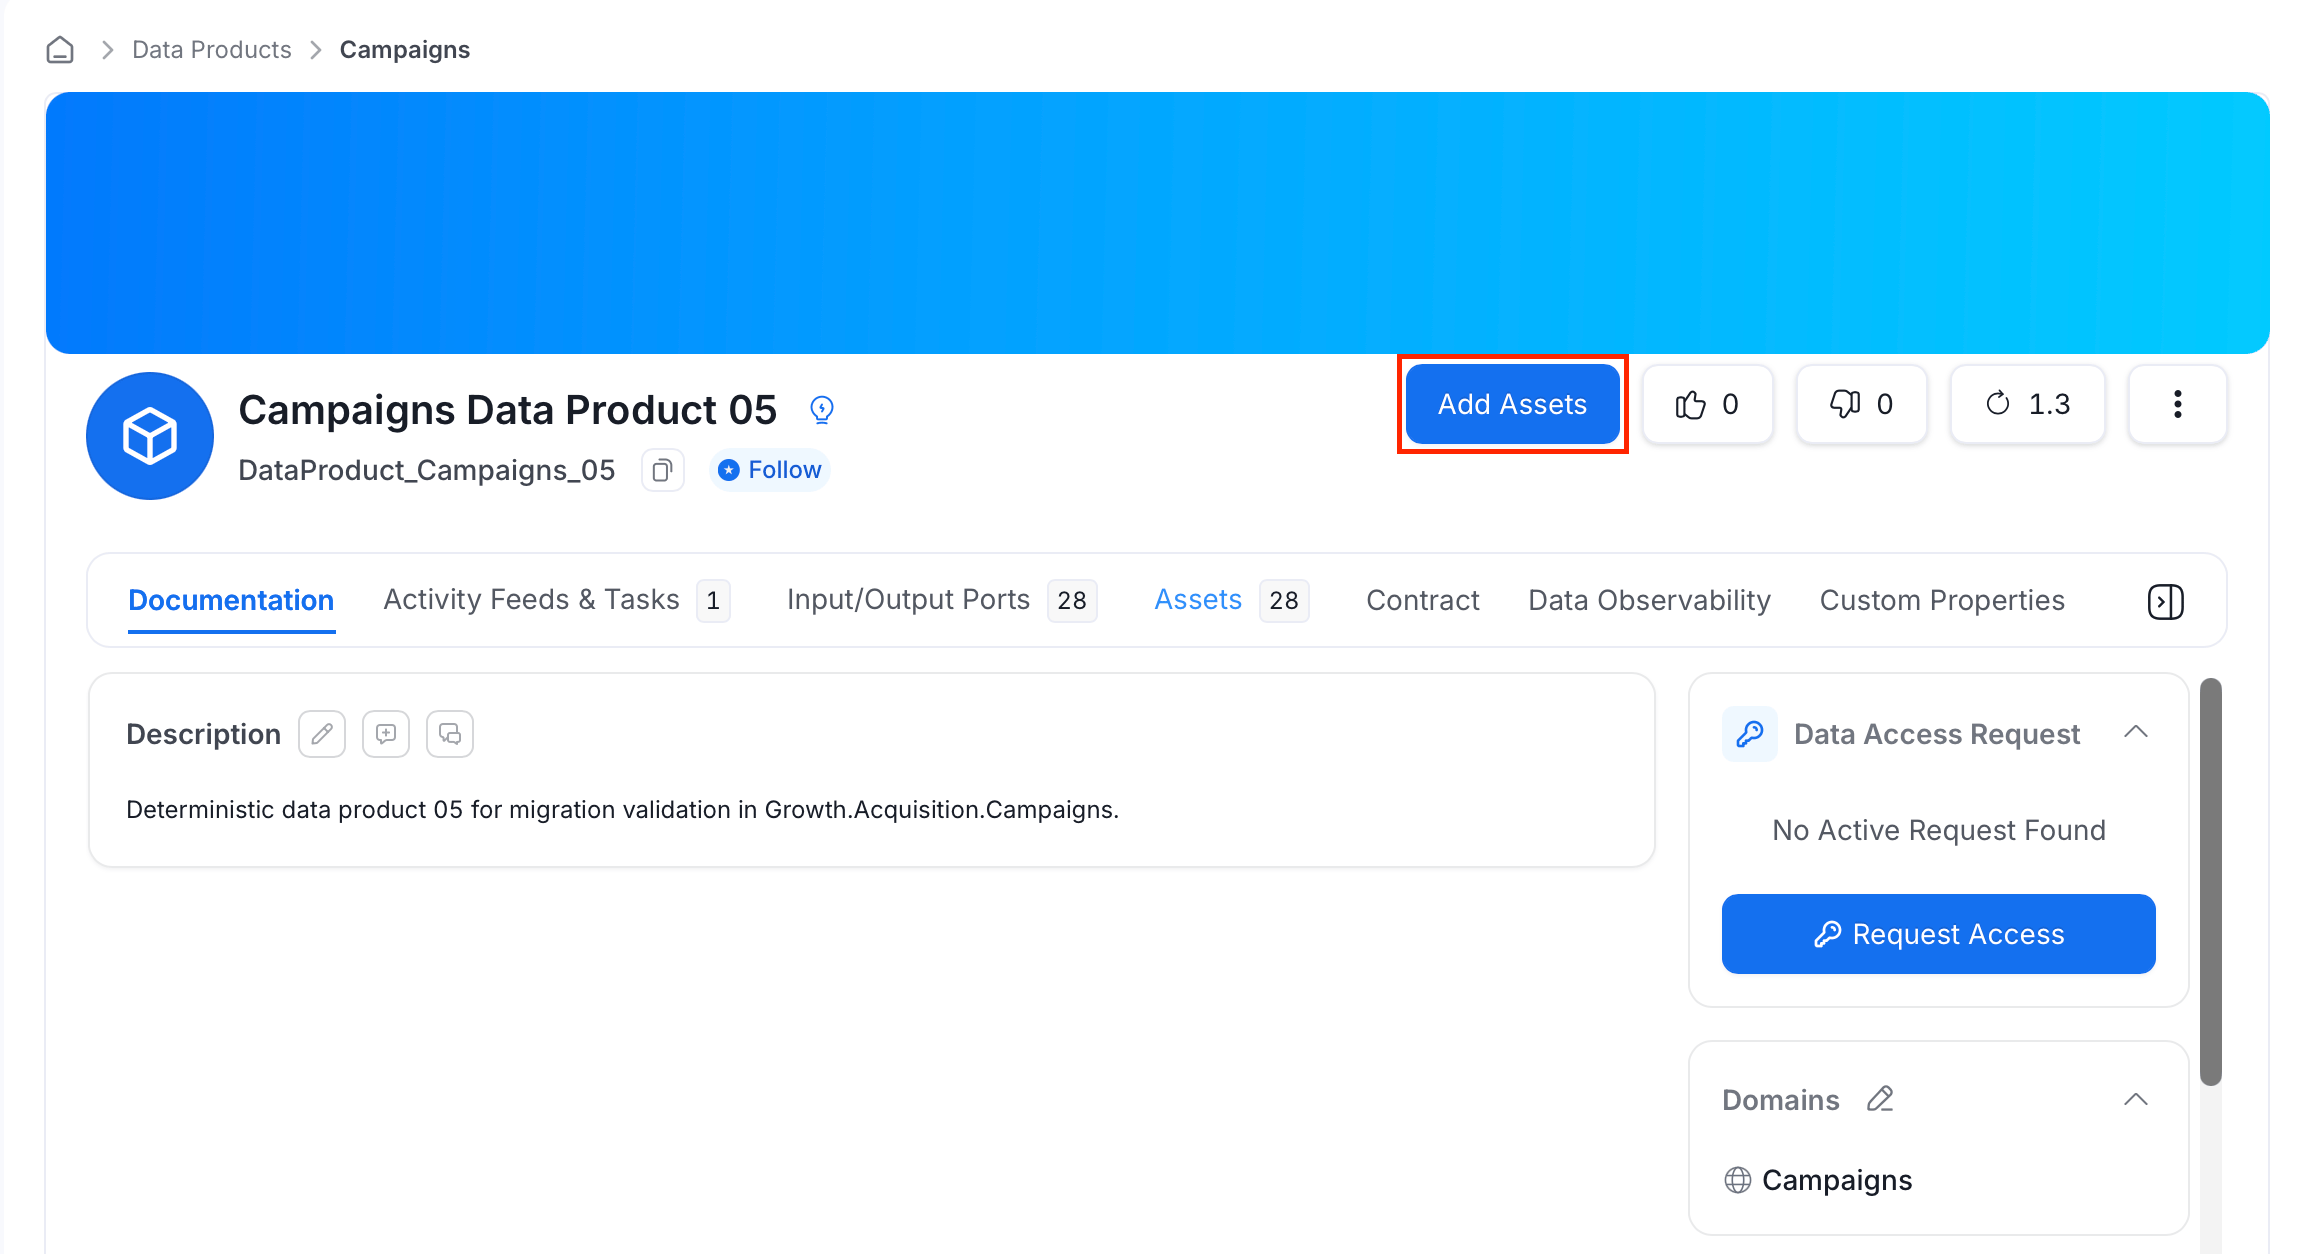 3. In the Add Assets panel, search for assets or use the filters (**Entity types**, **Owners**, **Tag**, **Tier**, **Service**, **Service Type**) to narrow results.
4. Select the assets to include in the data product.
3. In the Add Assets panel, search for assets or use the filters (**Entity types**, **Owners**, **Tag**, **Tier**, **Service**, **Service Type**) to narrow results.
4. Select the assets to include in the data product.
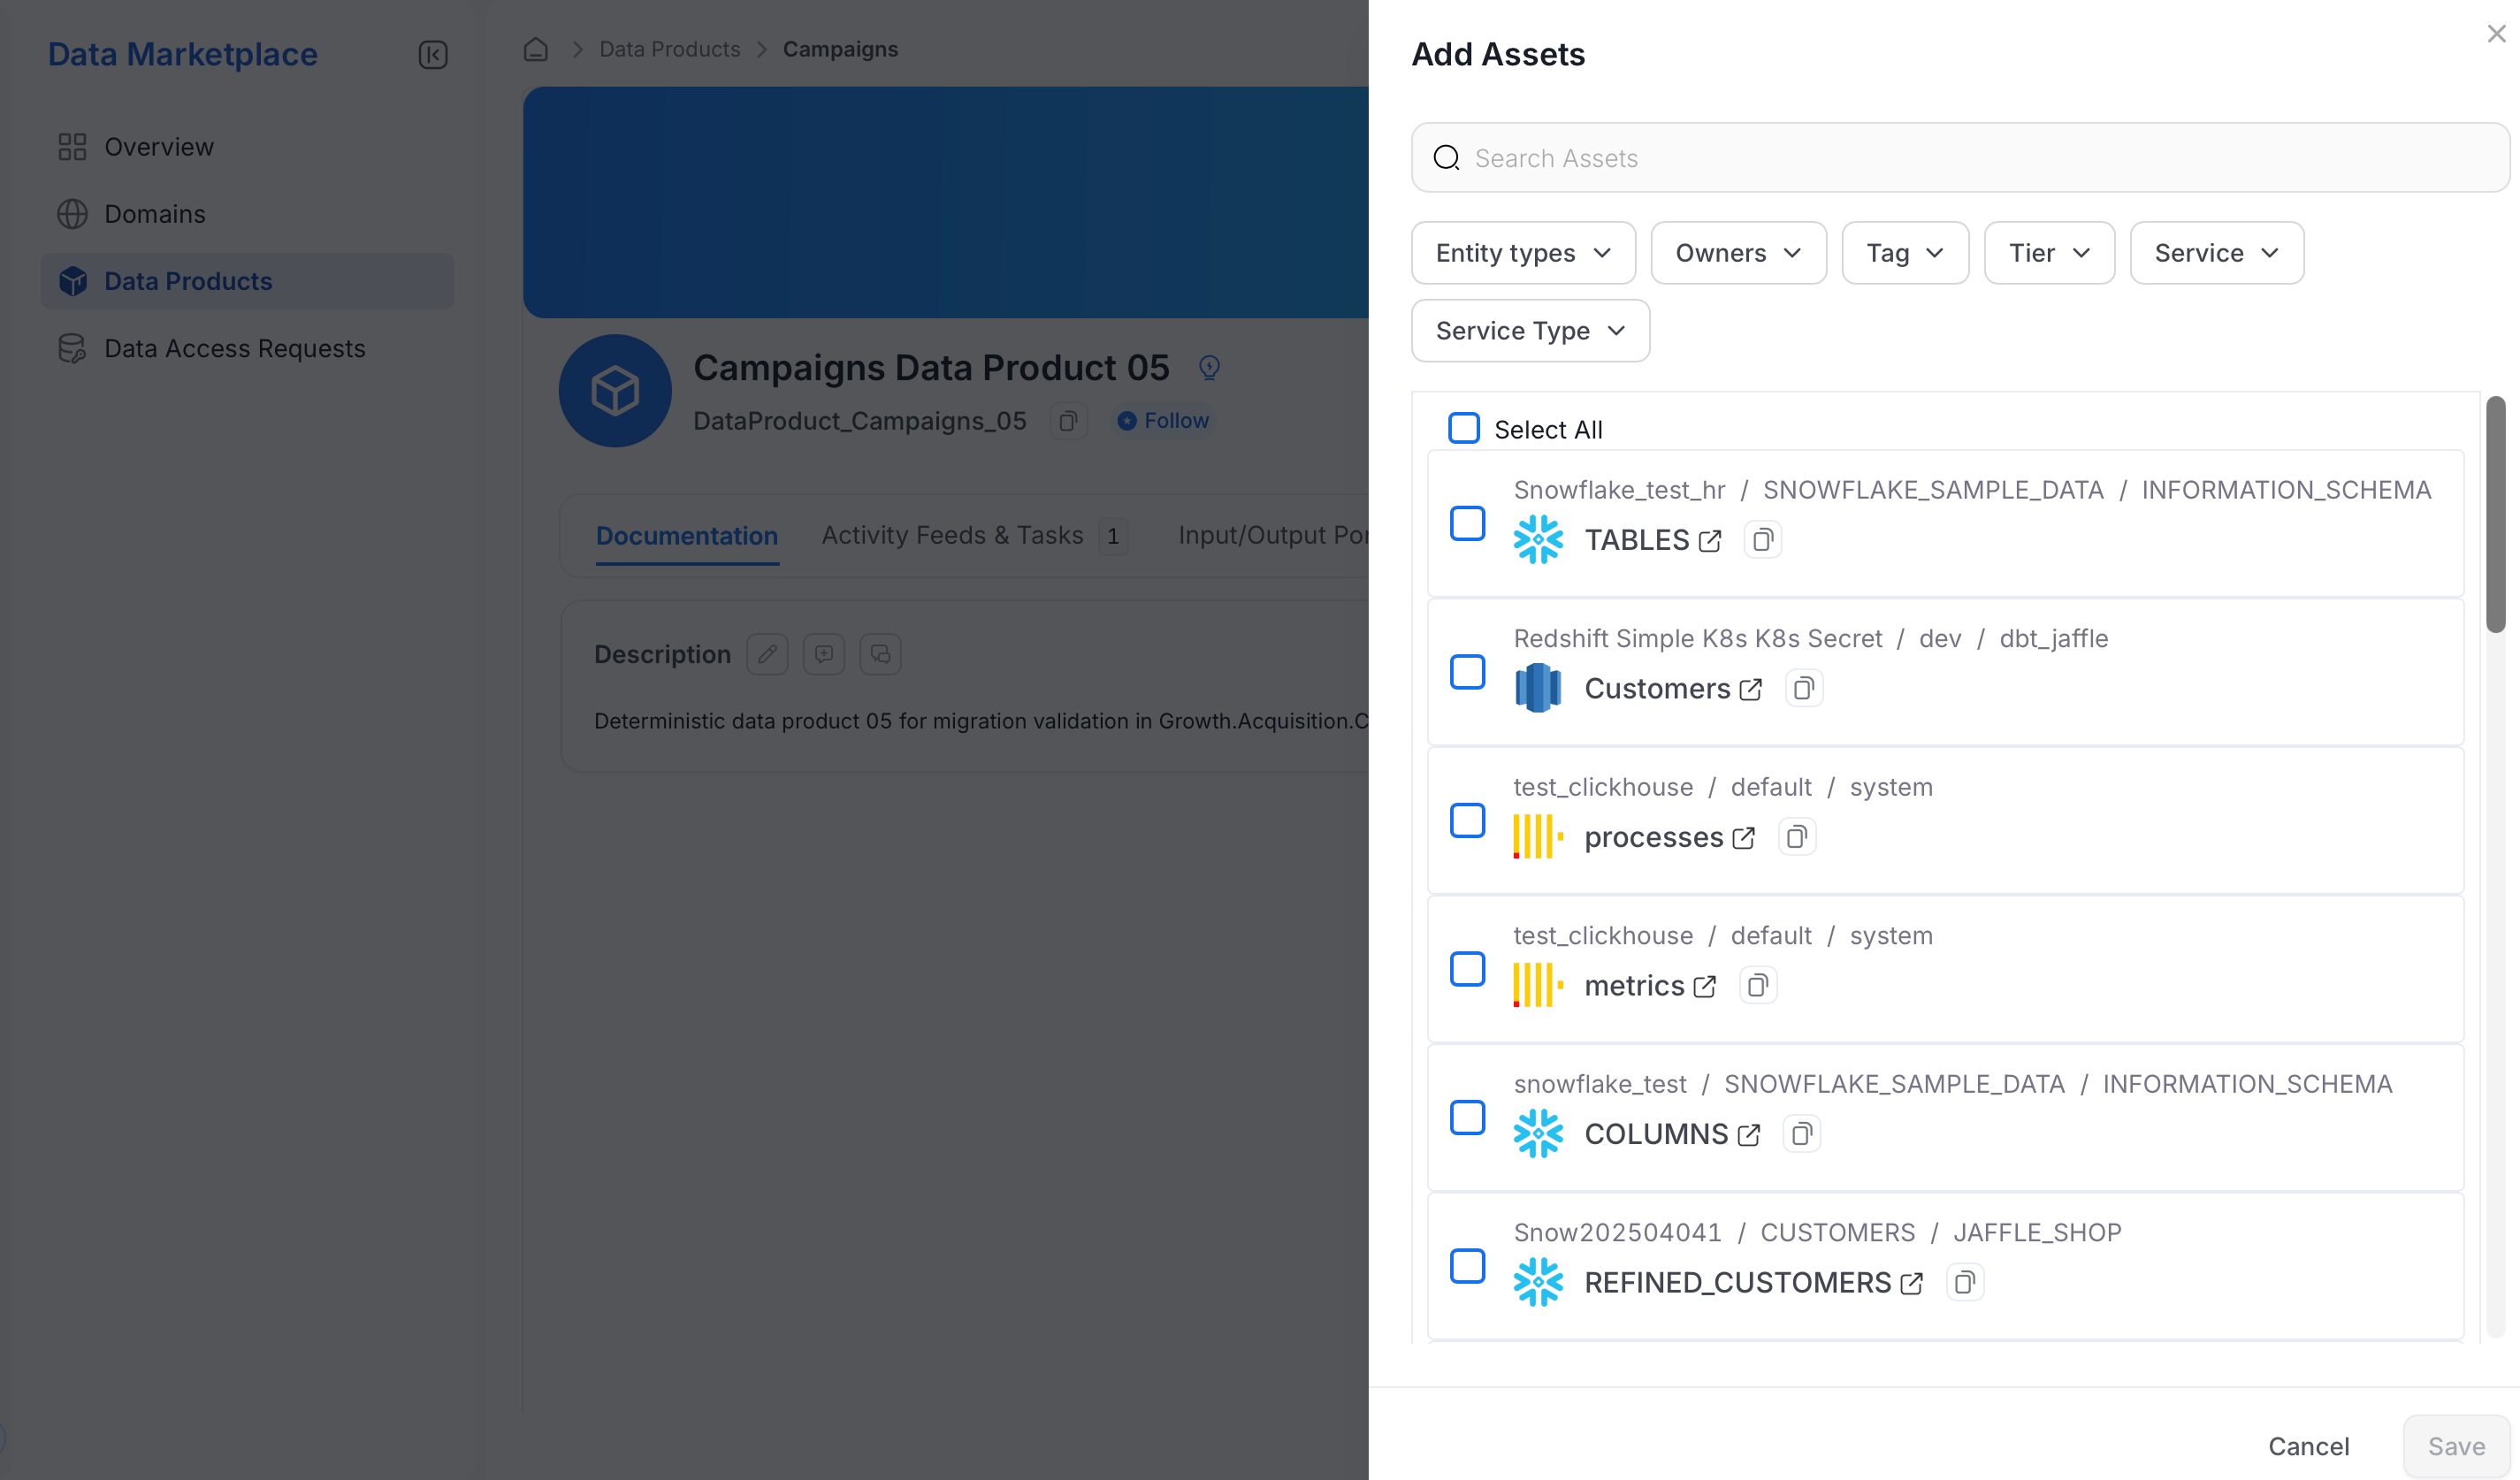 5. Click **Save**.
## Input Ports and Output Ports
Beyond general assets, a data product can declare which assets it **consumes** and which it **produces or exposes**: an ODCS/ODPS-aligned data contract concept that makes a data product's data flow explicit for lineage-style visualization.
* **Input Ports**: Data assets this data product consumes.
* **Output Ports**: Data assets this data product produces or exposes to consumers.
To add ports:
1. On the Data Products page, select a data product and go to the **Input/Output Ports** tab.
5. Click **Save**.
## Input Ports and Output Ports
Beyond general assets, a data product can declare which assets it **consumes** and which it **produces or exposes**: an ODCS/ODPS-aligned data contract concept that makes a data product's data flow explicit for lineage-style visualization.
* **Input Ports**: Data assets this data product consumes.
* **Output Ports**: Data assets this data product produces or exposes to consumers.
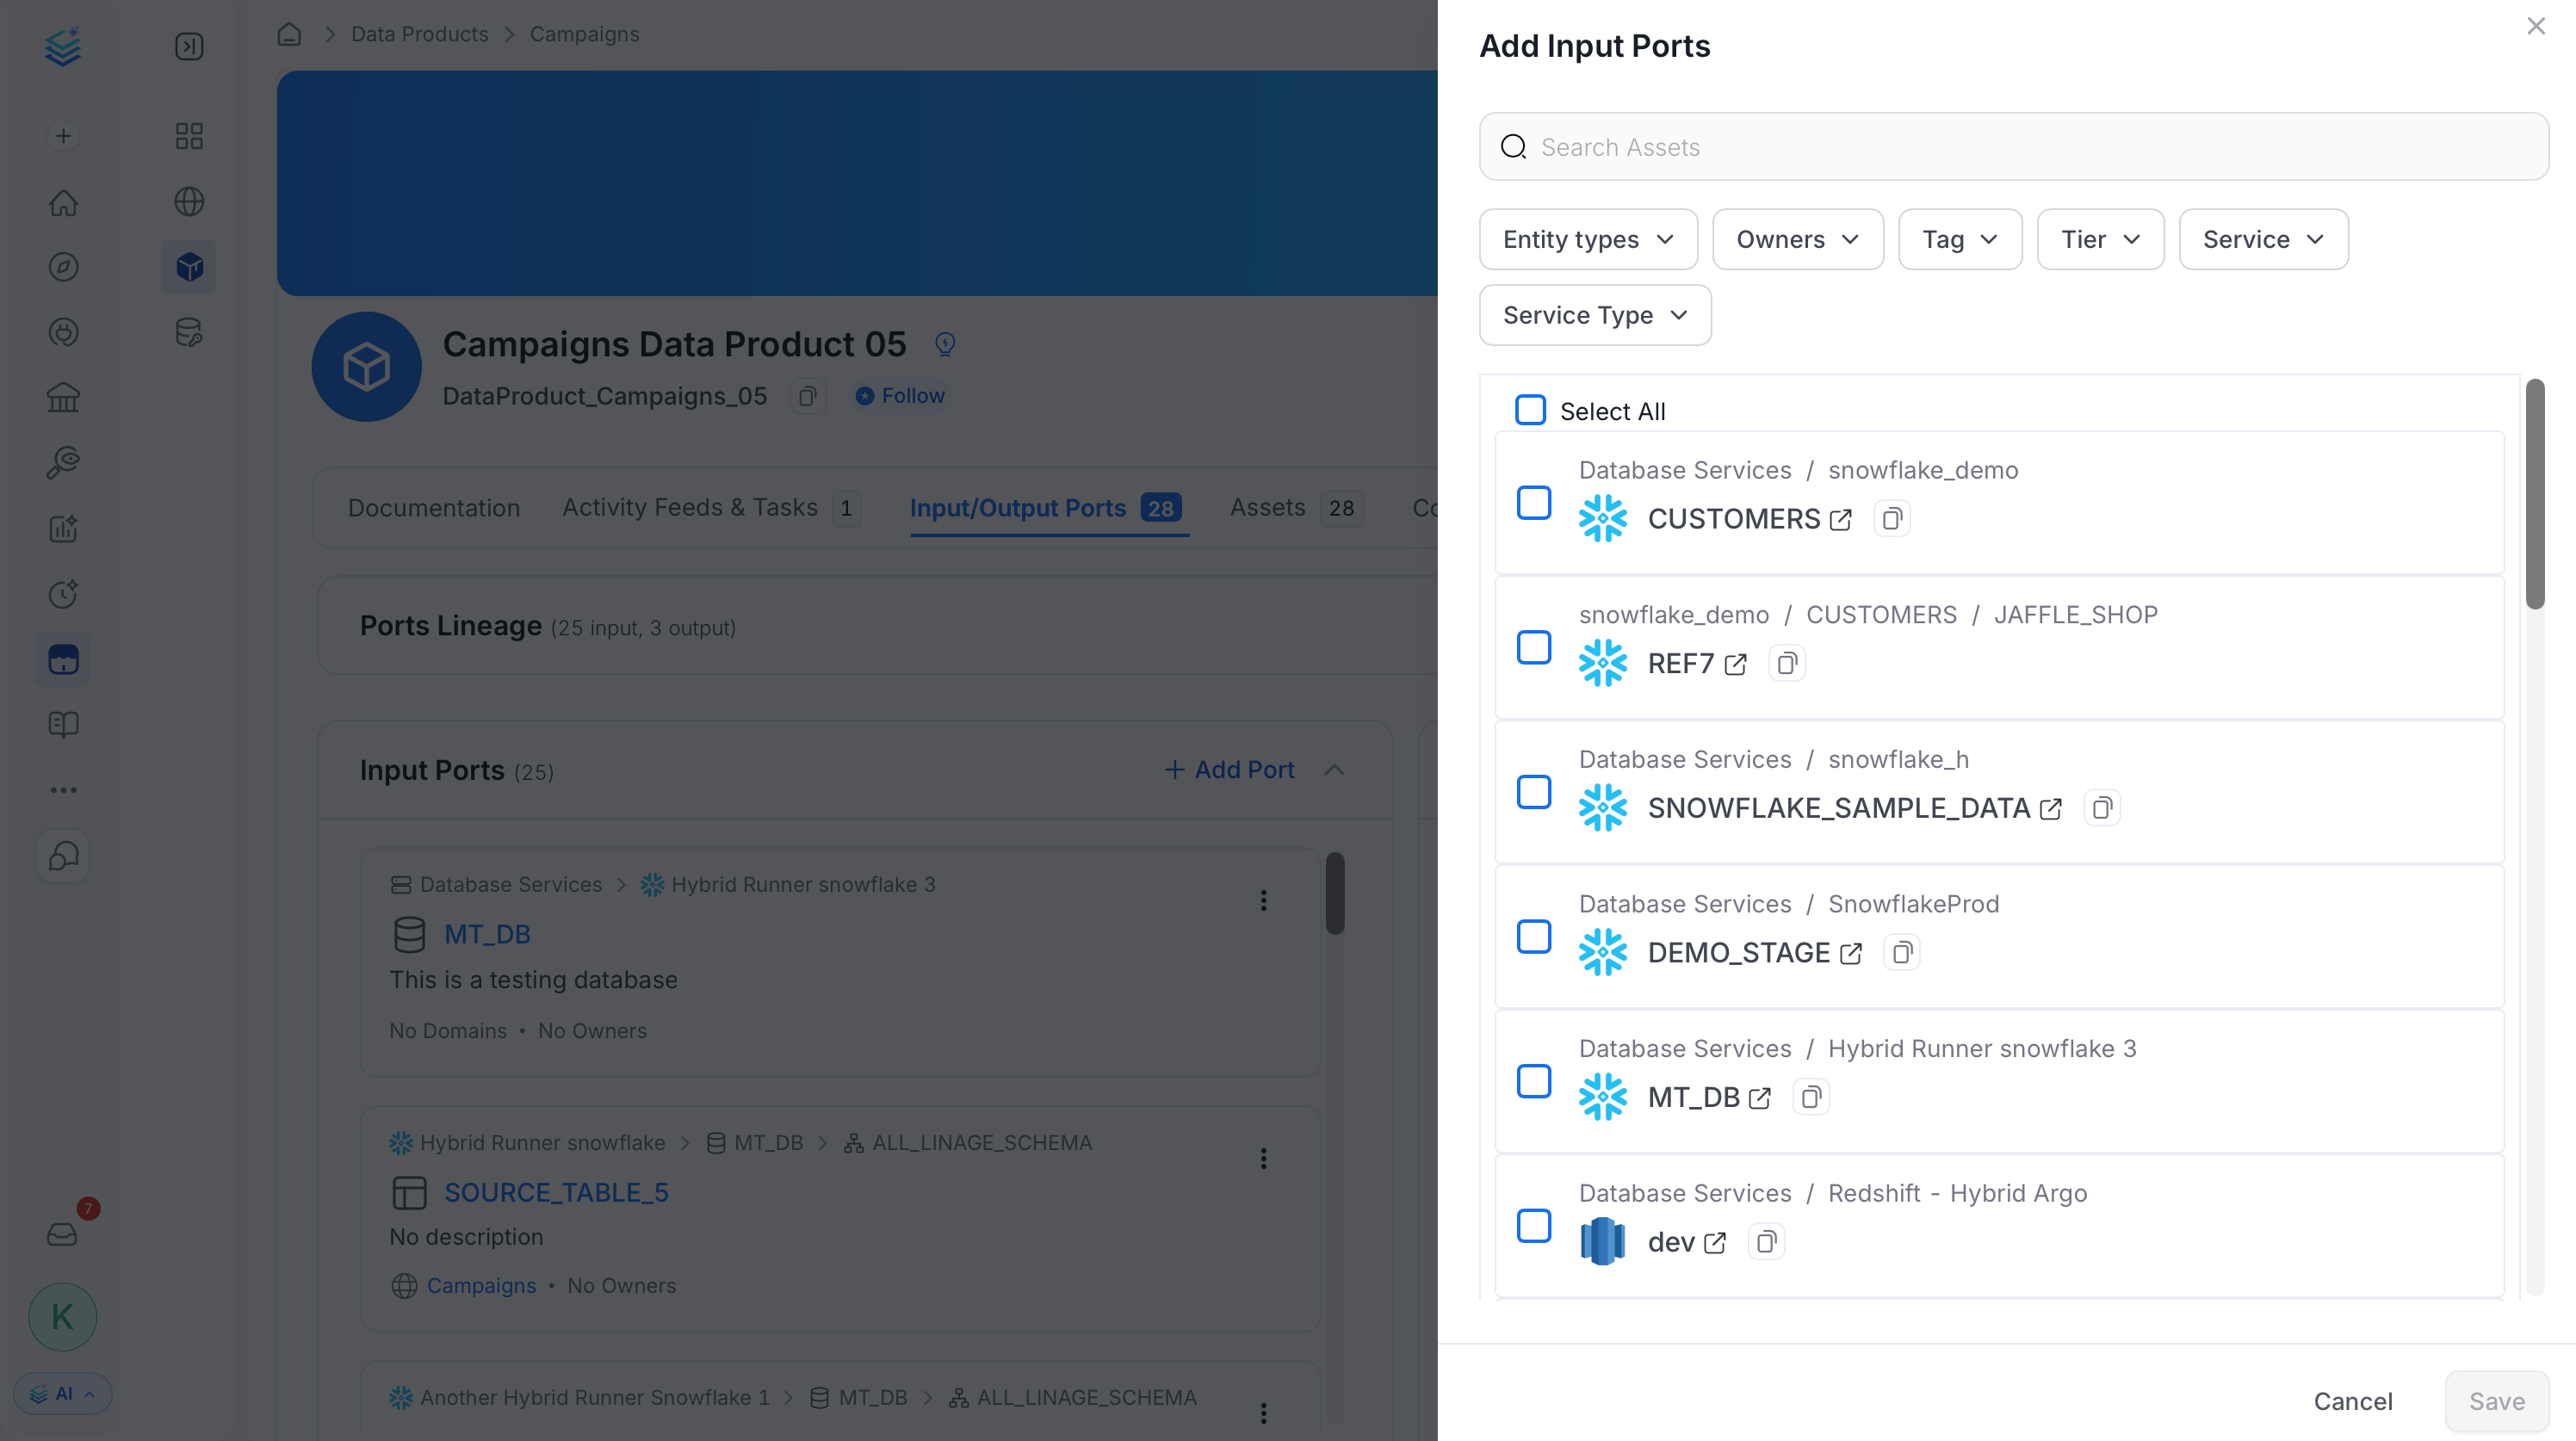
To add ports:
1. On the Data Products page, select a data product and go to the **Input/Output Ports** tab.
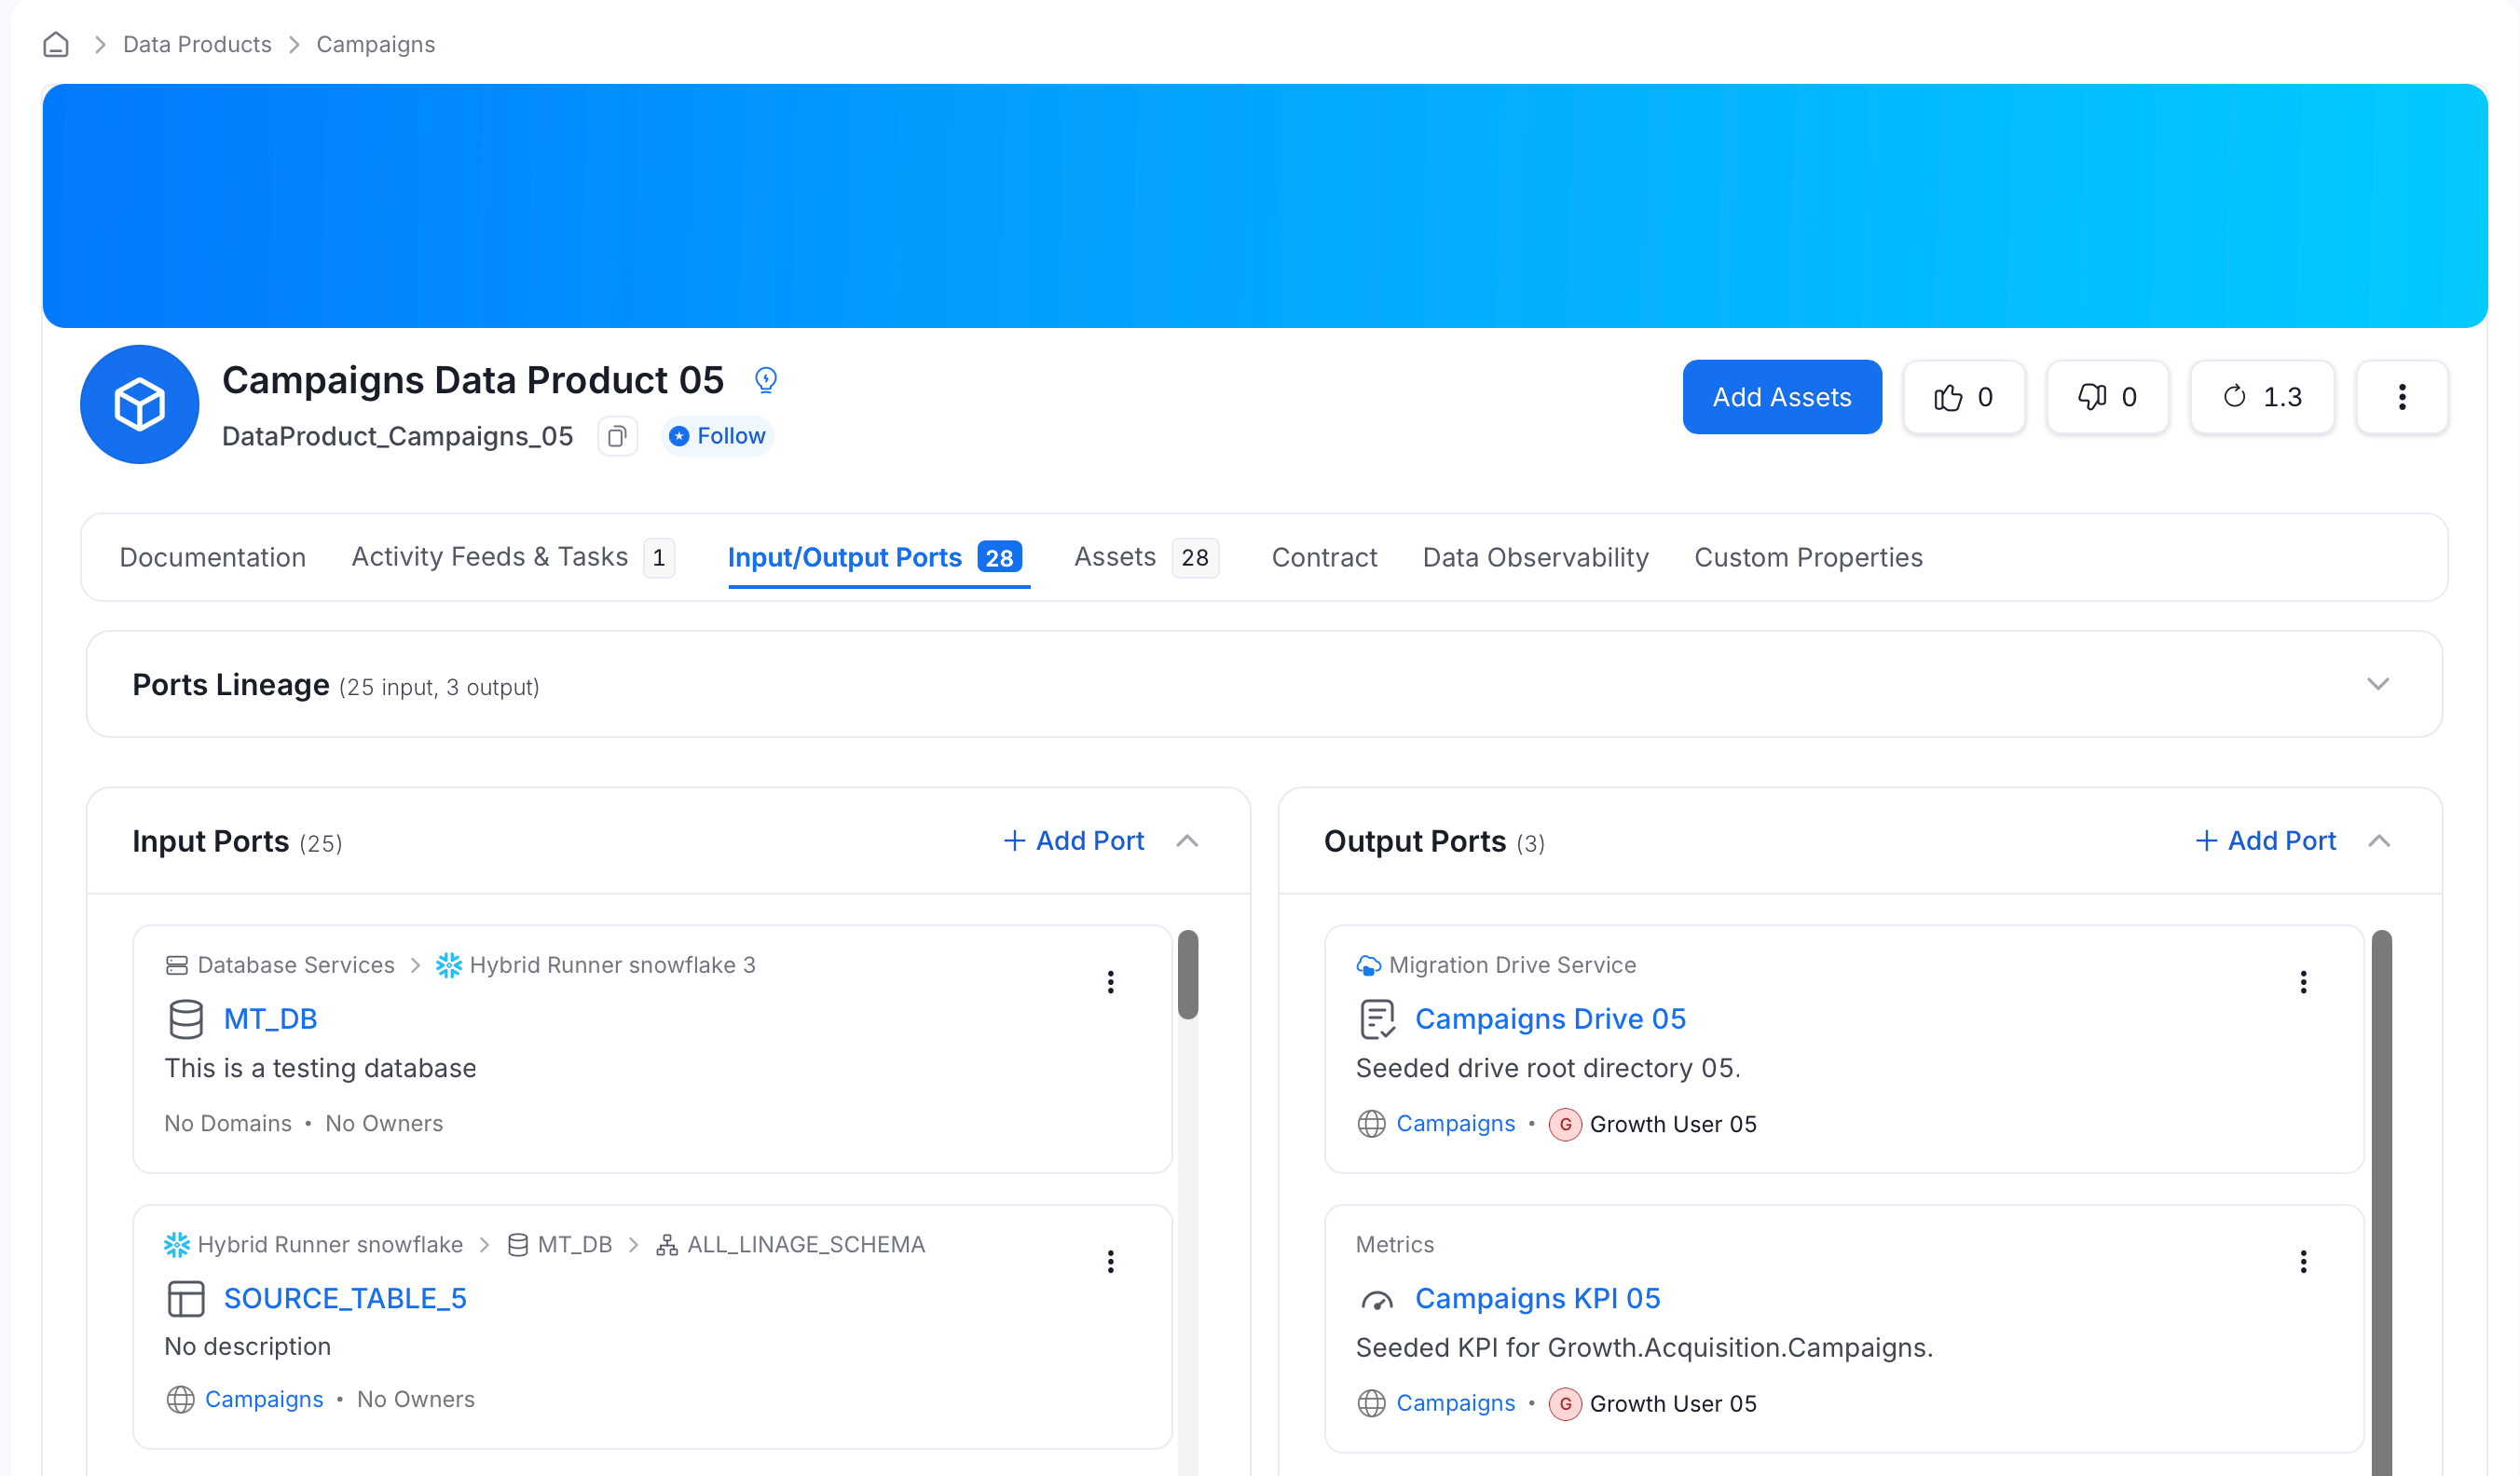 2. In the **Input Ports** or **Output Ports** section, click **Add Port**.
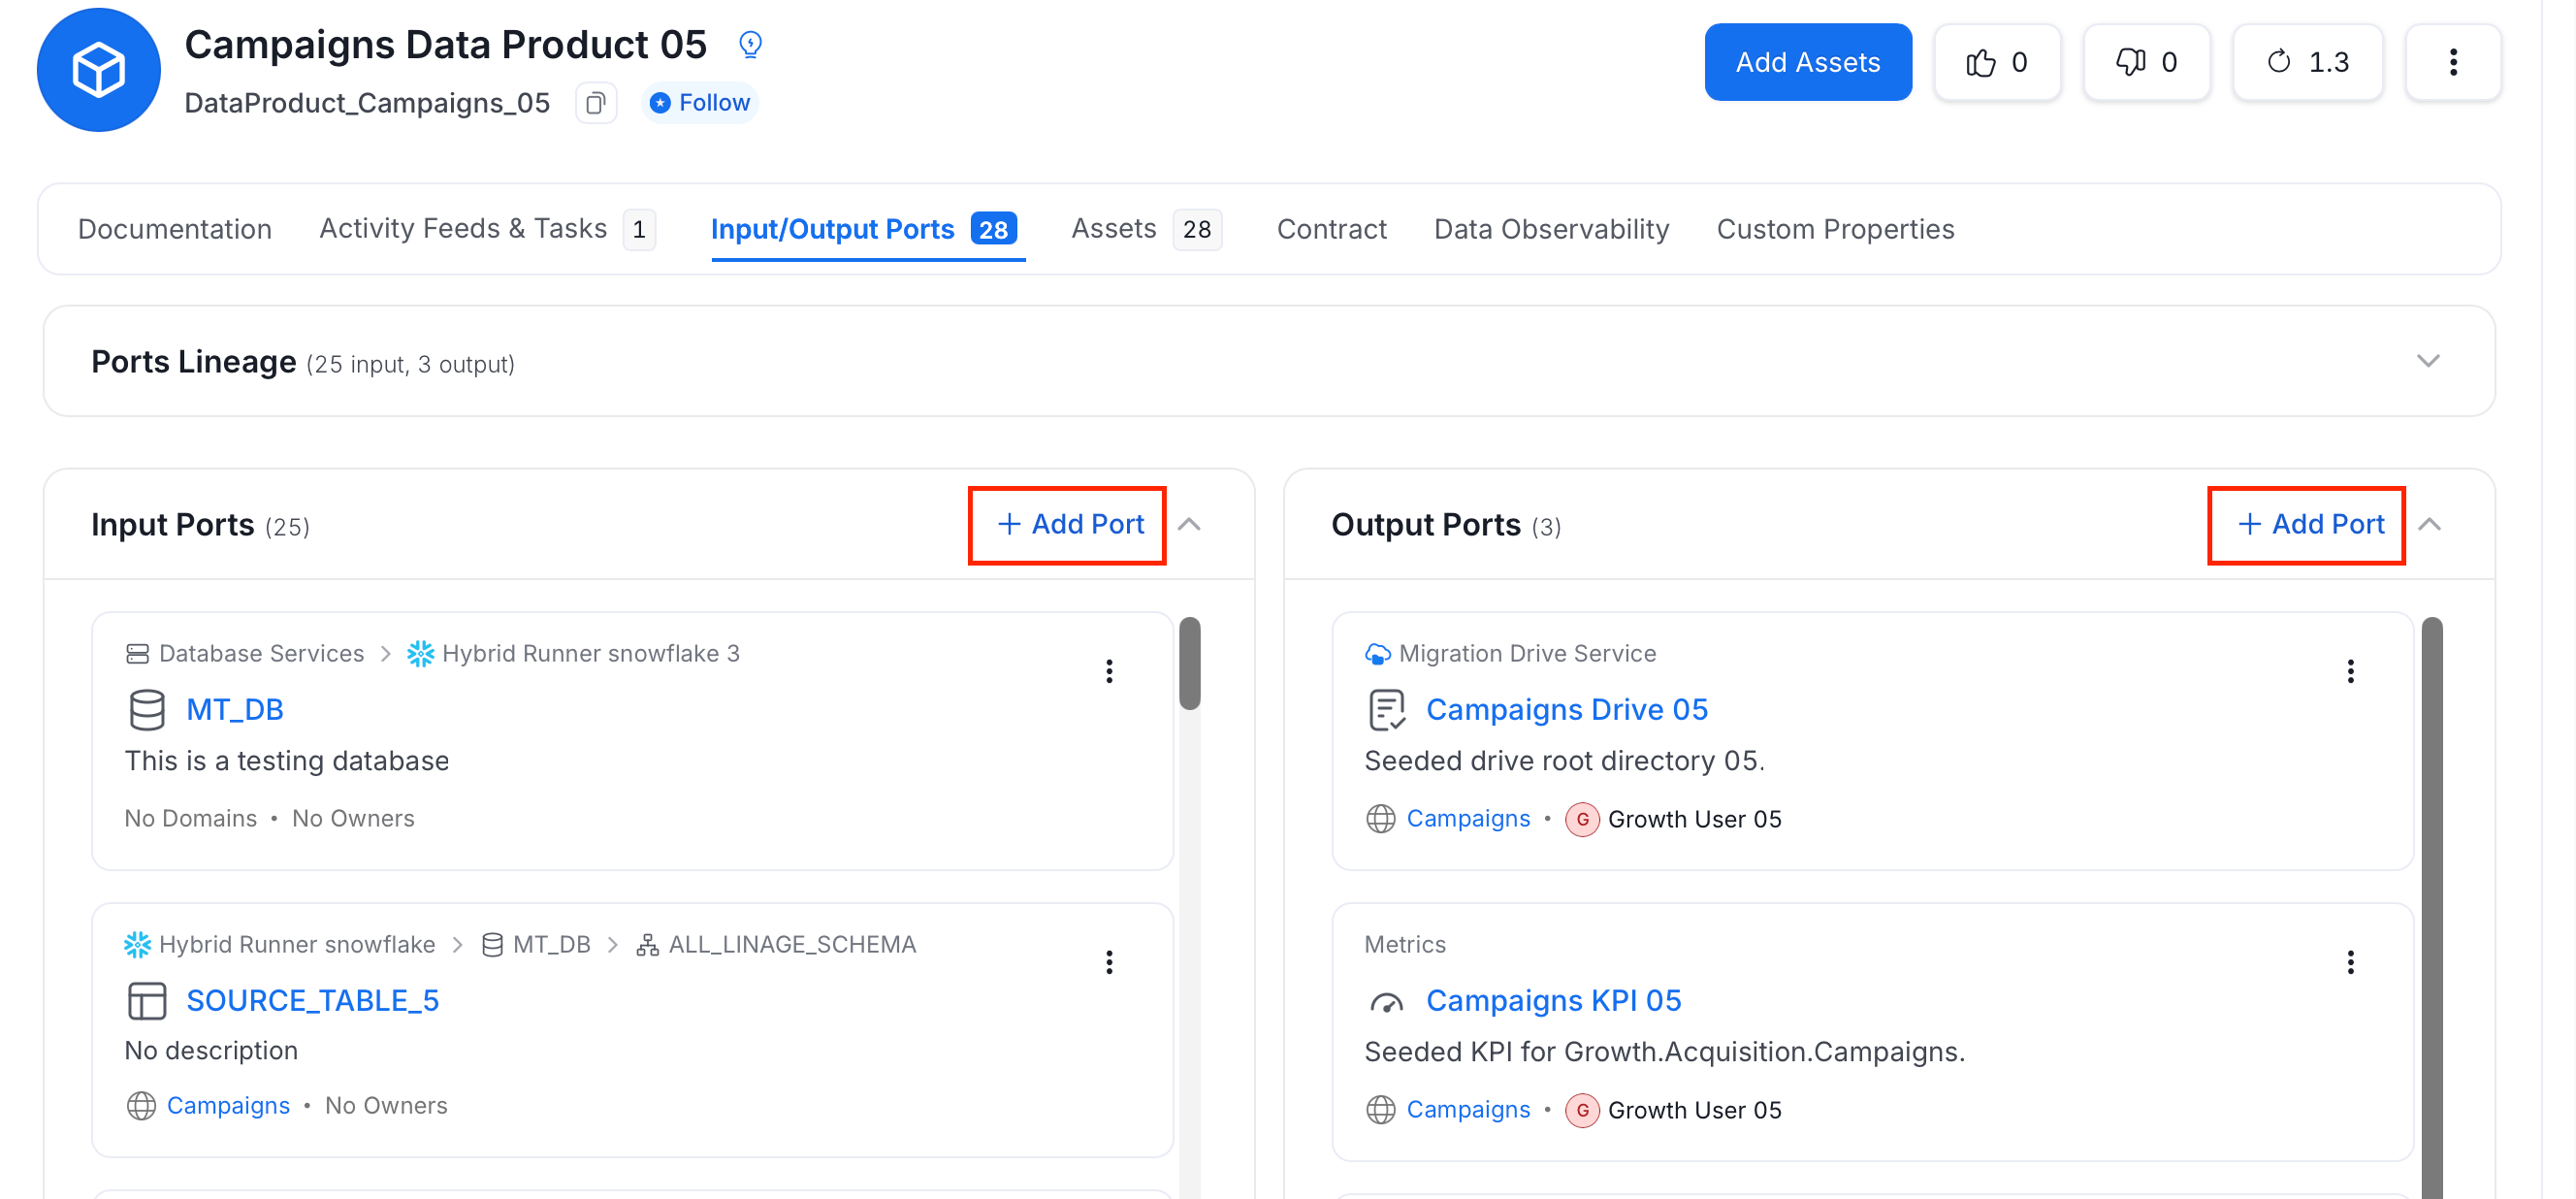 3. Search for and select the assets to add, then click **Save**.
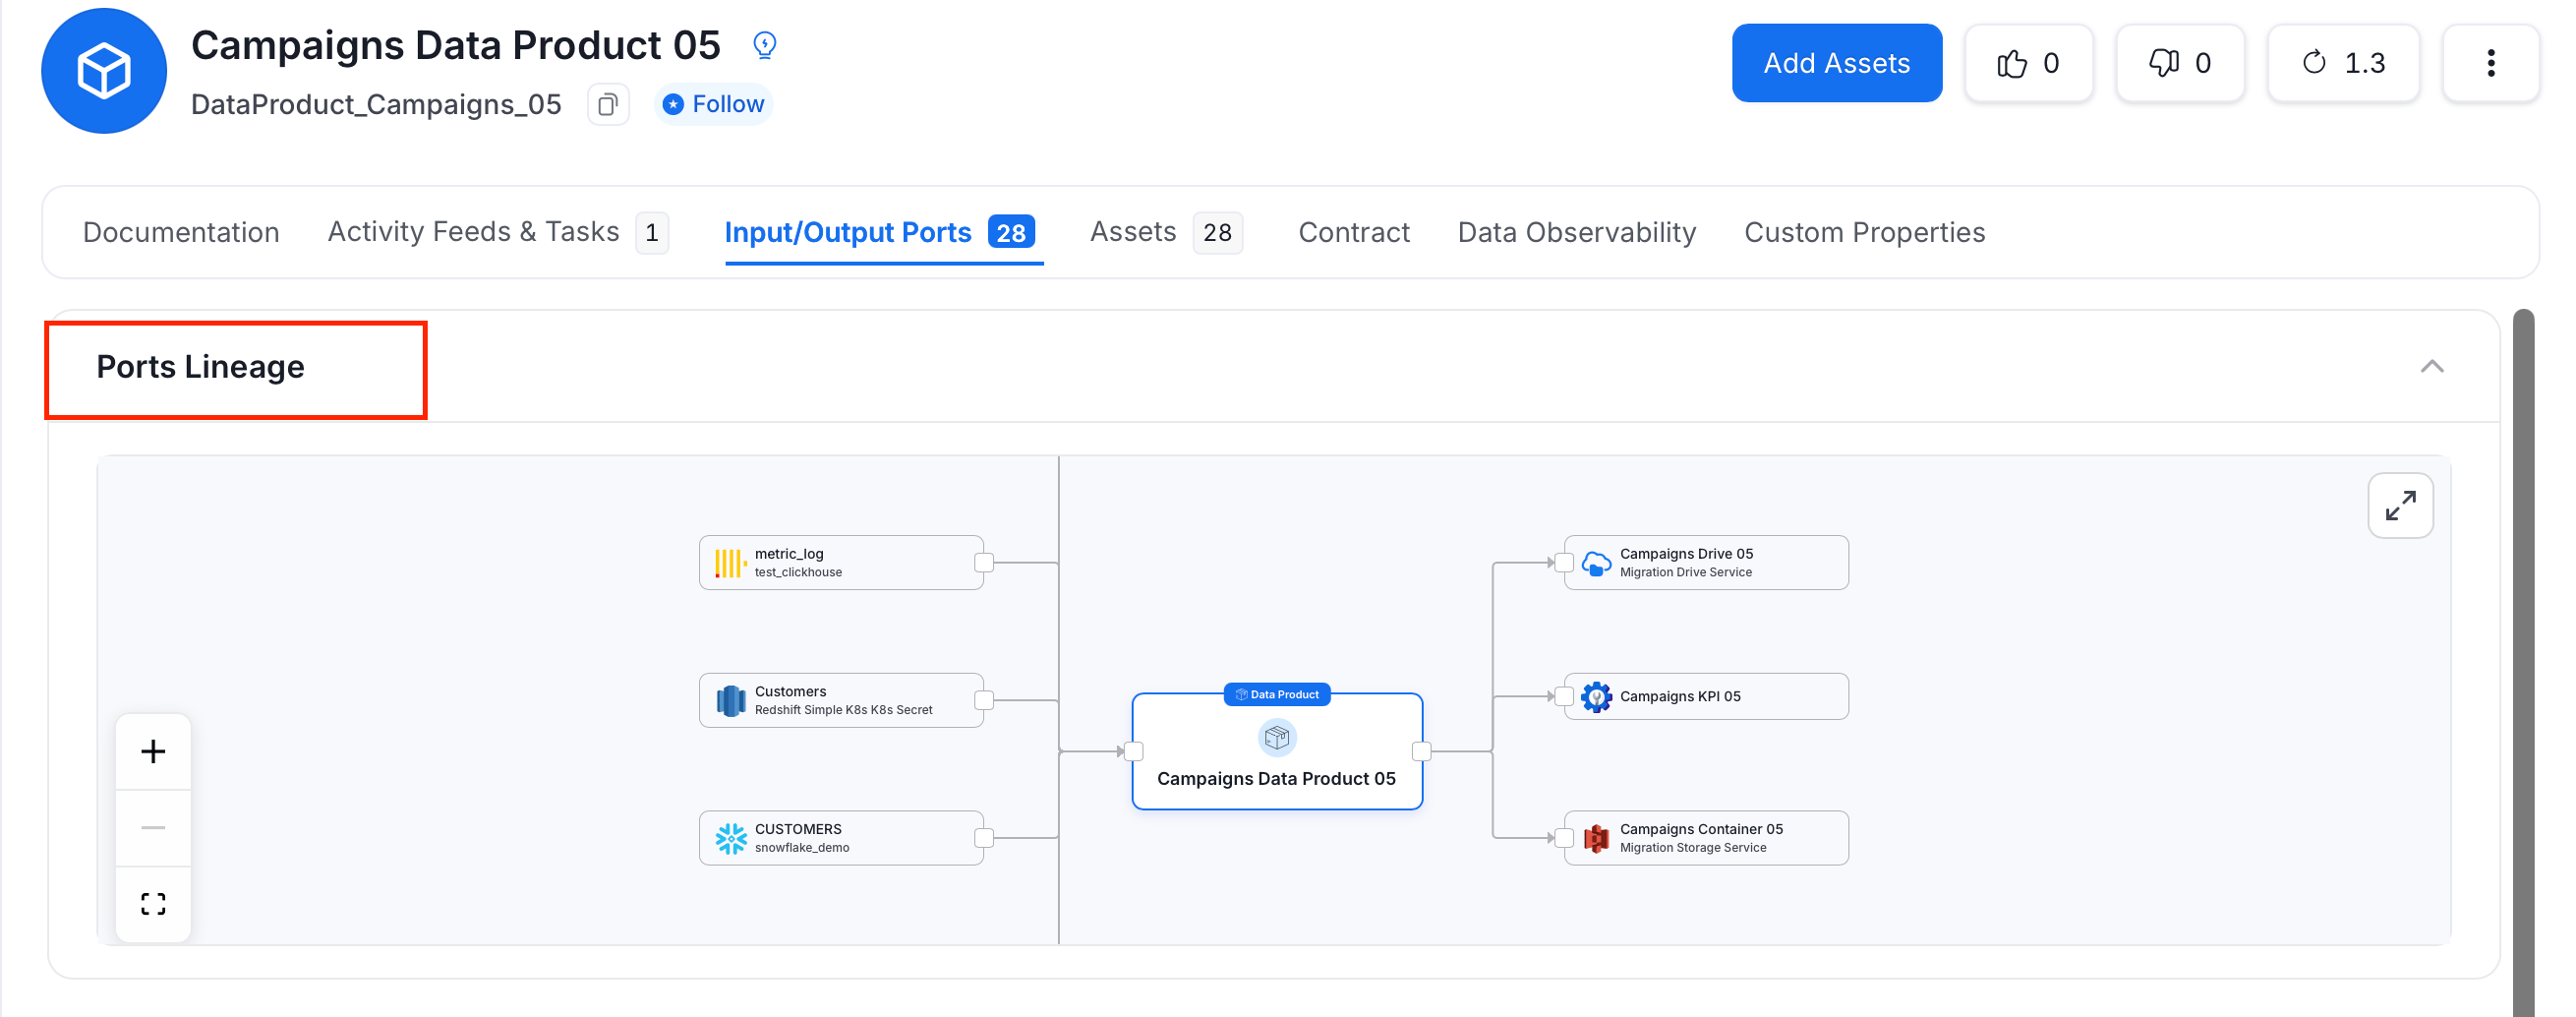
 The tab also offers a **Ports Lineage** view, which visualizes input and output ports as a lineage-style graph alongside the data product.
 **Tip**:
**Governance Workflow Triggers for Data Products**
Changes to the following Data Product fields trigger configured governance approval workflows:
* **Input Ports**: Adding or removing assets as input ports.
* **Output Ports**: Adding or removing assets as output ports.
* **Glossary Terms**: Assigning or removing glossary terms.
If you have governance workflows configured to watch Data Product changes, they trigger on port and glossary term updates.
## Data Product Details Page
Open a data product from the **Data Products** page to view its details, manage its assets, and track changes.
**Tip**:
**Governance Workflow Triggers for Data Products**
Changes to the following Data Product fields trigger configured governance approval workflows:
* **Input Ports**: Adding or removing assets as input ports.
* **Output Ports**: Adding or removing assets as output ports.
* **Glossary Terms**: Assigning or removing glossary terms.
If you have governance workflows configured to watch Data Product changes, they trigger on port and glossary term updates.
## Data Product Details Page
Open a data product from the **Data Products** page to view its details, manage its assets, and track changes.
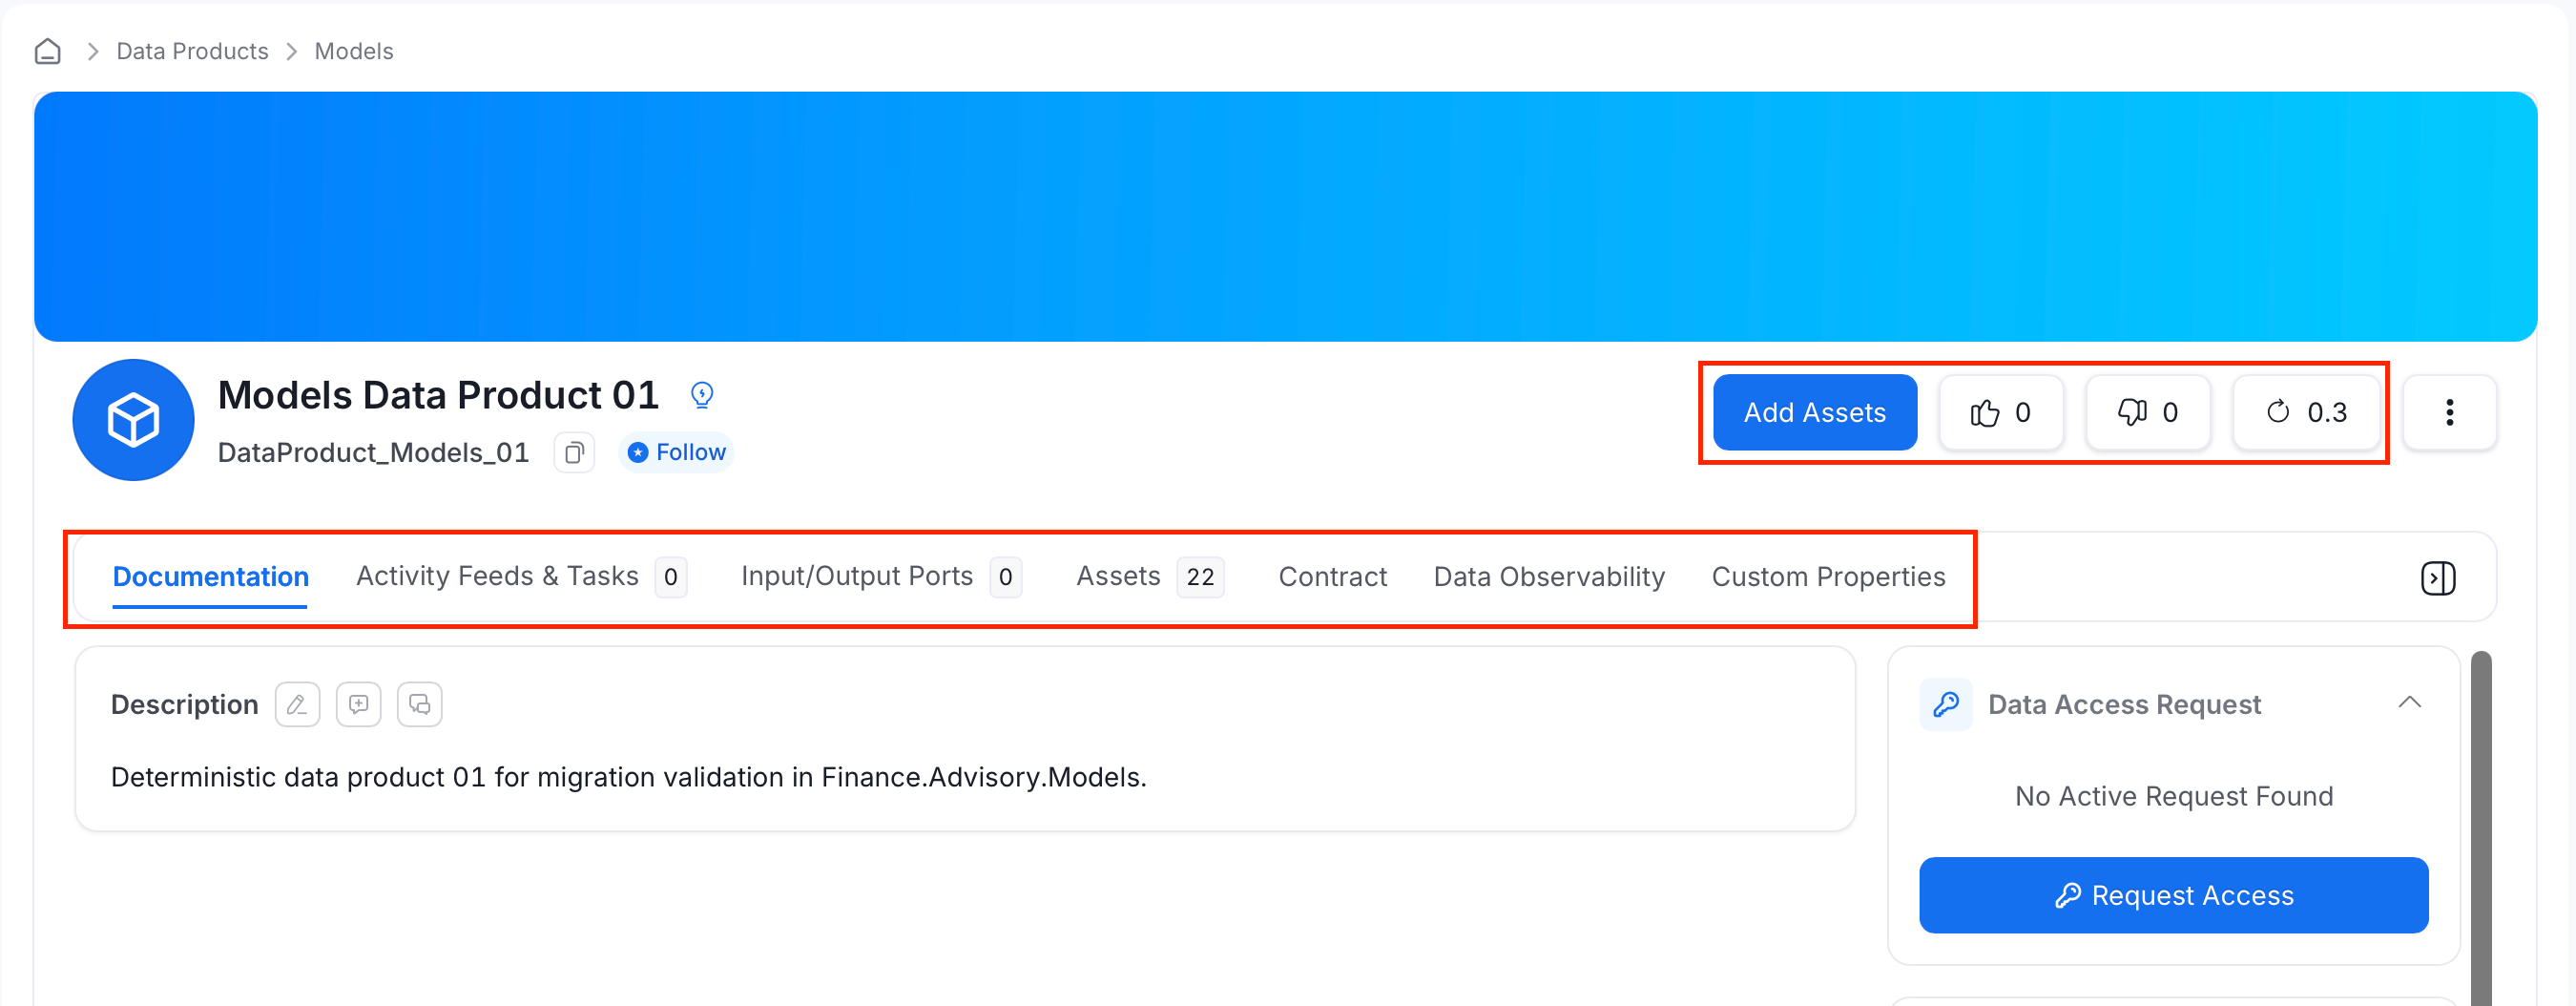 ### Data Product Tabs
| Tab | What it shows |
| -------------------------- | ---------------------------------------------------------------------------------------------------------------------------------------------------------------------------------------------------- |
| **Documentation** | The data product's description, owners, tags, glossary terms, and domain, plus a Data Access Request panel. See [Data Access Requests](/ai-2-0/how-to-guides/data-marketplace/data-access-requests). |
| **Activity Feeds & Tasks** | Conversations, task requests, and activity related to the data product. |
| **Input/Output Ports** | The data assets this data product consumes and produces. See [Input Ports and Output Ports](#input-ports-and-output-ports). |
| **Assets** | The data assets included in this data product. |
| **Contract** | The data contract associated with this data product, if one is configured. |
| **Data Observability** | Data quality and incident information for the data product's assets. |
| **Custom Properties** | Any custom property fields your administrator has configured for data products. |
### Data Product Actions
* **Add Assets**: Opens the Add Assets panel to add more data assets to this data product. See [Add Data Assets](#add-data-assets).
* **Votes**: The thumbs-up and thumbs-down icons let users upvote or downvote the data product, helping the team signal its quality and trustworthiness at a glance.
* **Version**: Shows the data product's current version number. Click it to open the Version History panel. See [Data Asset Versioning](/ai-2-0/how-to-guides/guide-for-data-users/versions) for details.
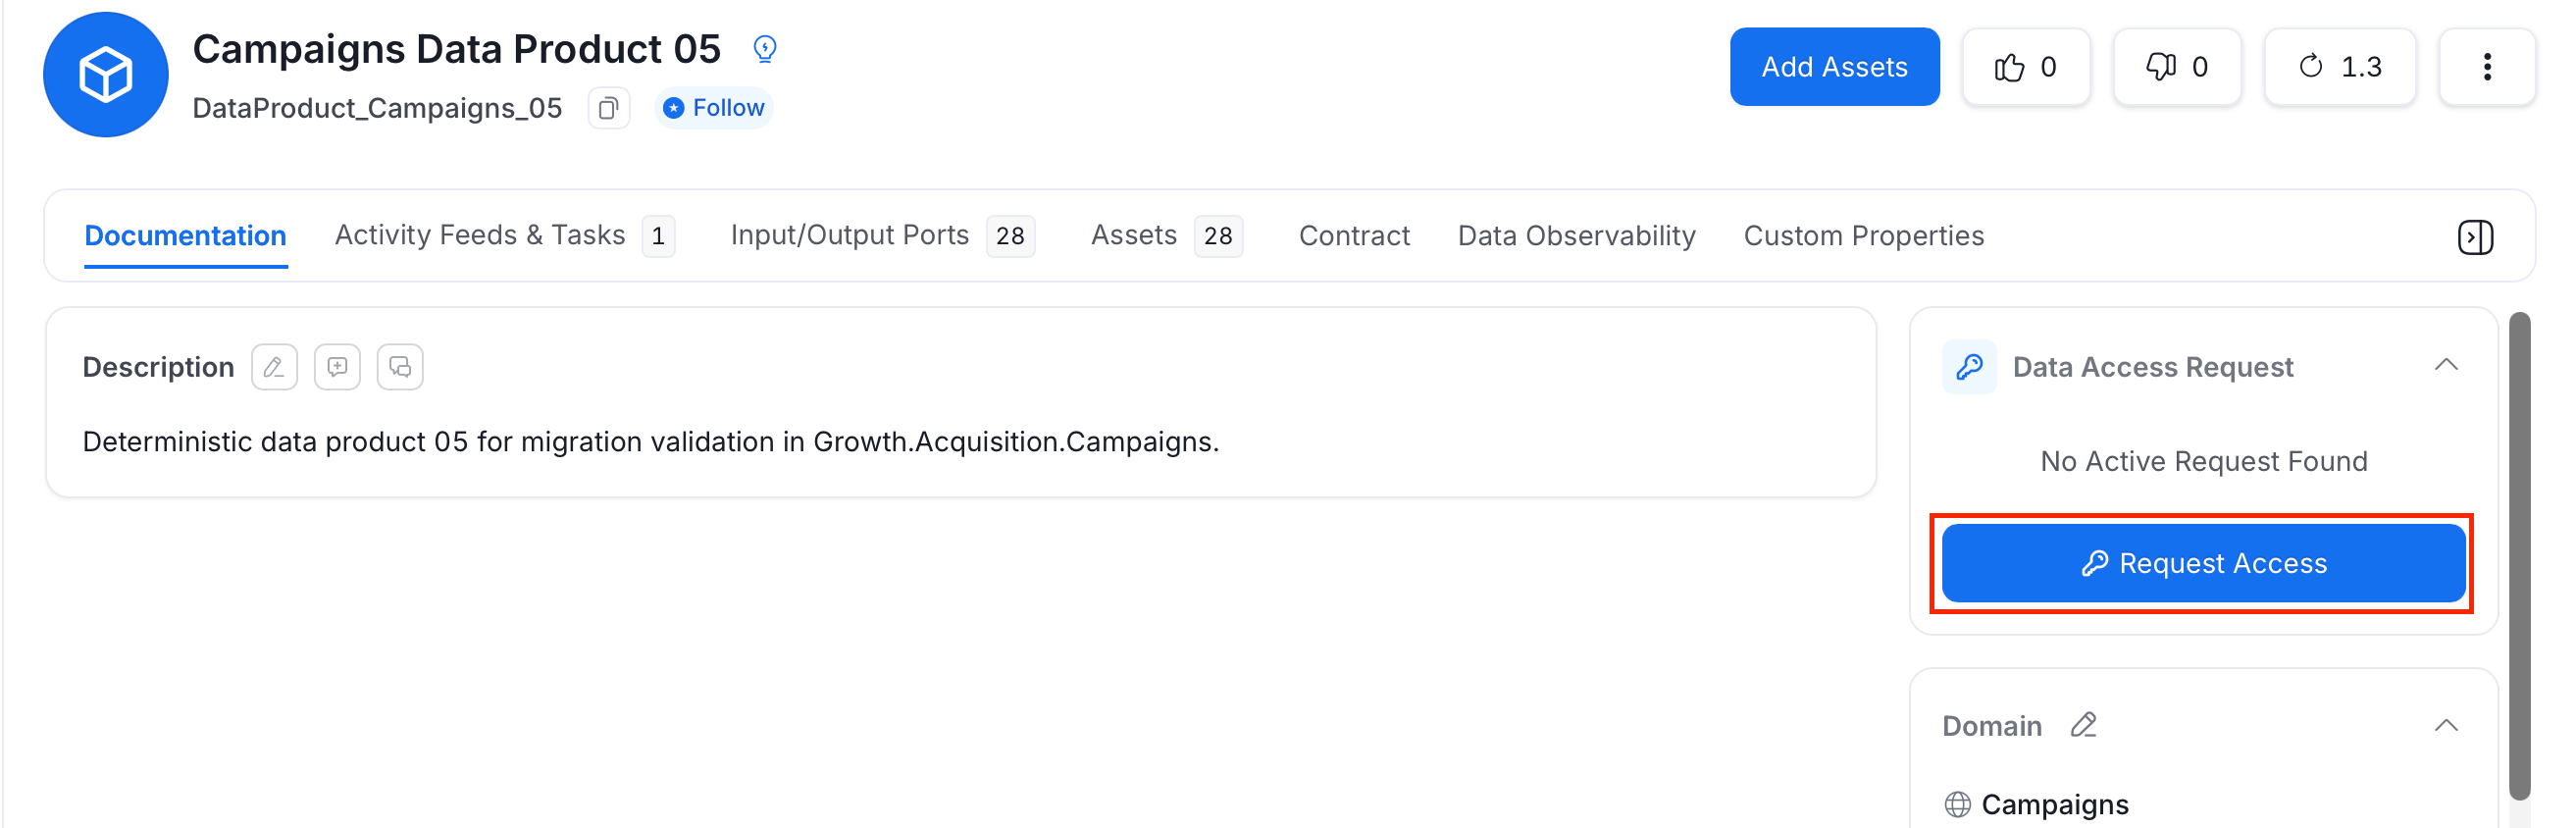
* **Request Access**: On the **Documentation** tab, the Data Access Request panel lets you request access to the data product's assets. See [Data Access Requests](/ai-2-0/how-to-guides/data-marketplace/data-access-requests).
### Data Product Tabs
| Tab | What it shows |
| -------------------------- | ---------------------------------------------------------------------------------------------------------------------------------------------------------------------------------------------------- |
| **Documentation** | The data product's description, owners, tags, glossary terms, and domain, plus a Data Access Request panel. See [Data Access Requests](/ai-2-0/how-to-guides/data-marketplace/data-access-requests). |
| **Activity Feeds & Tasks** | Conversations, task requests, and activity related to the data product. |
| **Input/Output Ports** | The data assets this data product consumes and produces. See [Input Ports and Output Ports](#input-ports-and-output-ports). |
| **Assets** | The data assets included in this data product. |
| **Contract** | The data contract associated with this data product, if one is configured. |
| **Data Observability** | Data quality and incident information for the data product's assets. |
| **Custom Properties** | Any custom property fields your administrator has configured for data products. |
### Data Product Actions
* **Add Assets**: Opens the Add Assets panel to add more data assets to this data product. See [Add Data Assets](#add-data-assets).
* **Votes**: The thumbs-up and thumbs-down icons let users upvote or downvote the data product, helping the team signal its quality and trustworthiness at a glance.
* **Version**: Shows the data product's current version number. Click it to open the Version History panel. See [Data Asset Versioning](/ai-2-0/how-to-guides/guide-for-data-users/versions) for details.
* **Request Access**: On the **Documentation** tab, the Data Access Request panel lets you request access to the data product's assets. See [Data Access Requests](/ai-2-0/how-to-guides/data-marketplace/data-access-requests).
 ## Manage Data Assest
From a data product's detail page, click the **⋮** (more actions) menu next to the Version count to manage the data product itself.
## Manage Data Assest
From a data product's detail page, click the **⋮** (more actions) menu next to the Version count to manage the data product itself.
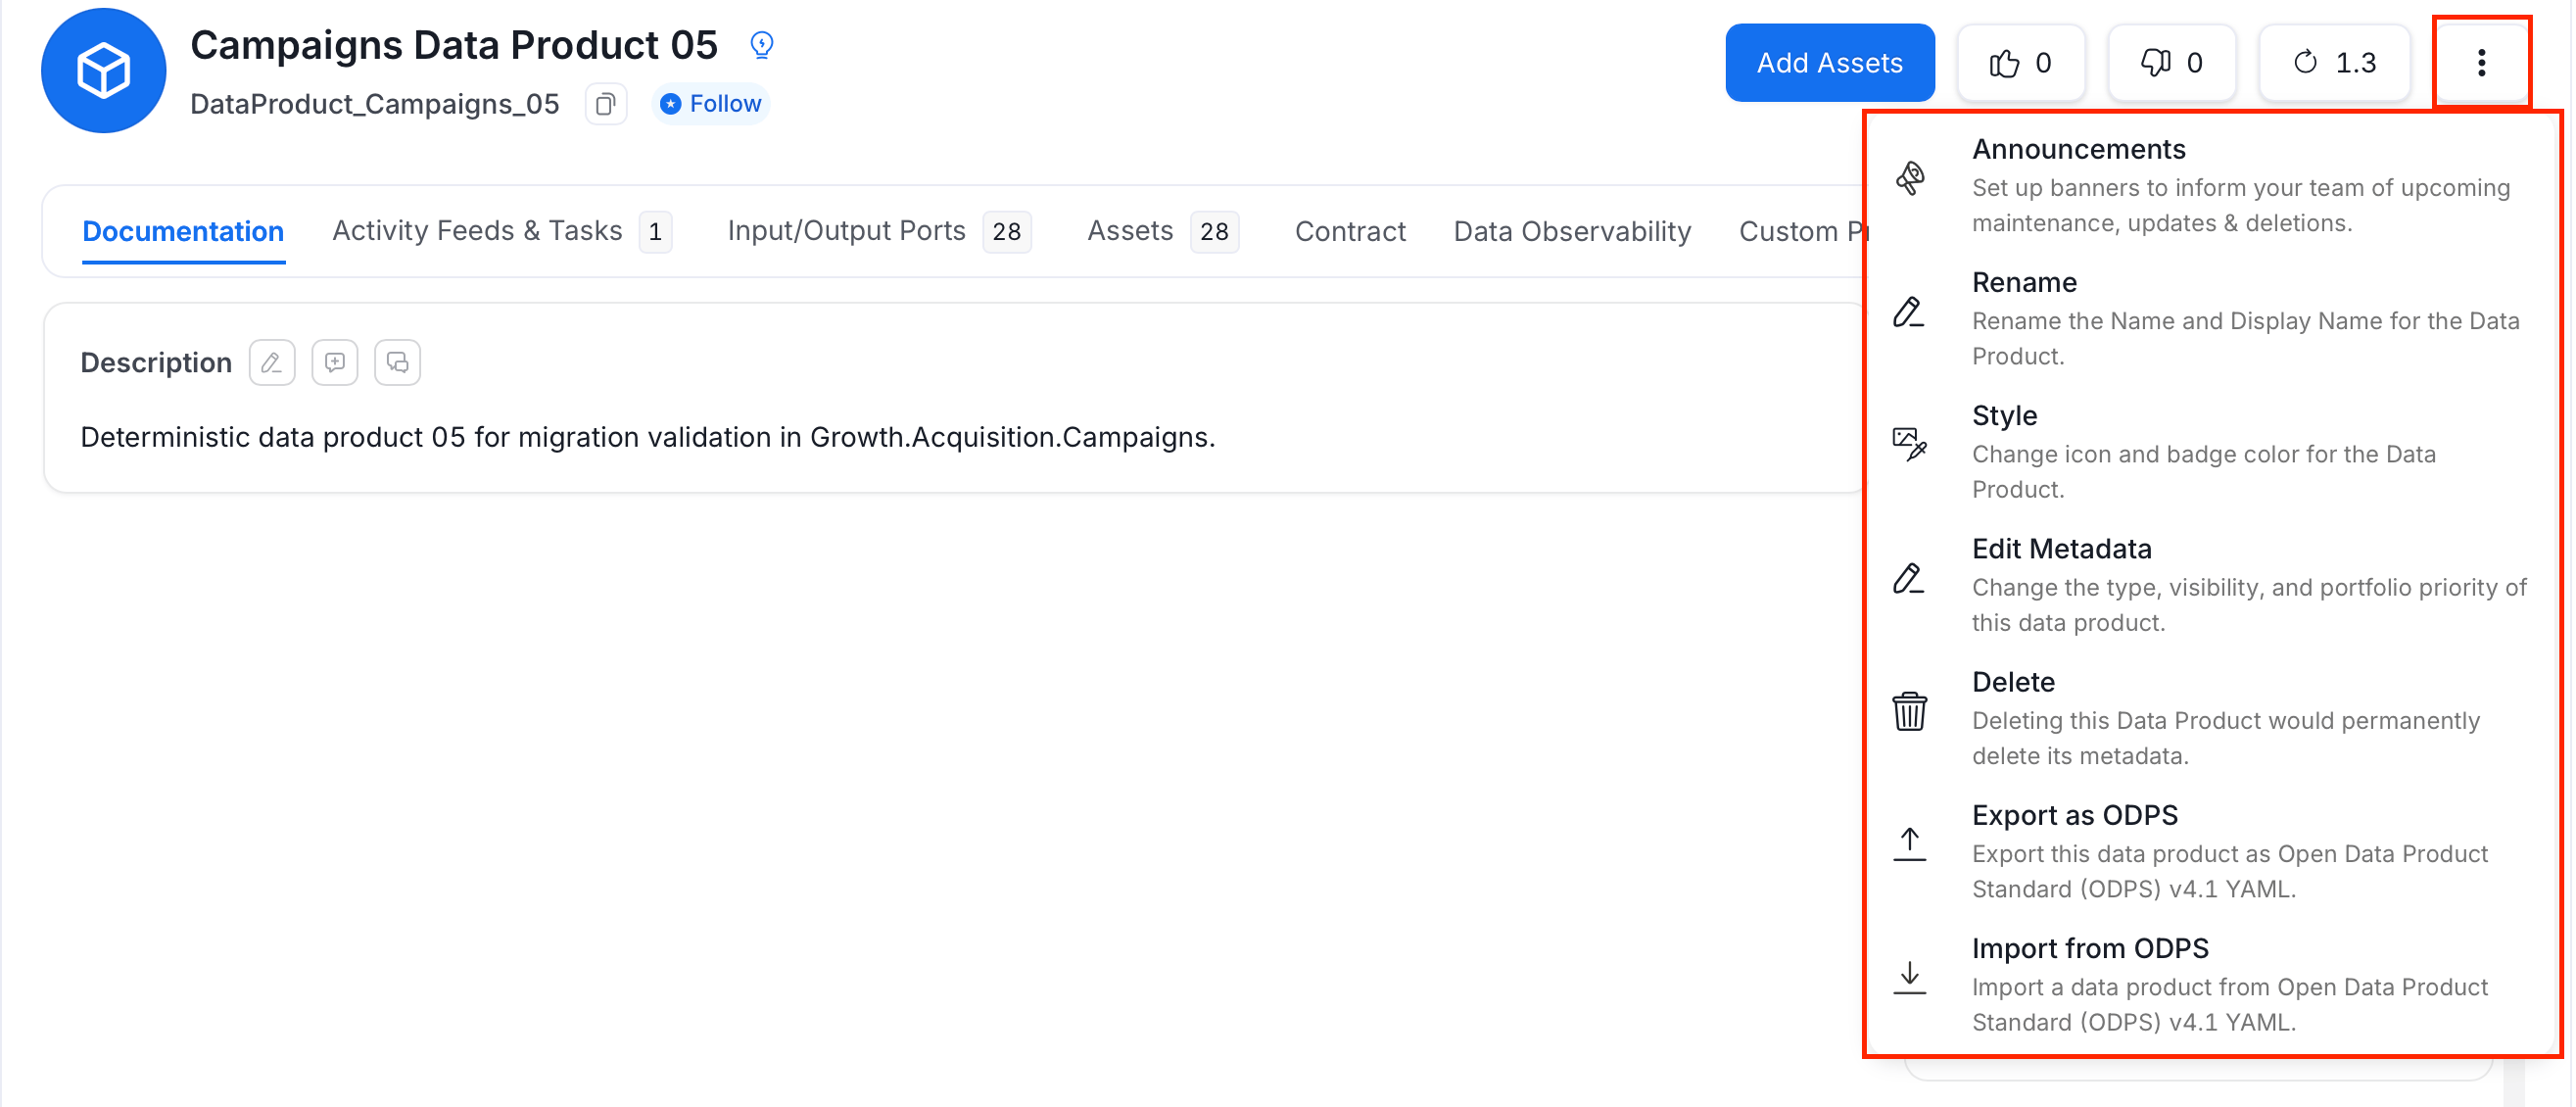 * **Announcements**: Set up banners to inform your team of upcoming maintenance, updates, and deletions. See [Announcements](/ai-2-0/how-to-guides/data-collaboration/announcements).
* **Rename**: Rename the Name and Display Name for the data product.
* **Style**: Change the icon and badge color for the data product.
* **Edit Metadata**: Change the type, visibility, and portfolio priority of the data product. See [Configure Data Product Settings](#step-4-configure-data-product-settings).
* **Delete**: Permanently delete the data product and its metadata.
* **Export as ODPS**: Export the data product as an Open Data Product Standard (ODPS) v4.1 YAML file.
* **Import from ODPS**: Import a data product definition from an ODPS v4.1 YAML file into this data product:
1. Click **Upload YAML File** to select a `.yaml`/`.yml` file, or paste the YAML directly into the text area.
* **Announcements**: Set up banners to inform your team of upcoming maintenance, updates, and deletions. See [Announcements](/ai-2-0/how-to-guides/data-collaboration/announcements).
* **Rename**: Rename the Name and Display Name for the data product.
* **Style**: Change the icon and badge color for the data product.
* **Edit Metadata**: Change the type, visibility, and portfolio priority of the data product. See [Configure Data Product Settings](#step-4-configure-data-product-settings).
* **Delete**: Permanently delete the data product and its metadata.
* **Export as ODPS**: Export the data product as an Open Data Product Standard (ODPS) v4.1 YAML file.
* **Import from ODPS**: Import a data product definition from an ODPS v4.1 YAML file into this data product:
1. Click **Upload YAML File** to select a `.yaml`/`.yml` file, or paste the YAML directly into the text area.
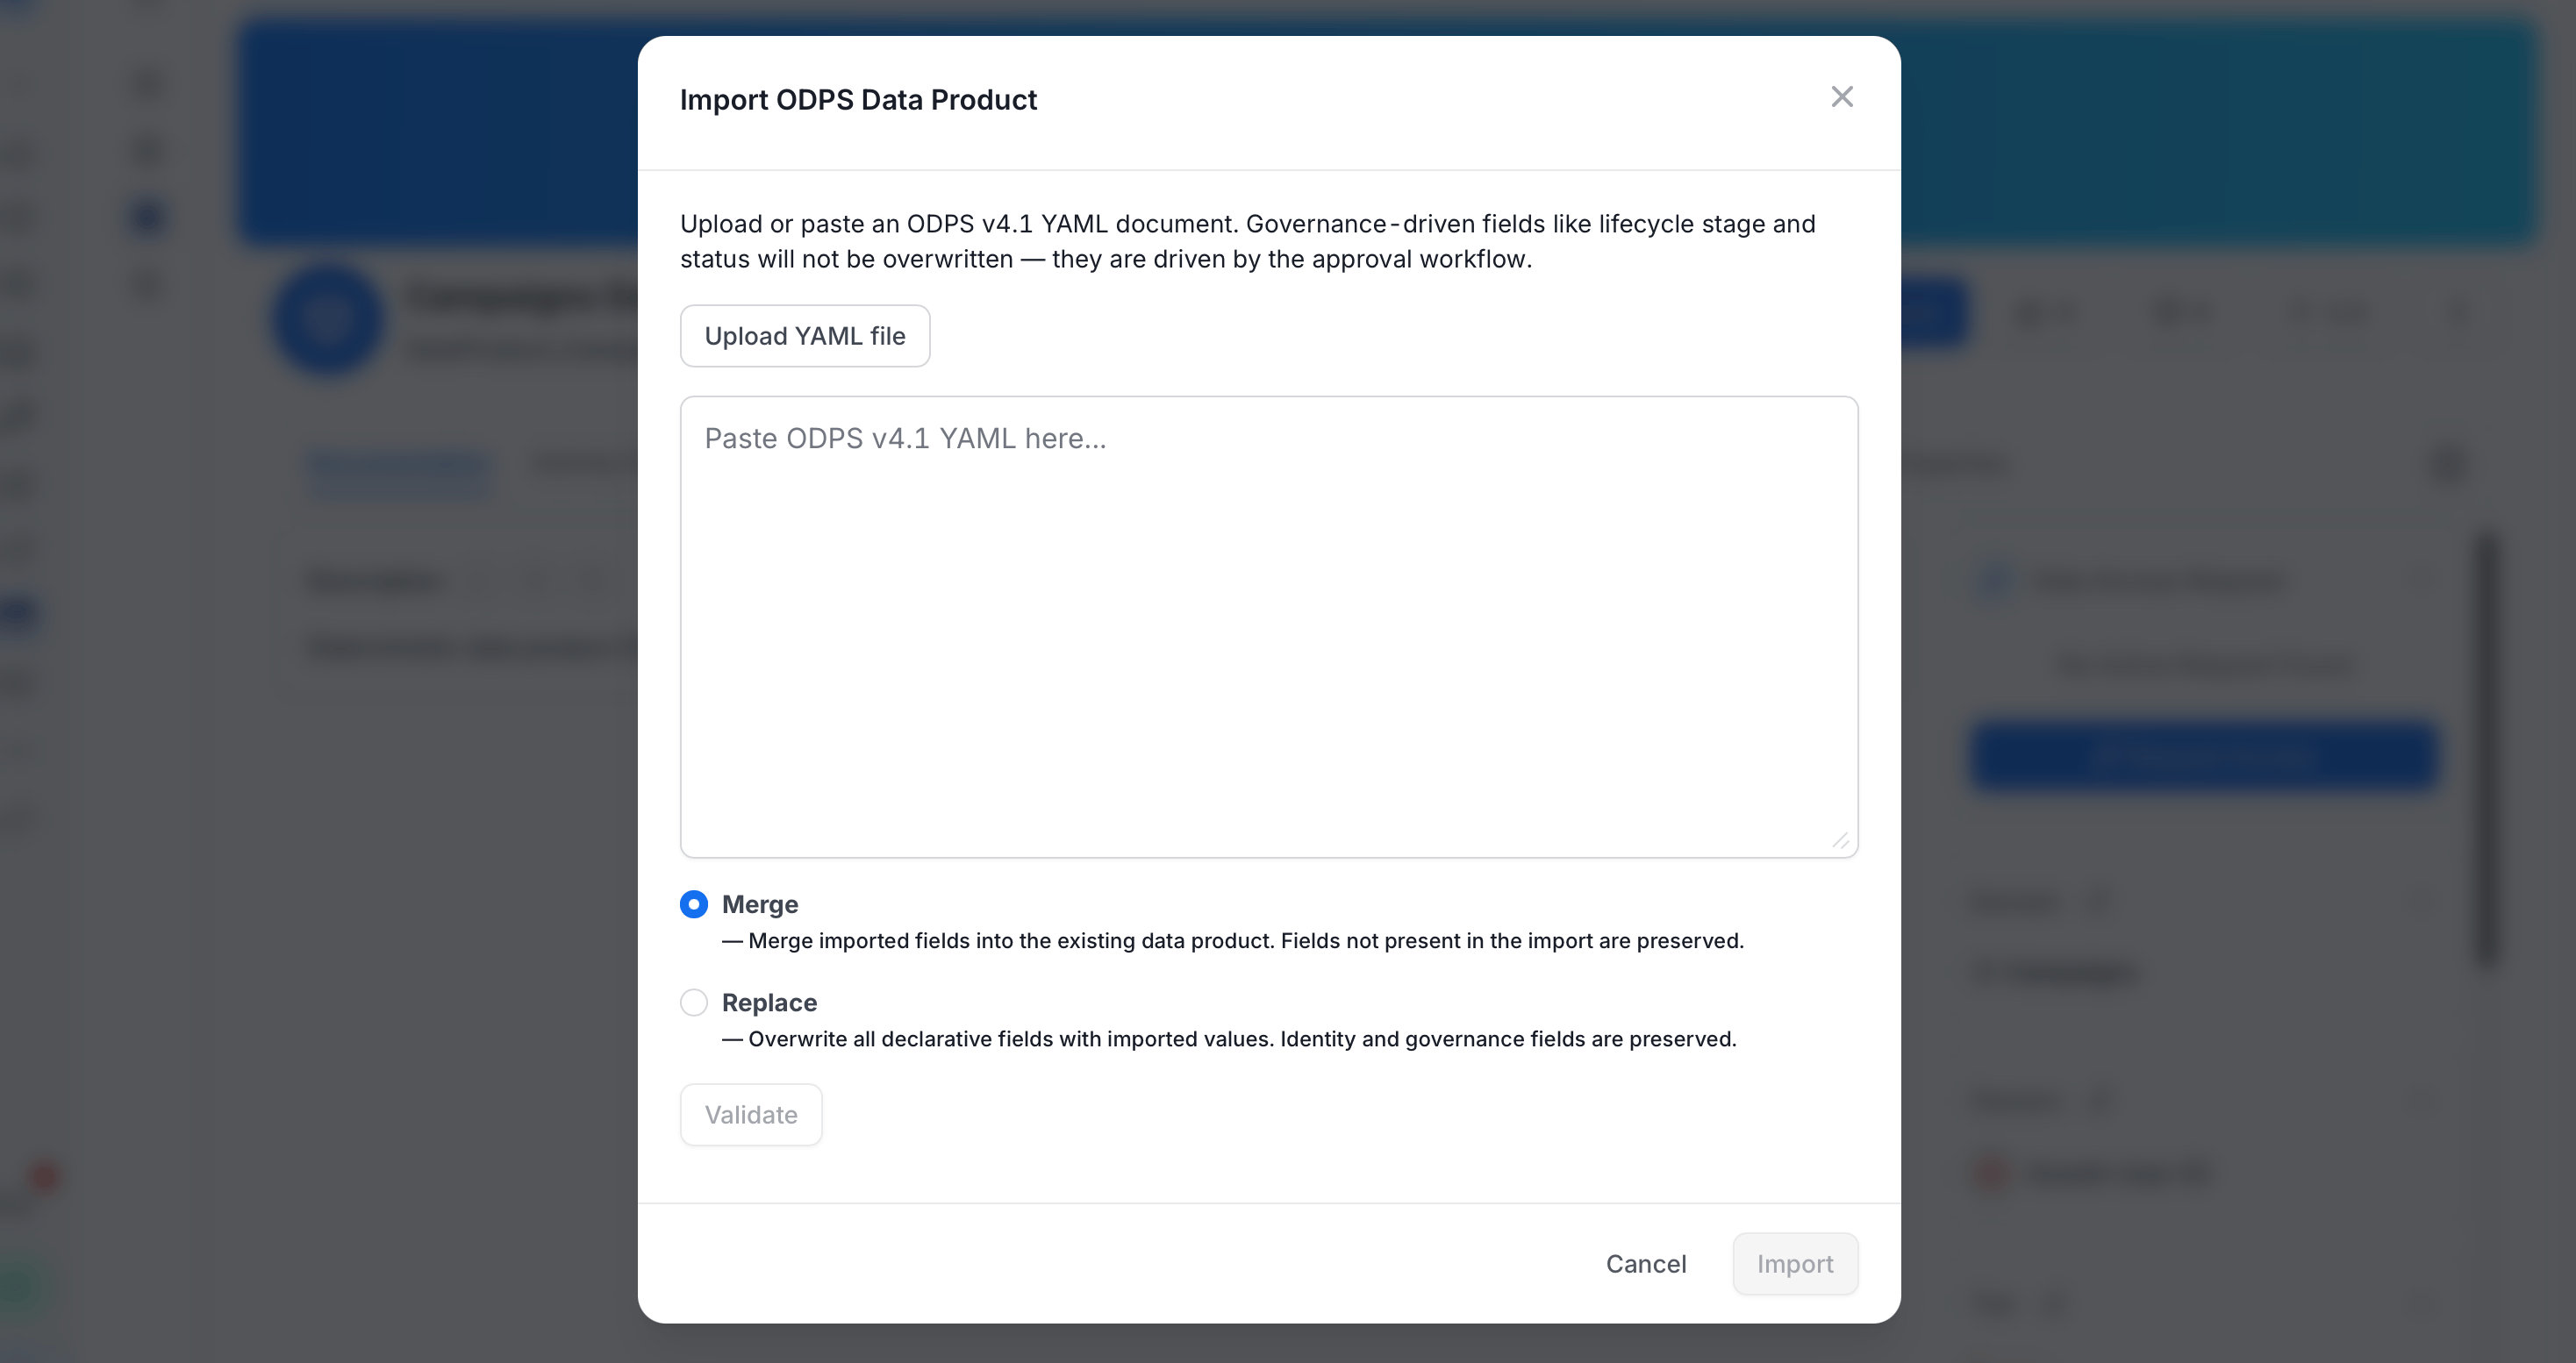 2. Optional: Click **Validate** to check the YAML before importing.
3. Choose how the import applies to this data product: **Merge** (default) combines the YAML's fields with the existing data product, or **Replace** overwrites them.
4. Click **Import**.
The imported YAML must resolve to this same data product (matched by name or display name); importing a YAML for a different data product is blocked.
**Note**: Announcements, Style, Edit Metadata, and Import from ODPS require edit permissions on the data product. Rename requires permission to edit the display name. Delete requires delete permission. Export as ODPS has no permission requirement: any user who can view the data product can export it.
## View Data Assets by Data Product
After adding data assets to a data product, view data assets for various data products on the **Explore Assets** page.
1. In the left navigation bar, click **Explore**.
2. In the **Data Assets** dropdown, select **Data Product**.
2. Optional: Click **Validate** to check the YAML before importing.
3. Choose how the import applies to this data product: **Merge** (default) combines the YAML's fields with the existing data product, or **Replace** overwrites them.
4. Click **Import**.
The imported YAML must resolve to this same data product (matched by name or display name); importing a YAML for a different data product is blocked.
**Note**: Announcements, Style, Edit Metadata, and Import from ODPS require edit permissions on the data product. Rename requires permission to edit the display name. Delete requires delete permission. Export as ODPS has no permission requirement: any user who can view the data product can export it.
## View Data Assets by Data Product
After adding data assets to a data product, view data assets for various data products on the **Explore Assets** page.
1. In the left navigation bar, click **Explore**.
2. In the **Data Assets** dropdown, select **Data Product**.
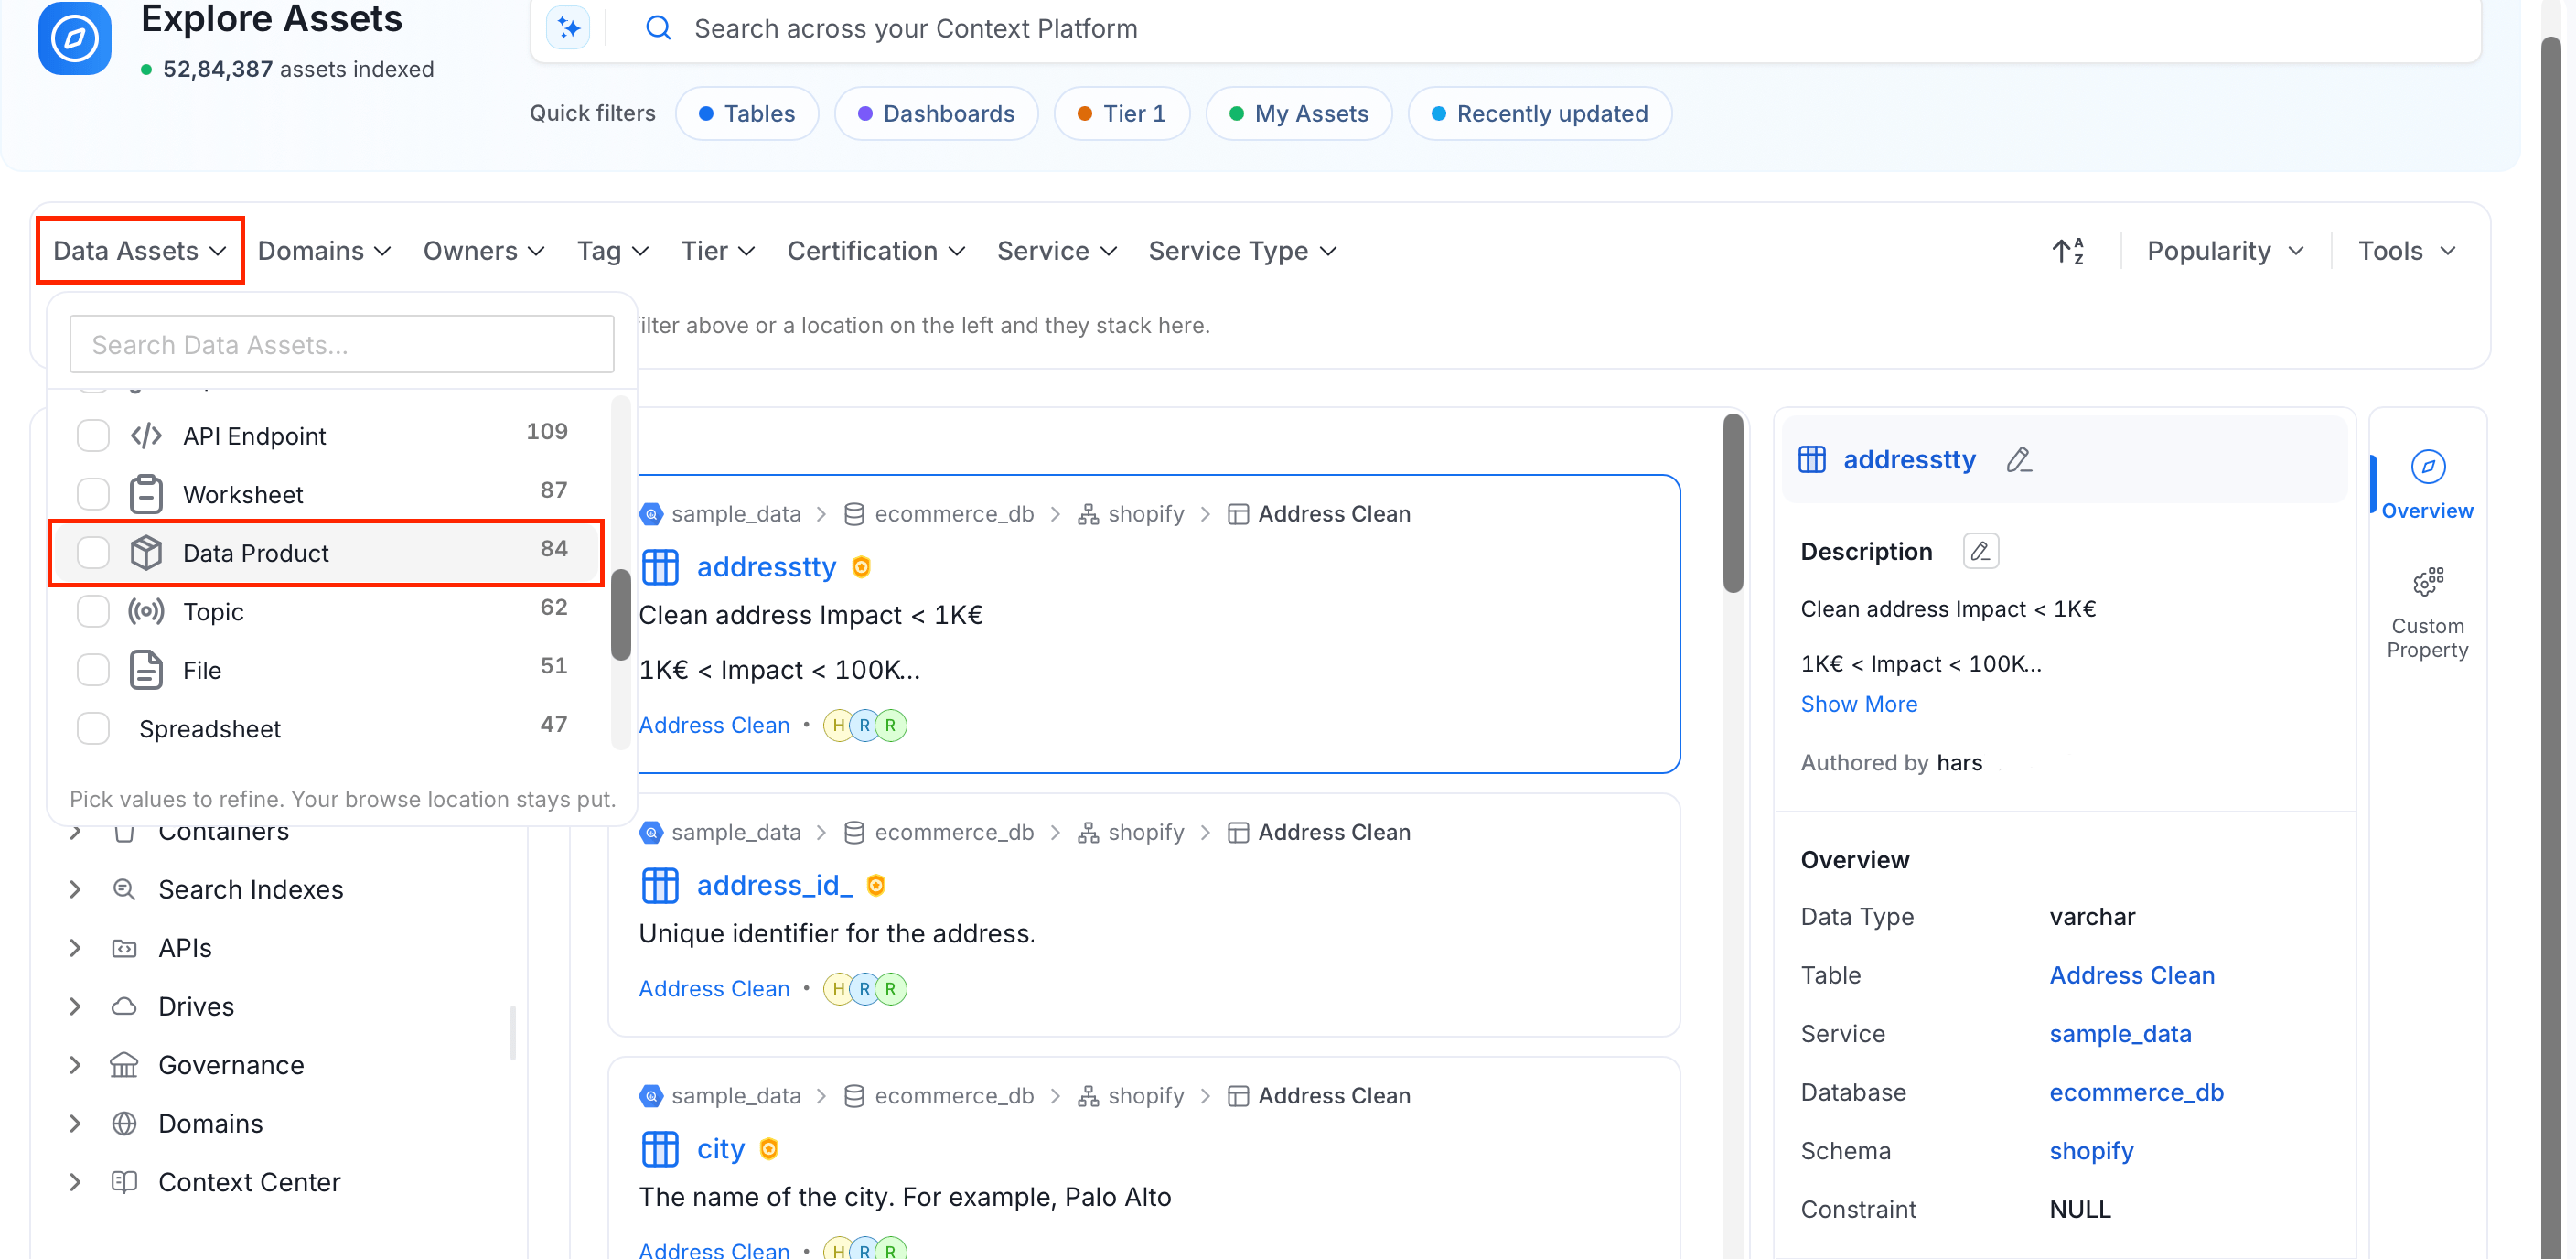 3. All data products appear in the results. Click any data product to view its assets, documentation, and metadata.
Watch the video below to see data products in action.
Learn about the Domains.
3. All data products appear in the results. Click any data product to view its assets, documentation, and metadata.
Watch the video below to see data products in action.
Learn about the Domains.