> ## Documentation Index
> Fetch the complete documentation index at: https://docs.getcollate.io/llms.txt
> Use this file to discover all available pages before exploring further.
# Governance Workflows - Creating a New Workflow
> Create a new governance workflow by setting basic details and running event-based or batch executions.
# Creating the “Set Tags to ML Model Workflow”
The following steps walk you through building the **SetTagsToMLModelWorkflow** from start to finish.
Each screenshot corresponds to a specific action you take while creating the workflow.
## Step 1: Create a New Workflow
1. From the left navigation bar, navigate to **Governance** > **Workflows**.
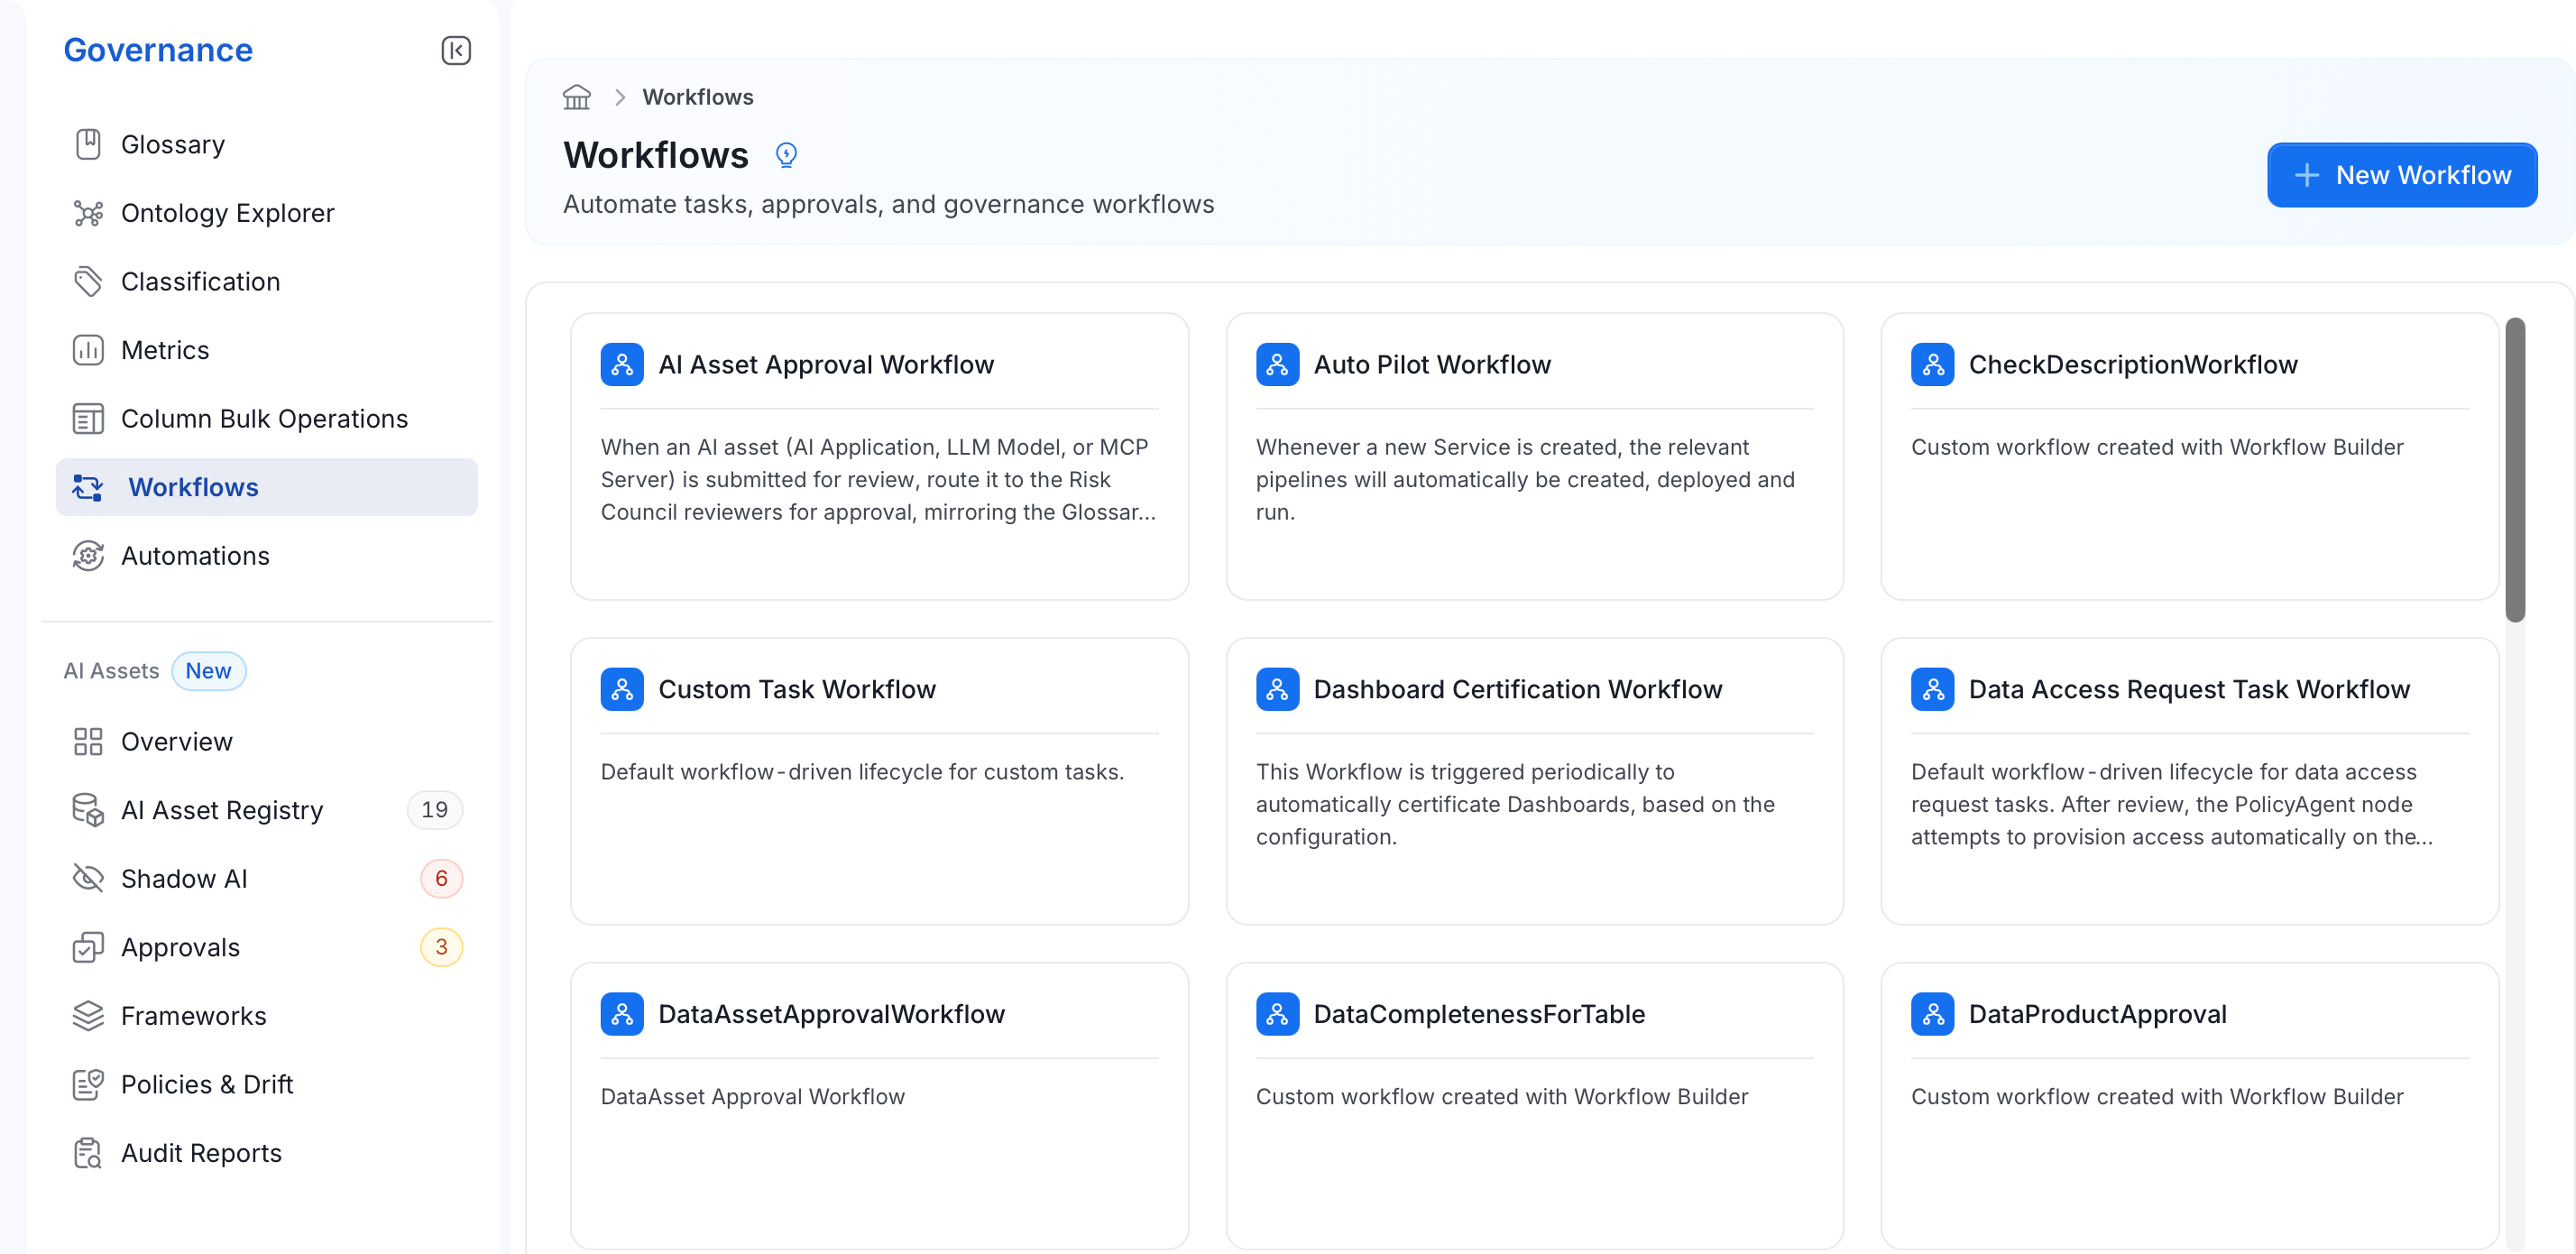 2. Click **New Workflow** and enter the following details:
* **Workflow Name**: A unique identifier without spaces. For example, `SetTagsToMLModelWorkflow`.
* **Description**: A short summary of the workflow purpose. For example, “Set Tags to ML Model if the description is complete.”
2. Click **New Workflow** and enter the following details:
* **Workflow Name**: A unique identifier without spaces. For example, `SetTagsToMLModelWorkflow`.
* **Description**: A short summary of the workflow purpose. For example, “Set Tags to ML Model if the description is complete.”
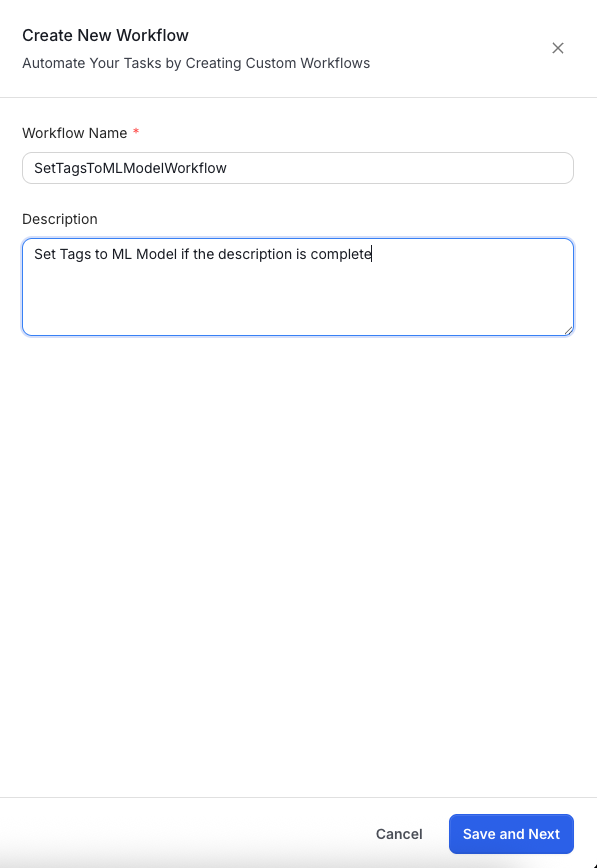 3. Click **Save and Next** to continue.
## Step 2: Configure the Start Node
After creating the workflow, configure the **Start** node to define which assets it applies to and when it runs.
1. Drag the **Start** node onto the canvas.
3. Click **Save and Next** to continue.
## Step 2: Configure the Start Node
After creating the workflow, configure the **Start** node to define which assets it applies to and when it runs.
1. Drag the **Start** node onto the canvas.
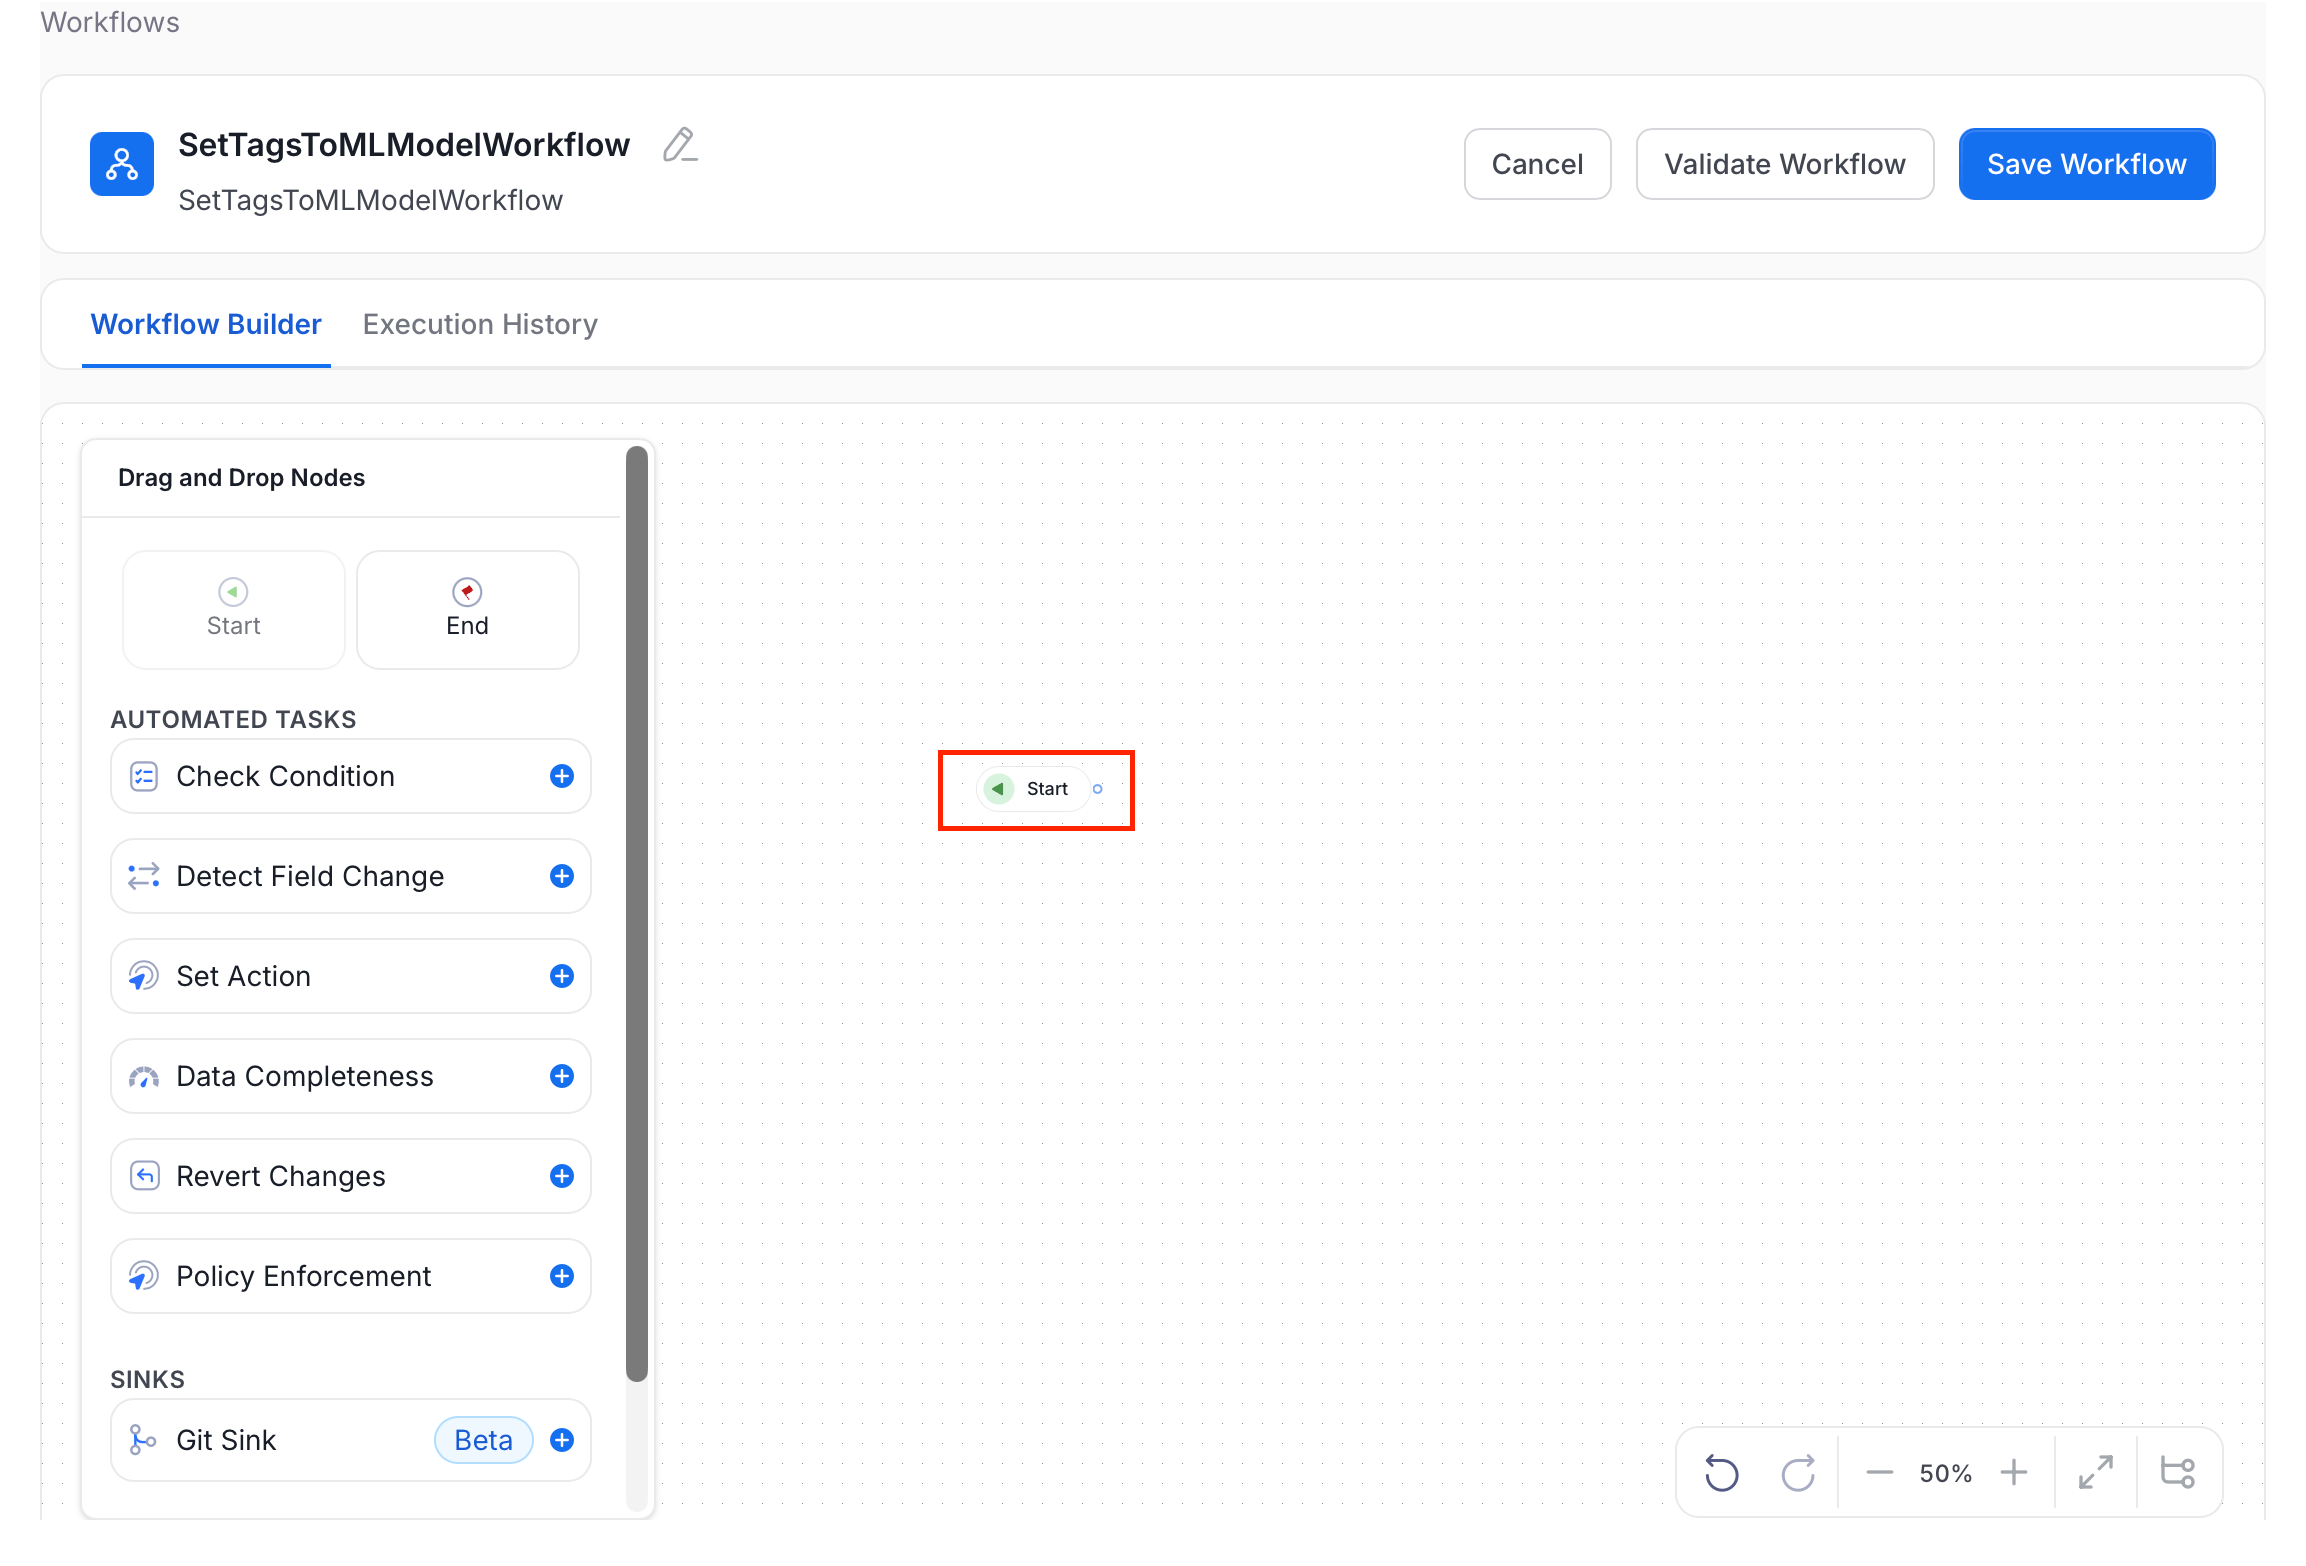 2. Fill in the following fields:
* **Data Asset** (required): Select one or more entity types the workflow applies to (for example, `MlModel`).
* **Data Asset Filter** (Optional): Add search filters to narrow which assets the workflow acts on.
* **Trigger Type** (required): Choose how to trigger the workflow:
* **Event Based**: Triggers when an entity is created or updated.
* **Periodic Batch**: Triggers on a schedule and processes entities in batches.
3. If you selected **Event Based**, configure:
* **Event Type** (required): Select the events that trigger the workflow — **Created**, **Updated**, or both.
* **Exclude Fields** (Optional): Select fields whose changes alone should not trigger the workflow.
* **Include Fields** (Optional): Select fields that must be present in the change to trigger the workflow. Takes priority over **Exclude Fields**.
4. If you selected **Periodic Batch**, configure:
* **Schedule Type** (required): Choose **On Demand** to trigger manually, or **Scheduled** to set a cron-based schedule.
* **Schedule** (shown when **Scheduled** is selected): Define the cron expression for when the workflow runs.
* **Batch Size**: Number of entities to process per batch (default: 100).
2. Fill in the following fields:
* **Data Asset** (required): Select one or more entity types the workflow applies to (for example, `MlModel`).
* **Data Asset Filter** (Optional): Add search filters to narrow which assets the workflow acts on.
* **Trigger Type** (required): Choose how to trigger the workflow:
* **Event Based**: Triggers when an entity is created or updated.
* **Periodic Batch**: Triggers on a schedule and processes entities in batches.
3. If you selected **Event Based**, configure:
* **Event Type** (required): Select the events that trigger the workflow — **Created**, **Updated**, or both.
* **Exclude Fields** (Optional): Select fields whose changes alone should not trigger the workflow.
* **Include Fields** (Optional): Select fields that must be present in the change to trigger the workflow. Takes priority over **Exclude Fields**.
4. If you selected **Periodic Batch**, configure:
* **Schedule Type** (required): Choose **On Demand** to trigger manually, or **Scheduled** to set a cron-based schedule.
* **Schedule** (shown when **Scheduled** is selected): Define the cron expression for when the workflow runs.
* **Batch Size**: Number of entities to process per batch (default: 100).
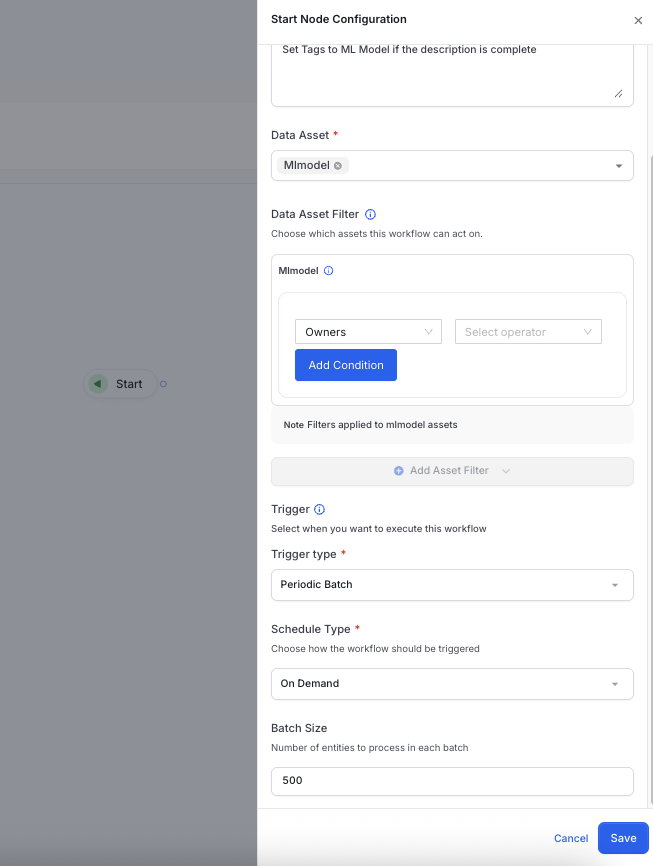 5. Click **Save**.
## Step 3: Add a Condition Check
1. Drag the **Check Condition** node onto the canvas.
5. Click **Save**.
## Step 3: Add a Condition Check
1. Drag the **Check Condition** node onto the canvas.
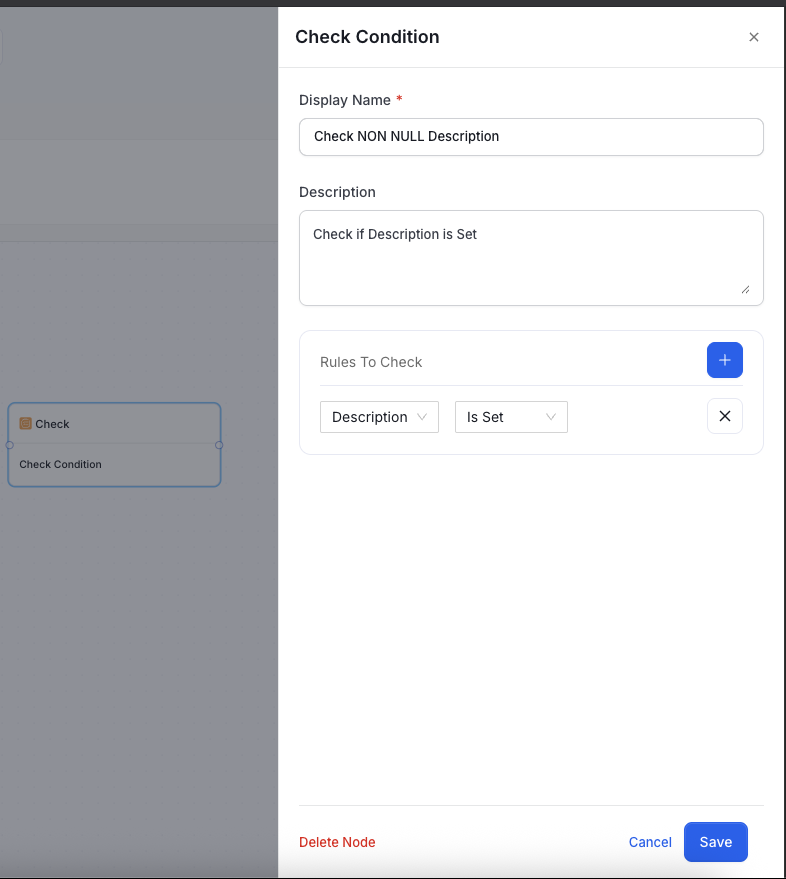 2. Fill in the following fields:
* **Display Name**: Enter a name for this condition (for example, *Check NON NULL Description*).
* **Description**: Briefly describe what this condition checks (for example, *Check if Description is Set*).
* **Rules to Check**: Build a condition using the query builder. For example:
* Field: `Description`
* Operator: `Is Set`
3. Click **Save**.
## Step 4: Configure the TRUE Condition Path
1. Draw a connection from the **Check Condition** node to a new **Set Action** node. A **Connection Condition** modal appears.
2. In the modal, set the condition to **TRUE** and confirm the source and destination nodes.
2. Fill in the following fields:
* **Display Name**: Enter a name for this condition (for example, *Check NON NULL Description*).
* **Description**: Briefly describe what this condition checks (for example, *Check if Description is Set*).
* **Rules to Check**: Build a condition using the query builder. For example:
* Field: `Description`
* Operator: `Is Set`
3. Click **Save**.
## Step 4: Configure the TRUE Condition Path
1. Draw a connection from the **Check Condition** node to a new **Set Action** node. A **Connection Condition** modal appears.
2. In the modal, set the condition to **TRUE** and confirm the source and destination nodes.
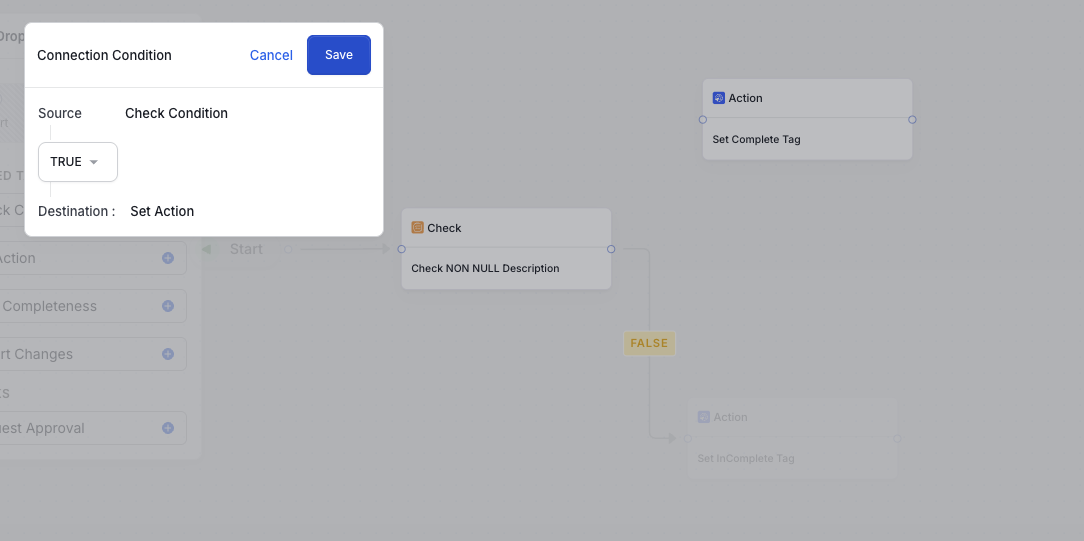 3. Click **Save**.
4. Open the **Set Action** node.
5. Fill in the following fields:
* **Display Name**: Enter a name for this action (for example, *Set Complete Tag*).
* **Description**: Briefly describe the action.
* **Field Name**: Select `tags`.
* **Field Value**: Select or enter `MachineLearning.Complete`.
3. Click **Save**.
4. Open the **Set Action** node.
5. Fill in the following fields:
* **Display Name**: Enter a name for this action (for example, *Set Complete Tag*).
* **Description**: Briefly describe the action.
* **Field Name**: Select `tags`.
* **Field Value**: Select or enter `MachineLearning.Complete`.
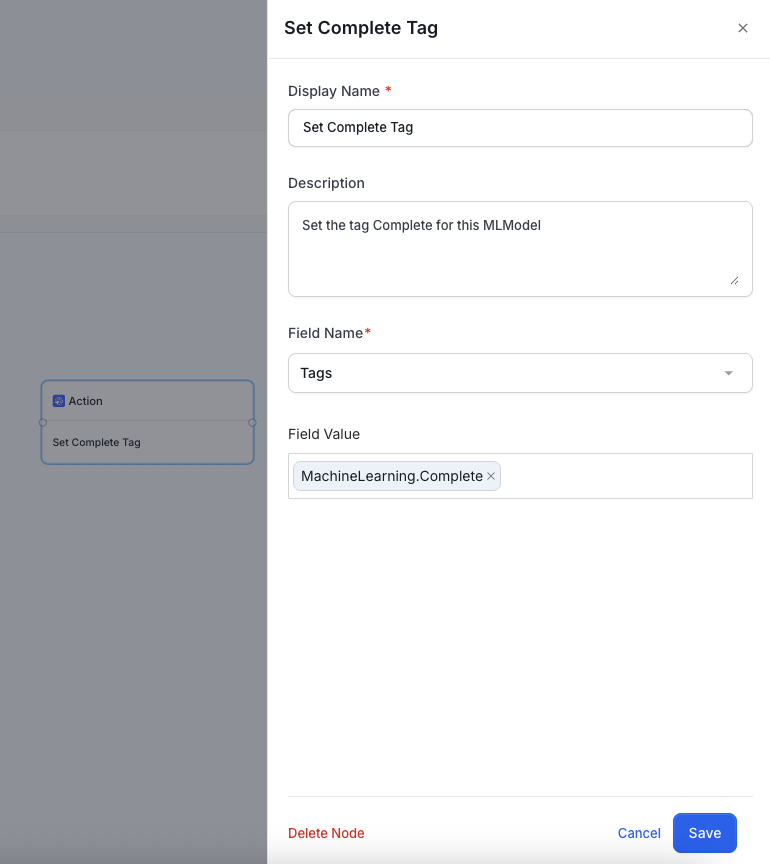 6. Click **Save**.
## Step 5: Configure the FALSE Condition Path
1. Draw a connection from the **Check Condition** node to another **Set Action** node. A **Connection Condition** modal appears.
2. In the modal, set the condition to **FALSE** and confirm the source and destination nodes.
6. Click **Save**.
## Step 5: Configure the FALSE Condition Path
1. Draw a connection from the **Check Condition** node to another **Set Action** node. A **Connection Condition** modal appears.
2. In the modal, set the condition to **FALSE** and confirm the source and destination nodes.
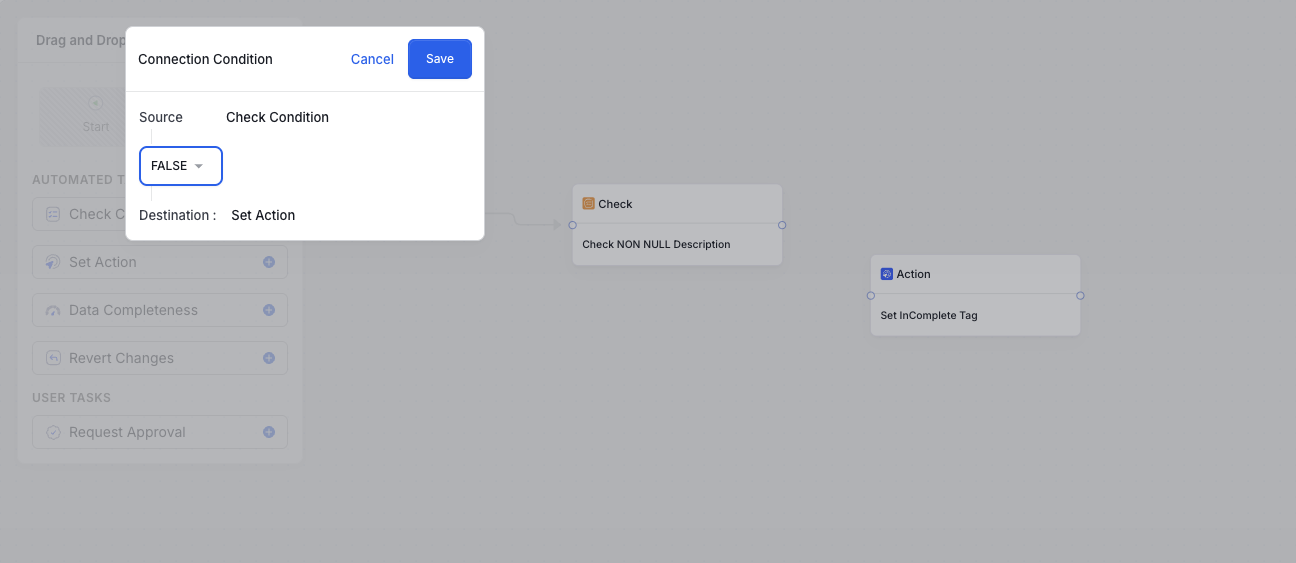 3. Click **Save**.
4. Open the **Set Action** node.
5. Fill in the following fields:
* **Display Name**: Enter a name for this action (for example, *Set InComplete Tag*).
* **Description**: Briefly describe the action.
* **Field Name**: Select `tags`.
* **Field Value**: Select or enter `MachineLearning.InComplete`.
3. Click **Save**.
4. Open the **Set Action** node.
5. Fill in the following fields:
* **Display Name**: Enter a name for this action (for example, *Set InComplete Tag*).
* **Description**: Briefly describe the action.
* **Field Name**: Select `tags`.
* **Field Value**: Select or enter `MachineLearning.InComplete`.
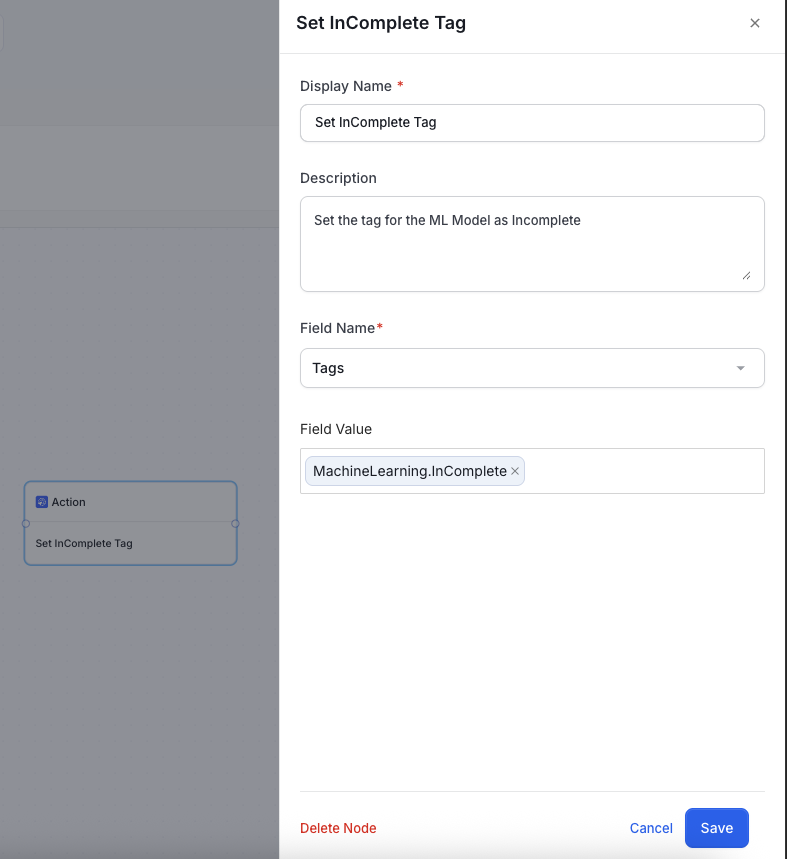 6. Click **Save**.
## Step 6: End the Workflow
Connect both the TRUE and FALSE action nodes to an **End** node to mark workflow completion.
6. Click **Save**.
## Step 6: End the Workflow
Connect both the TRUE and FALSE action nodes to an **End** node to mark workflow completion.
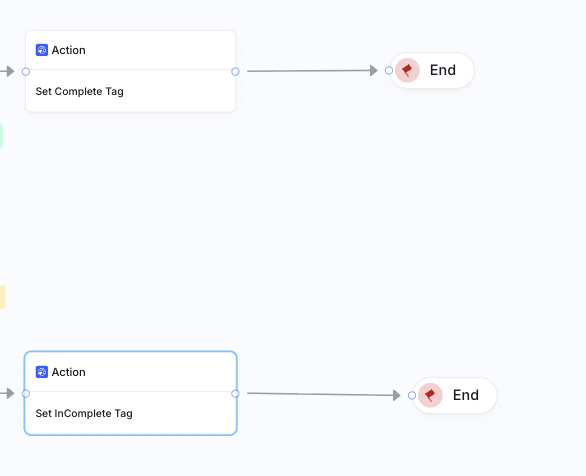 This ensures the workflow automatically stops after tagging the model appropriately.
## Final Workflow Overview
Once all nodes and connections are in place, your workflow should look like this:
This ensures the workflow automatically stops after tagging the model appropriately.
## Final Workflow Overview
Once all nodes and connections are in place, your workflow should look like this:
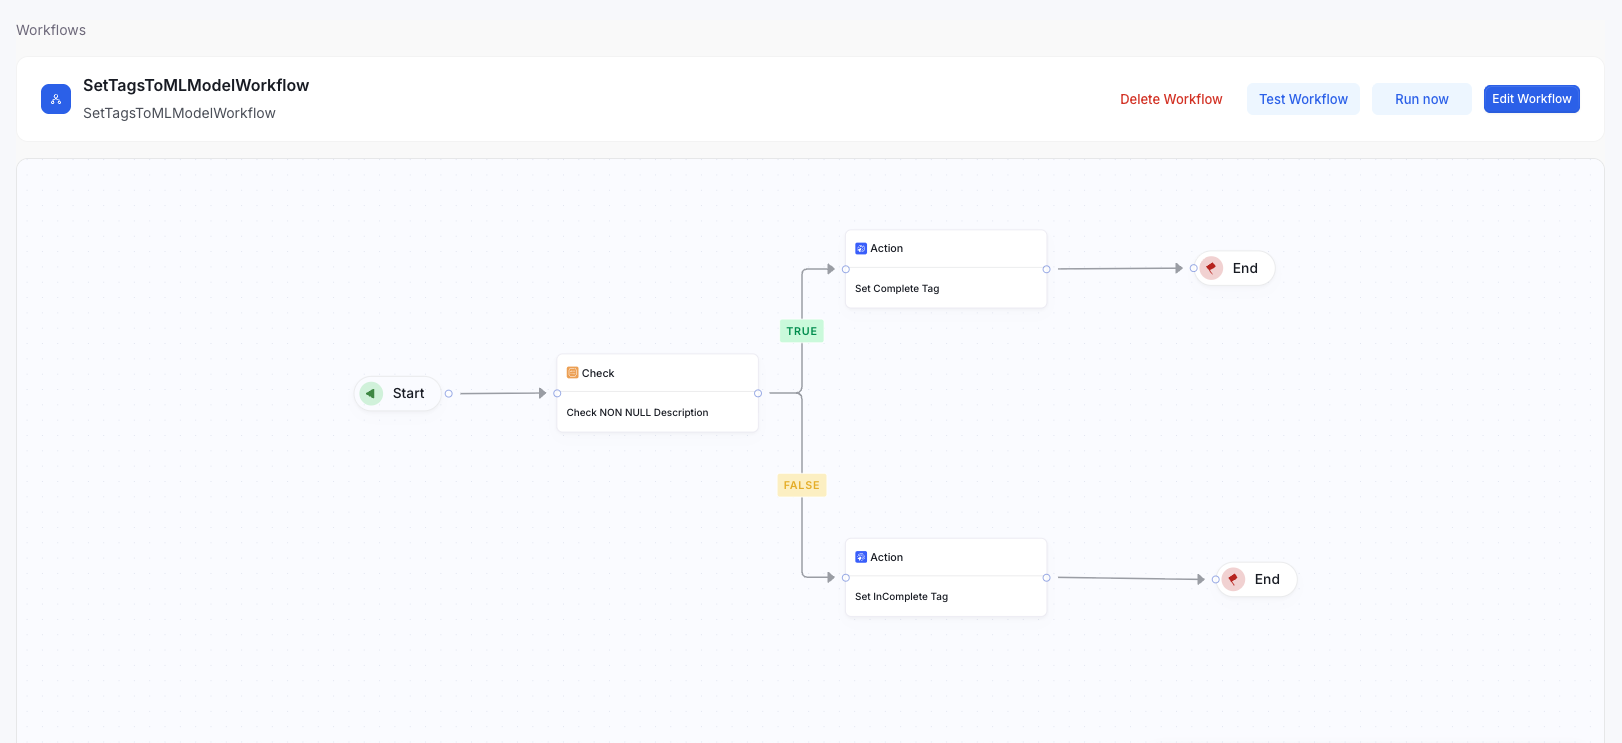 * **TRUE → Apply Complete Tag**
* **FALSE → Apply Incomplete Tag**
This workflow fully automates documentation completeness tagging for ML models.
### Running a Periodic Batch Workflow
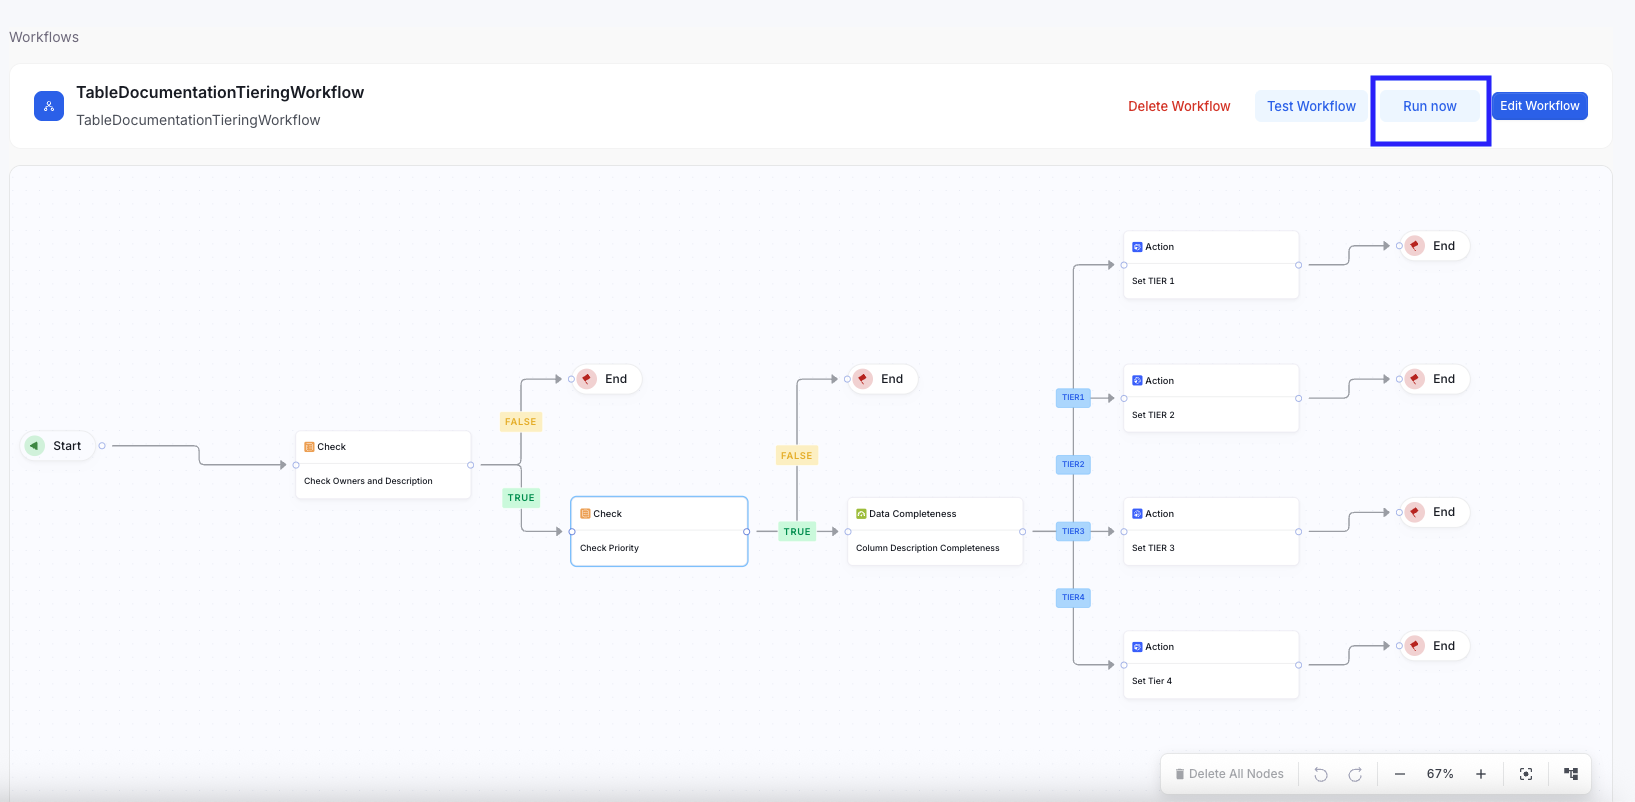
To execute an on-demand workflow, click **Run Now** This immediately triggers the workflow based on its configuration.
* **TRUE → Apply Complete Tag**
* **FALSE → Apply Incomplete Tag**
This workflow fully automates documentation completeness tagging for ML models.
### Running a Periodic Batch Workflow
To execute an on-demand workflow, click **Run Now** This immediately triggers the workflow based on its configuration.
 ## Best Practices
1. **Use the Right Type of Trigger**
* **Event-Based Entity Triggers** are ideal when Collate needs to automatically update specific fields in response to a change.
*Example:* When any attribute of a Glossary Term changes, its status automatically updates to **IN REVIEW**.
* **Periodic Batch Triggers** are best suited for bulk updates across many entities, especially for classification or enrichment workflows.
*Example:* Tables or Dashboards can be classified as Tier 1, Tier 2, or Tier 3 based on the completeness of their column descriptions.
2. **Use a Single Event-Based Workflow per Data Asset**
* Configure only one event-based entity workflow for each data asset.
Having multiple workflows attempting to update the same field (such as the status of a Glossary Term) can result in unpredictable behavior, as one workflow’s changes may override another’s.
3. **Optimize Batch Size for Periodic Workflows**
* Tune the batch size based on the number of data assets to ensure optimal performance.
* Avoid running periodic workflows across all entities without filtering. Instead, apply an inclusion filter to limit the result set and prevent performance degradation.
4. **Use User Approval Tasks Only in Event-Based Workflows**
* Use User Approval Tasks exclusively in event-driven workflows.
Using them in periodic workflows would generate multiple approval tasks simultaneously, overloading system resources.
* If a periodic batch workflow requires an approval step, limit the workflow scope to a small, controlled set of entities.
## Limitations
1. **User Approval Tasks Are Limited to Assets with Reviewer Support**
* User Approval Tasks can only be used for data assets that support assigning reviewers.
Reviewer support for additional asset types will be introduced in future releases.
2. **Fallback Behavior for Entities Without Reviewers**
* For entities that do not have any reviewers configured, User Approval Tasks automatically follow the **TRUE** path as a graceful fallback.
*Example:* A Metric without a reviewer will automatically pass the approval step.
## Best Practices
1. **Use the Right Type of Trigger**
* **Event-Based Entity Triggers** are ideal when Collate needs to automatically update specific fields in response to a change.
*Example:* When any attribute of a Glossary Term changes, its status automatically updates to **IN REVIEW**.
* **Periodic Batch Triggers** are best suited for bulk updates across many entities, especially for classification or enrichment workflows.
*Example:* Tables or Dashboards can be classified as Tier 1, Tier 2, or Tier 3 based on the completeness of their column descriptions.
2. **Use a Single Event-Based Workflow per Data Asset**
* Configure only one event-based entity workflow for each data asset.
Having multiple workflows attempting to update the same field (such as the status of a Glossary Term) can result in unpredictable behavior, as one workflow’s changes may override another’s.
3. **Optimize Batch Size for Periodic Workflows**
* Tune the batch size based on the number of data assets to ensure optimal performance.
* Avoid running periodic workflows across all entities without filtering. Instead, apply an inclusion filter to limit the result set and prevent performance degradation.
4. **Use User Approval Tasks Only in Event-Based Workflows**
* Use User Approval Tasks exclusively in event-driven workflows.
Using them in periodic workflows would generate multiple approval tasks simultaneously, overloading system resources.
* If a periodic batch workflow requires an approval step, limit the workflow scope to a small, controlled set of entities.
## Limitations
1. **User Approval Tasks Are Limited to Assets with Reviewer Support**
* User Approval Tasks can only be used for data assets that support assigning reviewers.
Reviewer support for additional asset types will be introduced in future releases.
2. **Fallback Behavior for Entities Without Reviewers**
* For entities that do not have any reviewers configured, User Approval Tasks automatically follow the **TRUE** path as a graceful fallback.
*Example:* A Metric without a reviewer will automatically pass the approval step.