> ## Documentation Index
> Fetch the complete documentation index at: https://docs.getcollate.io/llms.txt
> Use this file to discover all available pages before exploring further.
# Creating Data Contracts
> Create data contracts for data assets directly in the Collate UI
# Create a Data Contract
Data contracts define expectations for a data asset across schema, quality, security, and service levels.
## Step 1: Open the Contract Tab
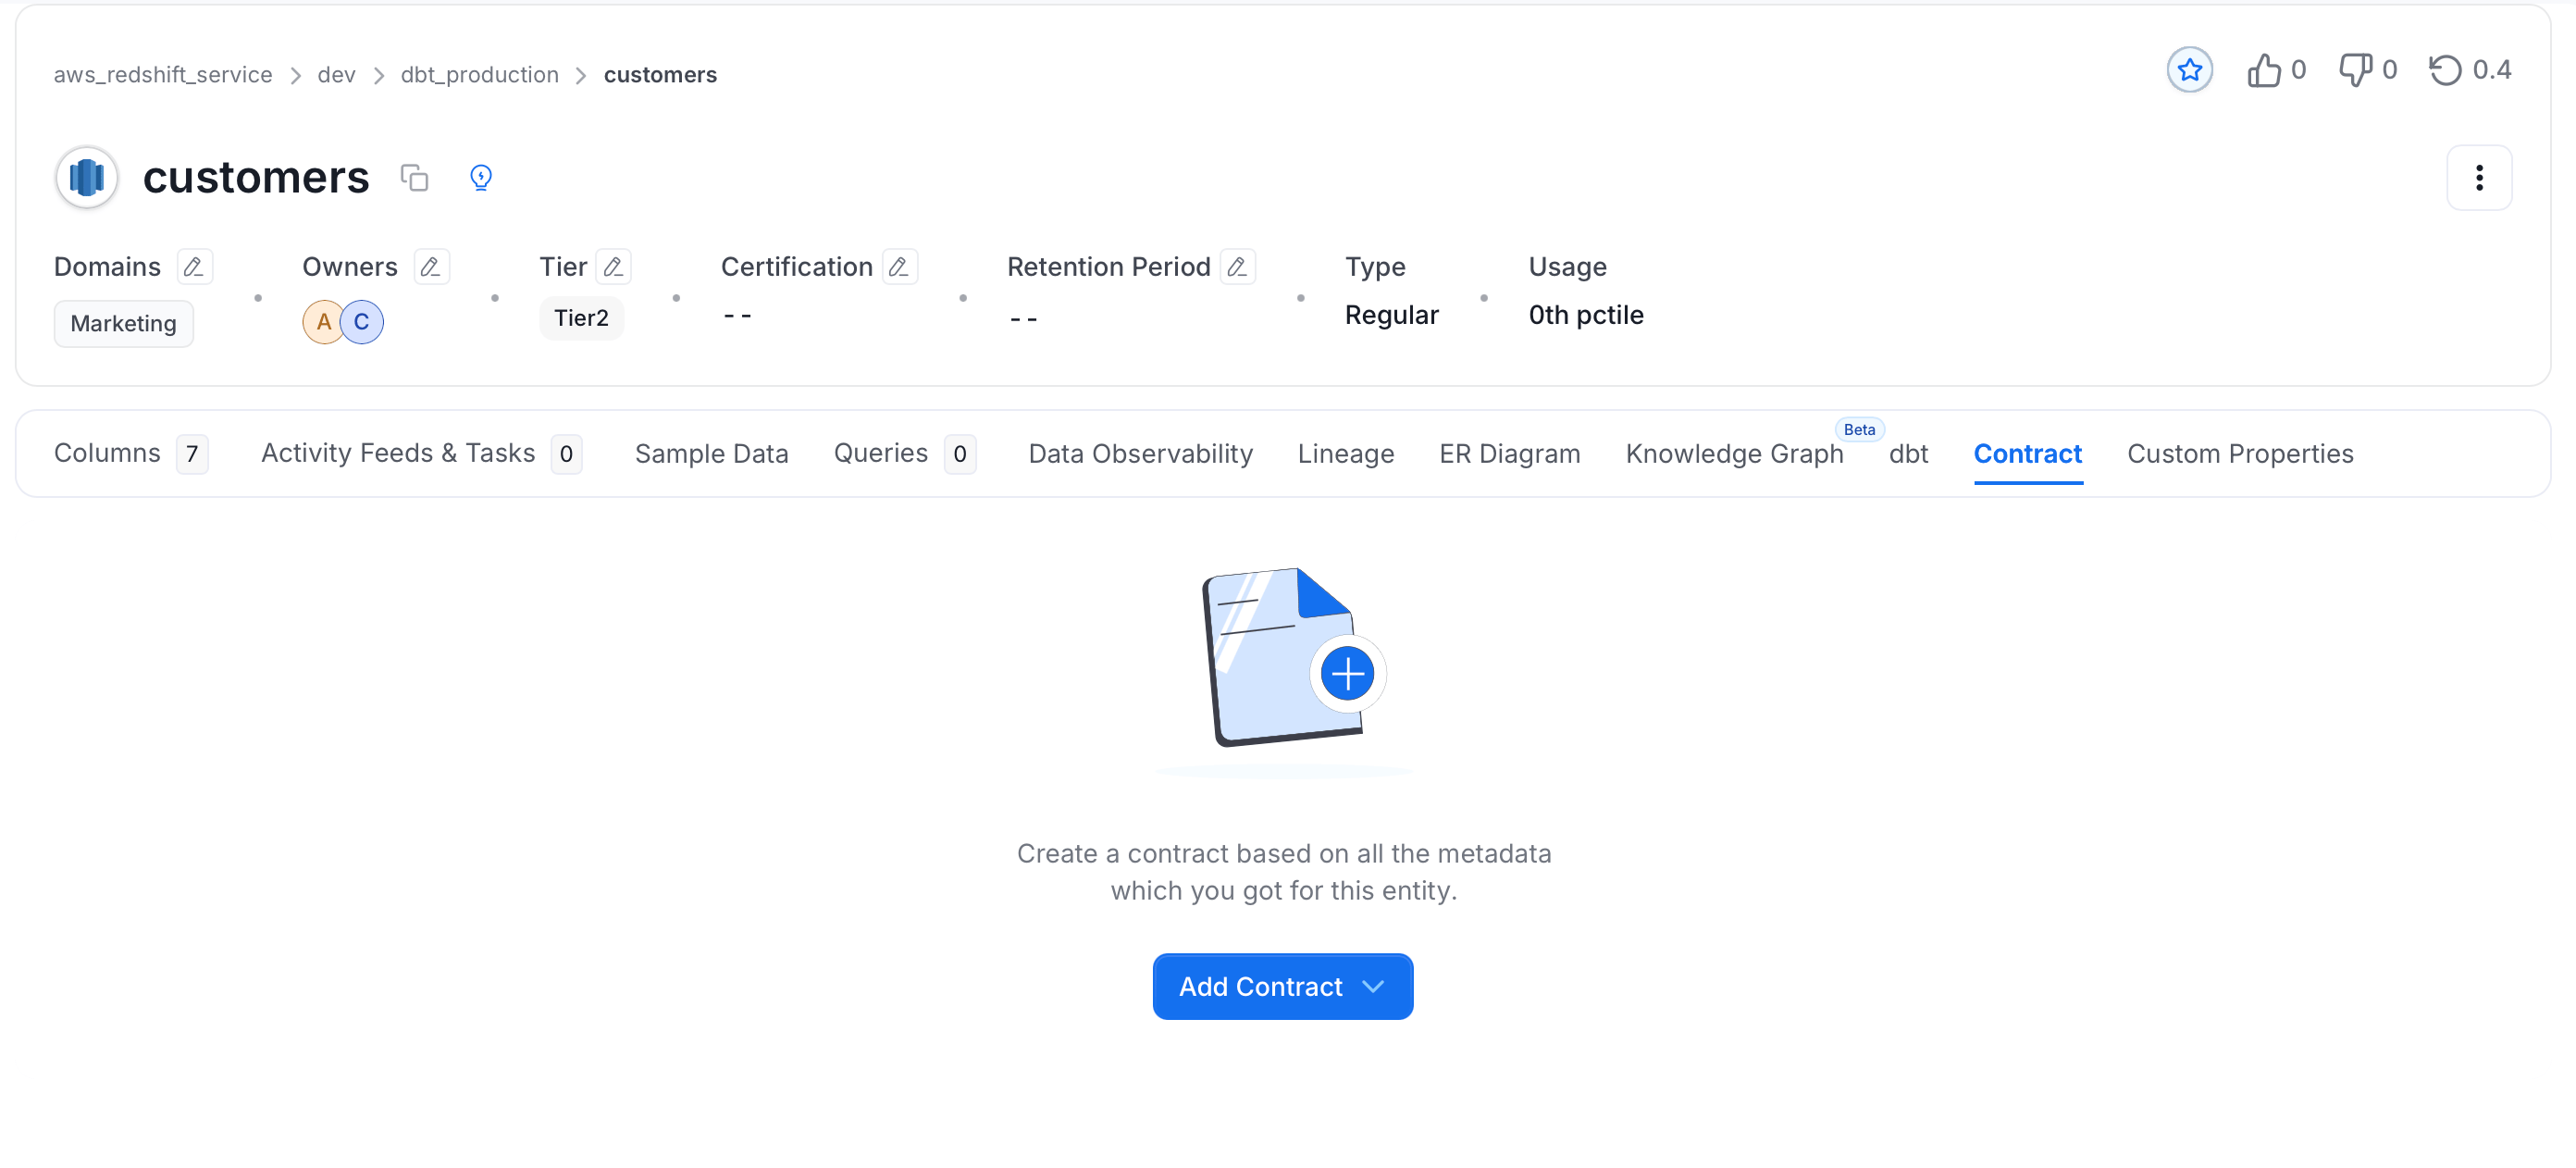
1. On the **Explore Assets** page, open an asset.
2. Select the **Contract** tab and click **Add Contract**.
 ## Step 2: Contract Details
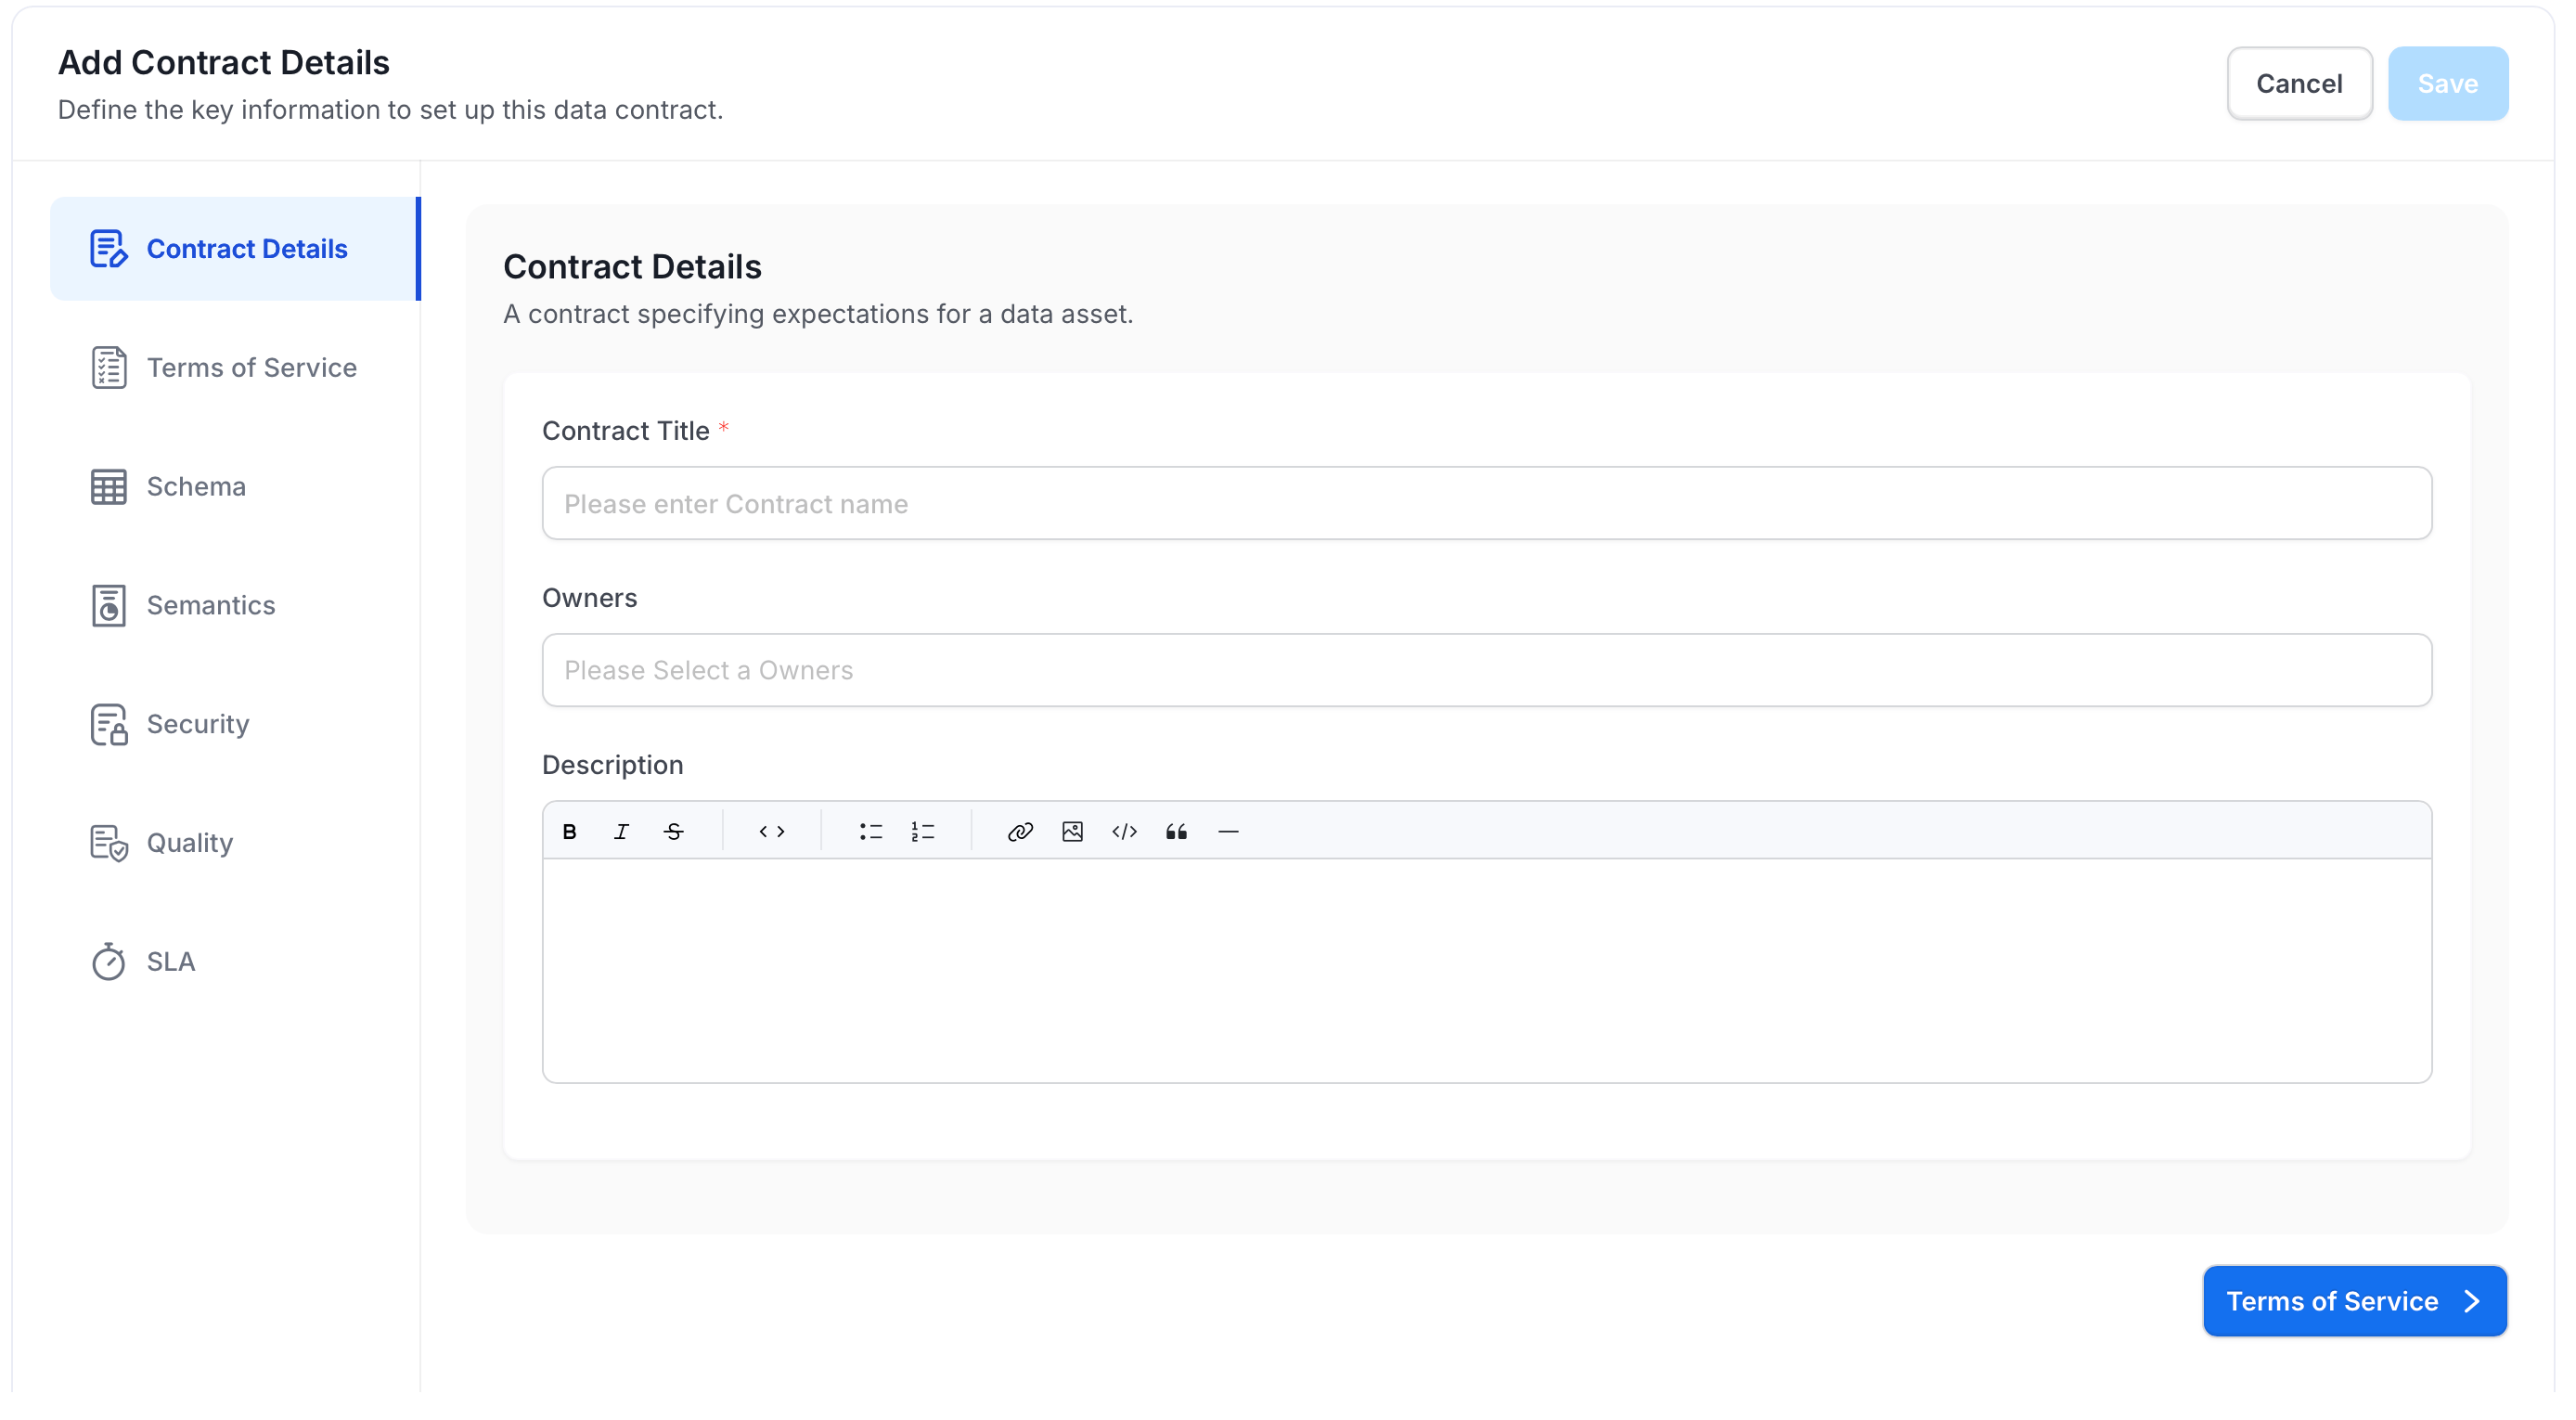
An **Add Contract Details** wizard opens with seven sections in the left sidebar: **Contract Details**, **Terms of Service**, **Schema**, **Semantics**, **Security**, **Quality**, and **SLA**.
1. Fill in the contract's basic information:
* **Contract Title** (required) — Enter a name for the contract.
* **Owners** — Select one or more owners from the directory.
* **Description** — Add a description using the rich text editor.
## Step 2: Contract Details
An **Add Contract Details** wizard opens with seven sections in the left sidebar: **Contract Details**, **Terms of Service**, **Schema**, **Semantics**, **Security**, **Quality**, and **SLA**.
1. Fill in the contract's basic information:
* **Contract Title** (required) — Enter a name for the contract.
* **Owners** — Select one or more owners from the directory.
* **Description** — Add a description using the rich text editor.
 2. Click **Terms of Service** to continue.
## Step 3: Terms of Service
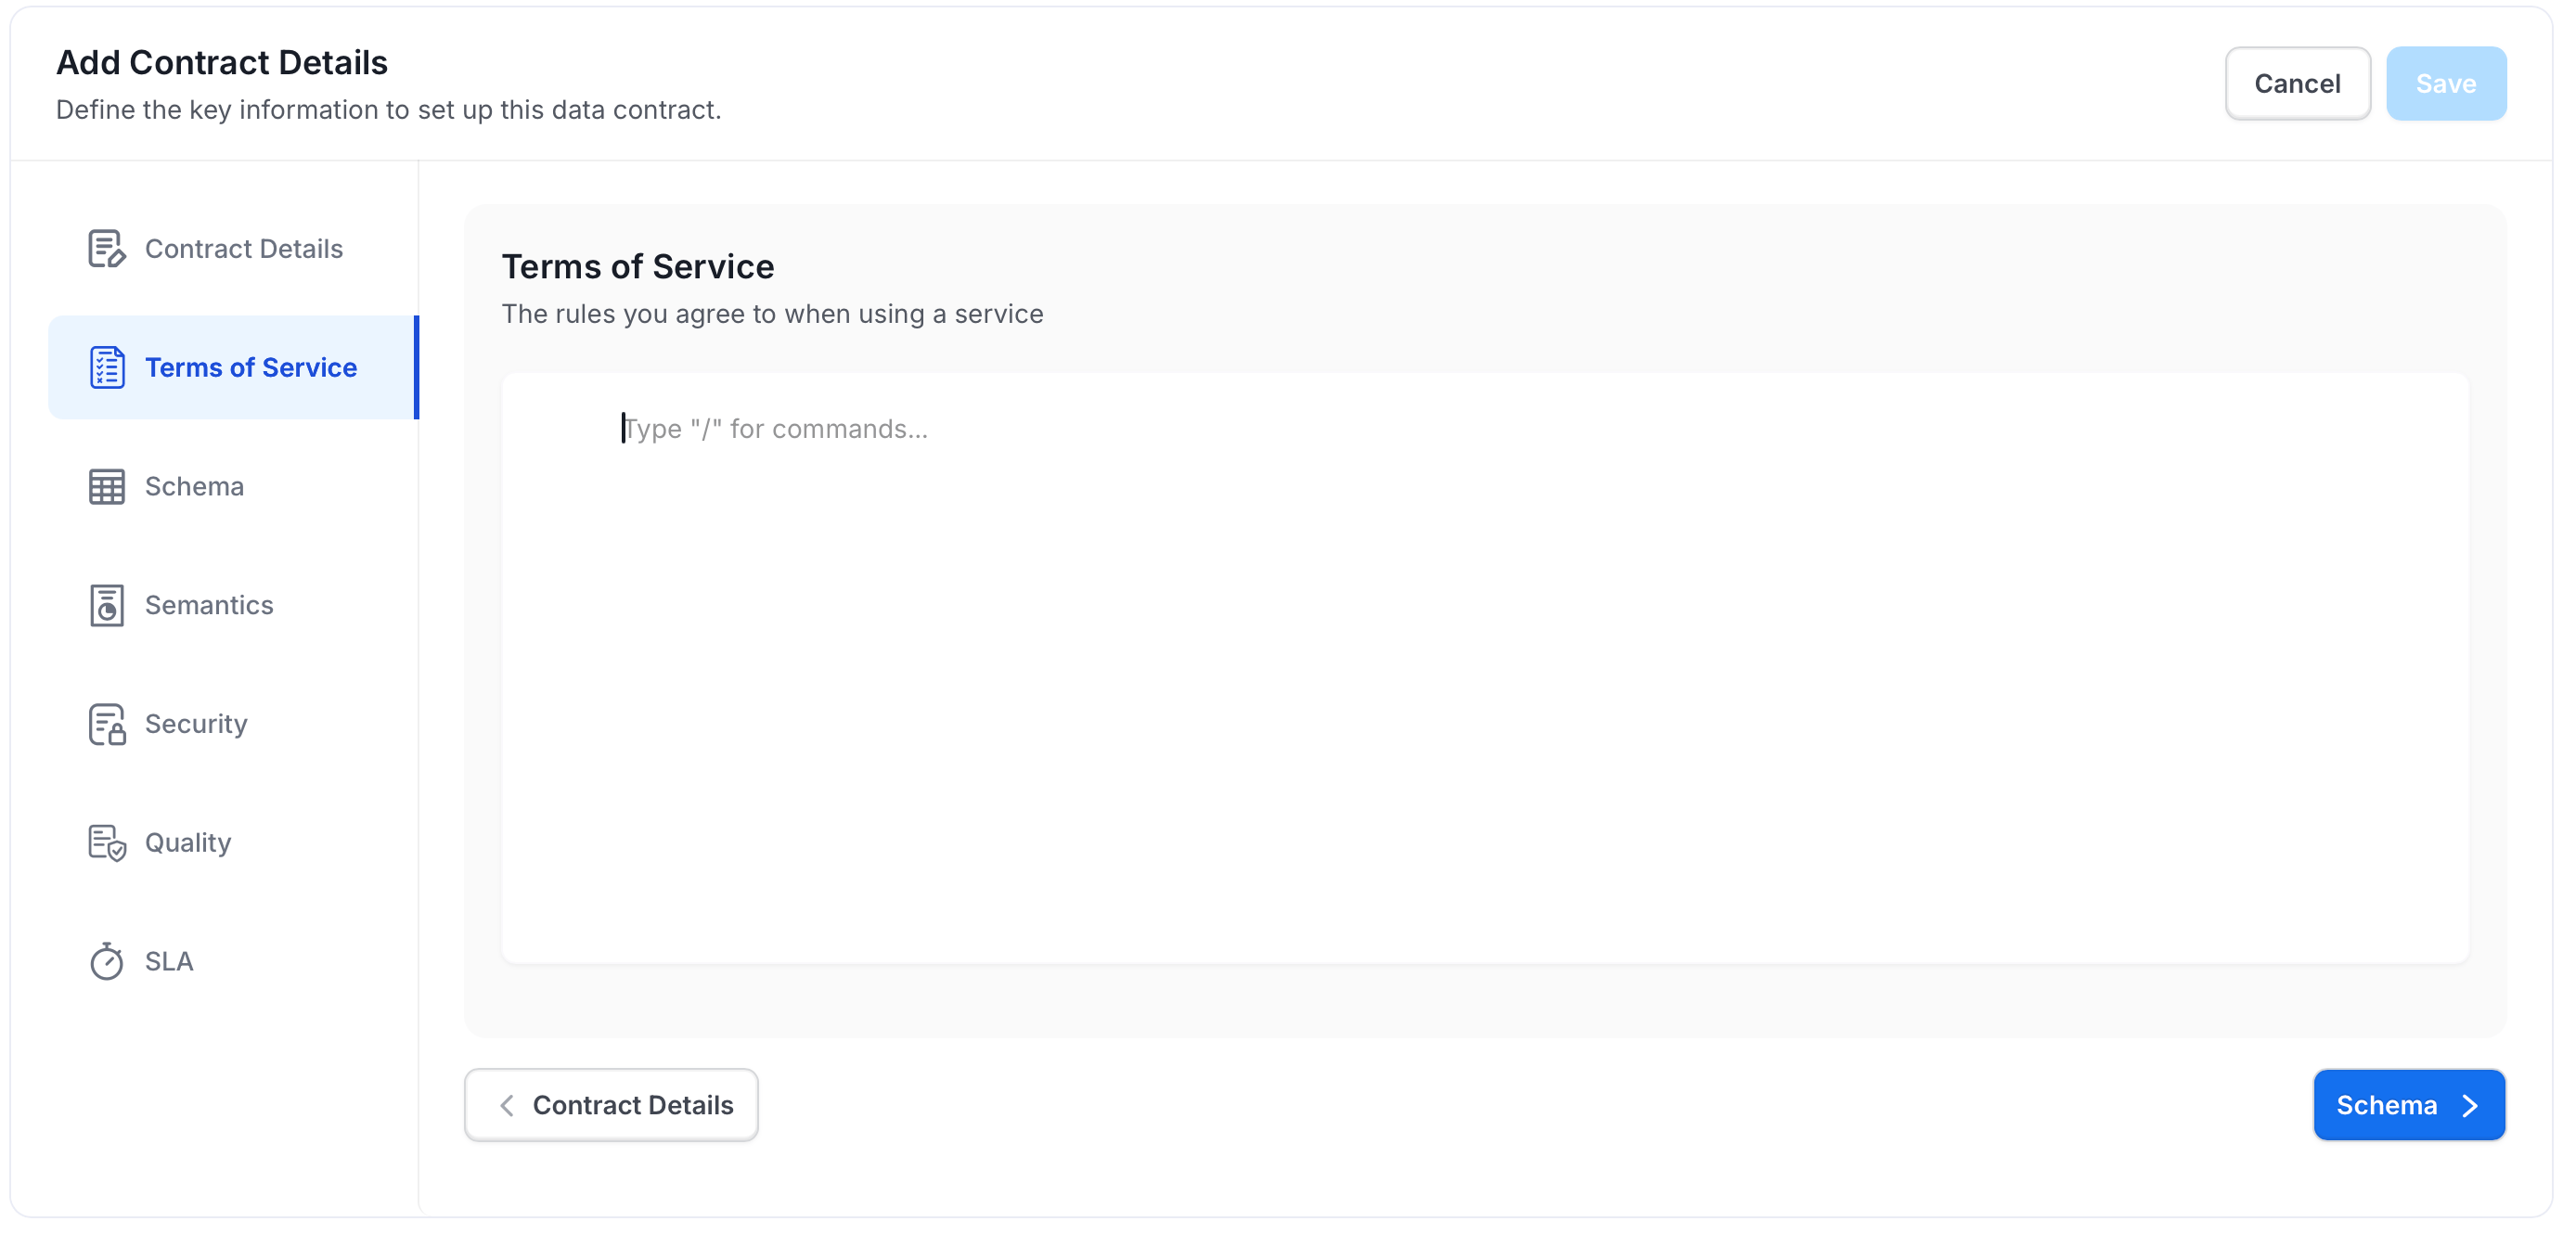
1. Enter the rules and conditions that consumers of this data asset agree to. Use the rich text editor — type `/` to access formatting commands.
2. Click **Terms of Service** to continue.
## Step 3: Terms of Service
1. Enter the rules and conditions that consumers of this data asset agree to. Use the rich text editor — type `/` to access formatting commands.
 2. Click **Schema** to continue.
## Step 4: Schema
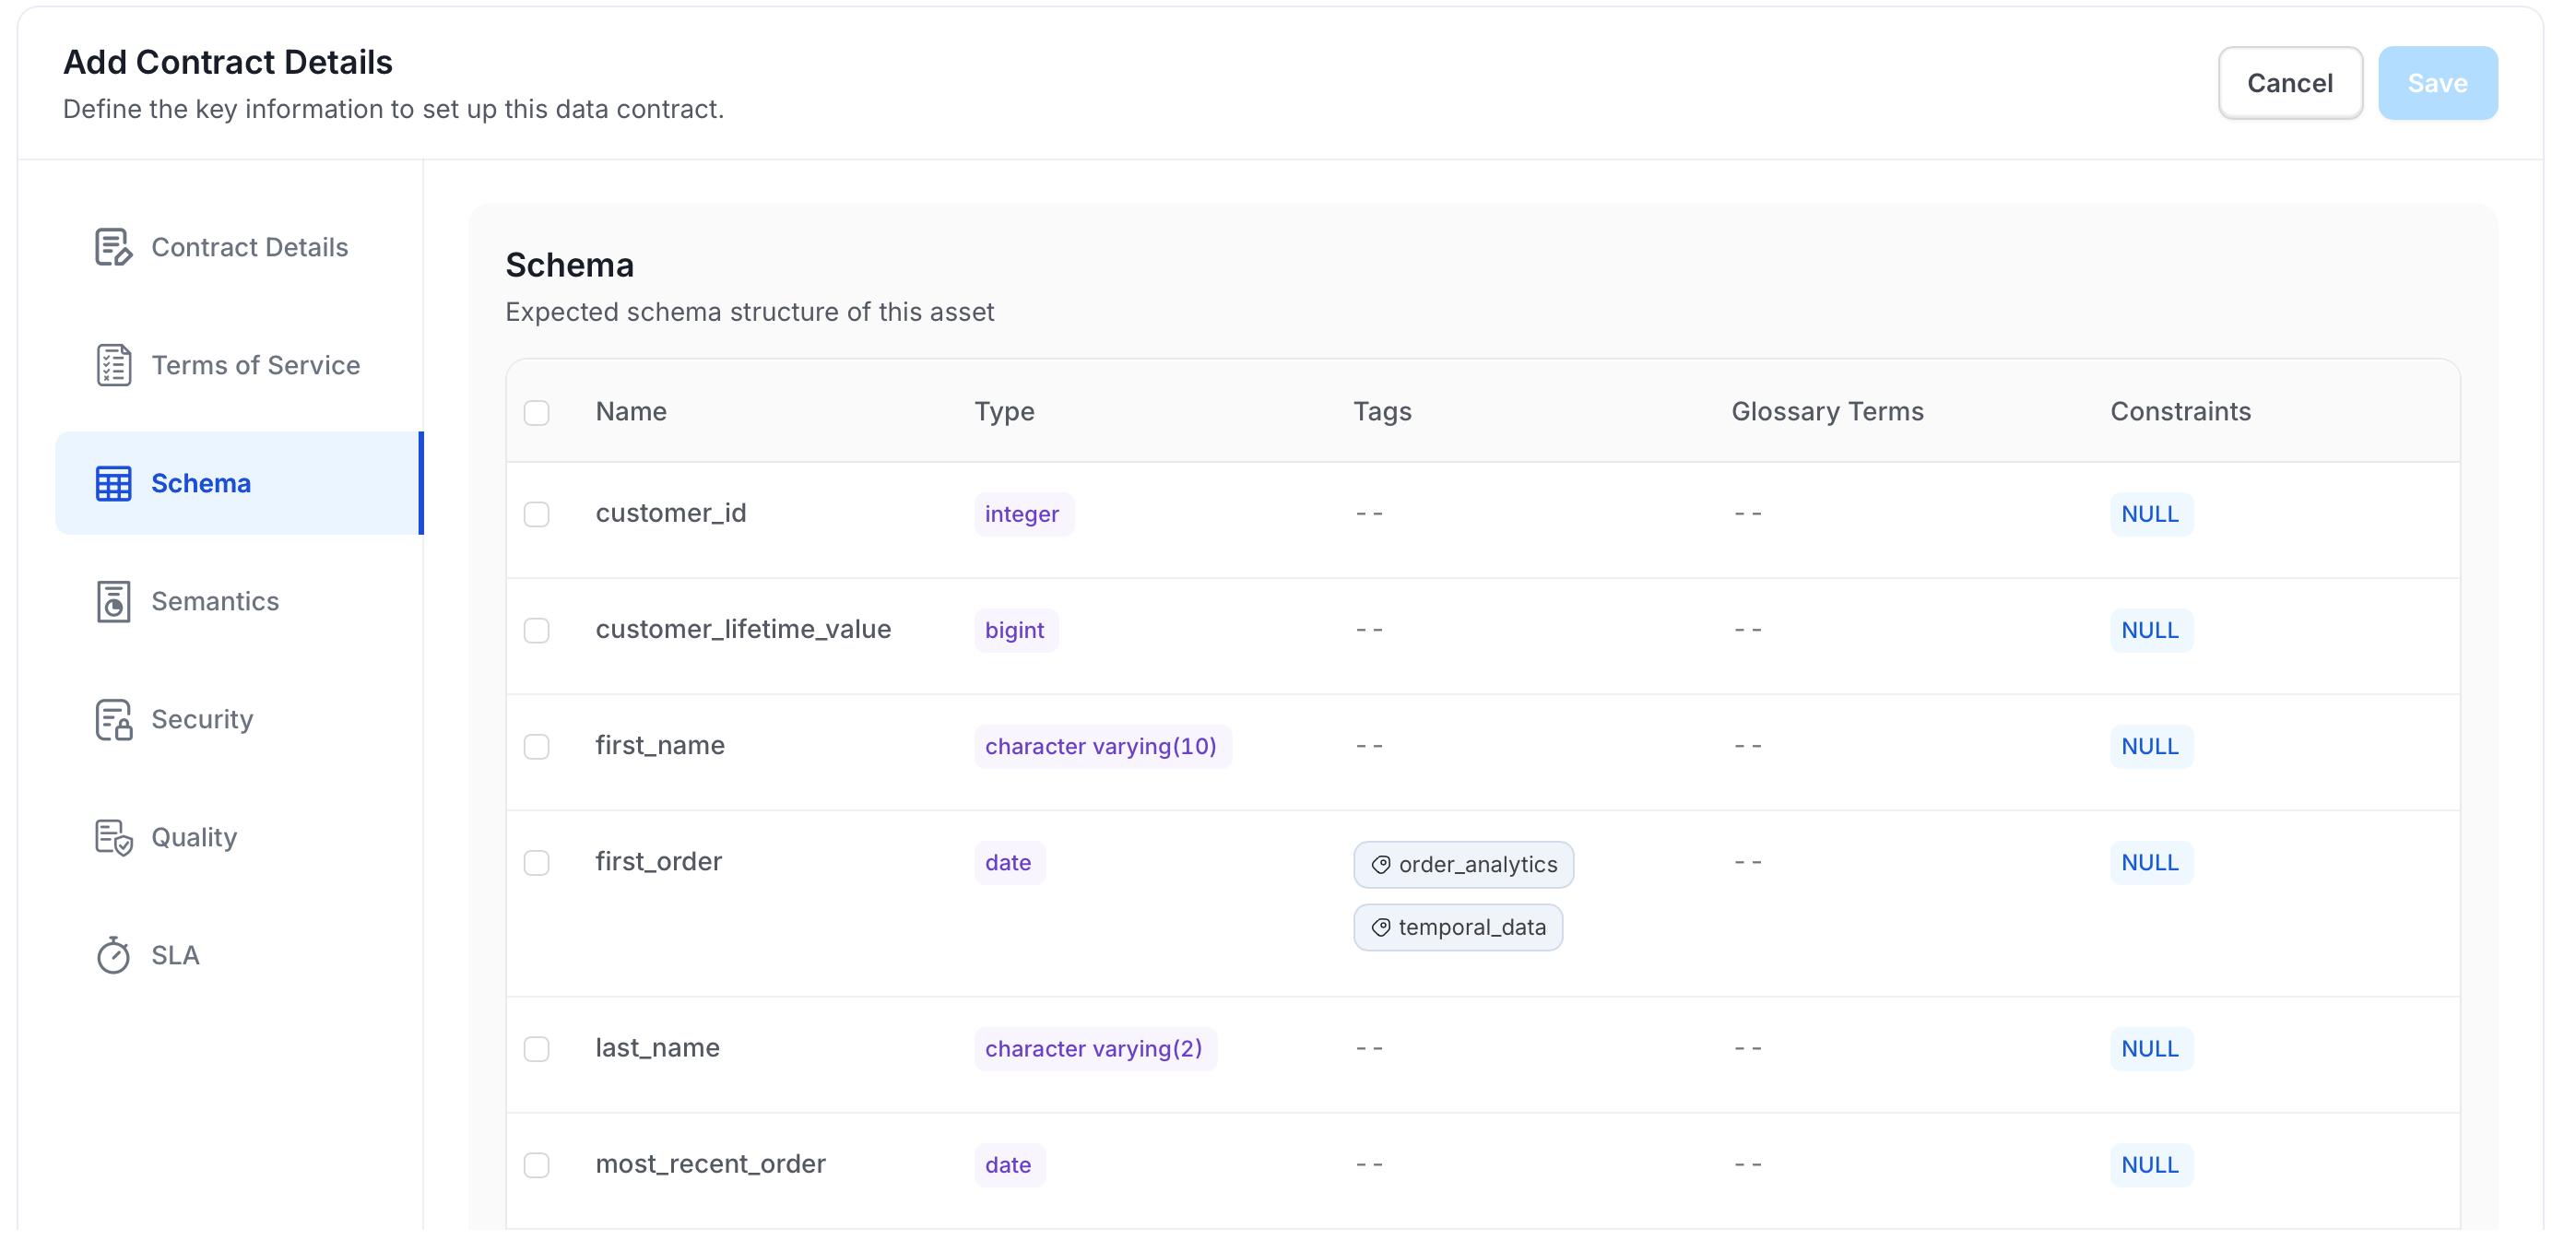
The Schema section lists all columns from the asset, pre-populated with their type, tags, glossary terms, and constraints.
1. Select the columns to include in this contract, or check the top box to select all.
2. Click **Schema** to continue.
## Step 4: Schema
The Schema section lists all columns from the asset, pre-populated with their type, tags, glossary terms, and constraints.
1. Select the columns to include in this contract, or check the top box to select all.
 2. Click **Semantics** to continue.
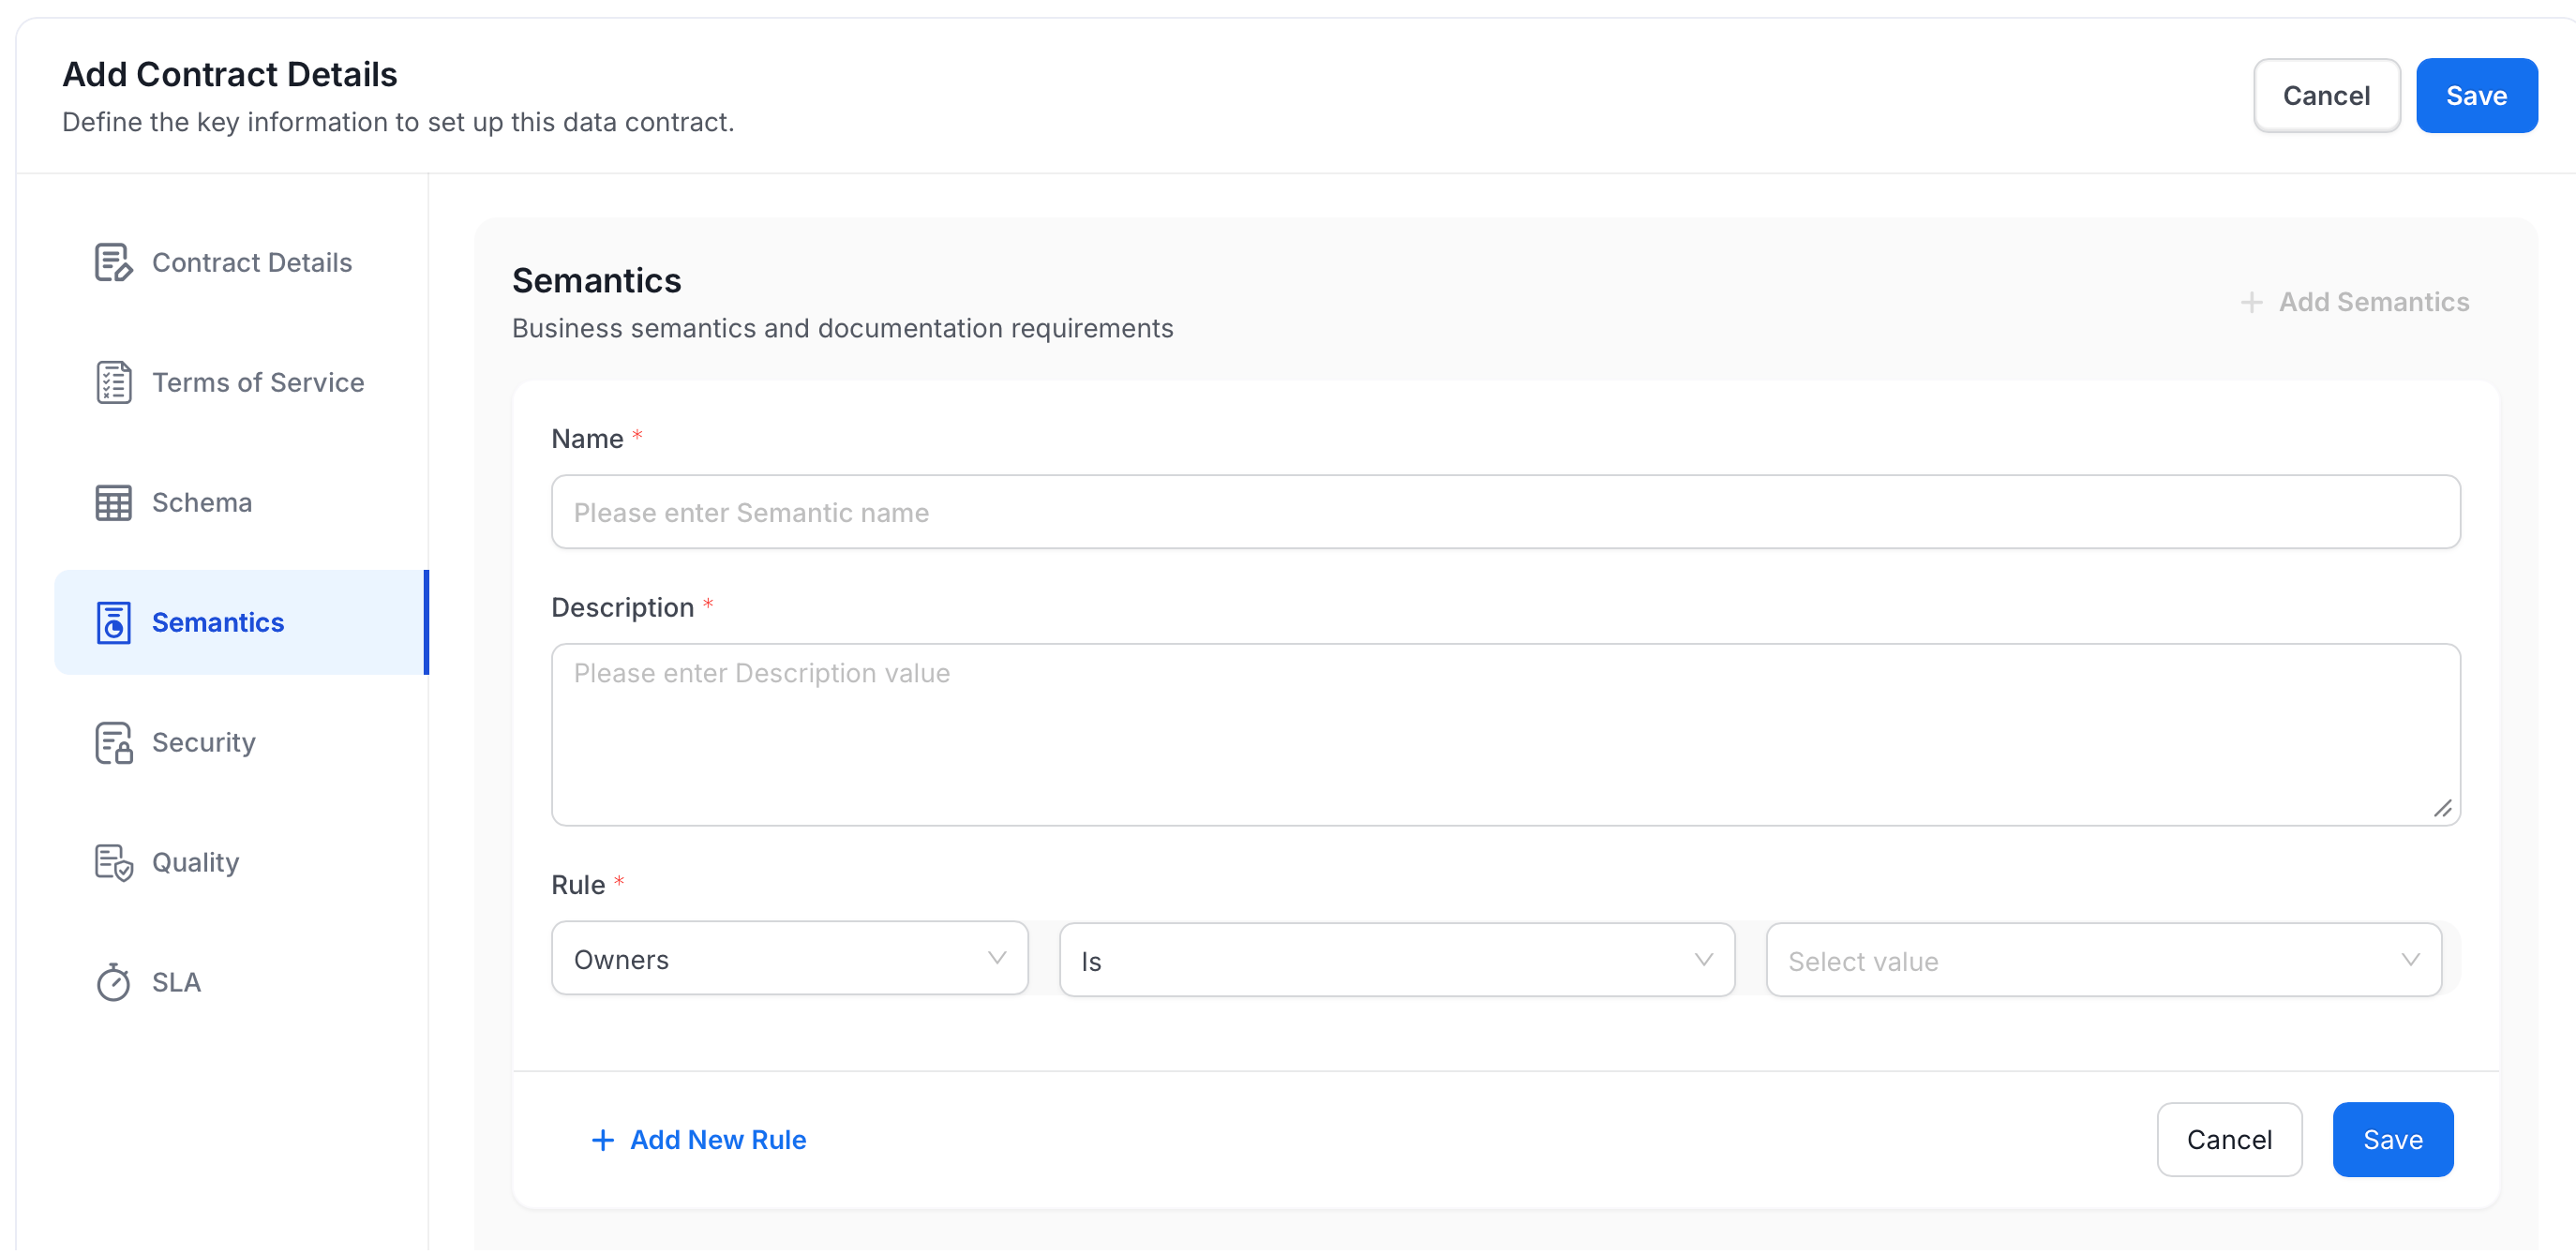
## Step 5: Semantics
Semantics define business documentation rules the asset must meet. Click **Add Semantics** to create a rule. See [Understanding Semantic Rules](#understanding-semantic-rules) for a full list of supported fields and how to combine conditions.
1. Enter a **Name** (required).
2. Enter a **Description** (required).
3. Configure the **Rule** using the query builder — select a field, operator, and value. Supported fields include:
* Service, Owners, Display Name, Name, Description, Tags, Domain, Data Product, Tier
4. Click **Add New Rule** within the query builder to add more conditions to the same rule, or click **Add Semantics** to create an additional rule.
5. Click **Security** to continue.
2. Click **Semantics** to continue.
## Step 5: Semantics
Semantics define business documentation rules the asset must meet. Click **Add Semantics** to create a rule. See [Understanding Semantic Rules](#understanding-semantic-rules) for a full list of supported fields and how to combine conditions.
1. Enter a **Name** (required).
2. Enter a **Description** (required).
3. Configure the **Rule** using the query builder — select a field, operator, and value. Supported fields include:
* Service, Owners, Display Name, Name, Description, Tags, Domain, Data Product, Tier
4. Click **Add New Rule** within the query builder to add more conditions to the same rule, or click **Add Semantics** to create an additional rule.
5. Click **Security** to continue.
 ## Step 6: Security
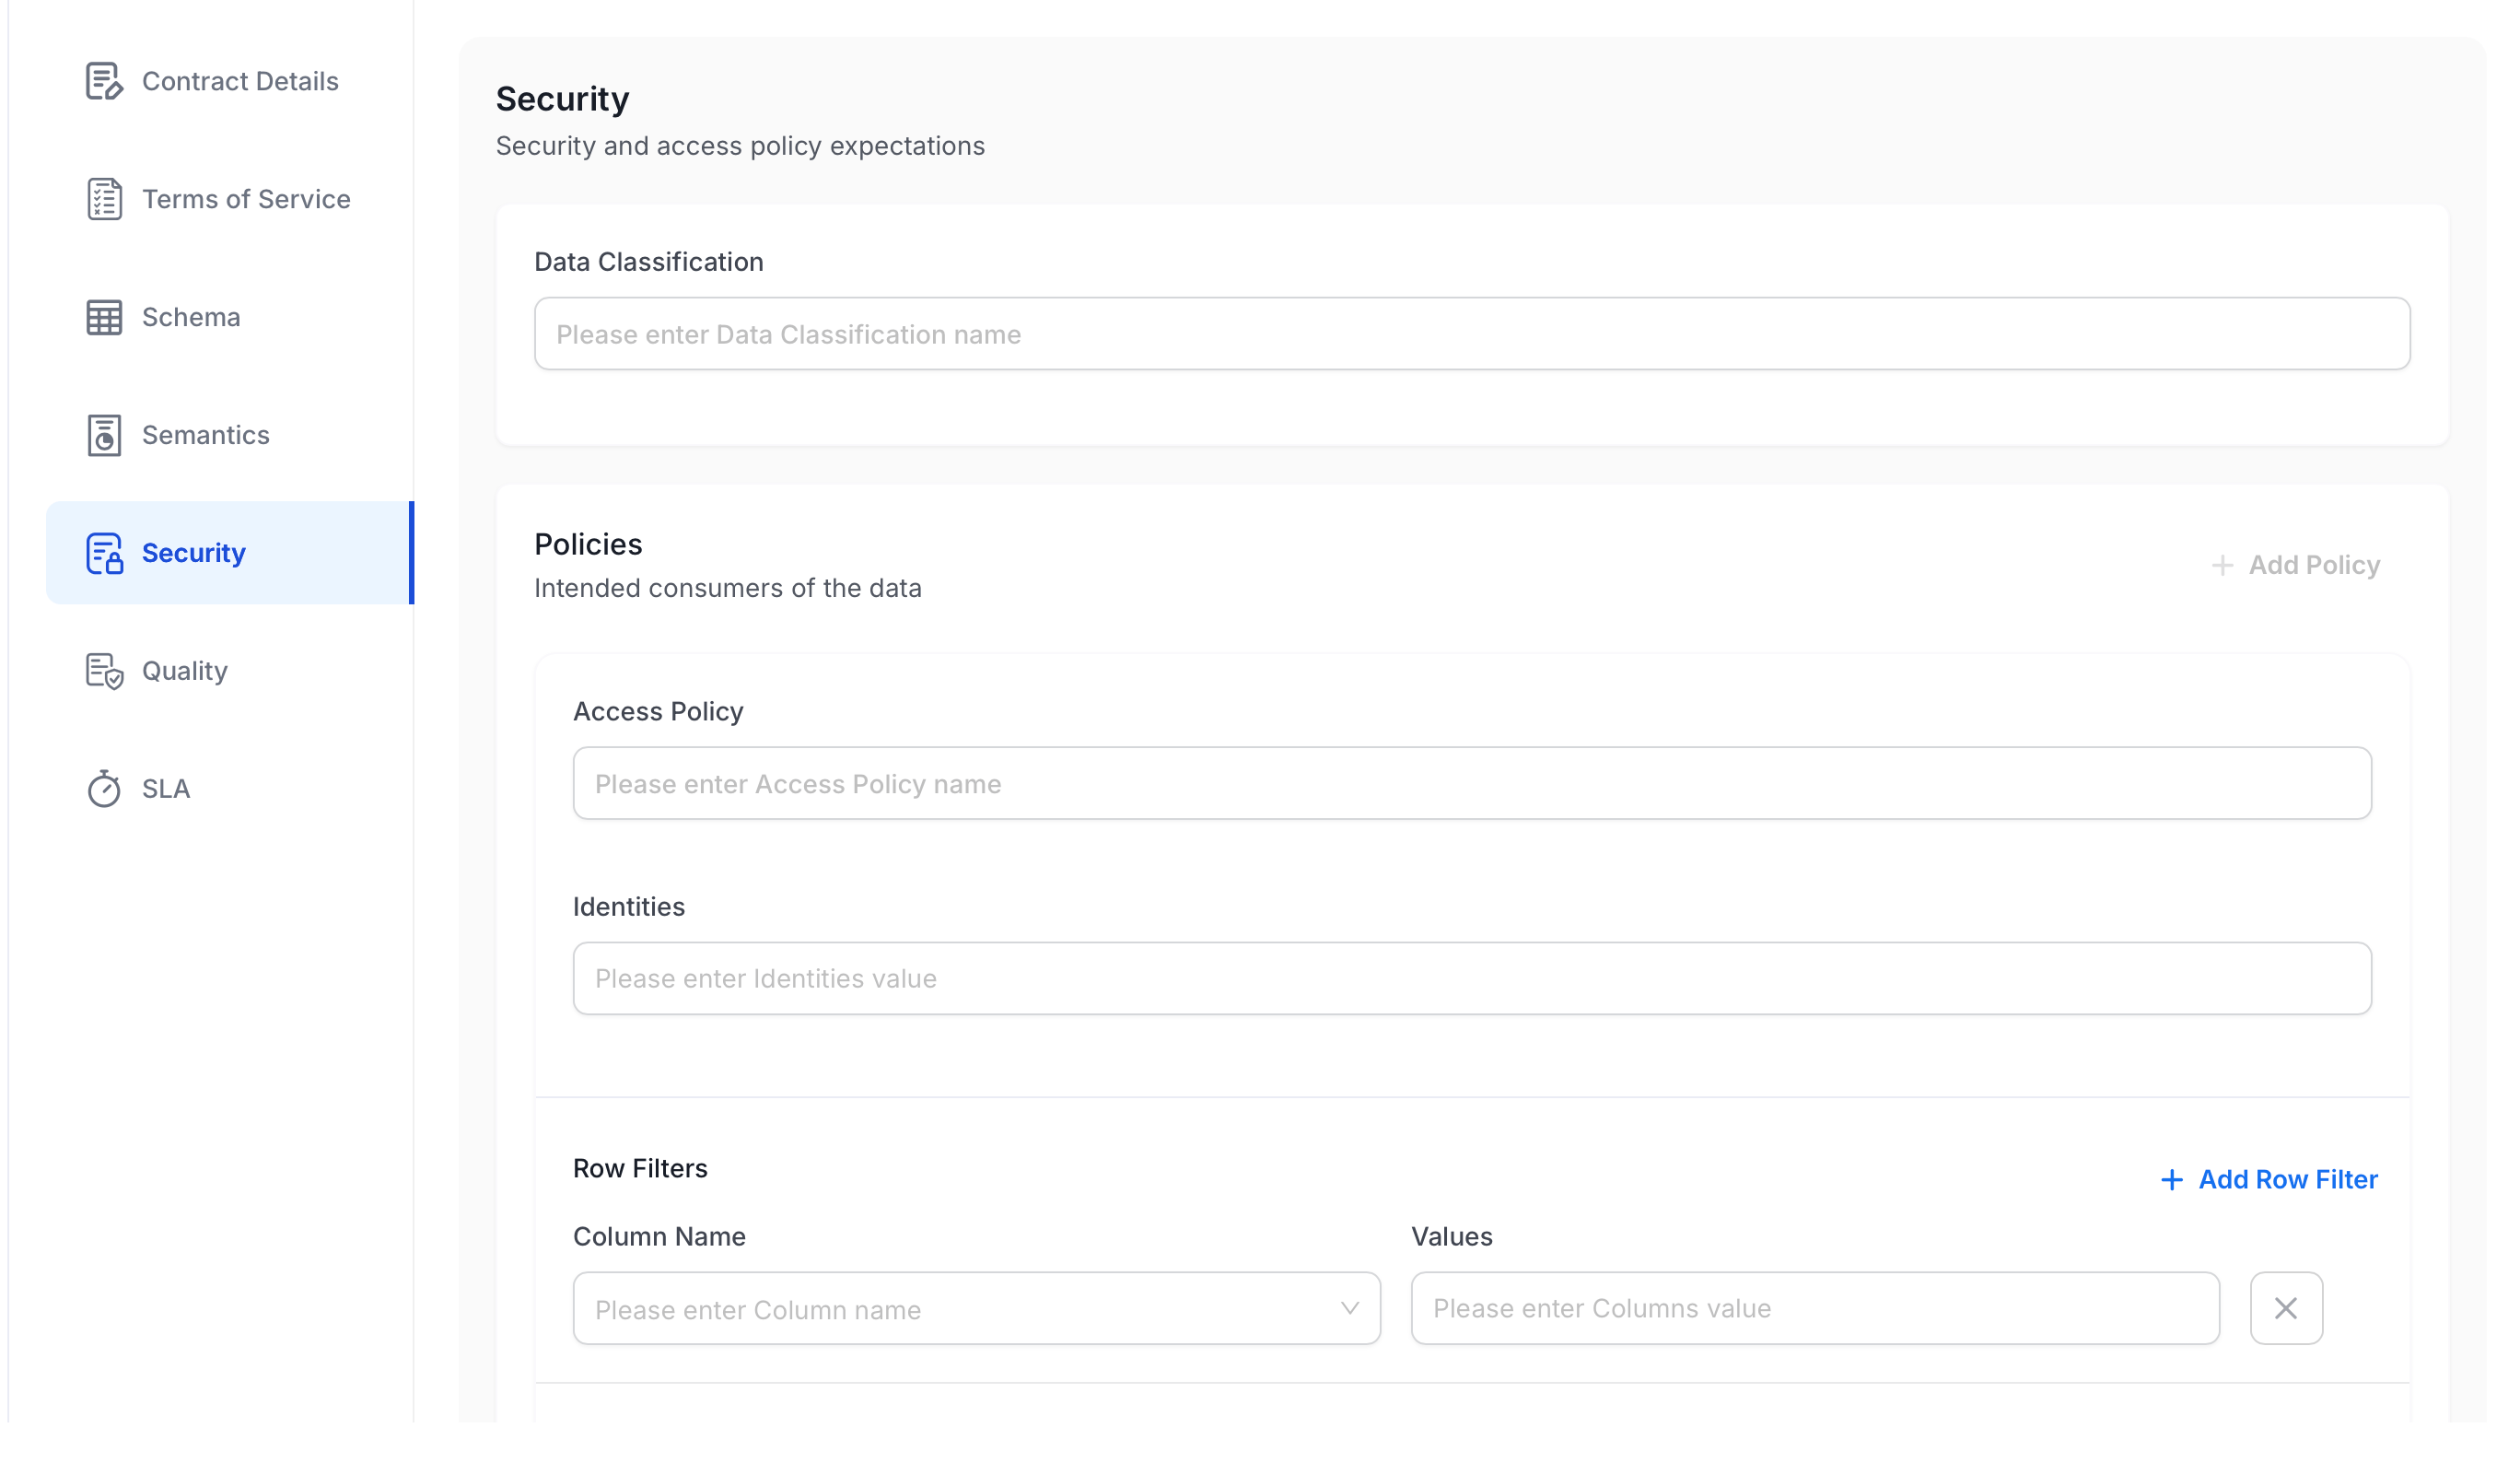
Security expectations cover classification, access policies, and row-level filters. See [Security Settings Explained](#security-settings-explained) for guidance on when and how to use each field.
1. Fill in the following details:
* **Data Classification** — Enter the classification label for this asset (for example, `PII`, `Confidential`).
* **Policies** — Click **+ Add Policy** to define an access policy:
* **Access Policy** — Name of the access policy.
* **Identities** — Users or groups the policy applies to.
* **Row Filters** — Click **+ Add Row Filter** to restrict visible rows by column value:
* **Column Name** — Select the column to filter on.
* **Values** — Enter the allowed values for that column.
## Step 6: Security
Security expectations cover classification, access policies, and row-level filters. See [Security Settings Explained](#security-settings-explained) for guidance on when and how to use each field.
1. Fill in the following details:
* **Data Classification** — Enter the classification label for this asset (for example, `PII`, `Confidential`).
* **Policies** — Click **+ Add Policy** to define an access policy:
* **Access Policy** — Name of the access policy.
* **Identities** — Users or groups the policy applies to.
* **Row Filters** — Click **+ Add Row Filter** to restrict visible rows by column value:
* **Column Name** — Select the column to filter on.
* **Values** — Enter the allowed values for that column.
 2. Click **Quality** to continue.
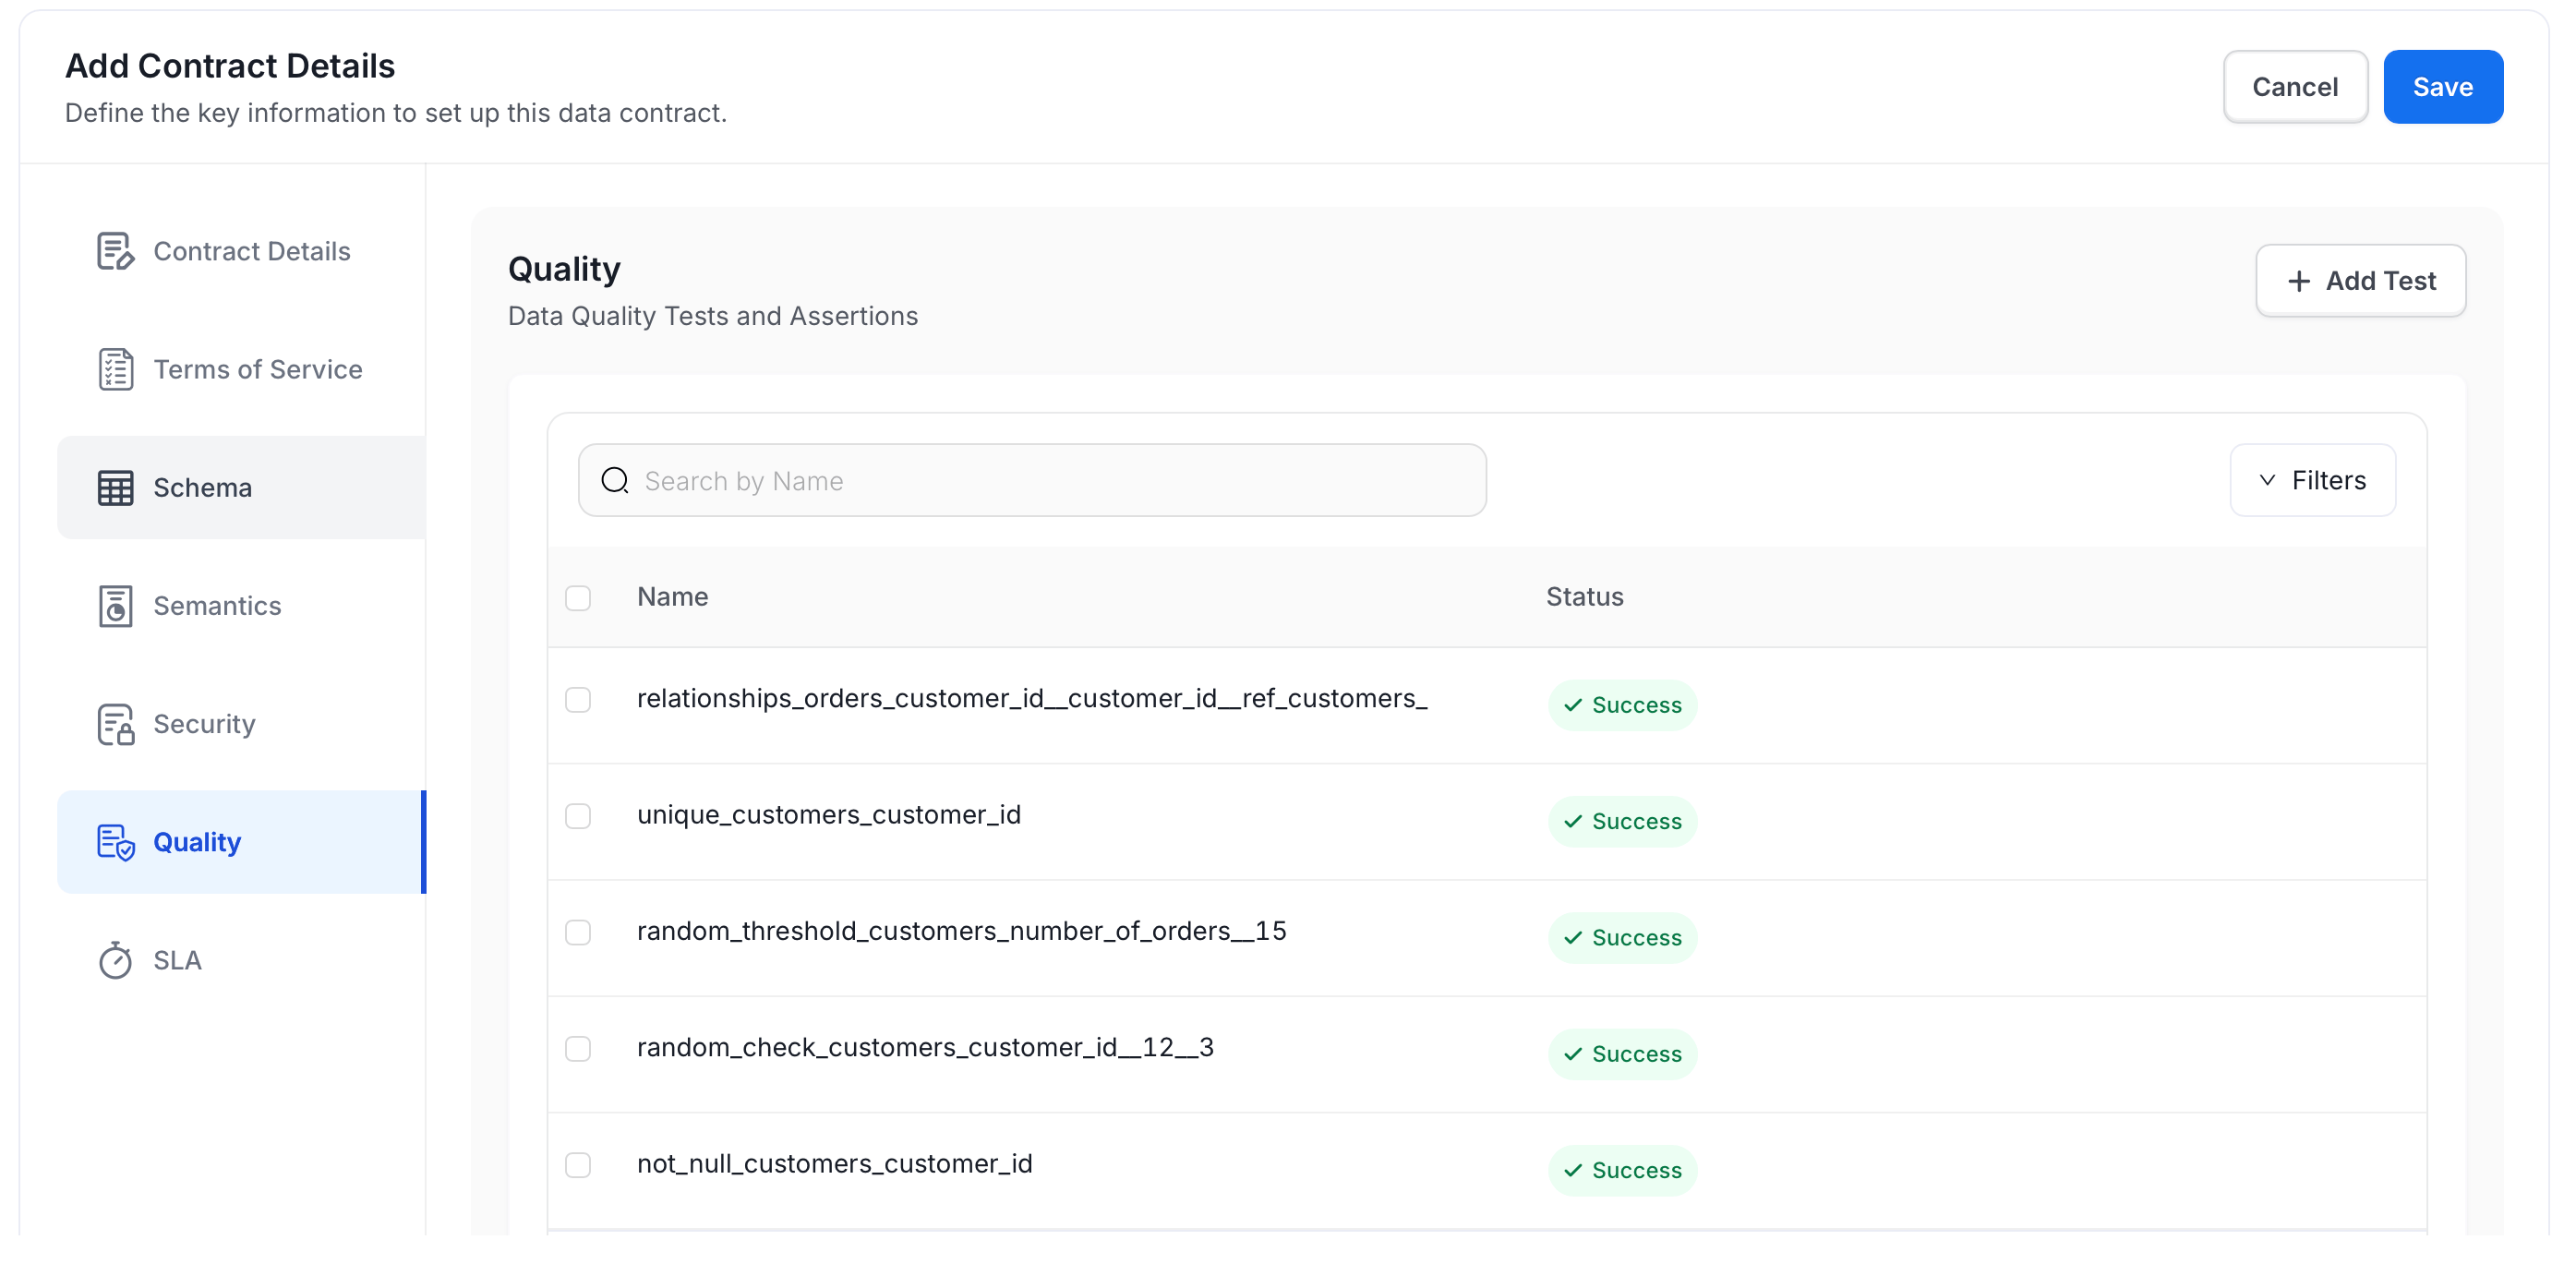
## Step 7: Quality
The Quality section lists existing data quality tests for the asset and their current status.
1. Select tests to include in the contract, or click **+ Add Test** to create a new test case. See [Create Quality Test Case](/ai-2-0/how-to-guides/data-quality-observability/quality/test).
2. Click **Quality** to continue.
## Step 7: Quality
The Quality section lists existing data quality tests for the asset and their current status.
1. Select tests to include in the contract, or click **+ Add Test** to create a new test case. See [Create Quality Test Case](/ai-2-0/how-to-guides/data-quality-observability/quality/test).
 2. Click **SLA** to continue.
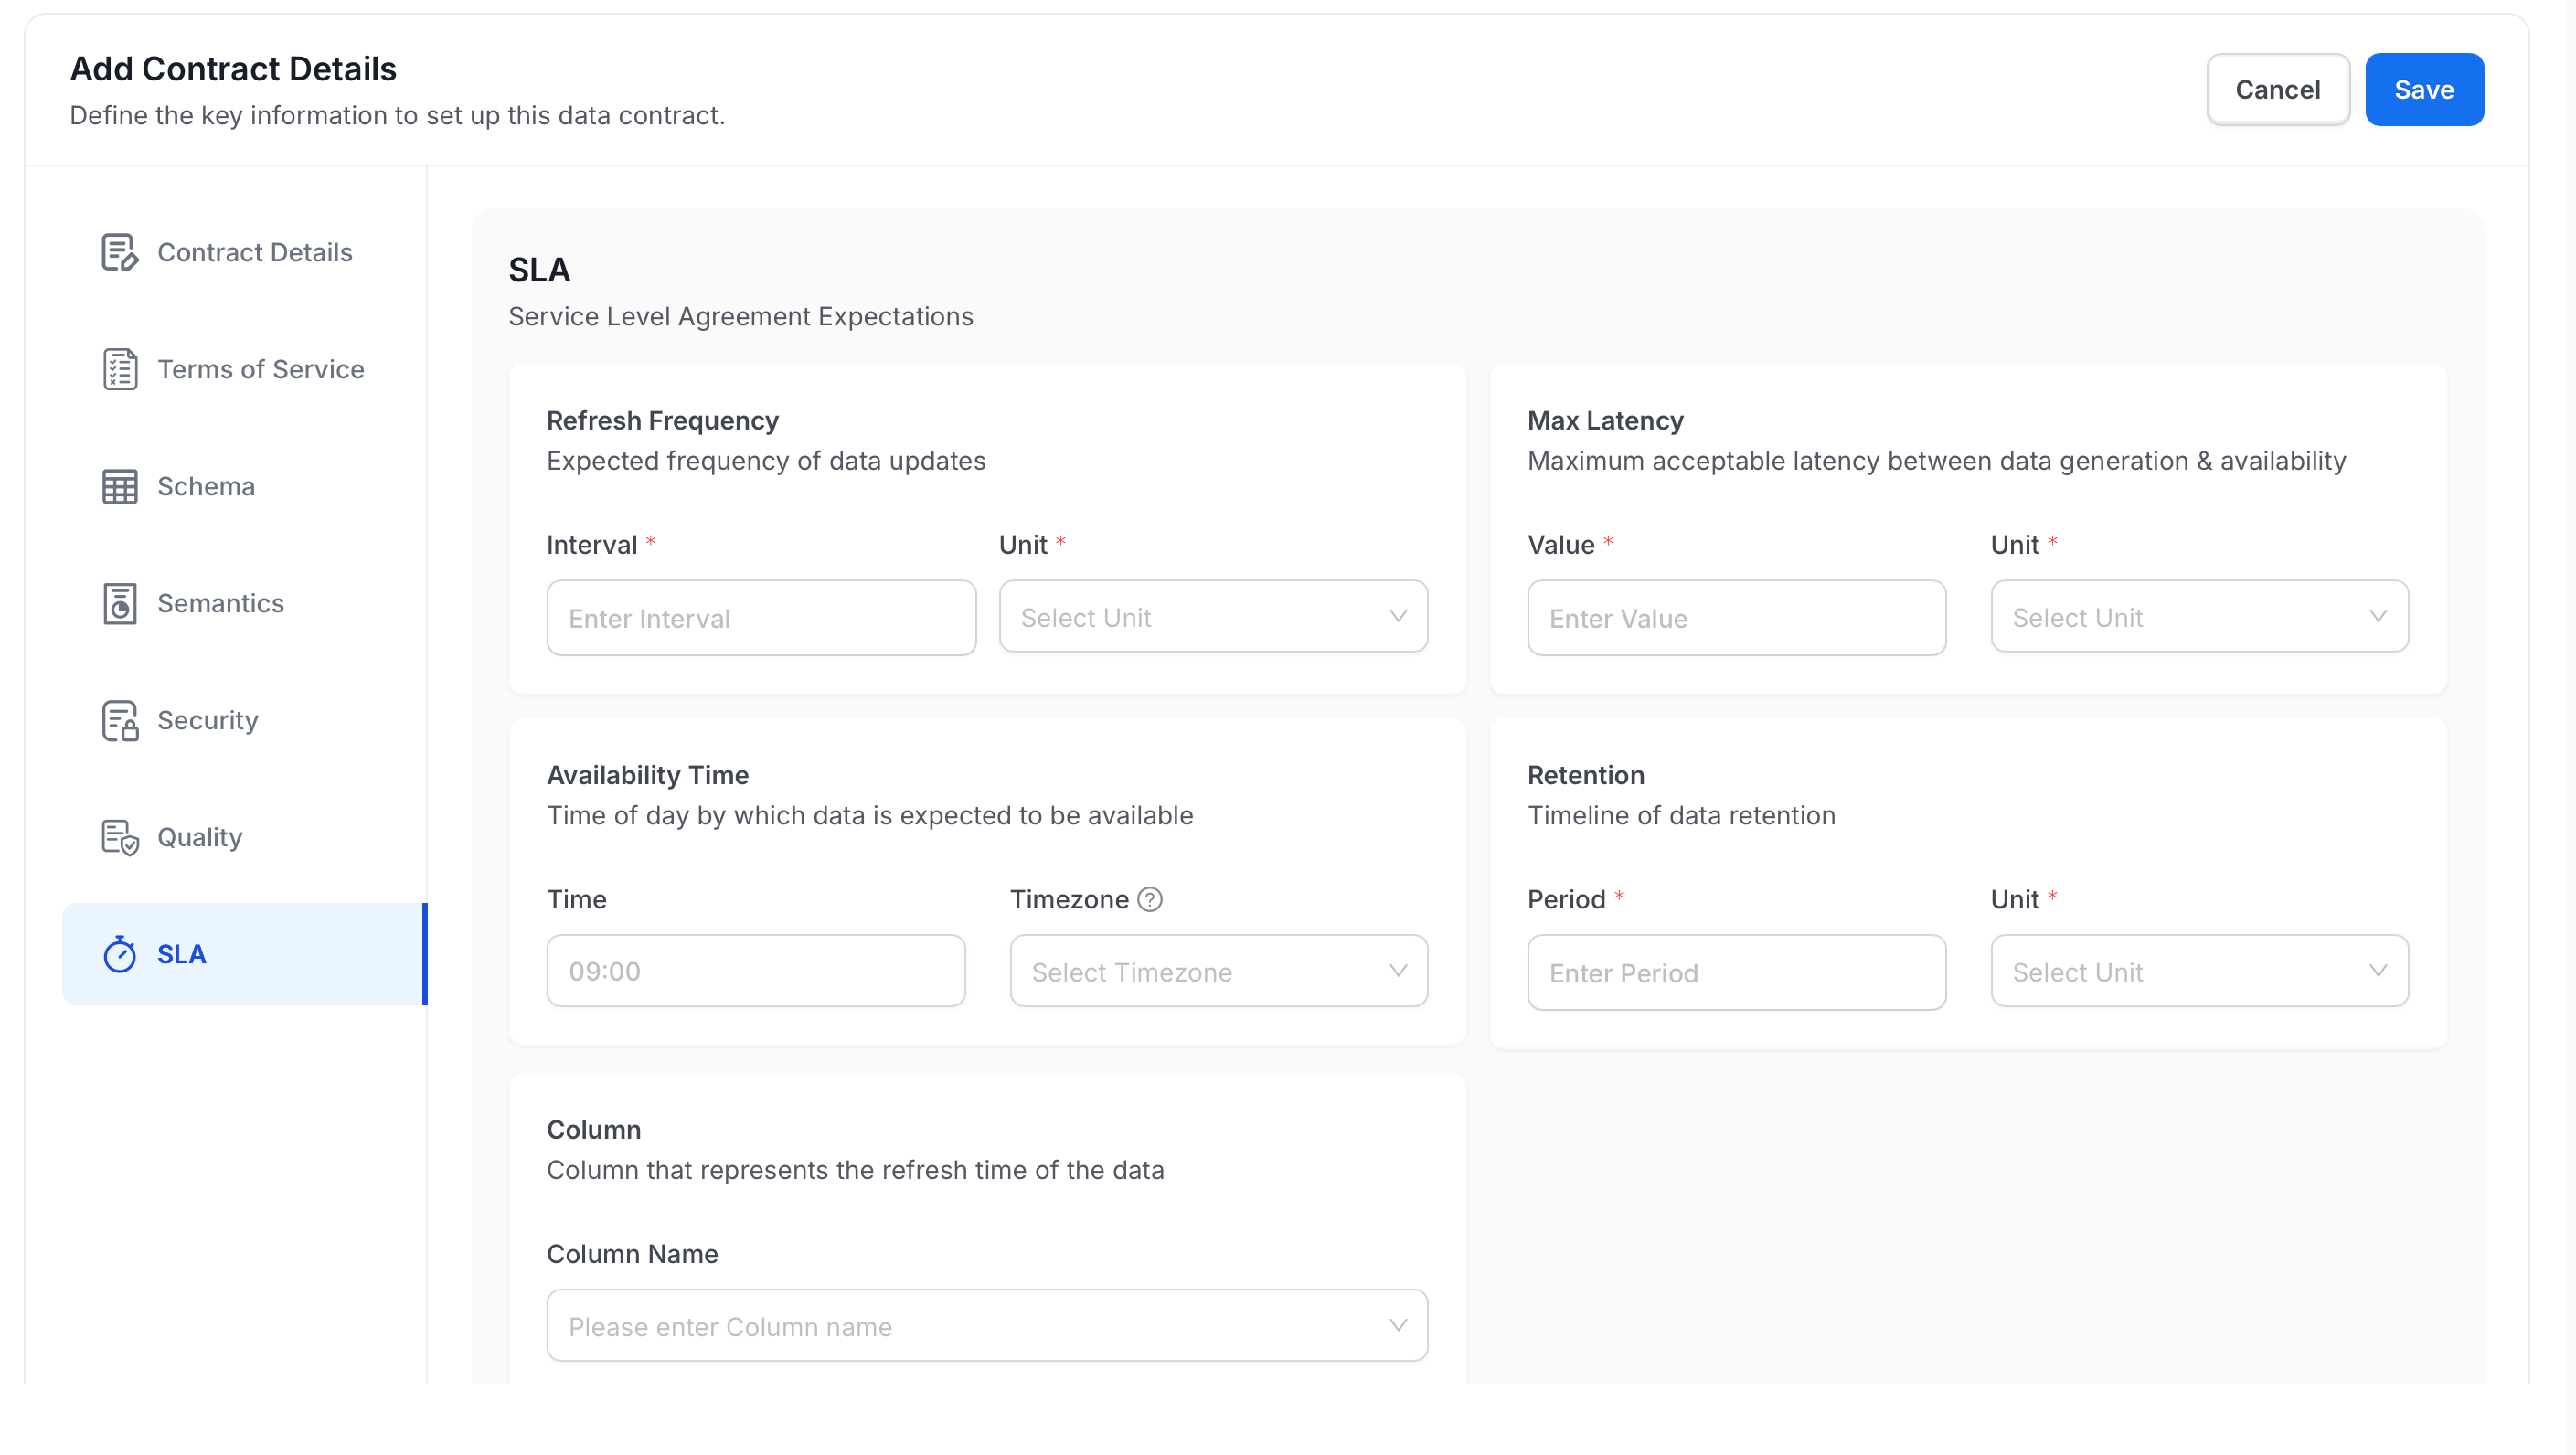
## Step 8: SLA
SLA defines the service level expectations for this asset. See [SLA Fields Explained](#sla-fields-explained) to understand the difference between each time-related field.
1. Fill in the following fields:
* **Refresh Frequency** — Set the expected update interval and unit (hour, day, week, month, or year).
* **Max Latency** — Set the maximum acceptable delay between data generation and availability, in minutes, hours, or days.
* **Availability Time** — Set the time of day by which data must be available, and select a timezone.
* **Retention** — Set the data retention period and unit (day, week, month, or year).
* **Column** > **Column Name** — Select the column that represents the refresh timestamp of the data.
2. Click **SLA** to continue.
## Step 8: SLA
SLA defines the service level expectations for this asset. See [SLA Fields Explained](#sla-fields-explained) to understand the difference between each time-related field.
1. Fill in the following fields:
* **Refresh Frequency** — Set the expected update interval and unit (hour, day, week, month, or year).
* **Max Latency** — Set the maximum acceptable delay between data generation and availability, in minutes, hours, or days.
* **Availability Time** — Set the time of day by which data must be available, and select a timezone.
* **Retention** — Set the data retention period and unit (day, week, month, or year).
* **Column** > **Column Name** — Select the column that represents the refresh timestamp of the data.
 2. Click **Save** to create a contract.
## Understanding Semantic Rules
The rule builder uses a three-part structure: **field** | **operator** | **value**. Each combination creates one condition that the asset must satisfy.
### Supported Fields
The following fields are available in the rule builder:
| Field | What it enforces |
| ---------------- | ---------------------------------------------------- |
| **Service** | The data service the asset belongs to. |
| **Owners** | One or more assigned owners. |
| **Display Name** | The display name of the asset. |
| **Name** | The technical name of the asset. |
| **Description** | Whether a description is present and meets criteria. |
| **Tags** | Classification tags applied to the asset. |
| **Domain** | The domain the asset is assigned to. |
| **Data Product** | The data product the asset belongs to. |
| **Tier** | The tier classification (Tier 1, Tier 2, etc.). |
### Combining Conditions
* Click **+ Add New Rule** within a semantic card to add another condition to the same rule.
* Click **+ Add Semantics** to create a separate, independent rule.
### Example
To enforce that every asset in a contract has an owner assigned and is tagged:
1. Click **+ Add Semantics**. Enter Name `Ownership Required`, then set the Rule to `Owners | Is | `. Click **Save**.
2. Click **+ Add Semantics** again. Enter Name `Tag Required`, then set the Rule to `Tags | Is | `. Click **Save**.
## Security Settings Explained
The Security section has three components, each serving a different purpose.
### Data Classification
Data Classification is a free-text label that identifies the sensitivity level of the asset. Common values include `PII`, `Confidential`, `Internal`, and `Public`. This label is informational — it does not automatically enforce access controls, but makes the classification visible to contract consumers.
### Policies
A policy defines who the intended consumers of this data are. Each policy has two fields:
* **Access Policy** — A name identifying the policy (for example, `analytics-read-only`).
* **Identities** — The users, teams, or groups the policy applies to.
Add multiple policies when different groups have different levels of access to the same asset.
### Row Filters
Row Filters restrict which rows a consumer can see when querying this asset. Each filter targets one column:
* **Column Name** — The column to filter on (for example, `country`).
* **Values** — The allowed values for that column (for example, `US`).
**Example:** A contract on a global orders table with a row filter `country = US` ensures that consumers governed by this contract only see rows where `country` is `US`.
**Note**: Row Filters apply to table assets only.
## SLA Fields Explained
The SLA section captures four distinct time-related expectations. Understanding the difference between them helps you set accurate commitments.
| Field | What it measures | Example |
| --------------------- | ------------------------------------------------------------------------------------------------------- | --------------- |
| **Refresh Frequency** | How often the data should be updated. | Every `1` `day` |
| **Max Latency** | The maximum acceptable delay between when data is generated upstream and when it appears in this asset. | `2` `hours` |
| **Availability Time** | The time of day by which data must be ready for consumers. | `09:00` `UTC` |
| **Retention** | How long historical data is expected to be kept. | `90` `days` |
### Refresh Frequency vs Max Latency
These two fields are often confused:
* **Refresh Frequency** is about *cadence* — the asset is expected to update once a day, once a week, etc.
* **Max Latency** is about *delay tolerance* — after the upstream source produces data, how long before it must appear in this asset.
A pipeline that runs daily but must reflect changes within 2 hours of upstream production would have a Refresh Frequency of `1 day` and a Max Latency of `2 hours`.
### Column
Select the column that holds the timestamp of each row's last refresh. Collate uses this column to verify data freshness against the Refresh Frequency expectation.
2. Click **Save** to create a contract.
## Understanding Semantic Rules
The rule builder uses a three-part structure: **field** | **operator** | **value**. Each combination creates one condition that the asset must satisfy.
### Supported Fields
The following fields are available in the rule builder:
| Field | What it enforces |
| ---------------- | ---------------------------------------------------- |
| **Service** | The data service the asset belongs to. |
| **Owners** | One or more assigned owners. |
| **Display Name** | The display name of the asset. |
| **Name** | The technical name of the asset. |
| **Description** | Whether a description is present and meets criteria. |
| **Tags** | Classification tags applied to the asset. |
| **Domain** | The domain the asset is assigned to. |
| **Data Product** | The data product the asset belongs to. |
| **Tier** | The tier classification (Tier 1, Tier 2, etc.). |
### Combining Conditions
* Click **+ Add New Rule** within a semantic card to add another condition to the same rule.
* Click **+ Add Semantics** to create a separate, independent rule.
### Example
To enforce that every asset in a contract has an owner assigned and is tagged:
1. Click **+ Add Semantics**. Enter Name `Ownership Required`, then set the Rule to `Owners | Is | `. Click **Save**.
2. Click **+ Add Semantics** again. Enter Name `Tag Required`, then set the Rule to `Tags | Is | `. Click **Save**.
## Security Settings Explained
The Security section has three components, each serving a different purpose.
### Data Classification
Data Classification is a free-text label that identifies the sensitivity level of the asset. Common values include `PII`, `Confidential`, `Internal`, and `Public`. This label is informational — it does not automatically enforce access controls, but makes the classification visible to contract consumers.
### Policies
A policy defines who the intended consumers of this data are. Each policy has two fields:
* **Access Policy** — A name identifying the policy (for example, `analytics-read-only`).
* **Identities** — The users, teams, or groups the policy applies to.
Add multiple policies when different groups have different levels of access to the same asset.
### Row Filters
Row Filters restrict which rows a consumer can see when querying this asset. Each filter targets one column:
* **Column Name** — The column to filter on (for example, `country`).
* **Values** — The allowed values for that column (for example, `US`).
**Example:** A contract on a global orders table with a row filter `country = US` ensures that consumers governed by this contract only see rows where `country` is `US`.
**Note**: Row Filters apply to table assets only.
## SLA Fields Explained
The SLA section captures four distinct time-related expectations. Understanding the difference between them helps you set accurate commitments.
| Field | What it measures | Example |
| --------------------- | ------------------------------------------------------------------------------------------------------- | --------------- |
| **Refresh Frequency** | How often the data should be updated. | Every `1` `day` |
| **Max Latency** | The maximum acceptable delay between when data is generated upstream and when it appears in this asset. | `2` `hours` |
| **Availability Time** | The time of day by which data must be ready for consumers. | `09:00` `UTC` |
| **Retention** | How long historical data is expected to be kept. | `90` `days` |
### Refresh Frequency vs Max Latency
These two fields are often confused:
* **Refresh Frequency** is about *cadence* — the asset is expected to update once a day, once a week, etc.
* **Max Latency** is about *delay tolerance* — after the upstream source produces data, how long before it must appear in this asset.
A pipeline that runs daily but must reflect changes within 2 hours of upstream production would have a Refresh Frequency of `1 day` and a Max Latency of `2 hours`.
### Column
Select the column that holds the timestamp of each row's last refresh. Collate uses this column to verify data freshness against the Refresh Frequency expectation.