{icon &&
 }
}
{name}
{stage}Feature List
{totalAvailableFeatures.map(feature =>
✓ {feature}
)}
{unavailableFeatures.map(feature =>
✕ {feature}
)}
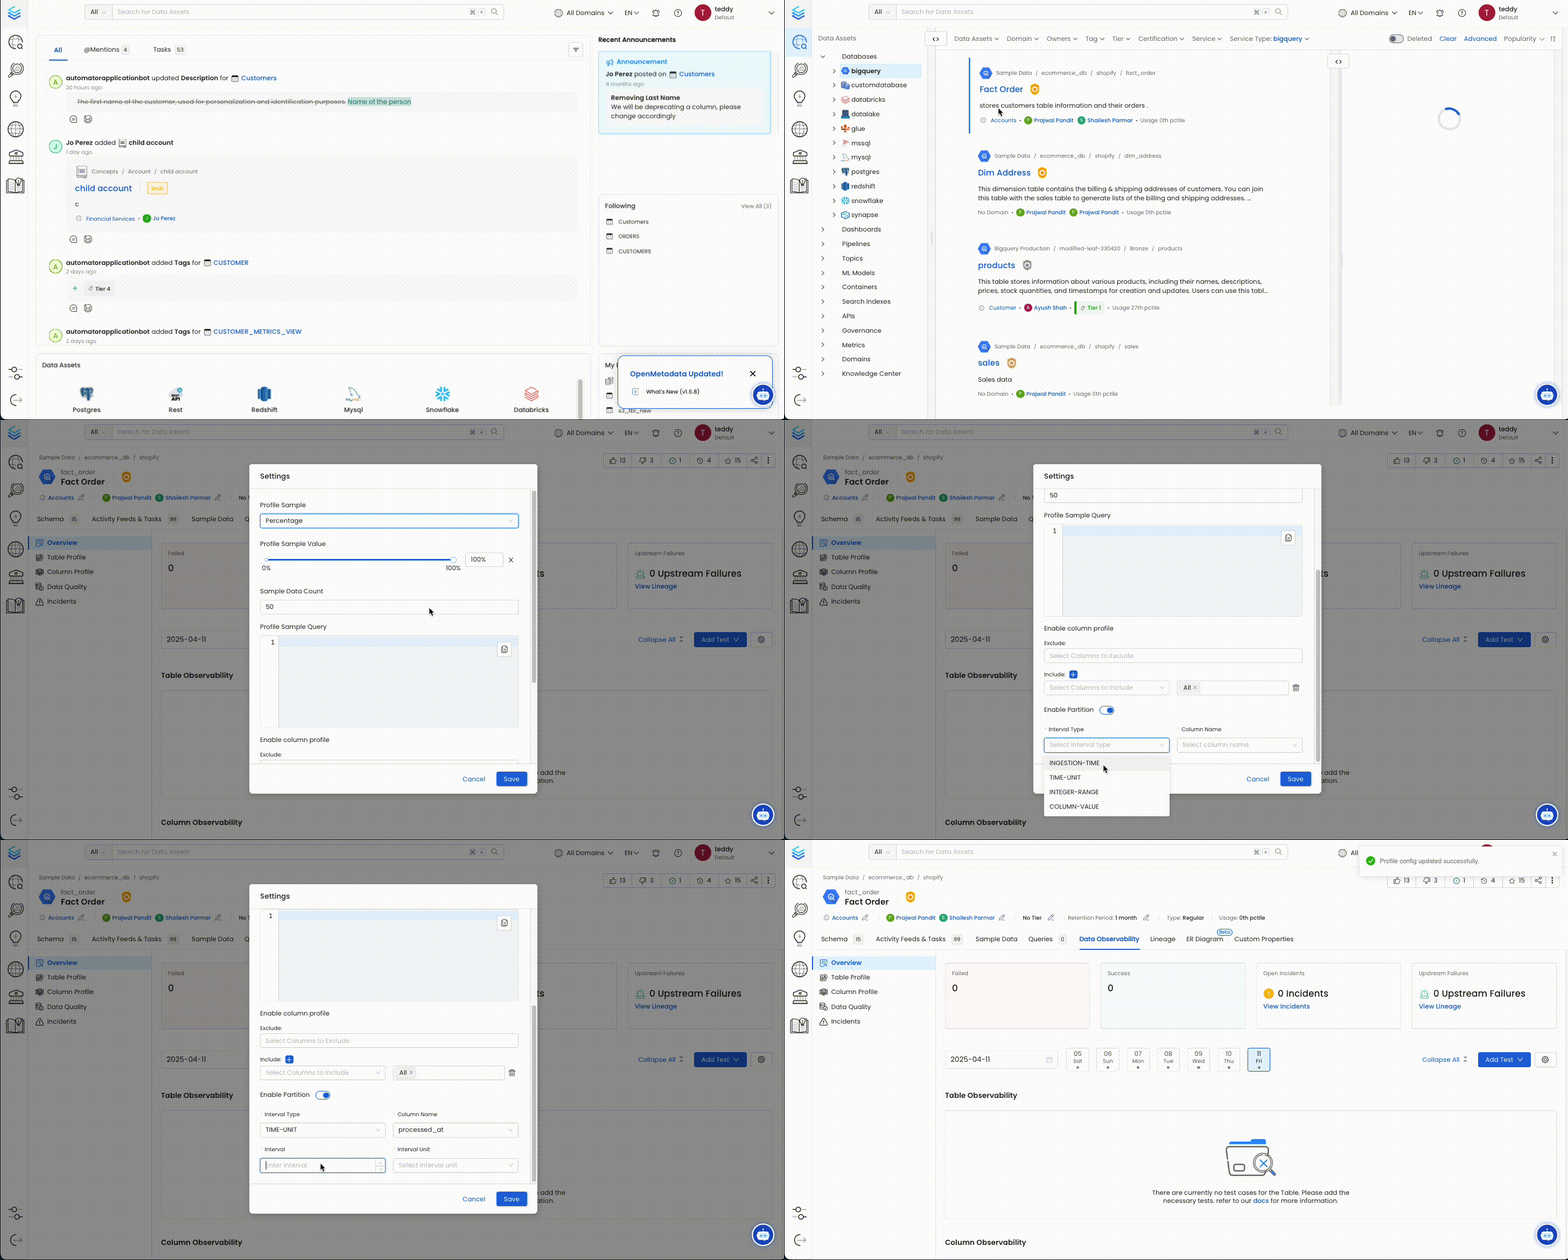 This change allows Collate to access a broader data range during profiling and sample data collection, resolving the issue for partitioned tables.
### Data Catalog API Permissions
* Follow Google's [instructions for enabling an API](https://docs.cloud.google.com/service-usage/docs/enable-disable).
* Select the `GCP Project ID` that you want to enable the `Data Catalog API` on.
* Search for and enable the `Data Catalog API`.
This change allows Collate to access a broader data range during profiling and sample data collection, resolving the issue for partitioned tables.
### Data Catalog API Permissions
* Follow Google's [instructions for enabling an API](https://docs.cloud.google.com/service-usage/docs/enable-disable).
* Select the `GCP Project ID` that you want to enable the `Data Catalog API` on.
* Search for and enable the `Data Catalog API`.
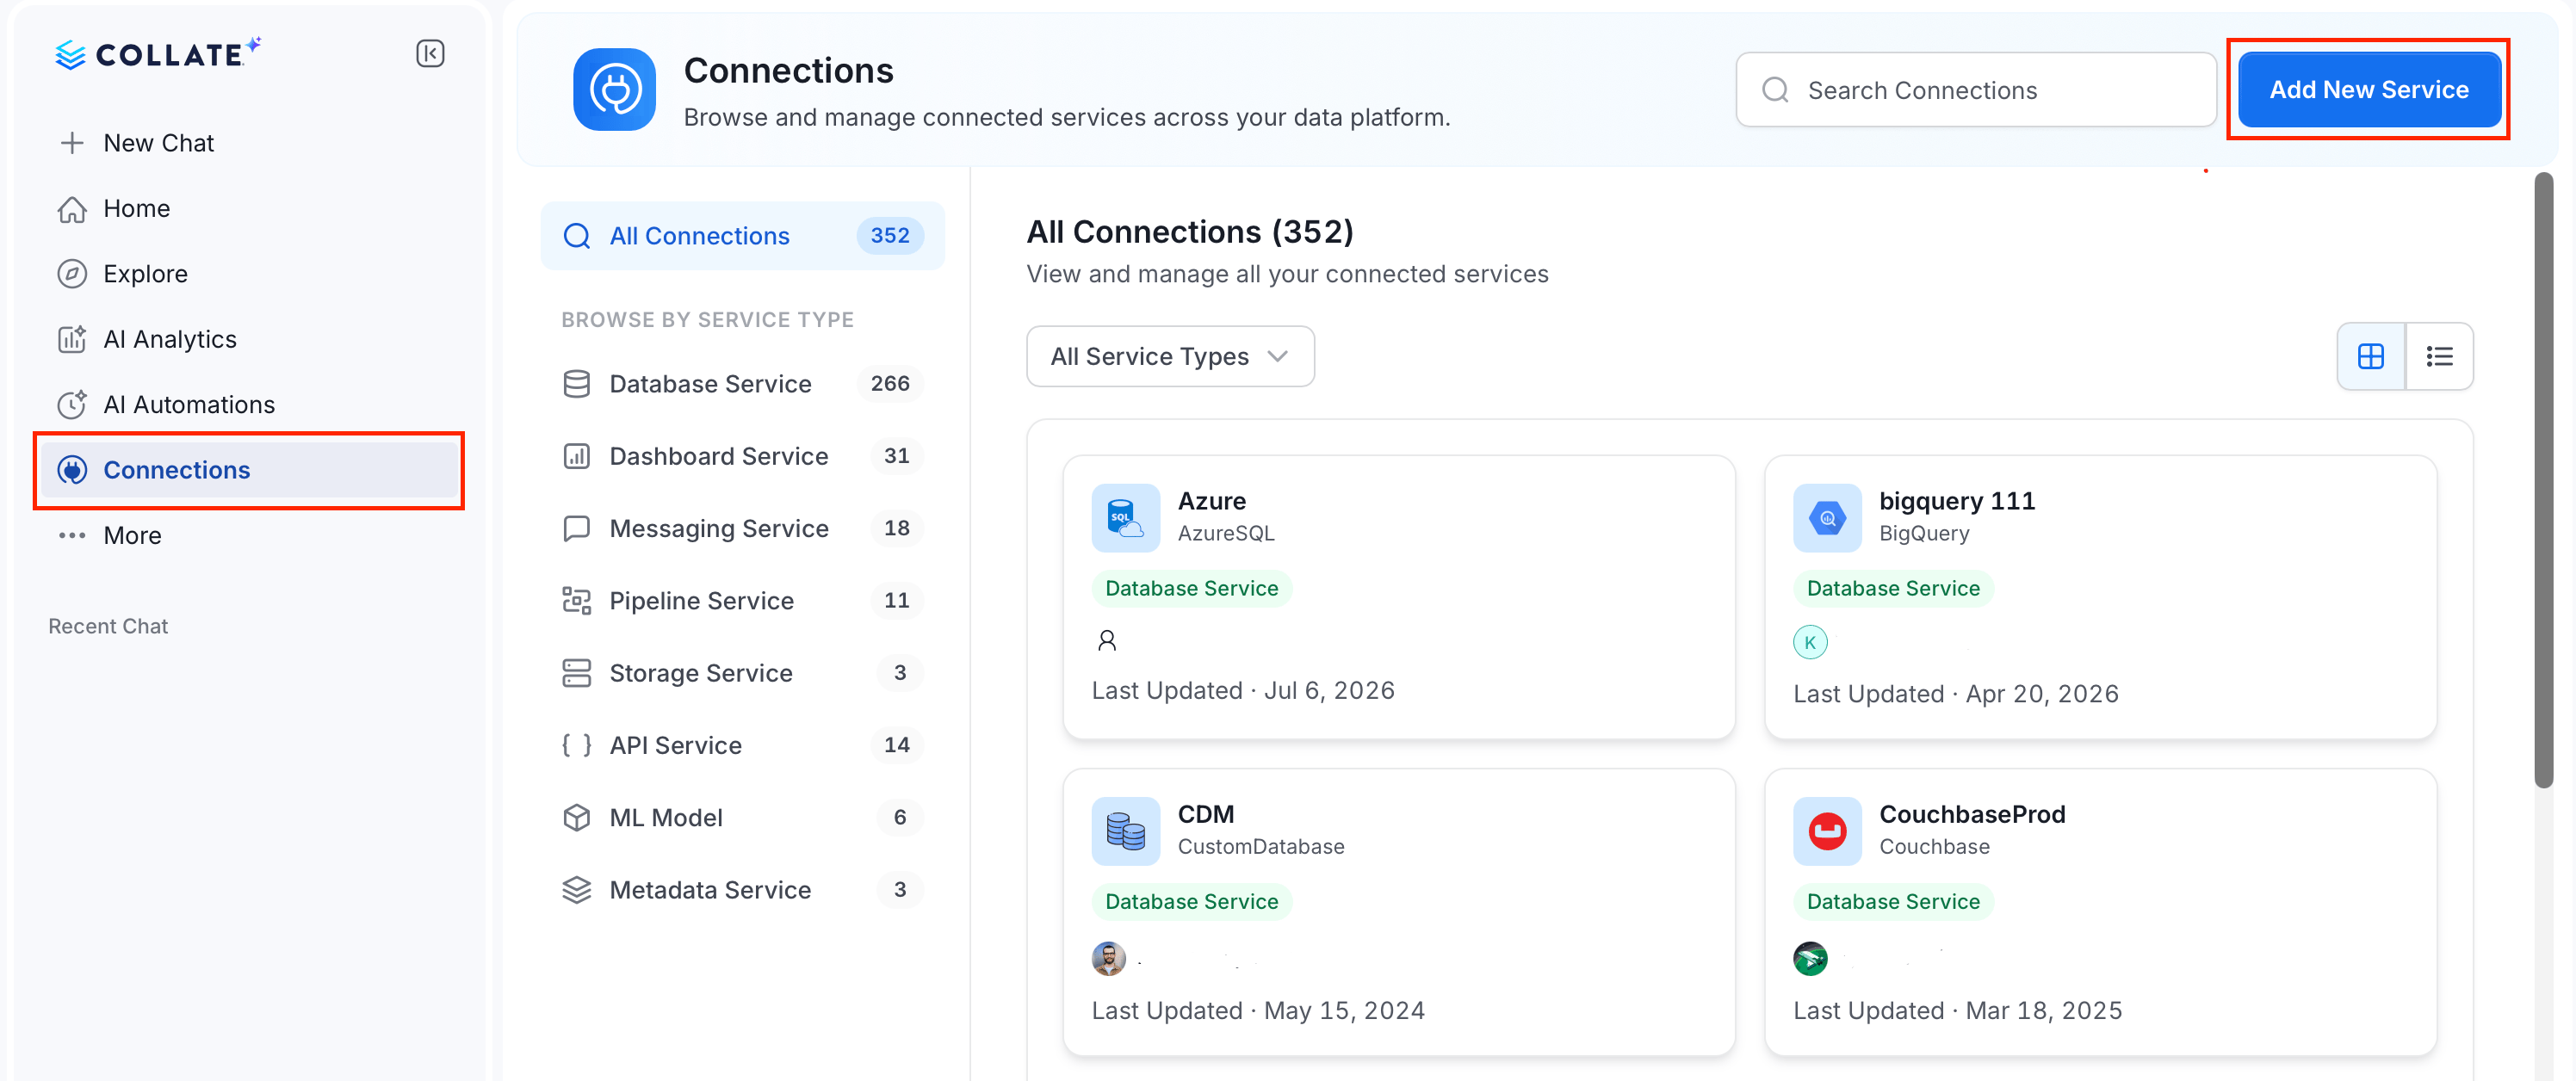 ### Step 2: Select a Service and Connector
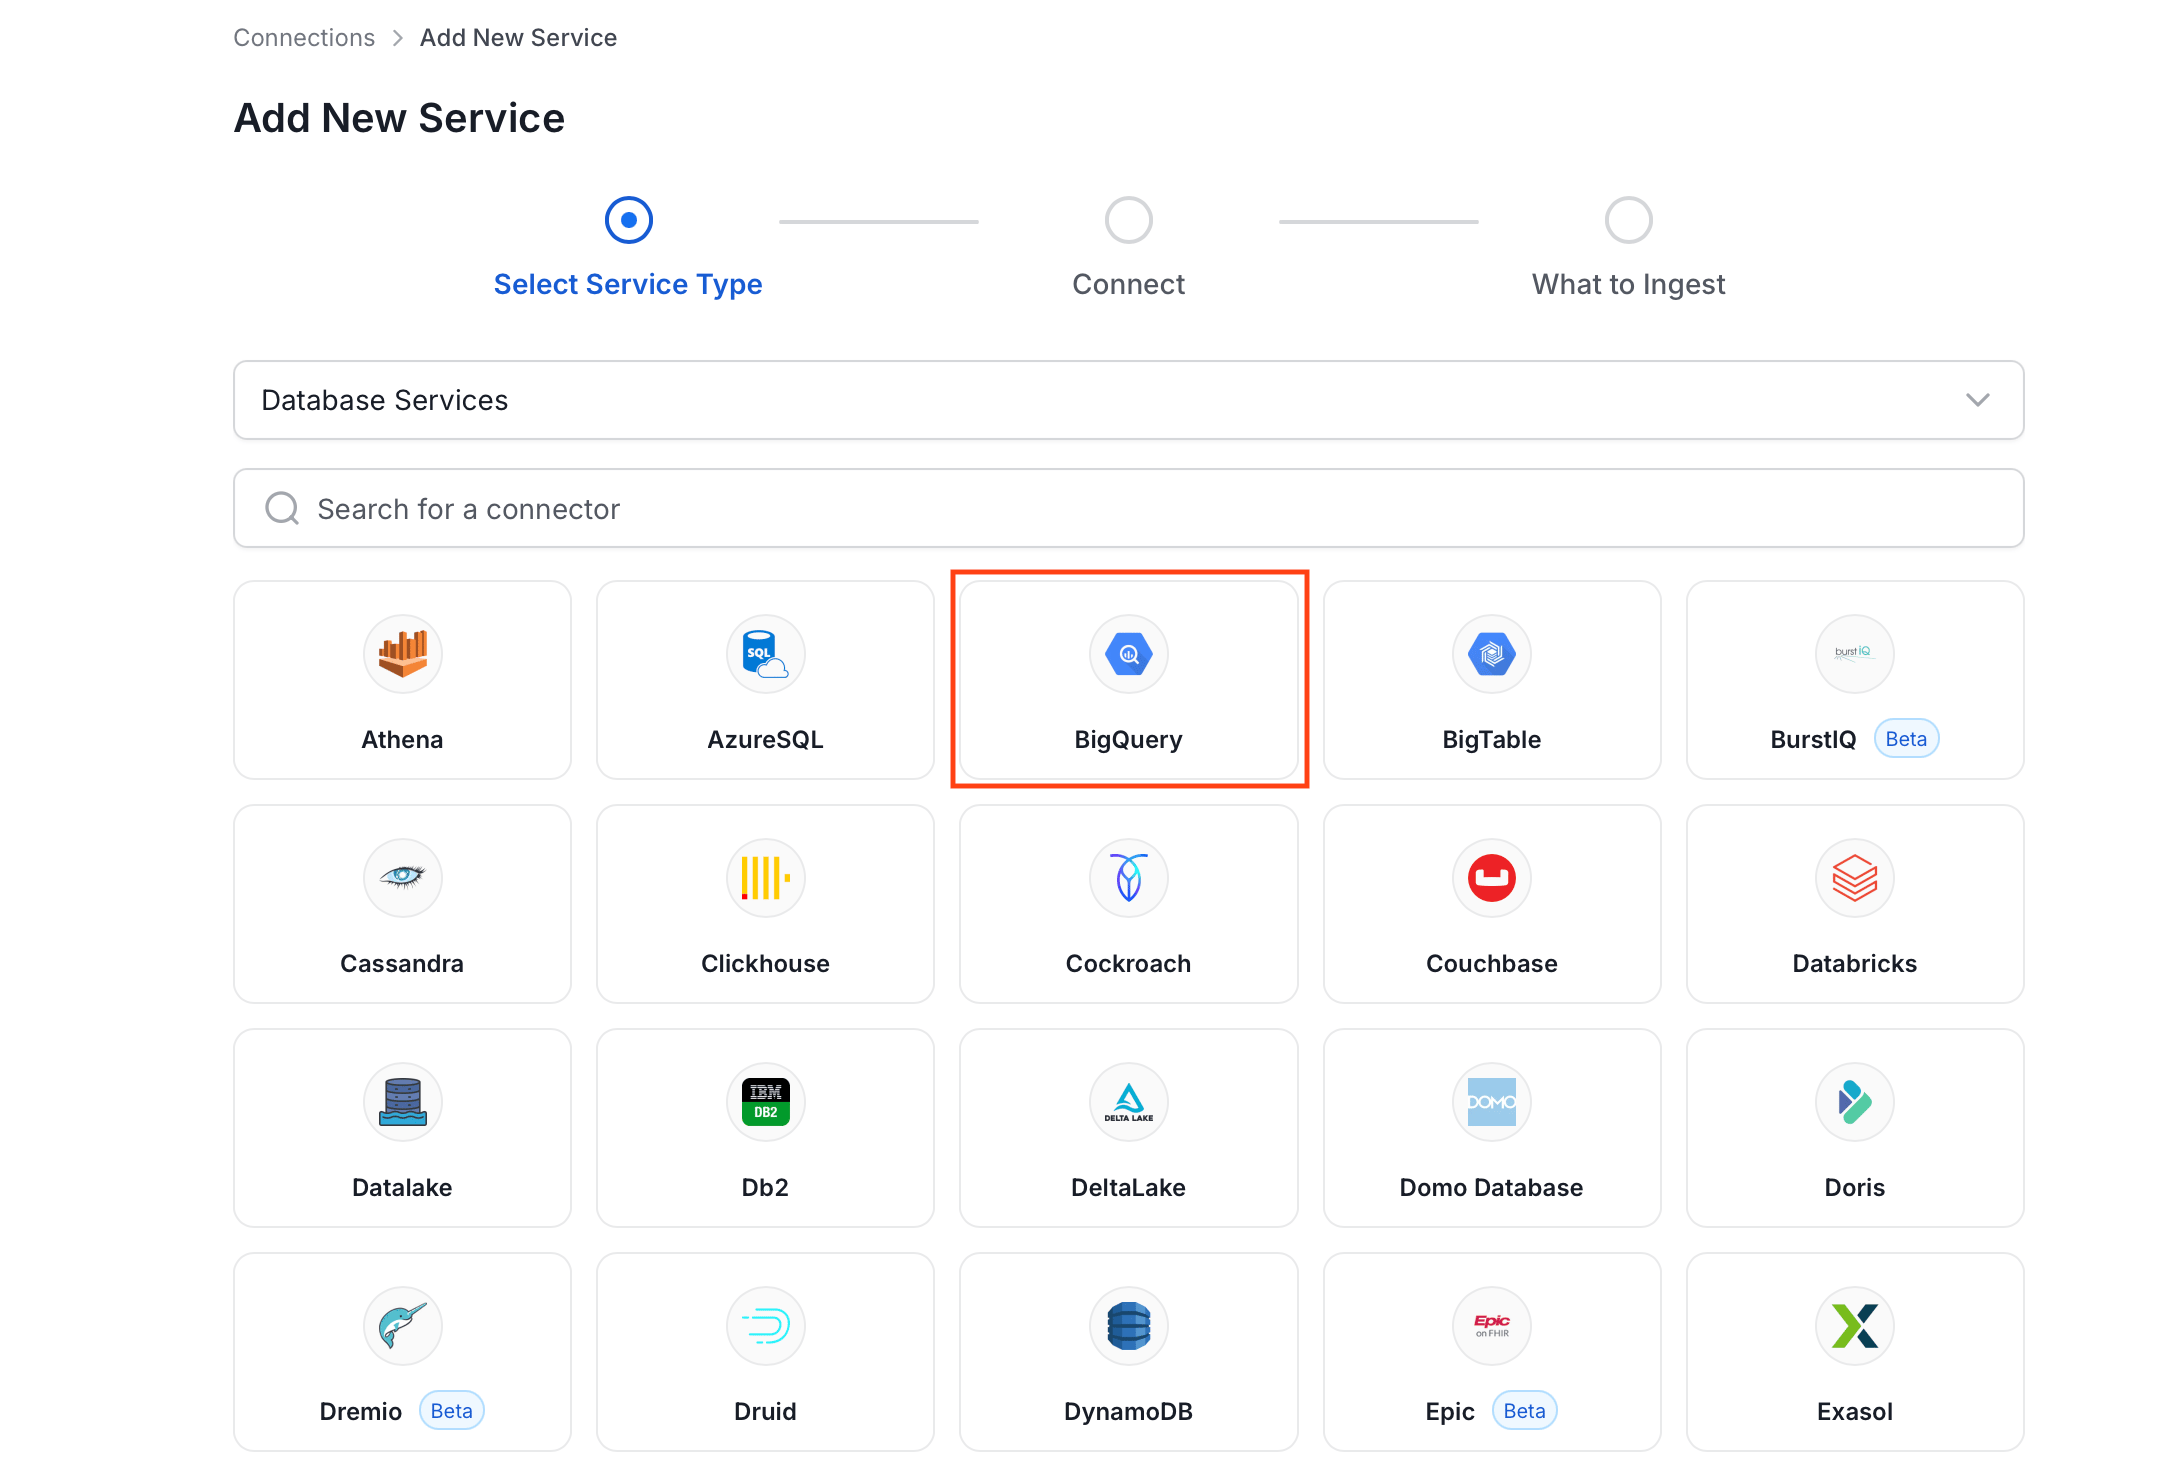
From the service type dropdown, select **Database Services**, then click the **BigQuery** connector tile.
### Step 2: Select a Service and Connector
From the service type dropdown, select **Database Services**, then click the **BigQuery** connector tile.
 ### Step 3: Add Service Name and Description
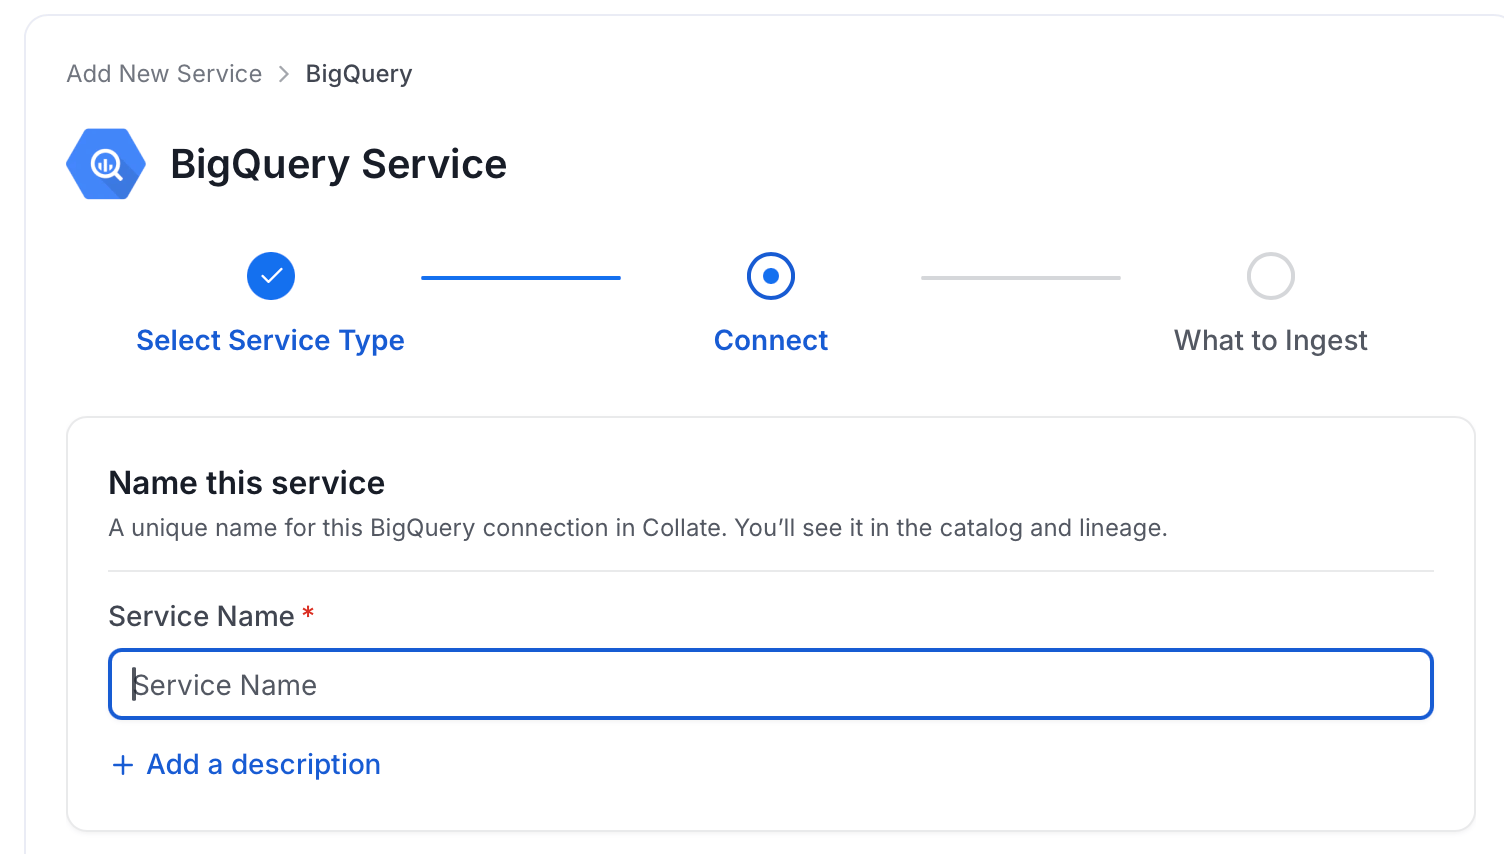
* Enter a unique, descriptive **Service Name**. Collate identifies services by their service name. Enter a name that distinguishes this deployment from other BigQuery services you are ingesting metadata from.
* Optional: Enter a **Description** for the service.
### Step 3: Add Service Name and Description
* Enter a unique, descriptive **Service Name**. Collate identifies services by their service name. Enter a name that distinguishes this deployment from other BigQuery services you are ingesting metadata from.
* Optional: Enter a **Description** for the service.
 #### Enter Connection Details
Enter the connection details for BigQuery. The right-hand panel in the UI displays inline help for each field.
#### Enter Connection Details
Enter the connection details for BigQuery. The right-hand panel in the UI displays inline help for each field.
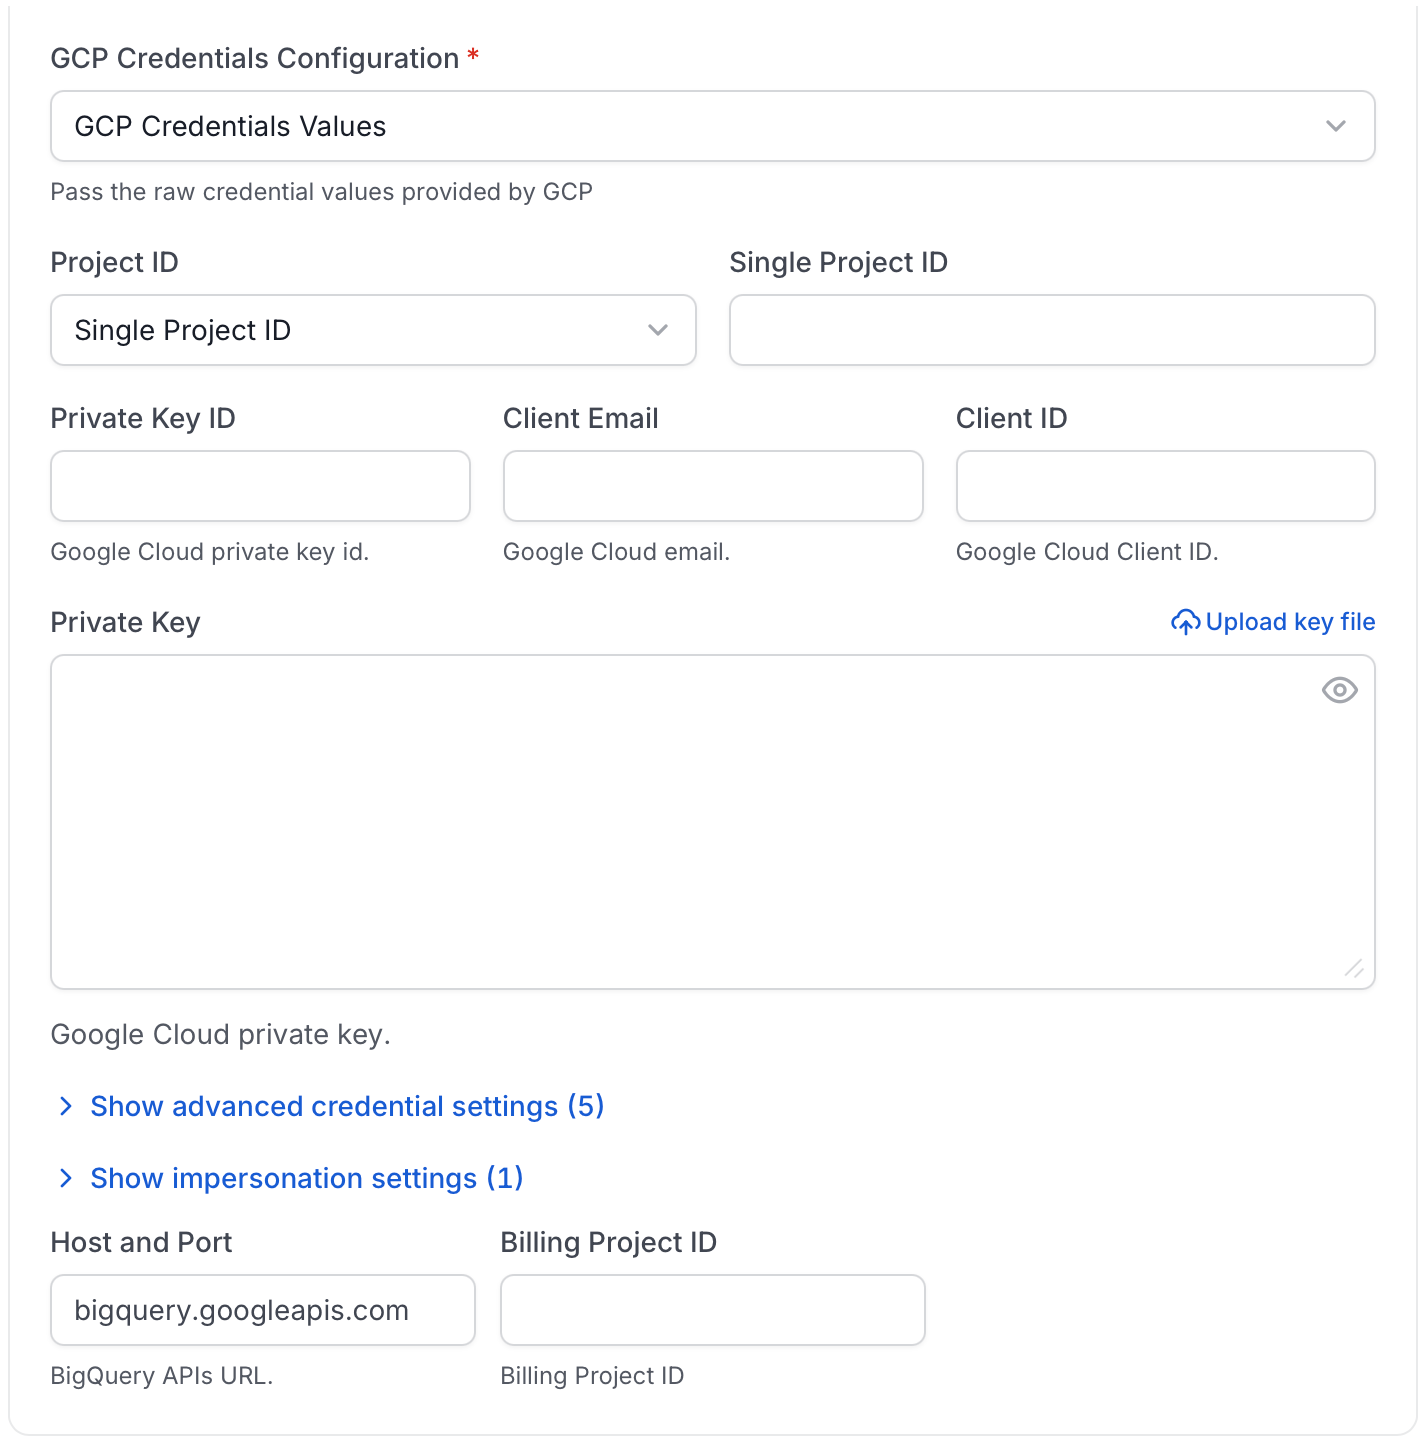 * **GCP Credentials**: You can authenticate with your BigQuery instance using either `GCP Credentials Path`, where you specify the file path of the service account key, or `GCP Credentials Values`, where you pass the values directly from the service account key file. Check out [this](https://cloud.google.com/iam/docs/keys-create-delete#iam-service-account-keys-create-console) documentation on how to create the service account keys and download it.
* **GCP Credentials Values**: Passing the raw credential values provided by BigQuery. This requires the following information, all provided by BigQuery:
* **Project ID**: The GCP project ID (or list of project IDs) that Collate should **read metadata from**: i.e., the project(s) containing the BigQuery datasets you want to catalog. To fetch this key, look for the value associated with the `project_id` key in the service account key file. Choose **Single Project ID** or **Multiple Project ID** and enter one or more project IDs to ingest metadata from different BigQuery projects into one service.
* **Private Key ID**: This is a unique identifier for the private key associated with the service account. To fetch this key, look for the value associated with the `private_key_id` key in the service account file.
* **Client Email**: This is the email address associated with the service account. To fetch this key, look for the value associated with the `client_email` key in the service account key file.
* **Client ID**: This is a unique identifier for the service account. To fetch this key, look for the value associated with the `client_id` key in the service account key file.
* **Private Key**: This is the private key associated with the service account that is used to authenticate and authorize access to BigQuery. To fetch this key, look for the value associated with the `private_key` key in the service account file. You can paste the key directly or use **Upload key file** to load it from the service account JSON file.
* Expand **advanced credential settings** for the following fields:
* **Credentials Type**: Credentials Type is the type of the account, for a service account the value of this field is `service_account`. To fetch this key, look for the value associated with the `type` key in the service account key file.
* **Authentication URI**: This is the URI for the authorization server. To fetch this key, look for the value associated with the `auth_uri` key in the service account key file. The default value is `https://accounts.google.com/o/oauth2/auth`.
* **Token URI**: The Google Cloud Token URI is a specific endpoint used to obtain an OAuth 2.0 access token from the Google Cloud IAM service. This token allows you to authenticate and access various Google Cloud resources and APIs that require authorization. To fetch this key, look for the value associated with the `token_uri` key in the service account credentials file. The default token URI is `https://oauth2.googleapis.com/token`.
* **Authentication Provider X509 Certificate URL**: This is the URL of the certificate that verifies the authenticity of the authorization server. To fetch this key, look for the value associated with the `auth_provider_x509_cert_url` key in the service account key file. The default value is `https://www.googleapis.com/oauth2/v1/certs`.
* **Client X509 Certificate URL**: This is the URL of the certificate that verifies the authenticity of the service account. To fetch this key, look for the value associated with the `client_x509_cert_url` key in the service account key file.
* **GCP Credentials Path**: Passing a local file path that contains the credentials.
* **GCP Impersonate Service Account Configuration** (Optional): Expand **impersonation settings** to enable the authenticated service account to impersonate another service account, instead of ingesting directly with the credentials above.
* **Target Service Account Email**: The email of the service account to impersonate.
* **Lifetime**: Number of seconds the delegated credential should remain valid. Defaults to `3600`.
* **Host and Port**: BigQuery APIs URL. By default, the API URL is `bigquery.googleapis.com`. You can modify this if you have a custom implementation of BigQuery.
* **Billing Project ID** (Optional): The GCP project that will be **charged for the BigQuery jobs** Collate runs (metadata, usage, and lineage queries). This is separate from the data project(s) configured under **Project ID**. In simple setups where your data and billing are in the same project, you can leave this blank or set it to the same value as **Project ID**. Set it explicitly when your organization uses a centralized billing project, a shared service account that spans multiple data projects, or when the service account's home project should not receive the query charges.
* **GCP Credentials**: You can authenticate with your BigQuery instance using either `GCP Credentials Path`, where you specify the file path of the service account key, or `GCP Credentials Values`, where you pass the values directly from the service account key file. Check out [this](https://cloud.google.com/iam/docs/keys-create-delete#iam-service-account-keys-create-console) documentation on how to create the service account keys and download it.
* **GCP Credentials Values**: Passing the raw credential values provided by BigQuery. This requires the following information, all provided by BigQuery:
* **Project ID**: The GCP project ID (or list of project IDs) that Collate should **read metadata from**: i.e., the project(s) containing the BigQuery datasets you want to catalog. To fetch this key, look for the value associated with the `project_id` key in the service account key file. Choose **Single Project ID** or **Multiple Project ID** and enter one or more project IDs to ingest metadata from different BigQuery projects into one service.
* **Private Key ID**: This is a unique identifier for the private key associated with the service account. To fetch this key, look for the value associated with the `private_key_id` key in the service account file.
* **Client Email**: This is the email address associated with the service account. To fetch this key, look for the value associated with the `client_email` key in the service account key file.
* **Client ID**: This is a unique identifier for the service account. To fetch this key, look for the value associated with the `client_id` key in the service account key file.
* **Private Key**: This is the private key associated with the service account that is used to authenticate and authorize access to BigQuery. To fetch this key, look for the value associated with the `private_key` key in the service account file. You can paste the key directly or use **Upload key file** to load it from the service account JSON file.
* Expand **advanced credential settings** for the following fields:
* **Credentials Type**: Credentials Type is the type of the account, for a service account the value of this field is `service_account`. To fetch this key, look for the value associated with the `type` key in the service account key file.
* **Authentication URI**: This is the URI for the authorization server. To fetch this key, look for the value associated with the `auth_uri` key in the service account key file. The default value is `https://accounts.google.com/o/oauth2/auth`.
* **Token URI**: The Google Cloud Token URI is a specific endpoint used to obtain an OAuth 2.0 access token from the Google Cloud IAM service. This token allows you to authenticate and access various Google Cloud resources and APIs that require authorization. To fetch this key, look for the value associated with the `token_uri` key in the service account credentials file. The default token URI is `https://oauth2.googleapis.com/token`.
* **Authentication Provider X509 Certificate URL**: This is the URL of the certificate that verifies the authenticity of the authorization server. To fetch this key, look for the value associated with the `auth_provider_x509_cert_url` key in the service account key file. The default value is `https://www.googleapis.com/oauth2/v1/certs`.
* **Client X509 Certificate URL**: This is the URL of the certificate that verifies the authenticity of the service account. To fetch this key, look for the value associated with the `client_x509_cert_url` key in the service account key file.
* **GCP Credentials Path**: Passing a local file path that contains the credentials.
* **GCP Impersonate Service Account Configuration** (Optional): Expand **impersonation settings** to enable the authenticated service account to impersonate another service account, instead of ingesting directly with the credentials above.
* **Target Service Account Email**: The email of the service account to impersonate.
* **Lifetime**: Number of seconds the delegated credential should remain valid. Defaults to `3600`.
* **Host and Port**: BigQuery APIs URL. By default, the API URL is `bigquery.googleapis.com`. You can modify this if you have a custom implementation of BigQuery.
* **Billing Project ID** (Optional): The GCP project that will be **charged for the BigQuery jobs** Collate runs (metadata, usage, and lineage queries). This is separate from the data project(s) configured under **Project ID**. In simple setups where your data and billing are in the same project, you can leave this blank or set it to the same value as **Project ID**. Set it explicitly when your organization uses a centralized billing project, a shared service account that spans multiple data projects, or when the service account's home project should not receive the query charges.
 ### Step 5: Configure Ingestion Options
In the **What to Ingest** step, use filter patterns to control which assets Collate ingests from your database service. Filter patterns use regular expressions applied to asset names.
#### How Filter Patterns Work
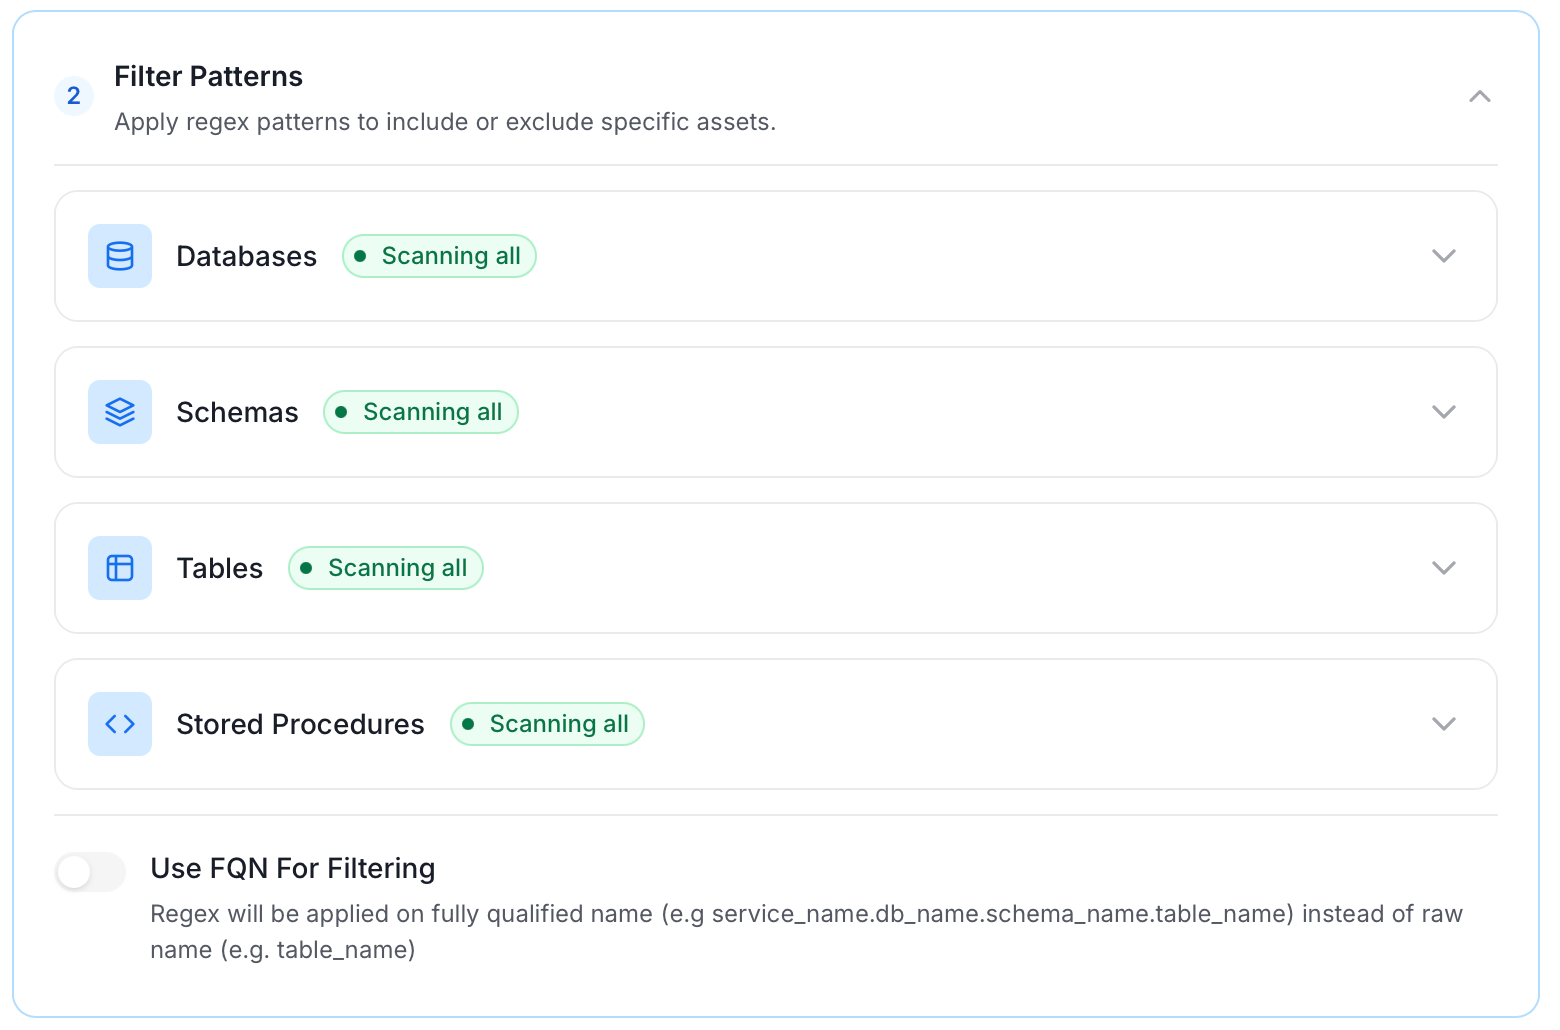
* **Include**: Add one or more comma-separated regular expressions. Collate ingests only assets whose names match at least one expression. Leave blank to include all assets.
* **Exclude**: Add one or more comma-separated regular expressions. Collate skips any asset whose name matches an expression. Leave blank to exclude nothing.
Rules match asset names using one of five expressions:
* **contains**: matches any name containing the value. For example, `sales` matches `my_sales_data` and `sales_2024`.
* **starts with**: matches names beginning with the value. For example, `prod_` matches `prod_db` and `prod_schema`.
* **ends with**: matches names ending with the value. For example, `_raw` matches `events_raw` and `logs_raw`.
* **is exactly**: matches the exact name only. For example, `analytics` matches only `analytics`.
* **matches regex**: matches names using a regular expression. For example, `^prod_.*_v\d+$` matches `prod_events_v1`.
When both Include and Exclude are set, Exclude takes priority.
### Step 5: Configure Ingestion Options
In the **What to Ingest** step, use filter patterns to control which assets Collate ingests from your database service. Filter patterns use regular expressions applied to asset names.
#### How Filter Patterns Work
* **Include**: Add one or more comma-separated regular expressions. Collate ingests only assets whose names match at least one expression. Leave blank to include all assets.
* **Exclude**: Add one or more comma-separated regular expressions. Collate skips any asset whose name matches an expression. Leave blank to exclude nothing.
Rules match asset names using one of five expressions:
* **contains**: matches any name containing the value. For example, `sales` matches `my_sales_data` and `sales_2024`.
* **starts with**: matches names beginning with the value. For example, `prod_` matches `prod_db` and `prod_schema`.
* **ends with**: matches names ending with the value. For example, `_raw` matches `events_raw` and `logs_raw`.
* **is exactly**: matches the exact name only. For example, `analytics` matches only `analytics`.
* **matches regex**: matches names using a regular expression. For example, `^prod_.*_v\d+$` matches `prod_events_v1`.
When both Include and Exclude are set, Exclude takes priority.
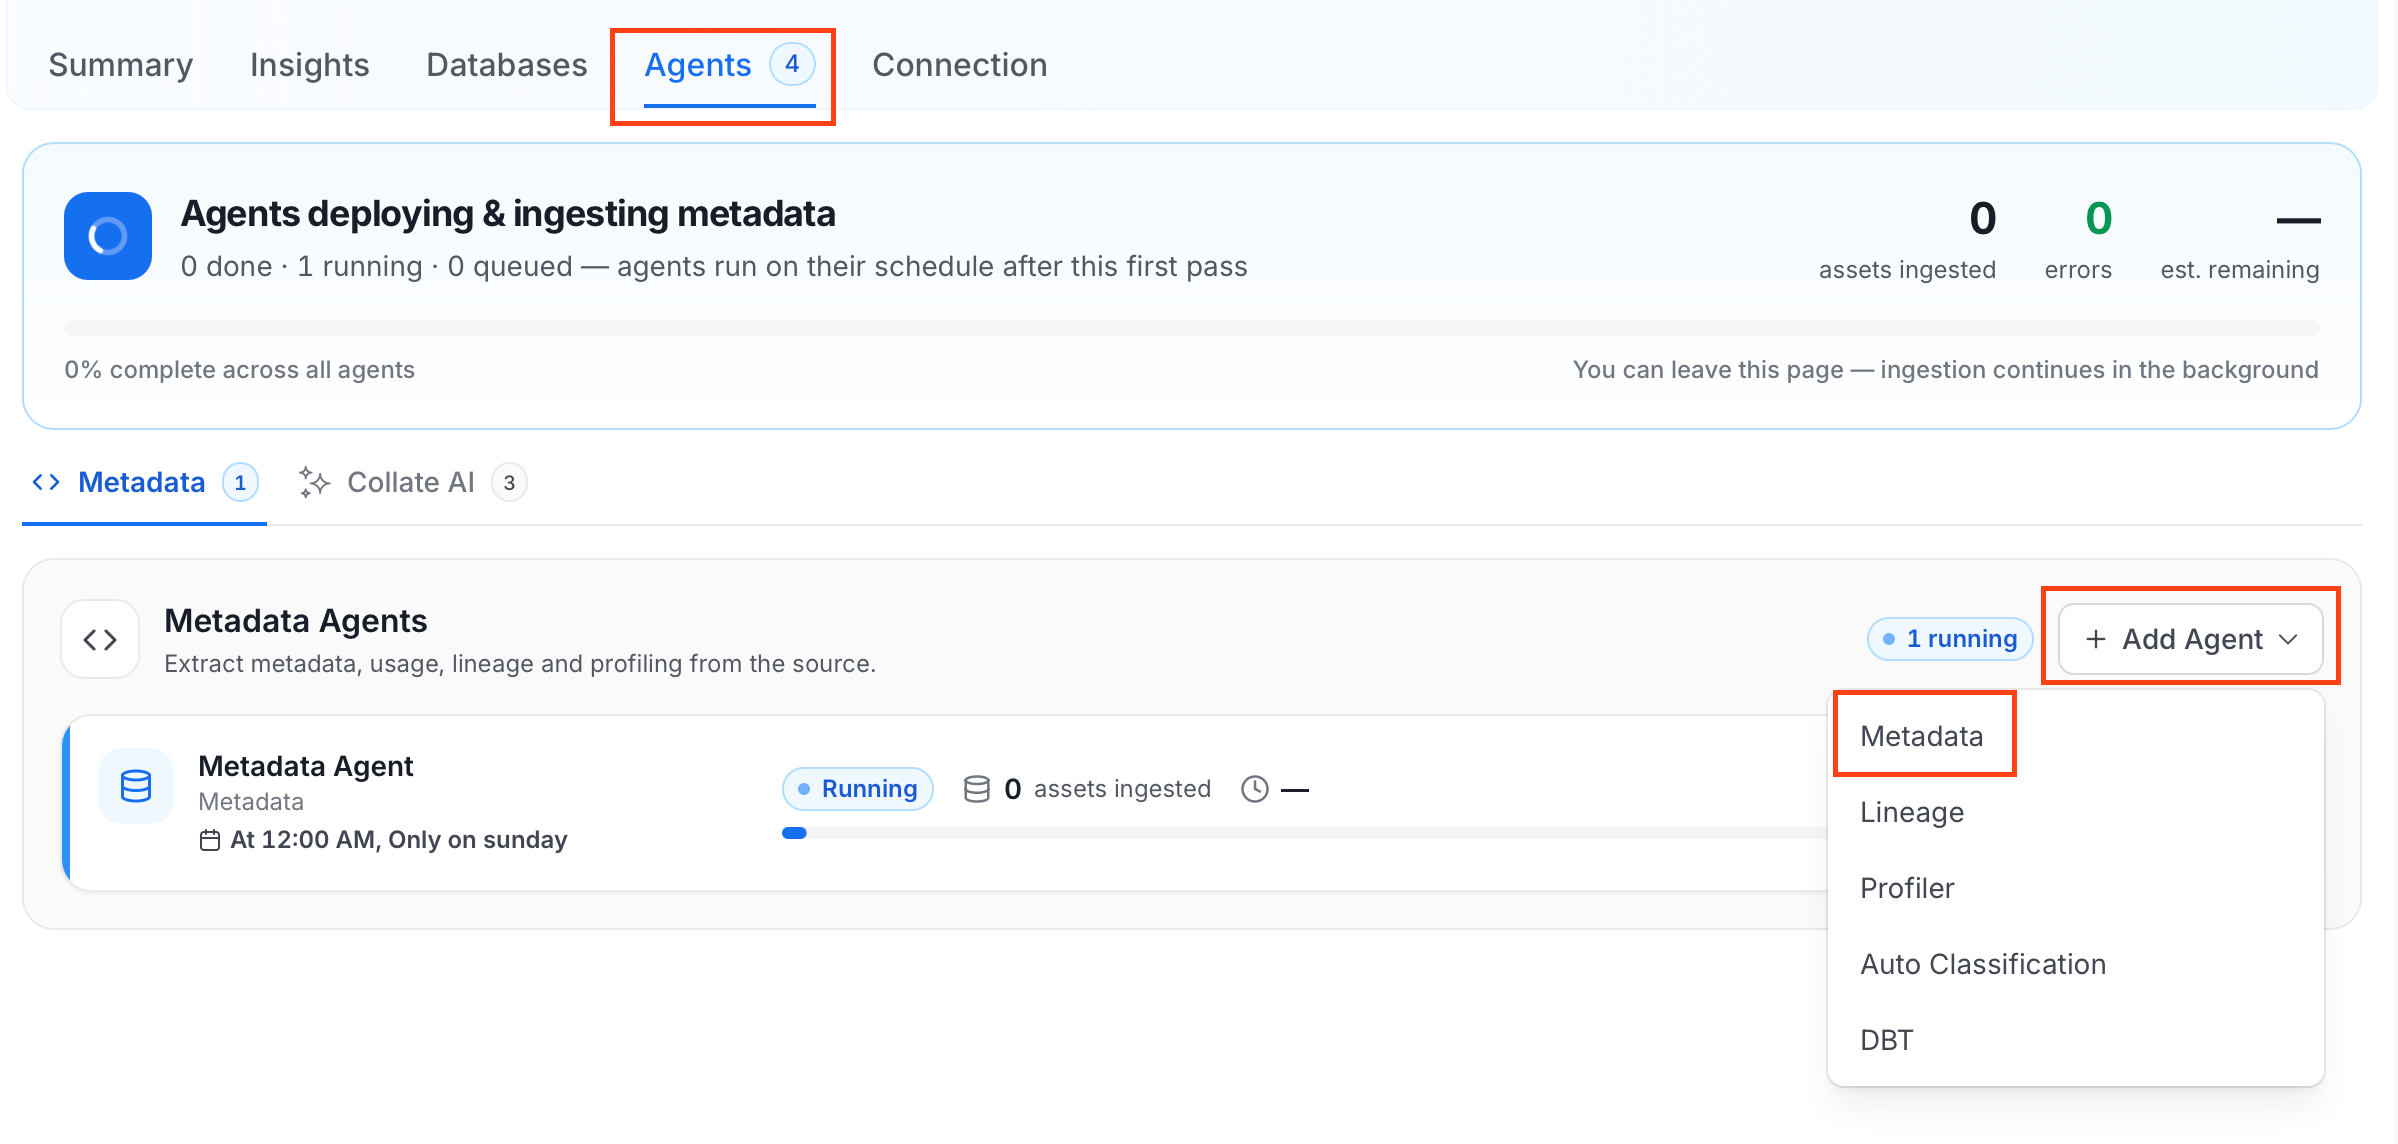 For some services, the dropdown is not available and clicking **Add Agent** takes you directly to the agent configuration page.
4. On the **Configure Ingestion** page, do the following and click **Next**.
* **Name this Ingestion**: Enter a unique recognizable name for this ingestion pipeline.
For some services, the dropdown is not available and clicking **Add Agent** takes you directly to the agent configuration page.
4. On the **Configure Ingestion** page, do the following and click **Next**.
* **Name this Ingestion**: Enter a unique recognizable name for this ingestion pipeline.
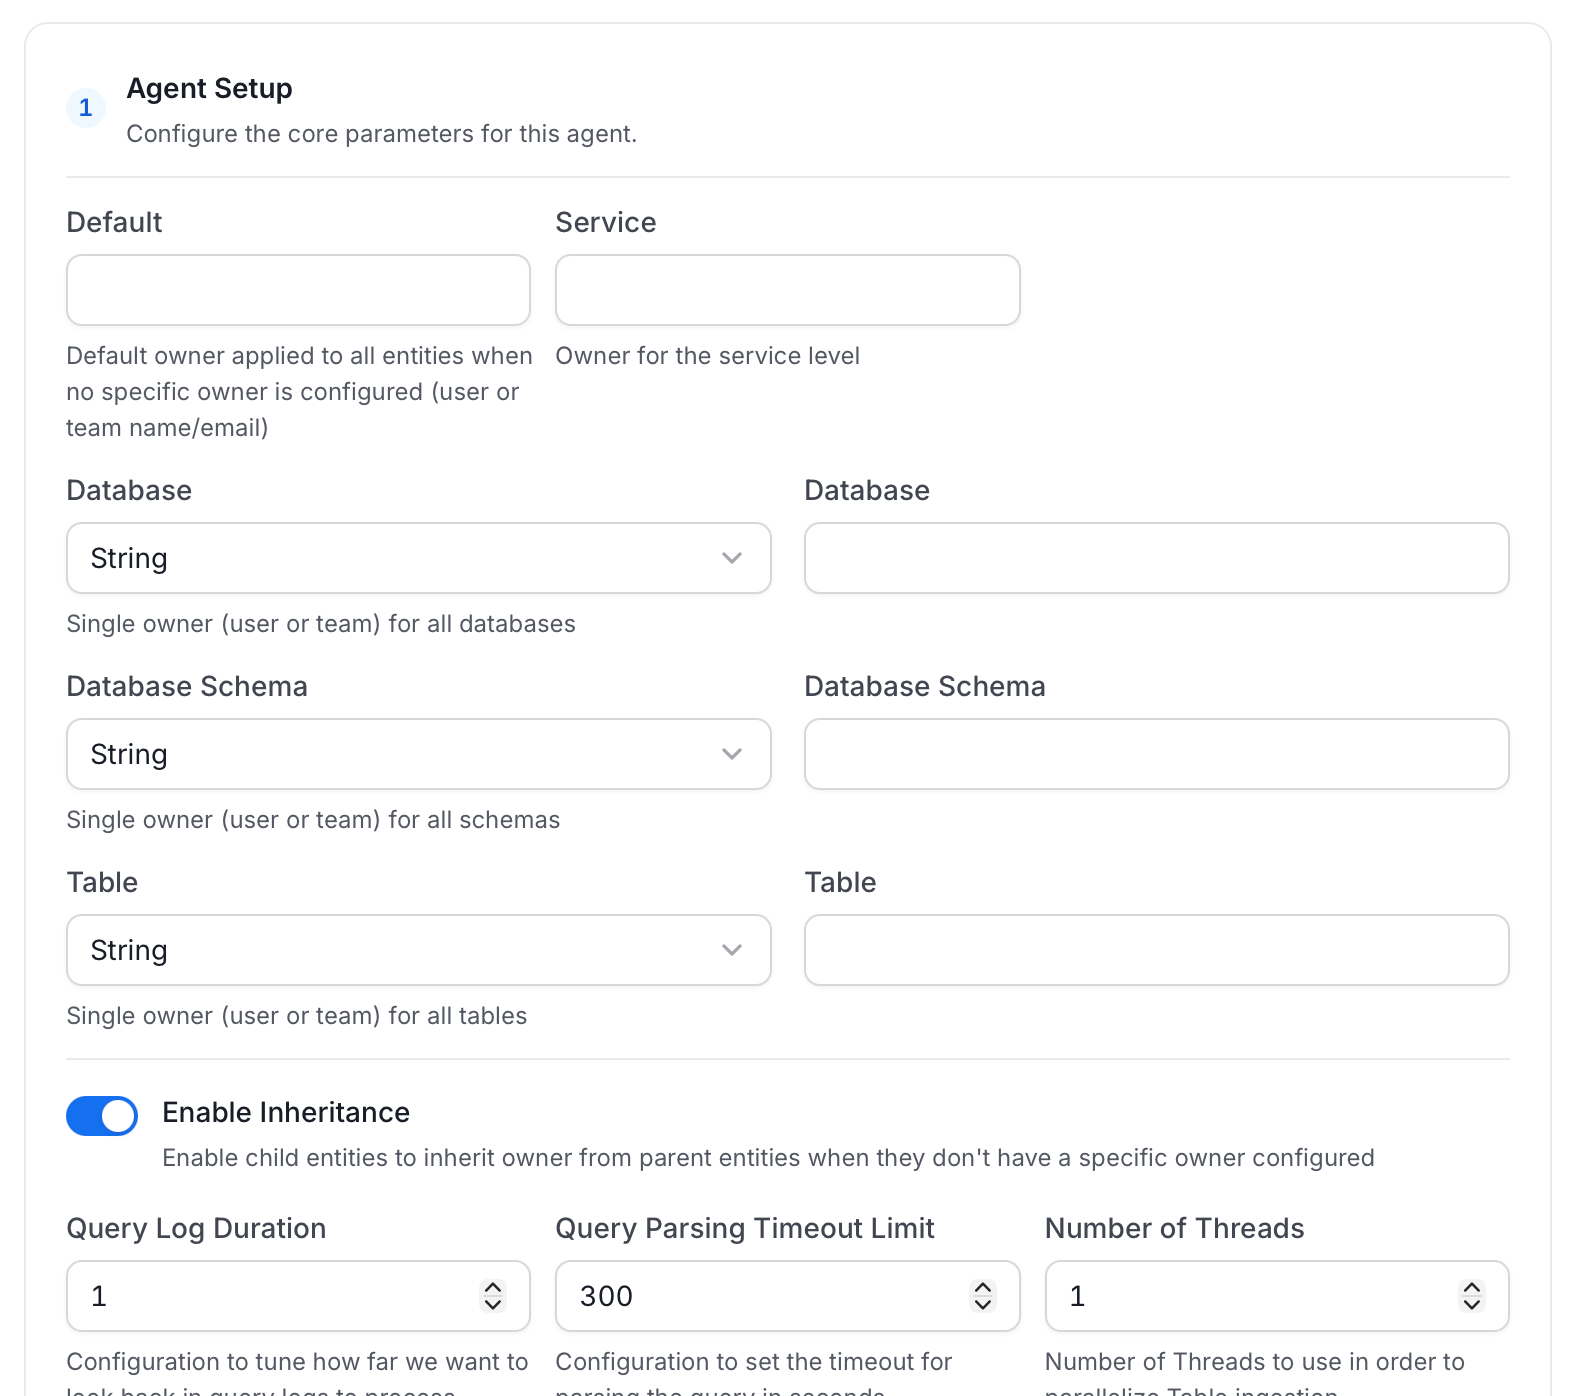
 * **Agent Setup**: Configure core parameters for metadata extraction. The following fields are available:
| Field | Default | Description |
| ------------------------------------- | ------- | ------------------------------------------------------------------------------------------------------------------------ |
| Default Owner | — | Owner applied to all entities when no specific level owner is configured. Accepts a user or team name/email. |
| Service Owner | — | Owner assigned to the service entity. |
| Database Owner | — | Owner assigned to all ingested databases. Accepts a single owner or a per-database name mapping. |
| Database Schema Owner | — | Owner assigned to all ingested schemas. Accepts a single owner or a per-schema name mapping. |
| Table Owner | — | Owner assigned to all ingested tables. Accepts a single owner or a per-table name mapping. |
| Enable Inheritance | On | When on, child entities inherit the owner from their parent when they have no owner configured. |
| Query Log Duration | 1 | Number of days to look back in query logs when processing stored procedure results. |
| Query Parsing Timeout Limit | 300 | Timeout in seconds for parsing a single query. |
| Number of Threads | 1 | Number of threads to use for parallel table ingestion. |
| Incremental Extraction | Off | When enabled, subsequent runs only extract entities changed since the last successful run. |
| Successful Pipeline Run Lookback Days | 7 | Number of days to search back for a prior successful run to use as a baseline for incremental extraction. |
| Safety Margin Days | 1 | Additional days added to the baseline timestamp as a buffer for incremental extraction. |
| JSON Schema Sample Size | 10 | Number of rows sampled to infer JSON column schema. Only applies when Extract JSON Schema is enabled in Advanced Config. |
* **Agent Setup**: Configure core parameters for metadata extraction. The following fields are available:
| Field | Default | Description |
| ------------------------------------- | ------- | ------------------------------------------------------------------------------------------------------------------------ |
| Default Owner | — | Owner applied to all entities when no specific level owner is configured. Accepts a user or team name/email. |
| Service Owner | — | Owner assigned to the service entity. |
| Database Owner | — | Owner assigned to all ingested databases. Accepts a single owner or a per-database name mapping. |
| Database Schema Owner | — | Owner assigned to all ingested schemas. Accepts a single owner or a per-schema name mapping. |
| Table Owner | — | Owner assigned to all ingested tables. Accepts a single owner or a per-table name mapping. |
| Enable Inheritance | On | When on, child entities inherit the owner from their parent when they have no owner configured. |
| Query Log Duration | 1 | Number of days to look back in query logs when processing stored procedure results. |
| Query Parsing Timeout Limit | 300 | Timeout in seconds for parsing a single query. |
| Number of Threads | 1 | Number of threads to use for parallel table ingestion. |
| Incremental Extraction | Off | When enabled, subsequent runs only extract entities changed since the last successful run. |
| Successful Pipeline Run Lookback Days | 7 | Number of days to search back for a prior successful run to use as a baseline for incremental extraction. |
| Safety Margin Days | 1 | Additional days added to the baseline timestamp as a buffer for incremental extraction. |
| JSON Schema Sample Size | 10 | Number of rows sampled to infer JSON column schema. Only applies when Extract JSON Schema is enabled in Advanced Config. |
 * **Filter Patterns**: Apply include or exclude rules to scope which databases, schemas, tables, and stored procedures this agent ingests. For more information about various filter options, see **Step 5: Configure Ingestion Options**.
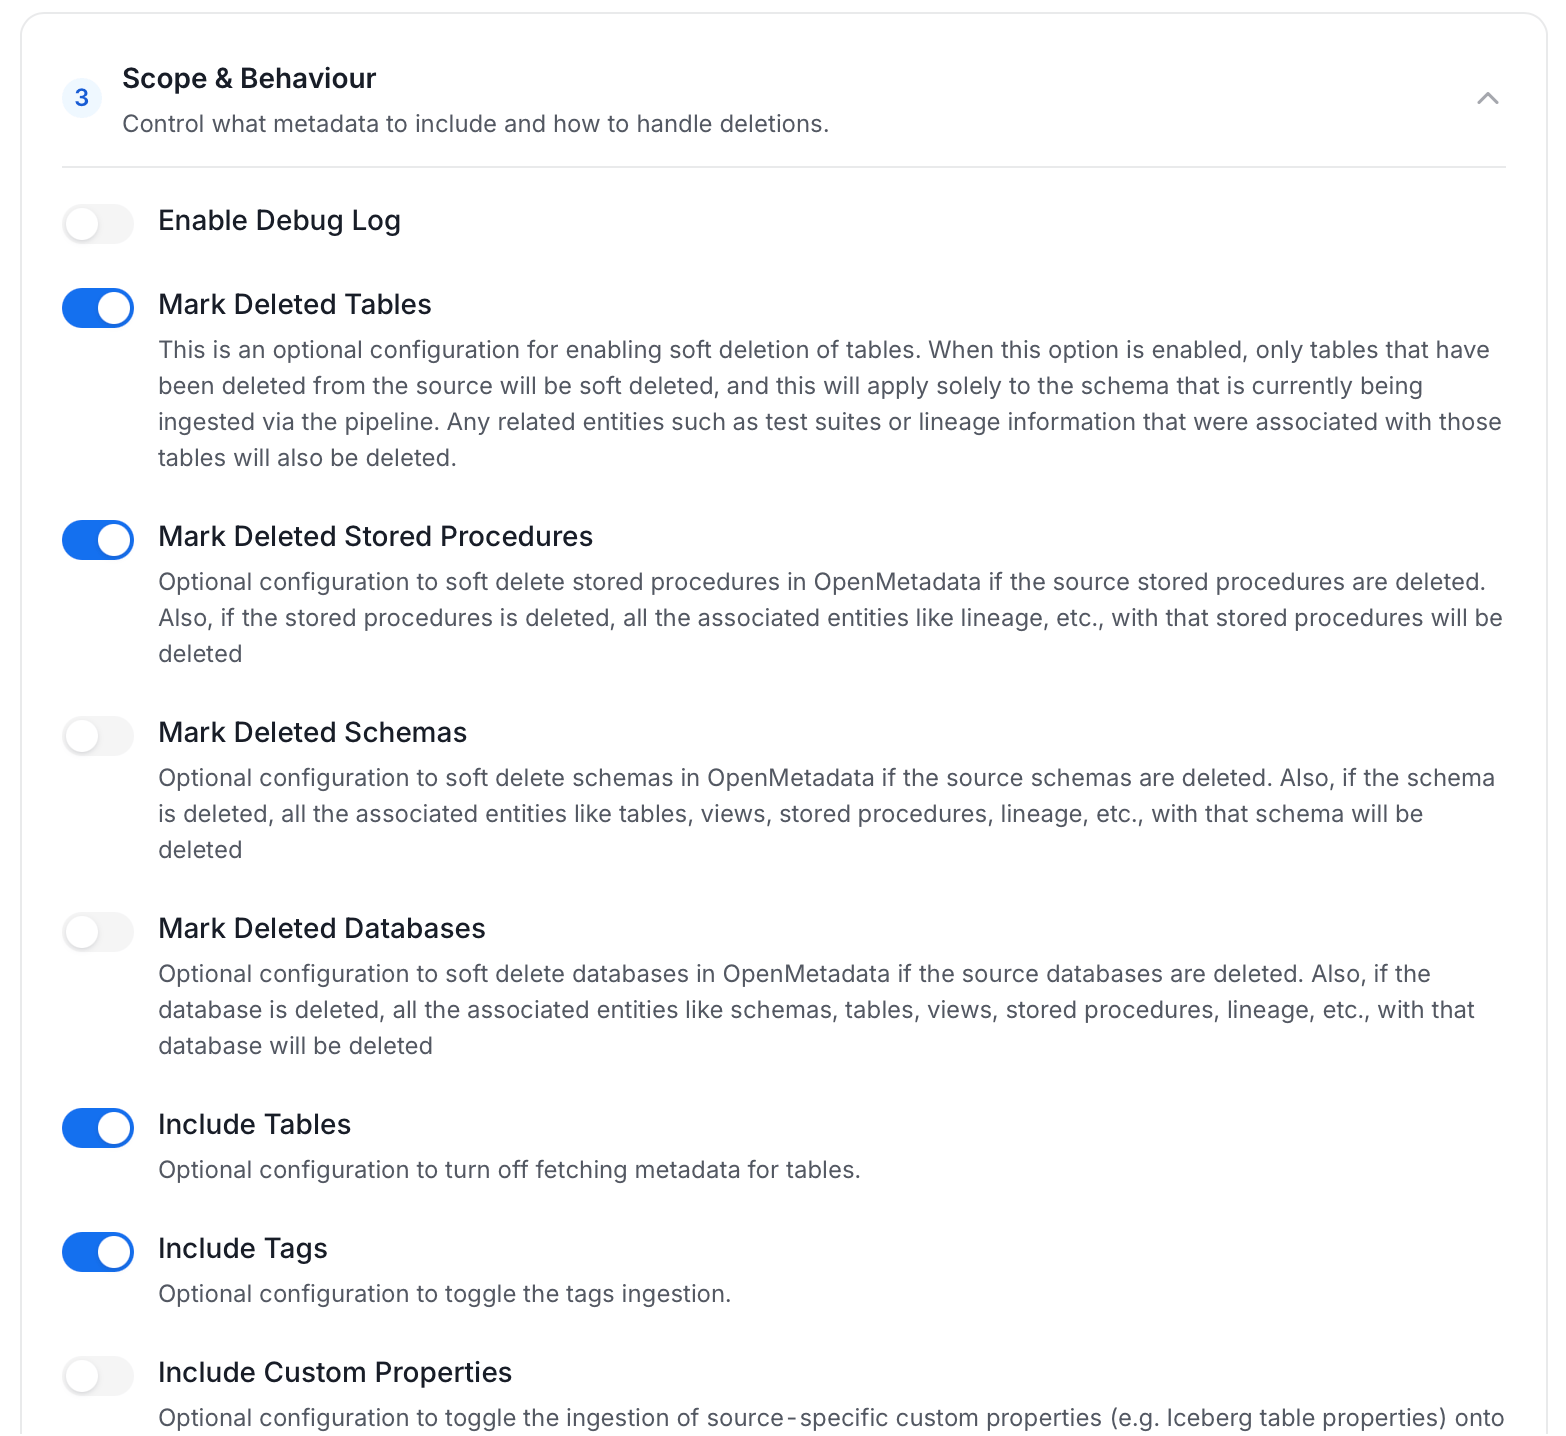
 * **Scope & Behaviour**: Control how the agent handles metadata during ingestion. Toggle each option on or off based on your needs:
| Toggle | Default | Description |
| ------------------------------ | ------- | ---------------------------------------------------------------------------------------------------------------------------------------------------------------------- |
| Include Tables | On | Ingest table metadata from the source. Turn off to skip tables entirely. |
| Include Tags | On | Ingest tags from the source. |
| Include Stored Procedures | On | Ingest stored procedure metadata. |
| Include DDL Statements | Off | Ingest DDL statements alongside table metadata. |
| Include Owners | Off | Assign owners to ingested entities when the source owner's email matches a user in Collate. Does not overwrite an existing owner. |
| Include Custom Properties | Off | Ingest connector-specific custom properties onto entities. |
| Mark Deleted Tables | On | Soft-delete tables in Collate when they are removed from the source. Applies only within the currently ingested schema. |
| Mark Deleted Stored Procedures | On | Soft-delete stored procedures in Collate when they are removed from the source. |
| Mark Deleted Schemas | Off | Soft-delete schemas and all their child assets when removed from the source. |
| Mark Deleted Databases | Off | Soft-delete databases and all their child assets when removed from the source. |
| Override Metadata | Off | When on, source values overwrite existing descriptions, tags, owners, and display names in Collate. When off, Collate only updates fields that have no existing value. |
| Enable Debug Log | Off | Sets the ingestion log level to DEBUG. Useful for troubleshooting. |
* **Scope & Behaviour**: Control how the agent handles metadata during ingestion. Toggle each option on or off based on your needs:
| Toggle | Default | Description |
| ------------------------------ | ------- | ---------------------------------------------------------------------------------------------------------------------------------------------------------------------- |
| Include Tables | On | Ingest table metadata from the source. Turn off to skip tables entirely. |
| Include Tags | On | Ingest tags from the source. |
| Include Stored Procedures | On | Ingest stored procedure metadata. |
| Include DDL Statements | Off | Ingest DDL statements alongside table metadata. |
| Include Owners | Off | Assign owners to ingested entities when the source owner's email matches a user in Collate. Does not overwrite an existing owner. |
| Include Custom Properties | Off | Ingest connector-specific custom properties onto entities. |
| Mark Deleted Tables | On | Soft-delete tables in Collate when they are removed from the source. Applies only within the currently ingested schema. |
| Mark Deleted Stored Procedures | On | Soft-delete stored procedures in Collate when they are removed from the source. |
| Mark Deleted Schemas | Off | Soft-delete schemas and all their child assets when removed from the source. |
| Mark Deleted Databases | Off | Soft-delete databases and all their child assets when removed from the source. |
| Override Metadata | Off | When on, source values overwrite existing descriptions, tags, owners, and display names in Collate. When off, Collate only updates fields that have no existing value. |
| Enable Debug Log | Off | Sets the ingestion log level to DEBUG. Useful for troubleshooting. |
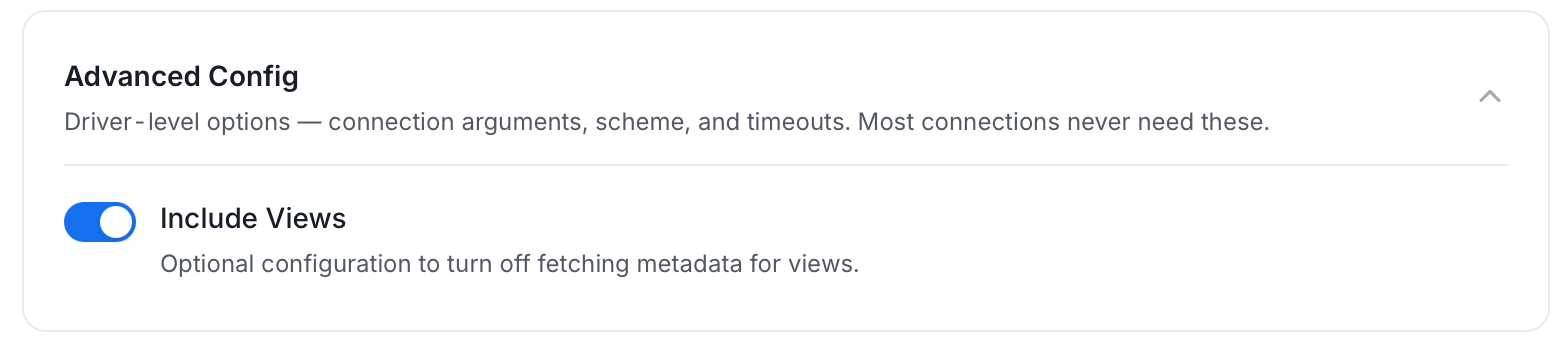
 * **Advanced Config**: Optional connector-specific settings such as Include Views and Extract JSON Schema.
 5. On the **Schedule Interval** page, set when the agent runs:
* **Schedule**: Choose a preset interval (Hourly, Daily, Weekly, Monthly) or enter a custom cron expression.
* **On-Demand**: No automatic schedule; trigger the agent manually when needed.
5. On the **Schedule Interval** page, set when the agent runs:
* **Schedule**: Choose a preset interval (Hourly, Daily, Weekly, Monthly) or enter a custom cron expression.
* **On-Demand**: No automatic schedule; trigger the agent manually when needed.
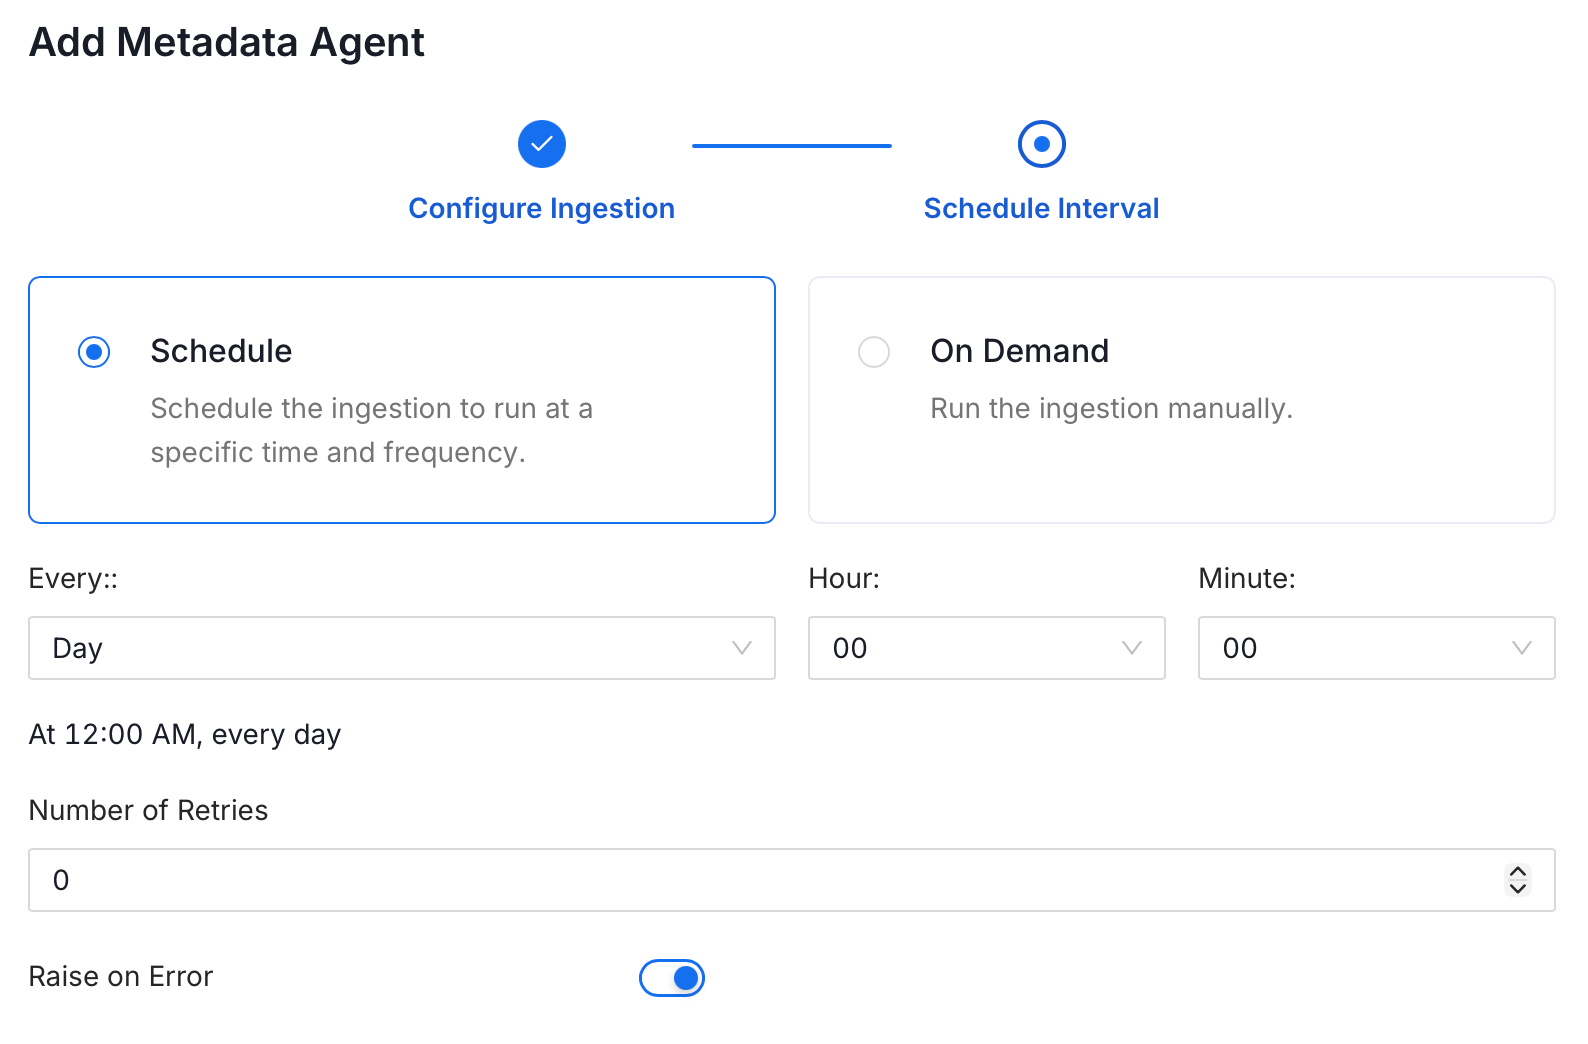 6. Click **Add** to deploy the agent.
## Cross Project Lineage
Collate supports cross-project lineage, but the data must be ingested within a single service. This means you need to perform lineage ingestion for just one service while including multiple projects.
## Reverse Metadata
* **Description Management**: BigQuery supports description updates at the following levels:
* Schema level
* Table level
* **Owner Management**: Owner management is not supported for BigQuery.
* **Tag Management**: BigQuery supports tag management at the following levels:
* Schema level
* Table level
* **Custom SQL Template**: BigQuery supports custom SQL templates for metadata changes. The template is interpreted using python f-strings.
Here are examples of custom SQL queries for metadata changes:
```sql theme={null}
-- Update table labels
ALTER TABLE `{database}.{schema}.{table}` SET OPTIONS (labels = {tags});
```
The list of variables for custom SQL can be found [here](/ai-2-0/admin-guide/applications/reverse-metadata#custom-sql-templates).
* **Requirements for Reverse Metadata**: In addition to the basic ingestion requirements, for reverse metadata ingestion the user needs:
| # | GCP Permission | Required For |
| :- | :----------------------- | :---------------------------------- |
| 1 | bigquery.datasets.update | Update dataset description & labels |
| 2 | bigquery.tables.update | Update table description & labels |
For more information about reverse metadata ingestion, see [Reverse Metadata Application](/ai-2-0/admin-guide/applications/reverse-metadata).
## Troubleshooting
6. Click **Add** to deploy the agent.
## Cross Project Lineage
Collate supports cross-project lineage, but the data must be ingested within a single service. This means you need to perform lineage ingestion for just one service while including multiple projects.
## Reverse Metadata
* **Description Management**: BigQuery supports description updates at the following levels:
* Schema level
* Table level
* **Owner Management**: Owner management is not supported for BigQuery.
* **Tag Management**: BigQuery supports tag management at the following levels:
* Schema level
* Table level
* **Custom SQL Template**: BigQuery supports custom SQL templates for metadata changes. The template is interpreted using python f-strings.
Here are examples of custom SQL queries for metadata changes:
```sql theme={null}
-- Update table labels
ALTER TABLE `{database}.{schema}.{table}` SET OPTIONS (labels = {tags});
```
The list of variables for custom SQL can be found [here](/ai-2-0/admin-guide/applications/reverse-metadata#custom-sql-templates).
* **Requirements for Reverse Metadata**: In addition to the basic ingestion requirements, for reverse metadata ingestion the user needs:
| # | GCP Permission | Required For |
| :- | :----------------------- | :---------------------------------- |
| 1 | bigquery.datasets.update | Update dataset description & labels |
| 2 | bigquery.tables.update | Update table description & labels |
For more information about reverse metadata ingestion, see [Reverse Metadata Application](/ai-2-0/admin-guide/applications/reverse-metadata).
## Troubleshooting